
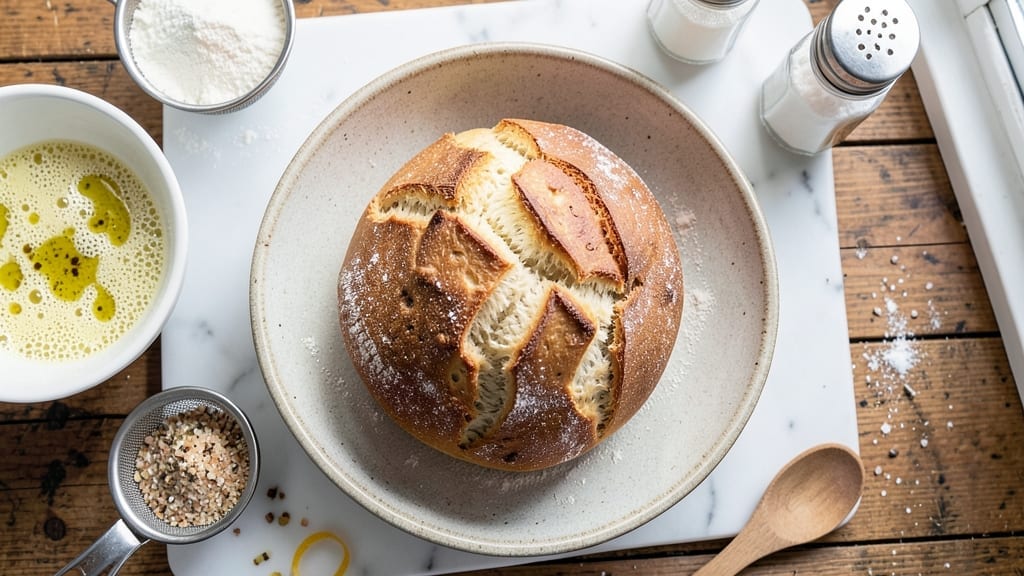
Making a 1-pound white bread recipe at home delivers a loaf with a crusty exterior and soft, airy crumb—far superior to store-bought. This method uses simple ingredients and precise techniques to achieve professional results without specialized equipment.
The key lies in proper yeast activation, controlled kneading, and baking at the right temperature to create that perfect texture contrast.
This recipe yields exactly one pound of bread, making it ideal for small households or when you want to avoid waste. The dough develops naturally through fermentation, which enhances flavor and texture.
With just five basic ingredients—flour, yeast, water, salt, and sugar—you’ll create a loaf that’s crisp on the outside and tender inside, with a golden-brown crust that’s impossible to resist.
Baking takes about 45 minutes, including proofing, and requires minimal hands-on time. The process is straightforward but demands attention to detail, particularly during kneading and shaping. Once baked, the bread will have a satisfying crunch when broken open, revealing a soft, even crumb that’s perfect for sandwiches or toast.
For best results, use all-purpose flour and measure ingredients precisely. This recipe is designed to be foolproof for beginners while still delivering restaurant-quality bread. Let’s get started on creating your perfect loaf!
Ingredients for 1 lb white bread
Five simple ingredients transform into a perfect 1-pound loaf with restaurant-quality texture.
| Ingredient | Amount | Notes |
|---|---|---|
| All-Purpose Flour 🌾 | 3 ½ cups | Sifted for even texture |
| Active Dry Yeast 🍞 | ¼ tsp | Freshly opened for potency |
| Granulated Sugar 🍚 | ¼ tsp | White sugar preferred |
| Salt 🧂 | ½ tsp | Diamond Crystal preferred |
| Lukewarm Water 💧 | 1 ¼ cups | 105-110°F ideal temperature |
| Extra-Virgin Olive Oil 🫒 | 1 tbsp | For dough enrichment |
| Cornmeal 🌽 | ½ cup | For dusting parchment |
The flour is everything here—King Arthur or Gold Medal all-purpose delivers the best balance of protein and texture. Bulk bins at Whole Foods often have fresher flour, but any quality brand works. The yeast needs to be freshly opened—check the expiration date. If it’s been sitting in your pantry for months, toss it. Lukewarm water is non-negotiable: too hot kills the yeast, too cold slows activation. 105-110°F is perfect (test by dropping a bit on your wrist—should feel warm but not hot). I always keep a thermometer in my kitchen for this exact reason.
No Diamond Crystal salt? Morton kosher salt at half the amount works fine. Running short on olive oil? Melted butter at the same quantity gives a slightly richer dough. The sugar can be swapped for honey at half the amount, but it’ll give a slightly sweeter loaf. For a gluten-free version, King Arthur gluten-free flour blend works beautifully—just increase the water by 2 tbsp. The cornmeal is optional but creates that perfect crust. If you’re out, semolina or rice flour work too.
This dough ferments beautifully overnight—up to 12 hours in the fridge for deeper flavor. Shape it into a tight log for that classic boules shape. Bake at 425°F for maximum crust development. The loaf keeps well for 3-4 days at room temperature, wrapped in a cotton towel. For longer storage, freeze slices wrapped in parchment—up to 3 months. Toasting revives stale bread instantly.
Why You’ll Love This Recipe
- Pantry Staples Only: I swear by this recipe because it uses what’s already in my cupboard—no specialty ingredients, no last-minute grocery runs. Just flour, yeast, sugar, salt, and water. That’s it. The simplicity means I can pull it together even when I’m staring at an empty fridge at 8 PM.
- Soft-Crust Perfection: The secret’s in the kneading (or lack thereof). This dough comes together in minutes, and the sugar just hints at sweetness without overpowering—like a buttery, pillowy cloud with a whisper of warmth. Honestly, the first slice out of the pan is the best part.
- Weeknight Sandwich Hero: Between us, this bread is my go-to for quick lunches, grilled cheese, or even toast with jam. It’s sturdy enough to hold up to anything but soft enough to melt into gooey goodness. My kids call it “the glue bread” because it literally sticks everything together—no crumbs flying everywhere.
- Budget-Friendly Baking: A single loaf costs me pennies, and it lasts for days. I’ll make a batch on Sunday, freeze half, and still have fresh slices for sandwiches all week. No waste, no stress—just reliable, cheap, and delicious bread that never lets me down. (Yes, even on a Tuesday night.)
Step-by-step instructions for homemade white bread
Here’s how to craft a perfect artisan-style loaf with a crisp exterior and tender interior.
Activate the Yeast and Mix the Dough
In a large mixing bowl, combine the 1.25 cups lukewarm water, 0.25 tsp granulated sugar, and 0.25 tsp active dry yeast. Let this mixture sit for 5-10 minutes until it becomes frothy—this confirms your yeast is active and ready to work. If it doesn’t bubble, your yeast may be dead, and you’ll need to start over.
Once bubbly, add the 3.5 cups all-purpose flour and 0.5 tsp salt to the bowl. Stir with a wooden spoon until a shaggy dough forms. Then add the 1 tbsp extra-virgin olive oil and mix until just combined. The dough will be sticky but should pull away from the sides of the bowl. Here’s the thing—don’t overmix at this stage. You’re building gluten, but too much handling makes the bread tough later.
Knead the Dough Until Elastic
Turn the dough onto a lightly floured surface and knead for 8-10 minutes by hand, or use a stand mixer with a dough hook on medium speed for 5-6 minutes. You’re looking for a smooth, elastic dough that springs back when poked. This develops gluten, which gives your bread structure and that satisfying chew.
I know it seems tedious, but this step makes all the difference. If the dough feels too sticky, wet your hands slightly and keep kneading—adding more flour now will make your bread dense. When you’re done, the dough should feel like soft, smooth putty. Shape it into a ball, place it back in the bowl, and lightly coat the top with olive oil to prevent a dry crust from forming during rising.
First Rise for Maximum Flavor
Cover the bowl with a damp kitchen towel and let the dough rise in a warm place for 1-1.5 hours, or until it has doubled in size. The kitchen near your oven with the light on works perfectly—just don’t let it get too hot, or the yeast will overwork. You’ll know it’s ready when the dough feels light and springs back slowly when poked.
This first rise develops the bread’s flavor and texture. Don’t rush it. If your kitchen is cool, place the bowl on top of your turned-off oven with the light on to create a warm environment. The dough should puff up noticeably and feel airy when you test it. Patience here prevents dense bread later.
Shape and Second Rise for Structure
Punch down the risen dough to release air, then turn it onto a lightly floured surface. Divide it into two equal pieces and shape each into a smooth, round loaf. Place them on a baking sheet lined with parchment paper, seam-side up. Cover loosely with the damp towel and let rise again for 30-45 minutes until puffy but not doubled.
For a more professional look, you can shape them into ovals or batards. The second rise is shorter because we’re just letting the dough relax and expand slightly before baking. This final shaping creates that beautiful crust and open crumb structure we’re after. Don’t skip this step—it’s what transforms good bread into great bread.
Bake to Golden Perfection
Preheat your oven to 375°F with a baking stone or inverted baking sheet on the middle rack. Once hot, brush the loaves with water and sprinkle generously with 0.5 cup cornmeal—this creates that classic crusty exterior. Bake for 25-30 minutes until the bread is deep golden brown and sounds hollow when tapped on the bottom.
Here’s where the magic happens: The cornmeal creates steam during baking, which develops that crisp crust while keeping the interior soft. If your oven runs hot, check at the 20-minute mark—you want the crust to be golden but not burnt. The internal temperature should reach 190-200°F when done. Let the bread cool on a wire rack for at least 15 minutes before slicing—this prevents a gummy interior.
Pro Tips For Making 1 Lb White Bread
- Check Yeast First: Sprinkle that active dry yeast in warm water with a pinch of sugar—if it bubbles within 5 minutes, it’s alive and ready to work. I learned this the hard way after baking a brick because my yeast was dead; now I never skip this step.
- Measure Flour Right: Use the spoon-and-level method for all-purpose flour—don’t scoop straight from the bag. Packing it down makes your bread dense, and you’ll end up with a sad, heavy loaf instead of light, airy slices.
- Knead Until Smooth: Stop when the dough springs back slowly after poking it—about 8-10 minutes by hand. Over-kneading develops too much gluten, and your bread turns out tough. (Yes, even if you’re impatient like me.)
- Proof in a Warm Spot: Place the dough in a lightly oiled bowl, cover it with a damp towel, and let it rise near the oven with the light on—it’s warmer there than most rooms. This cuts proofing time by nearly half without risking overproofing.
Serving suggestions for leftovers
Classic Sandwich Perfection
This bread shines in classic sandwiches like grilled cheese or turkey club. For grilled cheese, use sharp cheddar and butter (not margarine) for that golden crust. I like toasting slices first for extra crispiness—just 1-2 minutes per side in a dry pan.
For turkey club, layer with smoked turkey, crisp lettuce, tomato slices, and a drizzle of mayonnaise. The soft crumb holds up perfectly without getting soggy. 🥪
Garlic Butter Toast
Slice your bread into ½-inch thick pieces and toast until golden. Warm 2 tbsp butter with 1 minced garlic clove and ½ tsp garlic powder in a pan. Brush the warm butter mixture onto toasted slices and sprinkle with salt and fresh parsley.
This becomes my go-to breakfast or snack—simple but always satisfying. The crust stays crisp while the interior stays soft. 🧄
French Toast Upgrade
Cubed bread makes incredible French toast. Dip slices in a mixture of 2 eggs, ¼ cup milk, 1 tbsp sugar, and ½ tsp vanilla extract. Cook in a buttered pan over medium heat until golden brown.
Top with powdered sugar and maple syrup for a decadent breakfast. The bread’s texture absorbs the custard beautifully without falling apart. 🍯
Bread Pudding Magic
Use stale slices for bread pudding—it’s the perfect way to revive leftovers. Mix 4 cups cubed bread, 2 eggs, 1 cup milk, ½ cup sugar, and 1 tsp cinnamon.
Bake at 350°F for 40-45 minutes until set. Serve warm with vanilla ice cream or whipped cream. The soft crumb soaks up the custard perfectly, creating a rich, comforting dessert. 🍮
Cheese Board Star
Slice your bread into ½-inch thick pieces and lightly toast. Arrange on a board with aged cheddar, brie, cured meats, and grapes. The bread’s neutral flavor lets the other elements shine while providing a satisfying texture contrast.
I always include olive oil and balsamic vinegar for dipping—it’s the perfect party appetizer. 🧀
Storage Hacks for Serving
Keep bread fresh for serving by storing in a cotton bread bag (not plastic) at room temperature. For sliced bread, wrap tightly in parchment paper and freeze. To serve, simply toast slices until crispy. The bread reheats beautifully in a 350°F oven for 5-10 minutes—perfect for last-minute gatherings. 💡
Nutrition facts
Frequently asked questions
Why does my bread turn out dense instead of light and airy?
Dense bread usually means one of three things: over-kneading (which develops too much gluten), under-proofing (not letting the dough rise long enough), or using cold water (which slows yeast activation). Try kneading by hand for exactly 8-10 minutes until smooth but not tough, and let the dough rise until it doubles in size—about 1-1.5 hours in a warm place. Also, always use lukewarm water (105-110°F) to activate the yeast properly.
Can I make this recipe without a stand mixer?
This recipe is designed to work perfectly by hand. Just knead the dough on a lightly floured surface for 8-10 minutes until it becomes smooth and elastic. Wet your hands occasionally to prevent sticking, and don’t be afraid to get your hands messy—it’s the best way to develop that perfect gluten structure. The dough should spring back slowly when poked with your finger.
How do I know when the bread is fully baked?
Your bread is done when it’s deep golden brown and sounds hollow when tapped on the bottom (like a drum). For extra certainty, use an instant-read thermometer—it should reach 190-200°F at the center. If the crust browns too quickly, tent with foil or lower the oven to 350°F for the last 5-10 minutes to finish baking evenly.
Can I substitute whole wheat flour for all-purpose flour?
Yes, but with adjustments! Replace 1 cup all-purpose flour with 1 cup whole wheat flour and add 1-2 extra tablespoons of water since whole wheat absorbs more moisture. The bread will have a nuttier flavor and slightly denser texture. For best results, use a 50/50 blend of all-purpose and whole wheat flour to maintain the light crumb while adding nutrition.
Why does my bread develop a hard crust but stay gummy inside?
This usually happens when the bread cools too quickly after baking. Always let your loaf cool on a wire rack for at least 15 minutes before slicing. The steam needs time to escape gradually, allowing the interior to firm up properly. Also, ensure your oven is fully preheated—cold spots can create uneven baking. If the crust is too hard, try brushing with melted butter after baking for a softer finish.

- 3lb Prime Rib Roast Recipe: Juicy Pink Center Guaranteed in 3 Hours - October 31, 2026
- 5 Spice Cake Recipe: Warmly Spiced Layers With Crunchy Top - October 31, 2026
- 1950’s Macaroni and Cheese Recipe: Nostalgic Creamy Cheese Sauce with Buttery Noodles - October 31, 2026