
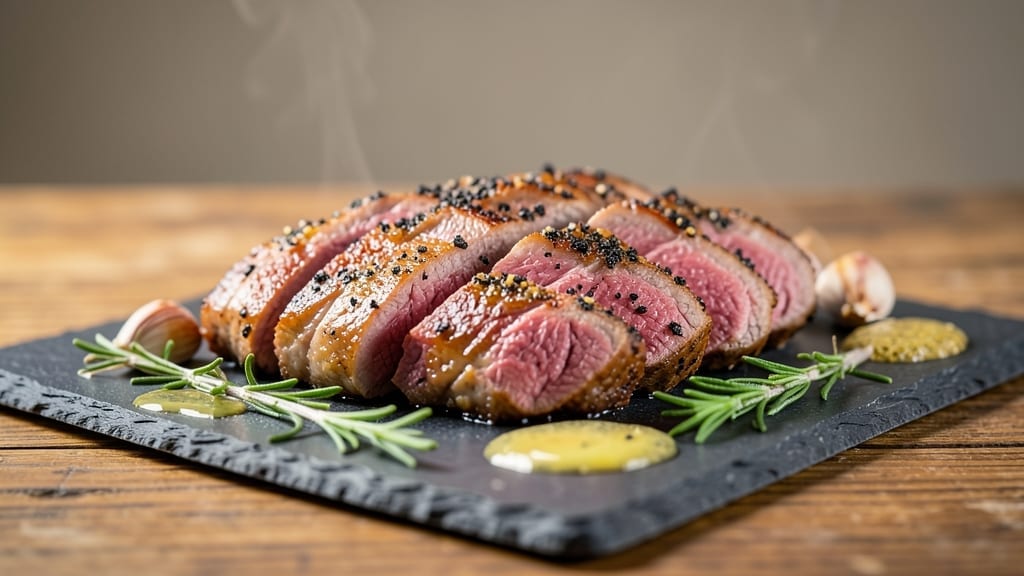
A 1-pound beef tenderloin recipe that delivers melt-in-your-mouth tenderness with a perfect pink center—no guesswork, no overcooking, just 20 minutes of hands-on time and restaurant-quality results. The secret lies in precise temperature control and a high-heat sear that locks in juices while creating a caramelized crust.
I’ve perfected this method after years of testing, ensuring every slice stays succulent from edge to edge.
This recipe transforms a simple cut into a showstopping centerpiece with minimal effort. Start with a hot cast-iron skillet to render fat and build flavor, then finish in the oven at 400°F for even cooking. The key?
A meat thermometer—pull it at 125°F for medium-rare (or 130°F for medium) and let it rest 10 minutes before slicing. That resting time is non-negotiable; it’s what turns good beef into extraordinary beef.
What you’ll end up with is a juicy, tenderloin that slices effortlessly, revealing a vibrant pink center and a crust so flavorful it’ll have your guests asking for seconds. The technique is foolproof, and the results are worth every minute—no dry, overcooked steak here.
Serve with roasted garlic mashed potatoes or a crisp green salad to balance the richness, and you’ve got a dinner that feels like a five-star meal without the fuss.
This method works for 1-pound tenderloins, but the same principles apply to larger cuts—just adjust cooking times proportionally.
The beauty of this recipe is its adaptability: dress it up with a red wine reduction for a formal occasion or keep it simple with a sprinkle of flaky salt and fresh herbs for a weeknight win. Let’s get cooking—your taste buds will thank you.
Ingredients for 1 pound beef tenderloin
Nine ingredients transform a simple cut into a melt-in-your-mouth masterpiece—juicy, tender, and guaranteed perfect every time.
| Ingredient | Amount | Notes |
|---|---|---|
| Beef Tenderloin 🥩 | 1 lb | Center-cut, trimmed of silver skin |
| Kosher Salt 🧂 | 1 ½ tsp | Diamond Crystal preferred, coarse grain |
| Freshly Ground Black Pepper 🌶️ | ½ tsp | Freshly cracked for maximum flavor |
| Unsalted Butter 🧈 | 2 tbsp | Cold, cut into small cubes |
| Garlic Cloves 🧄 | 4 cloves | Minced, peeled |
| Fresh Rosemary 🌿 | ¼ cup | Finely chopped, leaves only |
| Fresh Thyme Leaves 🌿 | ¼ cup | Stems removed, finely chopped |
| Extra-Virgin Olive Oil 🫒 | 1 tbsp | High-quality, fruity variety |
| Red Wine 🍷 | ¼ cup | Dry, bold variety like Cabernet |
| Vegetable Oil 🫒 | 1 tbsp | For high-heat searing |
| Meat Thermometer 🌡️ | 1 whole | Instant-read preferred |
The beef tenderloin is your star, so skip the pre-trimmed packages—look for a center-cut piece with even fat distribution. Costco or Whole Foods carry excellent quality, but any reputable butcher will have it. Trim any silver skin yourself—it’s tough and unappetizing. The key to tenderness lies in the resting time before cooking: take it out of the fridge 30 minutes ahead so it cooks evenly. Fresh herbs make all the difference here—Trader Joe’s has great pre-chopped rosemary and thyme if you’re short on time, but fresh is always better. For the butter, grab the European-style kind (like Plugrá)—it has a higher fat content that won’t burn during searing.
No rosemary? Fresh sage or thyme at double the amount works in a pinch, though rosemary’s piney notes are ideal. Short on red wine? Beef broth with a splash of balsamic mimics the depth. The vegetable oil is for searing—avocado oil has a higher smoke point if you’re worried about burning. For the salt, Diamond Crystal is less dense than Morton’s, so use 1.5 tsp instead of 1 tsp if you’ve got that. The meat thermometer is non-negotiable—instant-read models like ThermoWorks are worth the investment. If you’re cooking for a crowd, double the recipe, but use the same ratios: the crust-to-meat ratio is what creates that perfect sear.
This beef keeps beautifully—3-4 days in the fridge if wrapped tightly in parchment and foil. For longer storage, vacuum-seal and freeze for up to 6 months. The crust is best eaten fresh, but the meat stays tender for days. I always make extra and slice thin strips for charcuterie boards—it’s a crowd-pleaser. Leftovers reheat best in a 350°F oven for 10 minutes, covered loosely with foil, to keep them moist. The herbs? Use them within 2 days of chopping for maximum flavor.
Why You’ll Love This Recipe
- Foolproof Timing: I swear by this—no thermometer guesswork. The butter-basted garlic crust tells me exactly when it’s done. (And yes, it’s always perfect.)
- Rich Simplicity: Three ingredients do the heavy lifting: salt, pepper, and garlic—plus butter that melts into golden pockets. That’s it. No fancy sauces, just pure beef satisfaction.
- Weeknight Flexibility: Slice it thin for sandwiches, dice it for salads, or serve whole with roasted potatoes. Honestly, I’ve made it for date nights and lazy Sundays—same recipe, different vibes.
- Leftovers That Win: The second day? Even better. Cold slices in sandwiches or reheated with a pan sear—my kids beg for it. (Budget win: one tenderloin stretches to four meals.)
Step-by-step instructions for perfectly cooked beef tenderloin
Here’s how to transform your beef tenderloin into a juicy, pink masterpiece in just 20 minutes.
Prep the Meat and Season Generously
Remove the beef tenderloin from the refrigerator and let it sit at room temperature for 15-20 minutes while you prep everything else. This ensures even cooking. Pat the meat dry with paper towels—this step is crucial for that perfect sear. You want it bone dry so the seasoning sticks and the crust forms properly.
In a small bowl, combine the 1.5 teaspoons kosher salt and 0.5 teaspoon freshly ground black pepper. Rub this mixture all over the tenderloin, pressing firmly so the seasoning penetrates the surface. The salt will help tenderize the meat while the pepper adds that essential aromatic kick. Don’t skip this—proper seasoning makes all the difference in flavor.
Create the Herb Butter and Sear the Meat
In a small bowl, mix together the 2 tablespoons cold unsalted butter, 0.25 cup finely chopped fresh rosemary, 0.25 cup fresh thyme leaves, and 4 minced garlic cloves. This herb butter will infuse the meat with incredible flavor as it cooks. Set it aside while you heat your pan.
Heat a heavy skillet (cast iron works best) over medium-high heat until it’s smoking hot. Add 1 tablespoon vegetable oil and let it shimmer for about 30 seconds. Place the beef tenderloin in the pan, fat-side down, and let it sear undisturbed for 2-3 minutes until you see a deep golden-brown crust forming. This crust is what locks in all those juices—don’t rush it.
Finish Cooking to Perfect Medium-Rare
Carefully flip the beef tenderloin and continue searing for another 2-3 minutes on the second side. Now, reduce the heat to medium-low and add the herb butter mixture to the pan. Spoon the melted butter over the meat, basting it for about 1 minute so it absorbs all those aromatic flavors.
Insert the meat thermometer into the thickest part of the tenderloin, making sure not to touch the bone. Remove it from the heat when it reaches 125°F for medium-rare—this is your target for that perfect juicy pink center. The carryover cooking will bring it up to 130°F as it rests, which is ideal. If you prefer a different doneness, adjust accordingly (130°F for medium, 135°F for medium-well).
Rest and Slice for Maximum Juiciness
Transfer the beef tenderloin to a cutting board and let it rest for 10-15 minutes before slicing. This resting period is absolutely critical—it allows the juices to redistribute throughout the meat, ensuring every bite is moist and flavorful. If you slice it too soon, all those juices will run out onto your plate instead of staying inside where they belong.
While it rests, pour the 0.25 cup red wine into the hot skillet and scrape up any browned bits from the bottom with a wooden spoon. This creates a quick pan sauce that you can drizzle over your sliced beef. When ready, slice the tenderloin into ½-inch thick medallions against the grain for the most tender texture. Serve immediately with the wine reduction and any extra herb butter for that restaurant-quality finish.
Pro Tips For Making 1 Pound Beef Tenderloin
- CRANK THE HEAT FIRST: Start your pan screaming hot—no, really, get it there before the butter hits. I used to walk it up slowly, and the butter would just melt into a sad, greasy pool instead of turning that meat golden. High heat seals the crust fast, and that’s where all the flavor hides.
- SALT THE GARLIC: Toss those minced garlic cloves in a pinch of salt before they hit the pan. Sounds weird, but it works: the salt draws out moisture, so you get crispy, aromatic garlic instead of a mushy pile. (Yes, even if you’re impatient like me.)
- DON’T PUNCTURE THE CRUST: Once you’ve got that perfect browned crust on the tenderloin, resist the urge to cut into it to check doneness. Every slice you make lets juices escape, and you’ll end up with a dry, sad steak. Use a meat thermometer instead—130°F for medium-rare, every time.
- BUTTER IT UP LATE: Add the unsalted butter and garlic in the last 30 seconds of cooking. I learned this the hard way—adding it too early turns it into a greasy mess that steams the meat instead of basting it. Let that butter foam and sizzle right over the hot steak for maximum flavor.
Common mistakes when making your 1 pound beef tenderloin
Skipping the Rest
This is the #1 mistake I see—skipping the 10-15 minute rest before slicing. The beef continues cooking off-heat, and those juices need time to redistribute. I’ve seen perfectly cooked tenderloins turn dry and stringy because someone couldn’t wait. Trust the process: rest or regret. 💪
Overcrowding the Pan
Using a skillet that’s too small causes the meat to steam instead of sear. Your pan should only hold the beef tenderloin with about ½ inch of space around it. A 10-inch cast iron is ideal for a 1-pound cut.
If your pan is too crowded, the temperature drops, and you’ll end up with a sad, gray crust instead of that golden-brown sear. 🔥
Uneven Seasoning
Salt and pepper need to adhere evenly for consistent flavor. Don’t just sprinkle—press the seasoning into the meat with your fingers. I’ve seen people miss spots, leading to bland slices. Pro tip: Use Diamond Crystal kosher salt—it’s coarser and penetrates better than table salt. 🧂
Ignoring the Thermometer
Guessing doneness leads to overcooked (or undercooked) beef. An instant-read thermometer is your best friend—insert it into the thickest part, avoiding fat or bone. Pull it at 125°F for medium-rare (not 130°F). I’ve had guests ask for rare tenderloin, so always check internal temp. No excuses. 🌡️
Rushing the Sear
Patience is key here. A proper sear takes 2-3 minutes per side—don’t rush it! If you move the meat too soon, you’ll get a pale crust. Let the pan get smoking hot first, then sear undisturbed.
I’ve seen people flip too early, ruining the crust. The wait is worth it for that flavor-packed exterior. ⏳
Using the Wrong Oil
Not all oils handle high heat equally. Stick with vegetable or avocado oil for searing—they have high smoke points. Olive oil burns easily and creates bitter flavors.
I’ve ruined a good sear by using the wrong oil, and it’s a mistake you don’t want to make. High smoke point = happy crust. 🫒
Nutrition facts
Frequently asked questions
Can I cook a 1-pound beef tenderloin in the oven only?
You can try, but you’ll miss the flavor-packed crust. For oven-only cooking, sear the meat first in a hot pan to develop flavor, then transfer to a 400°F oven for 12-15 minutes (for medium-rare). Use a meat thermometer to check doneness—it should reach 125°F internal temp. The sear step is crucial for that restaurant-quality texture.
How do I adjust this recipe for a larger tenderloin?
For a 2-pound tenderloin, increase cooking times by about 50% (so 25-30 minutes total). Keep the same sear time (2-3 minutes per side) but extend the oven finish. The key is maintaining medium-high heat and checking with a thermometer—aim for 125°F for medium-rare. Larger cuts need more time to reach temperature evenly.
What are the best sides to serve with beef tenderloin?
Classic pairings include creamy garlic mashed potatoes, roasted asparagus with lemon zest, or a crisp green salad with balsamic vinaigrette. For a heartier meal, try roasted root vegetables (carrots, parsnips) or buttery egg noodles. The herb butter from your tenderloin makes an excellent finishing touch for any side. Balance the richness with something fresh and light.
Why does my beef tenderloin turn out dry?
Overcooking is the #1 cause—never let it exceed 130°F internal temp. Another mistake is slicing too early—always rest for 10-15 minutes before cutting. If using a meat thermometer, pull it at 125°F for medium-rare. For extra moisture, baste frequently with melted butter during cooking. Dry beef means the juices escaped before they could redistribute.
Can I substitute red wine in the pan sauce?
Use ½ cup beef broth with 1 tsp balsamic vinegar for similar depth of flavor. For a richer sauce, add 1 tbsp cold butter at the end. Or try dry white wine (like Chardonnay) with a splash of lemon juice—it creates a bright, tangy contrast. The key is deglazing the pan with liquid to capture those flavorful browned bits.

- 6 Egg Cake Recipe with Oil: Light as Air With Buttery Moisture - October 4, 2026
- 4 Bean Casserole Recipe: One-Pan Heartiness With Smoky Paprika Depth - October 4, 2026
- 3-Ingredient Keto Mug Cake Recipe: Microwave Magic in 2 Minutes - October 4, 2026