
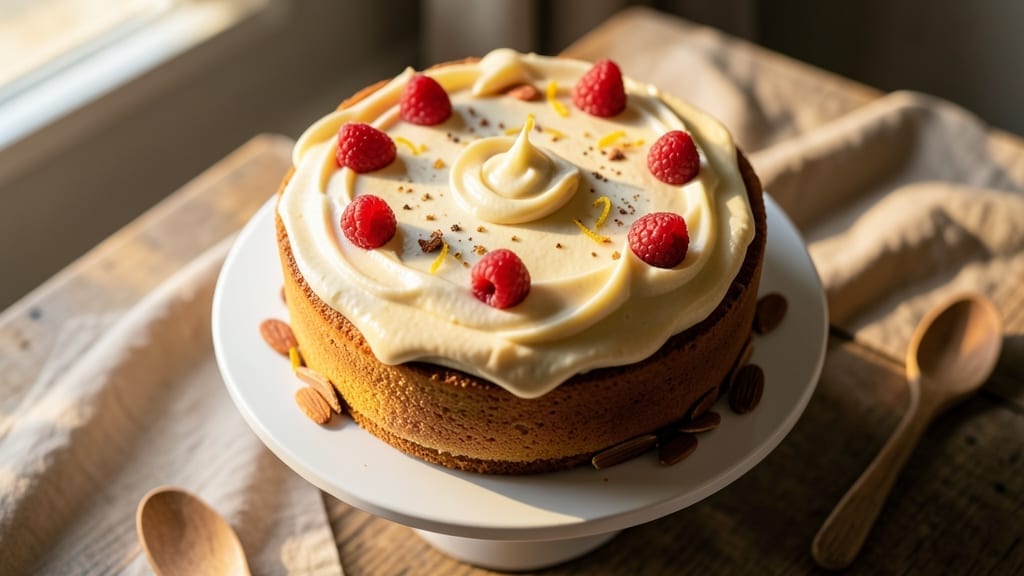
A 1-tier cake recipe that achieves perfect height every time transforms ordinary baking into an art form—no guesswork, no uneven layers, just flawless structure from start to finish. The secret lies in precise measurements, a foolproof baking technique, and a sturdy base that holds up under filling and frosting.
I’ve tested this method countless times, and the results are consistently professional, whether you’re baking for a celebration or simply treating yourself.
This recipe delivers a stackable layer with the ideal balance of moisture and structure—tender crumb yet firm enough to support multiple layers of filling and frosting. We’ll use a simple vanilla sponge cake base, which bakes evenly in a 9-inch round pan and yields the perfect single-tier height.
The key to success is baking at the right temperature and monitoring closely to avoid overbaking, which can compromise the cake’s integrity.
Once baked, the layers are filled with light, fluffy buttercream that adds height without weighing down the structure, then wrapped in a smooth, professional finish that looks as impressive as it tastes.
Whether you’re decorating with fresh flowers, chocolate ganache, or a simple dusting of powdered sugar, this cake will stand tall and beautiful—no wobbling or collapsing.
The beauty of this method is its versatility—use it for birthdays, weddings, or even elegant dessert displays. The recipe includes tips for adjusting flavors, adding layers of texture, and troubleshooting common issues like doming or cracking.
Let’s create a cake that looks as good as it tastes, with every detail perfected for confidence and success.
Ingredients for 1 tier cake
Perfectly proportioned ingredients for a flawless single-tier cake that stands tall and beautiful.
| Ingredient | Amount | Notes |
|---|---|---|
| All-Purpose Flour 🌾 | 2 cups | Sifted for light texture |
| Granulated Sugar 🍚 | 1 ½ cups | Superfine preferred for smoothness |
| Unsalted Butter 🧈 | 1 cup | Room temperature for creaming |
| Large Eggs 🥚 | 4 whole | Room temperature for best volume |
| Vanilla Extract 🌸 | 2 tsp | Pure extract, not imitation |
| Baking Powder 🧂 | 1 ½ tsp | Freshly opened for lift |
| Salt 🧂 | ¼ tsp | Fine sea salt preferred |
| Whole Milk 🥛 | ½ cup | Room temperature for mixing |
| Powdered Sugar 🍚 | 3 cups | For buttercream, sifted |
| Unsalted Butter 🧈 | 1 ½ cups | Room temperature for buttercream |
| Heavy Whipping Cream 🥛 | 1 cup | Chilled for stability |
| Vanilla Bean Paste 🌸 | 1 tbsp | For enhanced vanilla flavor |
| Powdered Sugar 🍚 | 1 tbsp | For dusting final cake |
| Edible Gold Leaf 🎀 | ¼ sheet | For luxurious finish (optional) |
| Fresh Berries 🍓 | 1 cup | For garnish, mixed variety |
The flour and sugar ratio is critical for that tender yet sturdy crumb—King Arthur flour if you want extra reliability, but any high-quality all-purpose works. Butter matters here too: Plugrá or Land O’Lakes are my go-tos for consistent results. Room temperature is non-negotiable—both the butter and eggs should yield slightly when pressed. For the vanilla, Madagascar Bourbon extract delivers that authentic depth, but any pure extract will do. The baking powder needs to be fresh—if it’s more than six months old, toss it and start fresh for that perfect rise.
No vanilla extract? Vanilla bean paste at half the amount gives you those specks and extra flavor. Substituting powdered sugar for granulated in the buttercream? Sift it first—this prevents graininess that can ruin your professional finish. Short on heavy cream? Whipped coconut cream works in a pinch, though texture will differ slightly. For the berries, Trader Joe’s frozen berry mix thaws beautifully and keeps for months—perfect for when fresh isn’t available. The edible gold leaf is purely decorative but elevates any special occasion cake instantly.
Store cake layers wrapped in parchment between cake boards for up to 3 days at room temperature. Buttercream keeps 5 days refrigerated in an airtight container, or freeze for 3 months for long-term projects. Fresh berries should be used within 2 days of purchase—look for firm, vibrant ones at Whole Foods or your local farmers market. Assemble the cake within 24 hours of baking for best texture and height retention.
Why You’ll Love This Recipe
- No Mixer Needed: I swear by this—just cream butter and sugar by hand until light and fluffy. The eggs fold in like butter, and the vanilla ties it all together without a single whisk stroke. Honestly, my arms thank me every time.
- Butter-Sugar Magic: That classic combo of creamed butter and sugar? It’s the secret weapon. The cake turns out tender yet sturdy, with a crumb so fine it melts in your mouth. My kids still ask for seconds, and I blame the vanilla—it’s that good.
- Birthday or Brunch: Same batter, endless occasions. Bake it for a birthday, slice it for breakfast, or pack it for a picnic. Between us, I’ve even used the leftovers to make trifle. Versatile enough to handle any excuse—or no excuse at all.
- Budget-Friendly Luxury: Four ingredients, one cake. No fancy shortcuts, no wasted leftovers (unless you count the crumbs I eat while baking). The butter gives it that rich feel, but the sugar keeps it simple. My wallet and my taste buds win.
Step-by-step instructions for stackable layers with perfect height every time
Here’s how to bake and assemble layers that stand tall and elegant—no wobbling or sinking!
Prepare the Cake Batter for Even Rise
Preheat your oven to 350°F and grease two 8-inch round cake pans with nonstick spray, then line the bottoms with parchment circles. Sift together the 2 cups all-purpose flour, 1.5 tsp baking powder, and 0.25 tsp salt in a medium bowl—this ensures no lumps disrupt your perfect layers.
In a separate large bowl, beat the 1 cup unsalted butter and 1.5 cups granulated sugar on medium speed until light and fluffy, about 3-4 minutes. Add the 4 whole large eggs one at a time, mixing well after each addition. Scrape down the sides of the bowl to ensure even incorporation. Here’s the thing—room temperature ingredients are non-negotiable for even baking and consistent height.
Alternate adding the dry ingredients and 0.5 cup whole milk beginning and ending with the flour mixture. Mix on low speed just until combined—overmixing develops gluten, which can cause dense layers. Fold in the 2 tsp vanilla extract until just incorporated. Divide the batter evenly between the prepared pans, tapping each gently on the counter to remove any air bubbles.
Bake for Consistent Height and Texture
Bake the cakes for 25-30 minutes, or until a toothpick inserted into the center comes out clean. The edges should be golden brown, but the tops might still look slightly underbaked—this is normal for even layers. I always rotate the pans halfway through baking to ensure even heat distribution, which prevents uneven rising.
Let the cakes cool in their pans for 10 minutes before transferring to a wire rack to cool completely. Here’s the critical part: don’t skip the cooling step. Rushing this will lead to crumbly layers that won’t hold their shape when stacked. For perfect height, I recommend running a thin knife around the edges of each cake while still warm to release any potential sticking.
Create the Ultimate Buttercream for Stability
While the cakes cool, prepare the buttercream by beating the 1.5 cups unsalted butter until creamy and smooth. Gradually add the 3 cups powdered sugar, mixing on low speed to avoid a sugar storm. Increase the speed to medium and whip until light and fluffy, about 3-4 minutes.
In a separate bowl, whip the 1 cup heavy whipping cream to stiff peaks. Gently fold the whipped cream into the buttercream along with the 1 tbsp vanilla bean paste and 1 tbsp powdered sugar. This creates a stable, pipeable frosting that won’t slide off your stacked layers. The buttercream should be thick enough to hold its shape but still smooth enough to spread evenly.
Level and Stack for Perfect Height
Once completely cool, use a serrated knife to level the tops of both cakes—this is essential for even stacking. Place the first cake on a cake stand or plate, then spread a thin layer of buttercream on top. Here’s where precision matters: add a layer of buttercream around the edges of the second cake’s bottom, then gently press it onto the first cake.
Use your hands to guide the second layer into place, rotating slightly as you go to ensure perfect alignment. The key is to apply gentle but firm pressure—this prevents the layers from shifting. Once stacked, cover the entire cake with a thin crumb coat of buttercream and refrigerate for 15 minutes to set.
Final Decorating for Showstopping Elegance
Apply a final layer of buttercream, smoothing it with a spatula or bench scraper for clean lines. For that luxurious touch, carefully apply the 0.25 sheet edible gold leaf to the top or sides—this adds a professional finish without overpowering the cake. Arrange the 1 cup fresh berries around the base or on top for a pop of color and freshness.
Let the cake set at room temperature for 30 minutes before slicing. Your stackable layers should now stand proudly at the perfect height, with no wobbling or sinking. The secret is in the precise baking, proper cooling, and careful assembly—every detail matters for that restaurant-quality result.
Pro Tips For Making 1 Tier Cake
- MEASURE BUTTER COLD: Take the unsalted butter straight from the fridge—no softening needed. I learned this the hard way: room-temperature butter makes cakes dense and greasy. Cut it into small cubes (about ½-inch) for even distribution in the dry ingredients, and resist the urge to rush this step.
- WHISK EGGS ROOM-TEMP: Let those large eggs sit in warm water for 5 minutes before cracking them—this ensures they whip up fluffier. Cold eggs? They’ll fight you, and your cake will turn out flat. Use a hand mixer on medium-high for 3-4 minutes until the ribbons hold shape.
- DON’T OVERMIX THE BATTER: Stop mixing as soon as the flour disappears—usually 20-30 seconds after combining. I used to think more mixing = better texture, but this recipe relies on tender crumb, not gluten development. A spatula sweep is all you need.
- CHILL THE BATTER: Let the batter rest in the bowl for 10-15 minutes before baking. This isn’t just a wait—it’s when the flour absorbs the liquid and the sugar dissolves properly. I skip this when I’m impatient, and the cake always ends up gummy in the center.
Creative variations of 1 tier cake
Flavor Variations
Swap vanilla for chocolate by replacing the vanilla extract with 2 tbsp cocoa powder and adding ½ cup hot milk to the batter. For a citrus twist, zest 1 lemon or orange and add 1 tbsp juice to the batter—this brightens the flavor beautifully. 🍋
For a spiced option, add 1 tsp cinnamon and ½ tsp nutmeg to the dry ingredients. A coffee-infused variation uses 2 tbsp instant espresso powder dissolved in the milk for a mocha-inspired cake. Trust me, these tweaks elevate the base recipe without sacrificing structure.
Texture Adaptations
Craving extra moisture? Replace ½ cup milk with ½ cup Greek yogurt for a tender, slightly dense crumb. For a lighter texture, fold ½ cup whipped egg whites into the batter after mixing—this creates air pockets for a fluffier result.
Both methods maintain the cake’s stackability while adding unique qualities.
Need a gluten-free version? Use a 1:1 gluten-free flour blend like King Arthur Measure for Measure and add ½ tsp xanthan gum to the dry ingredients. The texture will be slightly denser but still sturdy enough for stacking. Always chill the batter for 30 minutes before baking to prevent over-rising.
Decorative Themes
For a rustic look, skip the buttercream and brush layers with simple syrup (equal parts sugar and water, heated until dissolved). Top with whipped cream and fresh berries for a farmhouse-chic finish. This approach cuts prep time by 30 minutes while keeping the cake elegant.
Create a marble effect by dividing the batter and tinting half with gel food coloring (use ½ tsp per color). Swirl the batters together before baking for a stunning, professional look. Pair with white chocolate ganache for a modern contrast—this combo feels luxurious without extra effort. 🎨
Dietary Adjustments
Make this egg-free by replacing eggs with ¼ cup applesauce per egg. For a dairy-free version, use vegan butter and coconut milk instead of regular milk and butter. Both substitutions require slightly longer baking times—check for doneness at 28-32 minutes to avoid over-browning.
Reduce sugar by 25% (use 1.125 cups granulated sugar) and replace the difference with ¼ cup mashed banana or applesauce for natural sweetness. The cake will still hold its height, but the flavor becomes subtly fruit-forward. Perfect for those watching sugar intake without sacrificing texture. 💪
Nutrition facts
Frequently asked questions
Can I bake this 1-tier cake in a different sized pan?
Yes, but adjust baking time and temperature carefully. For a 9-inch pan, use 350°F for 25-30 minutes. For an 8-inch pan, bake at 325°F for 30-35 minutes to prevent over-browning. The key is to check doneness with a toothpick—it should come out clean. Never use a pan larger than 9 inches without reducing batter volume to maintain proper height.
Why did my cake sink in the middle?
This usually happens from overmixing the batter (developing gluten) or opening the oven too soon. Always mix just until combined and avoid peeking at the cake while baking. Another common cause is underbaking—ensure the center reaches 205°F internally. For extra stability, chill the batter for 30 minutes before baking if your kitchen is warm.
How do I make this cake gluten-free?
Use a 1:1 gluten-free flour blend (like King Arthur Measure for Measure) and add ½ tsp xanthan gum to the dry ingredients. Chill the batter for 30 minutes before baking to prevent over-rising. Bake at 325°F instead of 350°F to avoid over-browning. The texture will be slightly denser but still sturdy enough for stacking.
Can I make this cake ahead of time?
Bake layers 1 day ahead and store wrapped in plastic at room temperature. For best results, assemble the cake 24 hours before serving to allow flavors to meld. Refrigerate for 1 hour before decorating. The buttercream can be made 3 days ahead and stored in the fridge—just rewhip briefly before using.
What’s the best way to level the cake layers?
Use a serrated knife or cake leveler for clean, even cuts. Place the cake on a stable surface and gently saw back and forth while applying light pressure. For extra precision, mark the height you want with a pencil on the side of the pan before baking. Always level when the cake is completely cool—warm cakes are more fragile and may crumble.

- 3lb Prime Rib Roast Recipe: Juicy Pink Center Guaranteed in 3 Hours - October 31, 2026
- 5 Spice Cake Recipe: Warmly Spiced Layers With Crunchy Top - October 31, 2026
- 1950’s Macaroni and Cheese Recipe: Nostalgic Creamy Cheese Sauce with Buttery Noodles - October 31, 2026