
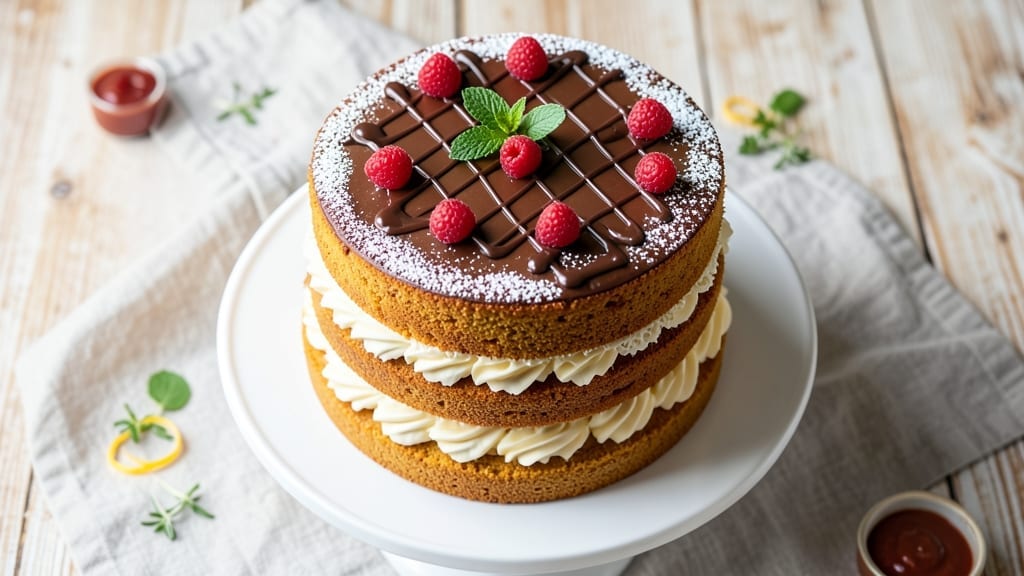
A 10-inch birthday cake deserves to be the star of the celebration, and this layered vanilla buttercream recipe delivers restaurant-quality results with foolproof techniques. The secret lies in precise measurements and a foolproof buttercream that stays luscious at room temperature—no refrigeration required for hours of serving.
I’ve baked this cake for countless birthdays, and it never fails to impress with its tender crumb and perfectly balanced sweetness.
This recipe uses a simple vanilla cake batter that yields moist, evenly baked layers every time, thanks to a 350°F oven and precise baking times. The buttercream is where the magic happens: rich, smooth, and just sweet enough to complement—not overpower—the delicate vanilla flavor.
We’ll build the cake layer by layer, ensuring each slice is as beautiful as it is delicious, with clean edges and professional-level frosting.
What you’ll achieve is a cake that looks as impressive as it tastes—golden layers separated by fluffy buttercream, ready for candles, sprinkles, or fresh berries. The texture is light yet sturdy, holding up perfectly for slicing and serving.
This isn’t just a cake; it’s a centerpiece that makes birthdays feel extra special without requiring advanced baking skills.
Perfect for beginners and experienced bakers alike, this recipe includes tips for leveling layers, crumb coat perfection, and even troubleshooting common cake mishaps. Let’s create a birthday cake that will have everyone asking for seconds—and the recipe to take home.
Ingredients for 10 inch birthday cake
Precision and patience yield a showstopping 10-inch vanilla cake with layers as flawless as they are delicious.
| Ingredient | Amount | Notes |
|---|---|---|
| All-Purpose Flour 🌾 | 3 cups | Sifted for even texture |
| Granulated Sugar 🍚 | 2 cups | White granulated preferred |
| Unsalted Butter 🧈 | 1 cup | Cold, cubed for creaming |
| Large Eggs 🥚 | 2 whole | Room temperature for blending |
| Pure Vanilla Extract 🌿 | 2 tsp | High-quality, not imitation |
| Baking Powder 🧂 | 2 tsp | Diamond Crystal preferred |
| Salt 🧂 | ½ tsp | Fine sea salt preferred |
| Whole Milk 🥛 | 1 cup | Room temperature for mixing |
| Unsalted Butter 🧈 | 2 cups | Cold, for buttercream (room temp for mixing) |
| Confectioners' Sugar 🍚 | 4 cups | Sifted for smooth texture |
| Heavy Whipping Cream 🥛 | 1 cup | Cold, for buttercream stability |
| Pure Vanilla Extract 🌿 | 1 tsp | Additional for buttercream |
| Vanilla Cake Layers 🎂 | 3 whole | Baked, cooled, leveled |
The flour and sugar are your foundation—King Arthur or Gold Medal brands ensure consistent rise and tender crumb. Cold butter for the cake batter creates air pockets that yield a light texture, while room-temperature eggs blend smoothly. Vanilla extract matters: McCormick or Nielsen-Massey deliver authentic flavor without artificial aftertaste. For the buttercream, European-style unsalted butter (like Plugrá) contains 82% fat, ensuring a stable, pipeable consistency. Sift both the flour and confectioners’ sugar to eliminate lumps and achieve a silky finish. The baking powder should be fresh—test by mixing with water; if it fizzes vigorously, it’s active.
No Diamond Crystal baking powder? Bob’s Red Mill works identically. Short on vanilla extract? Vanilla bean paste (like Madagascar Bourbon) adds depth and texture. The buttercream can handle substitutions: vegetable shortening (like Crisco) for a lighter texture, though it lacks richness. For a dairy-free option, Earth Balance vegan butter mimics the fat content. If your cake layers are slightly domed, level them with a serrated knife before frosting—this ensures clean, professional edges. The heavy whipping cream can be omitted for a simpler buttercream, though it adds lightness and stability.
Store baked cake layers airtight at room temperature for up to 3 days or freeze for 3 months. Buttercream holds beautifully at room temperature for 6-8 hours, making it ideal for birthday celebrations. For long-term storage, wrap layers in plastic and refrigerate; bring to room temperature before assembling. The buttercream can be made 2 days ahead and refrigerated—rewhip briefly before use. Cake freezes well: wrap tightly and thaw overnight in the fridge before decorating.
Why You’ll Love This Recipe
- No Mixer Needed: I swear by this—just a bowl and a whisk. That rich butter-sugar cream? You’ll get it smooth without overworking, and the eggs fold in like butter. Honestly, my lazy Sunday mornings became actual baking mornings because of this.
- Vanilla Butter Bliss: The moment you taste that first forkful—warm, tender crumb with vanilla so deep it lingers—you’ll understand. No artificial extracts here; just real vanilla cutting through the buttery sweetness. That’s the kind of cake people will actually finish.
- One-Bowl, Many Uses: Birthday? Check. Potluck? Done. Even a last-minute office celebration. The same simple batter works for cupcakes or a sheet cake if you’re feeling ambitious. I’ve used leftover batter for cookies—yes, really—and no one batted an eye.
- Fridge Magic Leftovers: This cake stays moist for days, so you’re not stuck scrambling for seconds. Slice it, wrap it, and stash it—it’s still perfect for lunch the next day. Between us, I’ve pulled this out for a 3 PM sugar rush more times than I can count.
Step-by-step instructions for layered vanilla buttercream cake
Master this classic technique for a perfectly moist cake with flawless buttercream layers.
Prepare the Cake Batter
Preheat your oven to 350°F and grease three 10-inch round cake pans with nonstick spray, then line the bottoms with parchment circles. In a large mixing bowl, combine the 3 cups all-purpose flour, 2 cups granulated sugar, 2 tsp baking powder, and 0.5 tsp salt. Whisk until evenly distributed.
In a separate bowl, cream together the 1 cup unsalted butter and the 2 whole large eggs on medium speed until light and fluffy, about 3-4 minutes. Gradually add the dry ingredients to the wet, alternating with 1 cup whole milk in 3 additions, beginning and ending with flour. Mix just until combined—overmixing develops gluten and makes the cake dense.
Divide the batter evenly among the prepared pans. Bake for 25-30 minutes or until a toothpick inserted in the center emerges clean. Let the cakes cool in the pans for 10 minutes, then transfer to a wire rack to cool completely before leveling and frosting.
Create the Perfect Buttercream
In a stand mixer fitted with the paddle attachment, beat the 2 cups unsalted butter (softened to room temperature) on medium speed until smooth and creamy, about 2-3 minutes. Gradually add the 4 cups confectioners’ sugar, sifted to prevent lumps, mixing on low speed until incorporated.
Increase the speed to medium and beat for 2-3 minutes until the mixture is light and fluffy. Add the 1 cup heavy whipping cream and 1 tsp pure vanilla extract, mixing until fully combined. The buttercream should be smooth, spreadable, and hold its shape when piped. If it’s too thick, add 1-2 tablespoons milk to achieve the perfect consistency.
Assemble the Cake Layers
Place the first vanilla cake layer on a cake stand or plate. Spread a thin layer of buttercream (about ¼ inch thick) over the top to create a “crumb coat.” This prevents crumbs from mixing into the final frosting. Chill the cake in the refrigerator for 15 minutes to set the crumb coat.
Apply a thicker layer of buttercream (about ½ inch thick) to the top of the first layer. Place the second cake layer on top, gently pressing down to create a clean edge. Repeat the process with the third layer, ensuring each layer is level and centered. Chill the assembled cake for 20 minutes before applying the final outer layer of buttercream.
Frost and Finish the Cake
Spread the remaining buttercream evenly over the entire cake, creating a smooth, even surface. Use a long metal spatula or bench scraper to achieve sharp edges. For extra elegance, pipe decorative borders or swirls around the edges using a piping bag fitted with a star tip. Let the cake rest at room temperature for 30 minutes before slicing to allow the frosting to set.
To ensure a flawless finish, keep the cake refrigerated for 1 hour before serving. This allows the buttercream to firm up slightly, making it easier to slice cleanly. Serve at room temperature for the best texture and flavor balance.
Pro Tips For Making 10 Inch Birthday Cake
- Measure Butter Cold: Take the butter straight from the fridge—no softening needed. I learned this the hard way when my cake turned out dense after using room-temperature butter; cold cubes cut cleanly into the flour and create the right air pockets for a light texture.
- Whisk Eggs First: Beat the eggs with sugar until they’re pale and tripled in volume before folding in the flour. This isn’t just about mixing—it’s about building structure. Skip this, and your cake might collapse in the middle (yes, I’ve seen it happen).
- Avoid Overmixing: Stop folding the flour into the batter the second it’s just combined—lumps are fine. Overworking the batter makes the cake tough, and no one wants a birthday cake that feels like a hockey puck.
- Test Doneness Early: Pull the cake from the oven when the center still jiggles slightly—it’ll firm up as it cools. I used to wait until the toothpick came out completely clean, but that left mine dry and crumbly. Trust the wiggle.
Wine and beer pairings for this recipe
Sweet Wine Pairings
For a birthday cake with rich vanilla buttercream, opt for sweet dessert wines that complement rather than compete with the flavors. A Moscato d’Asti from Italy offers light, fizzy sweetness that cleanses the palate between bites, while its bright acidity balances the cake’s richness.
I always reach for a chilled bottle—around 45-50°F—to enhance its refreshing qualities. 🍷
If you prefer a slightly more robust pairing, try a Late Harvest Riesling from Germany or Washington State. The honeyed notes and subtle spice mirror the cake’s vanilla and buttercream, creating a harmonious match. Look for labels with residual sugar (RS) levels of 50-80 grams per liter for optimal sweetness.
Creamy Beer Options
Creamy stout beers like Guinness or Samuel Smith’s Nut Brown Ale provide the perfect contrast to vanilla cake. The roasted malt notes and slight bitterness cut through the sweetness, creating a delightful balance.
Serve the beer well-chilled (40-45°F) to enhance its smooth texture and prevent it from becoming too heavy alongside the cake.
For a lighter option, consider a Belgian-style dubbel like Westmalle Dubbel. Its caramel and spice notes complement the cake’s vanilla while adding a touch of complexity. The alcohol content (around 6-7% ABV) ensures it won’t overpower the dessert but still provides a satisfying finish. 🍺
Fruity Liqueur Accents
Add a splash of vanilla liqueur like Giffard Amaretto or Disaronno to your wine or beer for an extra layer of flavor. A 1-ounce pour into each glass enhances the vanilla notes in the cake and adds a warm, almond-like depth.
This works especially well with Moscato d’Asti or a light dessert wine.
For a non-alcoholic twist, serve sparkling apple cider chilled to 40°F. The crisp acidity and subtle sweetness make it a refreshing alternative that still pairs beautifully with the cake’s buttery richness. Brands like Martinelli’s or Woodchuck offer excellent quality.
Serving Temperature Tips
Wine and beer should always be served at the right temperature to highlight their flavors. Keep dessert wines chilled but not ice-cold—45-50°F is ideal. Over-chilling can mute their aromas and sweetness, so remove the bottle from the fridge 10-15 minutes before serving.
For beer, use a beer cooler or ice bucket to maintain consistent temperatures.
If you’re serving multiple pairings, arrange them in order of sweetness—starting with the driest (like a dubbel) and ending with the sweetest (like Moscato). This progression ensures each sip enhances the cake’s flavors without overwhelming them. 💫
Nutrition facts
Frequently asked questions
Can I make this cake in a 9-inch pan instead of 10-inch?
Yes, but you’ll need to adjust the recipe slightly. For a 9-inch pan, reduce each layer’s batter to 2/3 cup per pan (total 1.5 cups batter) and bake for 20-25 minutes. The cake will be taller, so consider reducing to 2 layers instead of 3 for easier handling. The buttercream quantity remains the same.
How do I level uneven cake layers?
Use a long serrated knife or cake leveler to trim the tops. Place the cake on a plate, then gently saw back and forth across the dome until flat. Wipe the surface with a damp paper towel to remove any crumbs before frosting. This ensures clean edges and a professional finish!
Can I substitute powdered sugar with cornstarch?
No, don’t substitute powdered sugar (confectioners’ sugar) with cornstarch—they serve completely different purposes. Powdered sugar dissolves smoothly in buttercream, while cornstarch lacks sweetness and won’t create the same creamy texture. If you’re out of powdered sugar, blend granulated sugar in a food processor for 2-3 minutes to make a rough substitute.
Why did my buttercream turn grainy?
Grainy buttercream usually happens from lumps in powdered sugar or not sifting it properly. Always sift the powdered sugar before mixing, and ensure your butter is at room temperature (not melted). If it happens, whisk vigorously with a hand mixer to break up any lumps. For extra smoothness, strain the buttercream through a fine-mesh sieve before using.
How long can I keep the cake before serving?
Assembled cakes stay fresh at room temperature for 4-6 hours. For longer storage, refrigerate the fully frosted cake for up to 3 days (bring to room temperature before serving). The buttercream may soften slightly when cold—let it sit at room temperature for 30 minutes before slicing for perfect texture.

- 3lb Prime Rib Roast Recipe: Juicy Pink Center Guaranteed in 3 Hours - October 31, 2026
- 5 Spice Cake Recipe: Warmly Spiced Layers With Crunchy Top - October 31, 2026
- 1950’s Macaroni and Cheese Recipe: Nostalgic Creamy Cheese Sauce with Buttery Noodles - October 31, 2026