
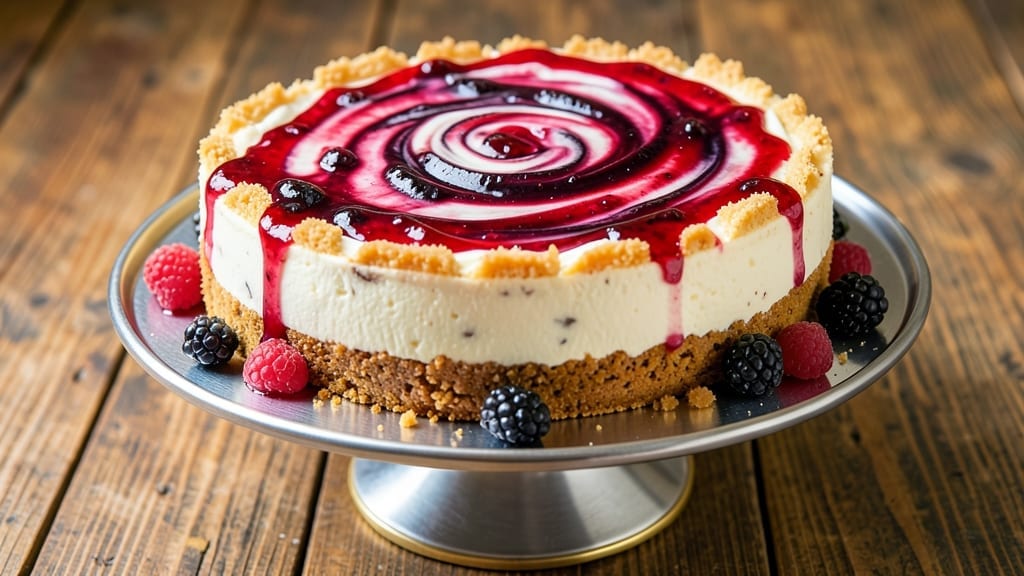
This 10-inch no-bake cheesecake recipe delivers silky-smooth cream cheese perfection without a single minute in the oven. 💛 The secret lies in a sturdy graham cracker crust and a stabilized filling that sets beautifully in the fridge—no baking skills required.
I’ve perfected this version to avoid cracks while keeping the texture rich and velvety, making it ideal for both beginners and dessert lovers who want restaurant-quality results in under 30 minutes of active time.
The beauty of this recipe is its simplicity: just six core ingredients create a dessert that tastes like it came from a bakery. A blend of cream cheese and sour cream forms the base, while gelatin ensures that creamy, luscious texture without graininess.
The graham cracker crust adds just the right amount of crunch to contrast the smooth filling, and it all comes together in a springform pan for easy slicing.
What you’ll end up with is a 10-inch cheesecake with a golden crust and a filling so smooth it practically melts in your mouth. The chilling process transforms the mixture from a thick batter into a sliceable masterpiece—no oven required.
This recipe is perfect for special occasions or when you want to impress guests without the stress of baking.
Once chilled, you can serve it plain or top with fresh berries, a drizzle of caramel, or a dusting of powdered sugar. The best part? It keeps beautifully in the fridge for up to five days, so you can make it ahead and enjoy it whenever the craving strikes.
Let’s get started on creating this foolproof dessert!
Ingredients for 10 inch cheesecake recipe no bake
Six core ingredients transform into a creamy, crack-free 10-inch no-bake masterpiece.
| Ingredient | Amount | Notes |
|---|---|---|
| Graham Crackers 🍪 | 2 ½ cups | Crushed into fine crumbs |
| Unsalted Butter 🧈 | ½ cup | Melted, full-fat preferred |
| Granulated Sugar 🍚 | ½ cup | For crust sweetness |
| Cream Cheese 🧀 | 32 oz | Full-fat, room temperature |
| Sour Cream 🥛 | 1 cup | Full-fat for richness |
| Granulated Sugar 🍚 | 1 ½ cups | For filling sweetness |
| Powdered Sugar 🍚 | ¼ cup | For smooth texture |
| Unflavored Gelatin 💊 | 1 ½ tbsp | Plus 3 tbsp cold water |
| Vanilla Extract 🌿 | 1 tbsp | Pure, high-quality |
| Heavy Cream 🥛 | ½ cup | Chilled for stability |
| Fresh Berries 🍓 | 2 cups | Optional garnish |
The graham crackers are your foundation—Honey Maid or Keebler work best for that buttery crunch. If you can’t find graham crackers, digestive biscuits or vanilla wafers are solid swaps. The butter matters here—full-fat only—anything else and the crust gets crumbly. For the cream cheese, Philadelphia is my go-to (the good stuff, not the pre-sliced kind), but any full-fat brand works. Room temperature is key—soften it for 30 minutes if it’s straight from the fridge. The gelatin? Great Lakes or Knox are reliable brands, and trust me on the powdered kind—it dissolves better than sheets.
No sour cream? Greek yogurt at half the amount keeps things creamy. Short on vanilla? Vanilla bean paste gives extra depth. The heavy cream can be whipped first if you want extra fluffiness (though it’s not required). For the berries, strawberries or raspberries add the best pop of color, but whatever’s in season works. Pro tip: if your filling seems too thick, add 1 tbsp of milk to loosen it up. And if you’re worried about cracks, chill the filling for 2 hours before assembling
This keeps like a dream—5 days in the fridge, no problem. For a special touch, wrap the whole pan in plastic wrap before refrigerating. Want to make it ahead? Assemble the crust and filling 24 hours early, then chill until serving. The berries? Add them right before serving so they stay bright. Freezing isn’t recommended, but if you must, wrap tightly and thaw overnight in the fridge. Leftovers? Slice and serve with a dollop of whipped cream—guests will never guess it’s no-bake.
Why You’ll Love This Recipe
- Here’s what sold me: that first bite where the toasted graham cracker meets the creamy filling. The sugar-butter mix for the crust caramelizes just enough to give it a subtle crunch, and the sour cream keeps the center silky. It’s the little details—like the way the edges stay sturdy even when you slice it—that make this cheesecake feel special.
- I’ll be real: cream cheese isn’t cheap, but this recipe stretches it perfectly. The graham crust uses pantry staples, and the sugar-butter combo keeps costs low without sacrificing flavor. Plus, it keeps for days in the fridge, so I’m not scrambling to bake something last-minute. That’s the kind of dessert that makes me feel like I’m treating myself without breaking the bank.
Step-by-step instructions for 10-Inch no-bake cheesecake
Let’s build this creamy, dreamy cheesecake without ever turning on the oven.
👨🍳 Step 1: Make the Crust and Prepare the Pan
Preheat your oven to 325°F—yes, we’re preheating even though it’s no-bake, but trust me, it’s for the crust only. In a food processor, pulse the 2.5 cups graham crackers until you get fine crumbs. You want it to look like sand, not pebbles.
Mix the crumbs with the 0.5 cup melted unsalted butter and 0.5 cup granulated sugar until everything sticks together. Press this mixture firmly into the bottom and up the sides of a 10-inch springform pan, using the back of a spoon to create an even base. Bake for 8-10 minutes until golden. Let it cool completely—this prevents soggy crust later.
🥘 Step 2: Bloom the Gelatin and Mix the Filling
While the crust cools, sprinkle the 1.5 tbsp unflavored gelatin over 3 tbsp cold water in a small bowl. Let it sit for 5 minutes to bloom—you’ll see it thicken slightly. Meanwhile, beat the 32 oz cream cheese with an electric mixer until completely smooth, about 3-4 minutes.
In a separate bowl, whisk together the 1 cup sour cream, 1.5 cups granulated sugar, 0.25 cup powdered sugar, and 1 tbsp vanilla extract. Gradually add this mixture to the cream cheese while mixing on low speed. Add the bloomed gelatin and mix until fully incorporated. The batter should be thick but pourable.
🍳 Step 3: Fold in the Heavy Cream
In a separate bowl, whip the 0.5 cup chilled heavy cream with clean beaters until soft peaks form. Gently fold this into the cheesecake mixture using a spatula—fold, don’t stir. You want to maintain as much air as possible for that light, cloud-like texture. The batter should be smooth and glossy.
Here’s the thing—don’t overmix. Just until fully combined. Overmixing will make your cheesecake dense. Pour the filling over the cooled crust, spreading it evenly. Tap the pan gently on the counter a few times to remove any air bubbles. Smooth the top with a spatula.
⏰ Step 4: Chill and Set
Cover the pan tightly with plastic wrap and refrigerate for at least 6 hours, preferably overnight. This is where patience pays off—the longer it chills, the firmer it gets. After 4 hours, you can run your finger through the center—if it comes out clean, it’s ready. If not, give it more time.
Once fully set, run a knife around the edge to loosen. Release the springform and transfer to a serving plate. Top with the 2 cups fresh berries arranged in a decorative pattern. Serve chilled—this cheesecake is best enjoyed straight from the fridge!
Pro Tips For Making 10 Inch Cheesecake Recipe No Bake
- Chill the Crust First: I learned this the hard way—skipping this step means your crust will soften when the filling goes in, and suddenly you’ve got a soggy bottom. Press the graham cracker crumbs into the pan, then pop it in the freezer for 15 minutes before adding the filling. Trust me, your cheesecake’s structural integrity depends on it.
- Soften Cream Cheese Right: Don’t nuke it in the microwave like I used to—it turns greasy and grainy. Cut the cream cheese into cubes, place them in a bowl, and let them sit at room temperature for 1–2 hours. If you’re in a rush, use a stand mixer to beat them while they soften; the friction does half the work for you.
- Press the Crust Evenly: Uneven crust = uneven texture. Use the bottom of a glass to press the crumbs firmly into the pan, rotating as you go. No gaps, no weak spots—this isn’t the time to half-ass it. A well-packed crust holds up to the filling and keeps the slice clean.
- Use Full-Fat Sour Cream: I was skeptical until I tried it: full-fat sour cream (not the low-fat stuff) makes the filling richer and smoother. It also prevents cracking when the cheesecake chills. If you’re using a substitute, add 1 tablespoon of heavy cream to mimic the fat content—your taste buds will notice the difference.
Essential equipment for this recipe
Springform Pan
A 10-inch springform pan is absolutely essential—it gives you that perfect round shape and makes slicing a breeze. I use Nordic Ware because it has a sturdy base that won’t warp, but any quality brand like USA Pan works too.
The key is making sure it’s completely clean and dry before assembling the crust. If you don’t have a springform, a regular cake pan will work, but you’ll need to grease it well to prevent sticking. 💡
Electric Mixer
An electric mixer (like a KitchenAid stand mixer or Cuisinart hand mixer) is a game-changer for blending the cream cheese until smooth. If you’re short on time, a hand mixer works just fine—just make sure to beat the cream cheese for at least 3-4 minutes until it’s completely lump-free.
For the gelatin mixture, a whisk or fork suffices, but the mixer makes everything faster. Pro tip: Use the paddle attachment for cream cheese to avoid splattering. ✨
Food Processor
Crushing graham crackers into fine crumbs is easiest with a food processor—it’s faster and more consistent than a rolling pin or mortar and pestle. If you don’t have one, a ziplock bag and rolling pin works: place the crackers in the bag, seal it, and roll until they’re crumbly.
For extra fine texture, pulse in short bursts (about 5-6 seconds per pulse). A blender can also work, but it might over-process the crumbs into a paste. 🌟
Plastic Wrap
Tightly wrapping your cheesecake in plastic wrap (or parchment paper) prevents drying and keeps it compact while chilling. I like Glad Press’n Seal because it sticks well to the pan’s edges, creating an airtight seal. If you’re making this ahead, double-wrap the pan to lock in moisture.
For serving, leave the wrap on until just before slicing—it helps maintain that perfect slice. Trust me, this small step makes a huge difference in texture! 💫
Measuring Cups
Precision matters in no-bake cheesecakes, so dry measuring cups (for graham crackers and sugar) and a liquid measuring cup (for butter and cream) are must-haves. I swear by OXO Good Grips—they’re sturdy and easy to read.
For the gelatin, a small bowl and measuring spoons ensure you bloom it correctly. Don’t eyeball it: 1.5 tbsp gelatin is critical for stability, and too little can lead to a runny filling. 🔥
Offset Spatula
An offset spatula is your secret weapon for smoothing the filling and spreading it evenly in the pan. I use a 6-inch silicone one (like OXO’s) because it glides smoothly without scratching the pan.
After pouring the filling, use it to tap the pan gently on the counter—this releases air bubbles that could cause cracks. For the crust, it’s perfect for pressing the crumbs firmly into the pan’s sides. A regular spatula works, but the offset gives you better control. 💪
Nutrition facts
Frequently asked questions
Why does this recipe use gelatin instead of cornstarch?
Gelatin creates a silky, stable texture that cornstarch can’t match—it prevents that grainy mouthfeel while keeping the filling firm enough to slice cleanly. For a vegetarian option, you can substitute agar-agar (follow package instructions) or increase the gelatin to 2 tbsp while reducing the heavy cream to 0.375 cup.
How do I prevent cracks in my no-bake cheesecake?
Cracks usually happen from temperature shifts or overmixing. First, make sure your cream cheese is room temperature (not cold). Second, fold the heavy cream gently—don’t stir. Finally, chill the filling for 2 hours before assembling, and avoid opening the fridge door frequently while it sets. Tap the pan gently on the counter after pouring to release air bubbles.
Can I make this cheesecake ahead of time?
Assemble the crust and filling 24 hours in advance, then refrigerate uncovered for 4-6 hours before wrapping tightly. It keeps beautifully for 5 days in the fridge—just add fresh berries right before serving to keep them vibrant. For parties, this is a lifesaver!
What’s the best way to slice this cheesecake?
Run a hot, clean knife through the center first to create a guide, then wipe it dry between slices. Dip the knife in hot water and dry it again before each cut—this prevents dragging and gives you clean edges. For perfect portions, use a serrated knife and angle it slightly for cleaner cuts.
Can I use whipped topping instead of heavy cream?
Not recommended—whipped topping contains stabilizers that can alter the texture. If you’re short on time, whip the 0.5 cup heavy cream to stiff peaks first, then fold it in gently. The extra air helps lighten the filling without compromising stability. For a shortcut, reduce the gelatin to 1 tbsp and increase the heavy cream to 0.75 cup.

- 3lb Prime Rib Roast Recipe: Juicy Pink Center Guaranteed in 3 Hours - October 31, 2026
- 5 Spice Cake Recipe: Warmly Spiced Layers With Crunchy Top - October 31, 2026
- 1950’s Macaroni and Cheese Recipe: Nostalgic Creamy Cheese Sauce with Buttery Noodles - October 31, 2026