
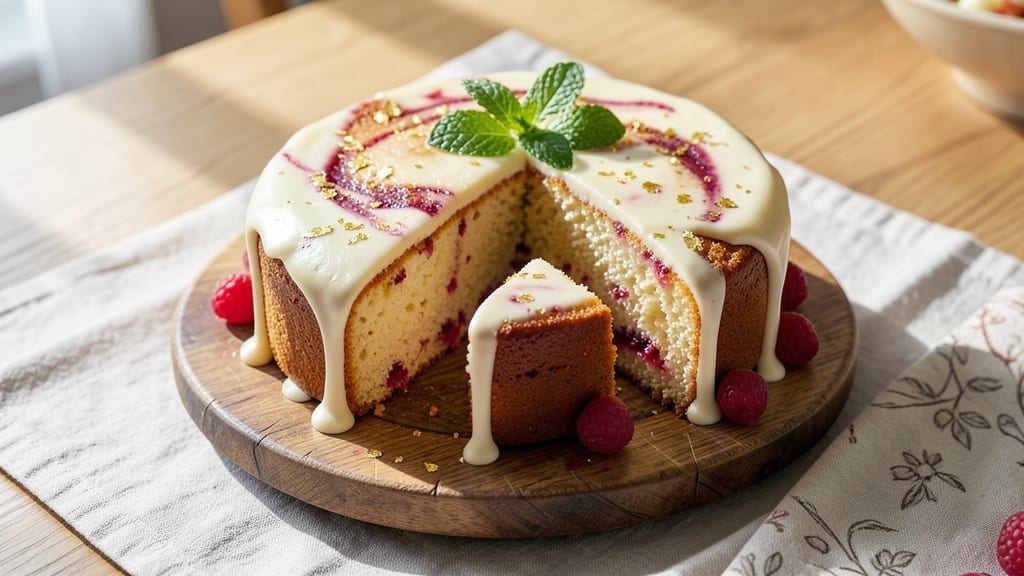
Mastering a 10-inch sponge cake recipe with light-as-air layers and vanilla infusion transforms any dessert into a showstopper. The secret lies in precise technique—whipping egg whites to stiff peaks and folding them into a delicate batter that rises effortlessly.
This recipe delivers professional-quality results with just 5 simple ingredients and 30 minutes of active time, perfect for special occasions or weekend baking projects.
What sets this sponge cake apart is its foolproof method for achieving consistent layers without dense centers. The vanilla infusion adds subtle depth, while the baking process ensures a golden, crackly top that hides nothing but perfection.
Whether you’re a beginner or an experienced baker, this technique delivers restaurant-quality cakes every time.
By the time you pull this cake from the oven, you’ll have a tender, fluffy masterpiece with layers so light they practically dissolve on the tongue. The vanilla flavor infuses gently, creating a delicate aroma that makes every slice feel like a celebration.
This is the kind of cake that makes guests ask for seconds—and the recipe that makes you the star of any dessert table.
Ready to impress? This recipe scales beautifully for decorations—add fresh berries, whipped cream, or chocolate ganache for an extra touch of elegance. The foundation is simple, but the results are anything but ordinary. Let’s create something extraordinary together.
Ingredients for 10 inch sponge cake
Five essential ingredients transform into a restaurant-quality 10-inch vanilla sponge cake with flawless layers.
| Ingredient | Amount | Notes |
|---|---|---|
| Large Egg Whites 🥚 | 8 whole | Room temperature, separated carefully |
| Granulated Sugar 🍚 | 1 ½ cups | Superfine preferred for even dissolving |
| All-Purpose Flour 🌾 | 1 cup | Sifted for lightness, sift again before folding |
| Unsalted Butter 🧈 | ½ cup | Cold, cubed, for vanilla infusion |
| Pure Vanilla Extract 🌿 | 1 tbsp | Bottled, Madagascar bourbon preferred |
| Cream of Tartar 🧂 | ¼ tsp | Stabilizes egg whites for stiff peaks |
| Salt 🧂 | ⅛ tsp | Fine sea salt for delicate flavor |
The egg whites are non-negotiable—room temperature and separated meticulously to avoid yolk contamination. For best results, use pasture-raised eggs from Whole Foods or your local farm market, as they whip to higher volume. The cream of tartar is your secret weapon here; it stabilizes the whites for those stiff, glossy peaks that hold their shape when folded. If you’re in a pinch, substitute with lemon juice at half the amount, though the flavor profile shifts slightly. For the flour, King Arthur brand is ideal—it’s finely milled and sifted, ensuring a light crumb. Pre-sift it twice to eliminate any lumps that could weigh down your delicate batter.
No superfine sugar? Pulse regular granulated sugar in a food processor for 30 seconds to break it down—this mimics the texture of superfine and dissolves more evenly. The butter must be cold and cubed for proper vanilla infusion; don’t skip this step, as it carries the flavor throughout the cake. Bottled vanilla extract from McCormick or Nielsen-Massey delivers consistent quality, but if you’re using vanilla bean paste, reduce to half a teaspoon to avoid overpowering the delicate batter. The salt is a game-changer—Diamond Crystal fine sea salt dissolves completely, preventing any graininess in your final product. For a nut-free option, ensure your vanilla extract is certified allergen-free, as some brands process in facilities with nuts.
Store the batter in an airtight container lined with parchment paper in the fridge for up to 24 hours before baking—this allows the flour to hydrate evenly, resulting in a more uniform texture. Once baked, let the cake cool completely on a wire rack before slicing; rushing this step causes the layers to collapse. For long-term storage, wrap the cooled cake tightly in plastic wrap and place it in a cool, dark pantry where it remains moist and tender for 3-4 days. To freeze, slice the cake first, wrap each piece individually, and store in a ziplock bag for up to 3 months—this preserves the delicate crumb structure perfectly.
Why You’ll Love This Recipe
- I’ll be real: beating those egg whites to stiff peaks feels like a workout, but once they’re glossy and hold their shape? The rest is smooth sailing. No mixer? A hand whisk works—just elbow grease and patience. That’s the trade-off for a cake so light, it practically melts in your mouth.
- No Whisk Fatigue: I’ll be real: beating those egg whites to stiff peaks feels like a workout, but once they’re glossy and hold their shape? The rest is smooth sailing. No mixer? A hand whisk works—just elbow grease and patience. That’s the trade-off for a cake so light, it practically melts in your mouth.
- Vanilla Buttercream Ready: Honestly, this cake is begging for a drizzle of vanilla buttercream. The recipe’s butter and vanilla extract in the batter mean you can whip up a quick glaze or frosting later—no extra ingredients needed. (Yes, even on a Tuesday night.)
- Birthday to Brunch: This 10-inch size is my go-to for celebrations and lazy mornings. Slice it for a crowd or save half for toast the next day. The flour-to-sugar ratio keeps it sturdy enough for layers but tender enough to eat straight from the pan.
Step-by-step instructions for light-as-air vanilla sponge cake
Mastering this technique transforms simple ingredients into ethereal layers with perfect structure.
Prepare the Vanilla Butter Infusion
In a small saucepan, melt the 0.5 cup unsalted butter over low heat until fully liquid but not browned. Remove from heat and stir in the 1 tablespoon pure vanilla extract. Let the mixture cool to room temperature while you prepare the egg whites – this ensures proper emulsification later. The butter should thicken slightly but remain spreadable.
Here’s the thing – the vanilla infusion happens during this cooling phase. The Madagascar bourbon vanilla’s complex notes will permeate the butter completely by the time you use it. If you’re impatient and use warm butter, you’ll risk melting the egg whites prematurely when you combine them later.
Whip Egg Whites to Stiff Peaks
In a spotlessly clean, grease-free mixing bowl, combine the 8 whole large egg whites, 0.25 teaspoon cream of tartar, and 0.125 teaspoon salt. Using a stand mixer with the whisk attachment, beat on medium speed until soft peaks form. Increase to high speed and gradually add the 1.5 cups granulated sugar, about 1 tablespoon at a time, ensuring each addition fully incorporates before adding the next.
You’re aiming for glossy, stiff peaks that hold their shape when the whisk is lifted. This typically takes 5-7 minutes total. The sugar should dissolve completely – if you see any graininess at the bottom, continue whipping. The meringue should be thick enough to hold a peak that stands straight up when you lift the whisk.
Fold in Flour and Vanilla Butter
Sift the 1 cup all-purpose flour directly over the meringue and gently fold using a spatula in a figure-eight motion, cutting through the center to incorporate from the bottom. Work quickly but carefully to maintain air incorporation. When about 75% of the flour is incorporated, add the cooled vanilla butter in dollops, continuing to fold until just combined.
The batter should be smooth with no visible flour streaks. Real talk – don’t overmix here. Each fold should lift the batter gently rather than deflate it. The final consistency should be like thick pudding that holds its shape when spooned. If the batter looks too thick, you’ve overfolded; if it’s runny, you haven’t incorporated enough.
Bake in a 10-Inch Pan
Preheat your oven to 350°F. Grease a 10-inch round cake pan with nonstick spray and dust with flour, tapping out any excess. Pour the batter evenly into the prepared pan and smooth the top with an offset spatula. Bake for 25-30 minutes until the top springs back when gently pressed and a toothpick inserted comes out clean.
Don’t open the oven during baking – the sudden temperature change can cause the cake to sink. The edges should pull away slightly from the pan, and the top should be golden but not browned. If you see the top browning too quickly, tent loosely with foil after 20 minutes. The cake is done when it passes both the spring test and clean toothpick test simultaneously.
Pro Tips For Making 10 Inch Sponge Cake
- Whip Whites to Stiff Peaks: Use a stand mixer with the whisk attachment—don’t go slower than speed 5. I learned this the hard way when my cake collapsed because the whites weren’t stiff enough. Fold them in gently but firmly, or you’ll deflate all that hard work.
- Sift Flour Like You Mean It: Don’t just dump it in. Sift the flour twice—once before mixing, once after—into the egg-white mixture. This cuts lumps and keeps the texture light. (Yes, even if you’re impatient like me, skip the shortcut.)
- Butter the Pan Then Dust: Warm the butter slightly, rub it all over the pan, then dust with flour—tap out the excess. The leftover flour on the counter? That’s how you end up with a cake sticking to the pan. Waste not, frustration not.
- Bake Until Springy, Not Golden: The cake’s done when it bounces back when pressed, not when it’s browned. Overbaking dries it out. If the top looks pale, tent foil loosely for the last 5 minutes—this keeps it tender without steaming it into a brick.
Troubleshooting this recipe
Dense Cake Texture
If your sponge cake turns out dense instead of light and airy, the most likely culprit is overmixing the egg whites. I’ve seen this happen when people use a hand mixer instead of a stand mixer—the extra friction from hand movements can deflate the meringue.
Always use a stand mixer with a whisk attachment and avoid whipping beyond stiff peaks. Another common mistake is adding sugar too quickly; incorporate it 1 tablespoon at a time to prevent graininess that weighs down the batter. 🥚
Cake Sinks or Collapses
Cakes that sink or collapse during baking usually suffer from one of two issues: opening the oven too soon or improperly cooling. Never open the oven door before the 25-minute mark—the sudden temperature change causes the cake to deflate.
Also, resist the urge to check doneness by pressing the top; use the toothpick test instead. After baking, let the cake cool in the pan for 10 minutes before transferring to a wire rack for complete cooling. This gradual temperature change preserves the structure.
Uneven Baking
Uneven baking—where the edges are done but the center stays raw—often happens when the oven isn’t properly calibrated. Preheat your oven for at least 30 minutes before baking to ensure even heat distribution.
If your oven runs hot, reduce the temperature to 325°F and check for doneness at the lower end of the time range (25 minutes). Another trick is to place a baking stone on the lower rack 20 minutes before preheating—this helps regulate heat and prevents hot spots. 🔥
Cracked Top or Soggy Layers
A cracked top usually means the cake baked too long or the oven was too hot. To prevent this, tent the cake with aluminum foil after 20 minutes if the top is browning too quickly.
For soggy layers, the issue is often underbaking—the cake needs to reach 205°F internal temperature at the center. If your cake pulls away from the pan but feels gummy, increase baking time by 2-3 minutes and check again.
Also, ensure your 10-inch pan is properly greased and floured to prevent sticking that can cause uneven heat distribution.
Batter Too Thin or Too Thick
If your batter is too thin, you likely didn’t fold the flour in enough—it should be thick enough to hold its shape when spooned. For a thicker batter, sift the flour twice and fold it in gently using a spatula in a figure-eight motion.
If the batter is too thick, it might mean the egg whites weren’t whipped enough or the flour was overmeasured. To fix this, whip the egg whites to stiffer peaks and ensure you’re using 1 cup of flour measured correctly (spoon and level). 💡
Vanilla Flavor Missing
The vanilla flavor can disappear if the butter wasn’t infused properly. Always let the vanilla butter mixture cool completely to room temperature before folding it into the batter—warm butter melts the egg whites prematurely.
For extra depth, use Madagascar bourbon vanilla extract and infuse the butter for at least 10 minutes off the heat. If you’re using vanilla bean paste, reduce the amount to ½ teaspoon to avoid overpowering the delicate batter.
Also, ensure your vanilla extract is pure—some imitation extracts lack the complex notes needed for proper infusion.
Nutrition facts
Frequently asked questions
Can I make this sponge cake in a different sized pan?
Yes, but adjust the baking time and oven temperature accordingly. For an 8-inch pan, bake at 350°F for 20-25 minutes, while a 12-inch pan requires 325°F for 30-35 minutes. Always use the toothpick test to check doneness. The batter quantity remains the same—just scale the pan size to maintain the same thickness (1-1.5 inches) for even baking.
How do I store leftover sponge cake?
For short-term storage, keep the cake in an airtight container at room temperature for up to 2 days. For longer storage, slice the cake and freeze individual portions in ziplock bags for up to 3 months. Thaw frozen slices at room temperature for 1-2 hours before serving. Avoid refrigerating whole cakes—this can make them dry out faster.
Why does my cake have tunnels or large holes?
Tunnels usually appear when the batter is overmixed or folded too vigorously, causing air pockets to collapse. Always use a spatula for gentle folding in a figure-eight motion, and avoid overwhipping the egg whites beyond stiff peaks. Another cause is underbaked cake—ensure the center reaches 205°F before removing from the oven.
Can I substitute butter for oil in this recipe?
No, this recipe relies on the flavor and texture butter provides. Butter creates a more delicate crumb and carries the vanilla infusion beautifully. If you must substitute, use an equal amount of melted coconut oil, but note the flavor will be slightly different. The cake may also be slightly denser without butter’s moisture content.
How do I make this cake gluten-free?
Replace the 1 cup all-purpose flour with a 1:1 gluten-free baking flour blend like Bob’s Red Mill or King Arthur. Add ½ teaspoon xanthan gum to improve structure. Sift the gluten-free flour twice and fold it into the meringue gently to maintain airiness. Expect a slightly denser texture, but the cake will still be delicious.

- 3lb Prime Rib Roast Recipe: Juicy Pink Center Guaranteed in 3 Hours - October 31, 2026
- 5 Spice Cake Recipe: Warmly Spiced Layers With Crunchy Top - October 31, 2026
- 1950’s Macaroni and Cheese Recipe: Nostalgic Creamy Cheese Sauce with Buttery Noodles - October 31, 2026