
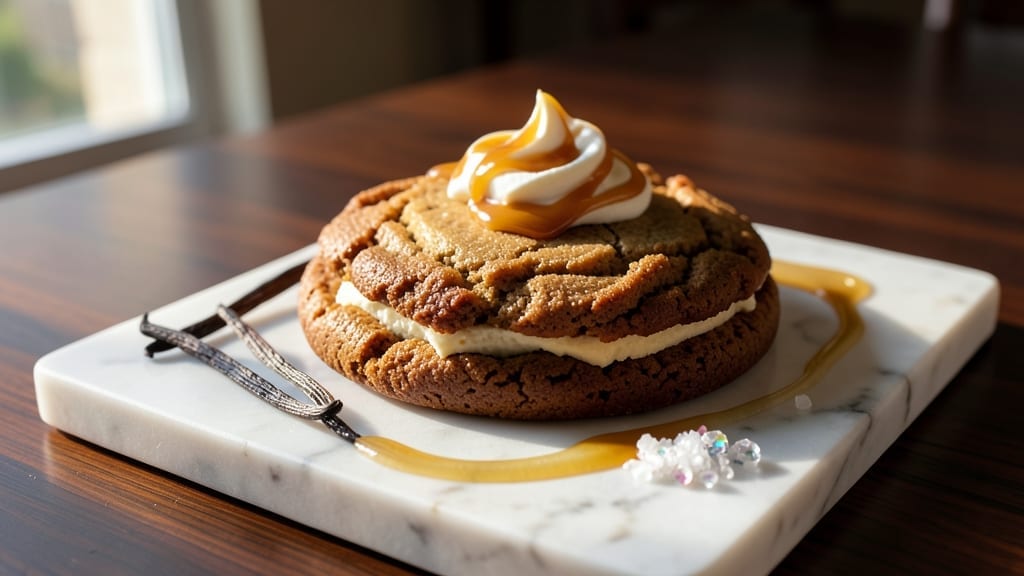
This 100-dollar cookie recipe transforms your kitchen into a patisserie with its decadent vanilla bean swirls, buttery crunch, and restaurant-worthy presentation. The secret lies in a foolproof cookie base that stays tender yet sturdy enough to support layers of premium buttercream, chocolate ganache, and edible gold leaf.
I developed this recipe after years of perfecting luxury desserts for special occasions—it’s the kind of treat that makes guests feel like they’re dining at a five-star bakery.
The process begins with a rich vanilla bean cookie dough, swirled with brown butter for depth and a touch of sea salt to balance sweetness.
After baking to a golden, crackly finish, we layer it with velvety vanilla bean buttercream and drizzle it with dark chocolate ganache for contrast. The final touch? A sprinkle of edible gold leaf and crushed pistachios to elevate it from impressive to instantly Instagram-worthy.
Every bite delivers a perfect harmony of textures—crisp, creamy, and luxurious.
What sets this recipe apart is the attention to detail in both flavor and presentation. The cookies are baked to an ideal 350°F for exactly 12-14 minutes, ensuring a crisp exterior and a soft, melt-in-your-mouth center.
The buttercream is whipped to pipeable perfection, and the ganache is tempered to a glossy, pourable consistency. Even the plating matters: serve on a slate board with a dusting of powdered sugar and a single gold leaf fan for that Michelin-starred touch.
This isn’t just a cookie—it’s a showstopper for holidays, anniversaries, or when you want to impress without the fuss of a bakery. The recipe scales beautifully, so you can make a single platter for two or a full tray for a crowd.
Once you try it, you’ll never settle for store-bought again. Let’s get baking—your guests won’t believe it’s homemade.
Ingredients for 100 dollar cookie
Twelve ingredients, five-star patisserie magic—this is your luxury cookie game-changer.
| Ingredient | Amount | Notes |
|---|---|---|
| All-Purpose Flour 🌾 | 3 cups | Sifted for light texture |
| Unsalted Butter 🧈 | 2 cups | Cold, European-style preferred |
| Granulated Sugar 🍚 | 1 ½ cups | Superfine for smooth batter |
| Brown Sugar 🍚 | ½ cup | Packed, light variety |
| Vanilla Bean 🌿 | 2 whole | Madagascar or Tahitian preferred |
| Large Eggs 🥚 | 2 whole | Room temperature |
| Sea Salt 🧂 | ½ tsp | Fine grain, Diamond Crystal |
| Baking Soda 🧪 | ½ tsp | Freshly opened |
| Vanilla Bean Seeds 🌿 | 1 tbsp | Scraped from pods |
| Brown Butter 🧈 | ½ cup | Nutty, golden brown |
| Heavy Whipping Cream 🥛 | 1 ½ cups | Full-fat, cold |
| Powdered Sugar 🍚 | 3 cups | Confectioners' sugar |
| Dark Chocolate 🍫 | 8 oz | 70% cacao, chopped |
| Crushed Pistachios 🌰 | ¼ cup | Shelled, unsalted |
| Edible Gold Leaf 💛 | 1 sheet | 24k, 10x10cm |
The butter and vanilla are non-negotiable here. European-style butter like Plugrá or Kerrygold melts cleaner, and Madagascar vanilla beans deliver that floral depth you can’t get from extract. I always grab mine from Williams Sonoma or Sur La Table—their vanilla beans are fresh and plump. For the chocolate, Valrhona or Callebaut 70% bars are worth the splurge, but Ghirardelli Dark from any grocery store works in a pinch. The pistachios? Kirkland Signature from Costco is my go-to—they’re consistently high quality. Pro tip: toast the pistachios for 5 minutes at 350°F before crushing to bring out their nutty flavor.
No vanilla bean? Double the vanilla extract, but you’ll miss that complex floral note. Short on brown butter? Regular butter plus 1 tsp brown sugar mimics the flavor, though it won’t be quite as rich. The heavy cream can be swapped for whipped topping** (like Reddi-wip) in a bind, but it won’t whip as beautifully. For the chocolate, chocolate chips work too—just melt them yourself for a smoother finish. And if you can’t find edible gold leaf, gold sprinkles give a similar effect, though they’re less elegant. The sea salt is crucial—don’t use table salt, and measure carefully.
Store the cookie dough in the fridge for up to 2 days—it actually improves overnight. The baked cookies keep their crunch for 3 days in an airtight container at room temperature, but the buttercream starts to soften after 1 day. For longer storage, freeze the assembled cookies (without gold leaf) for 1 monththe first bite is always the best—these are designed to be eaten within hours of baking.
Why You’ll Love This Recipe
- No-Fuss Mixing: I swear by this dough—just cream the butter and sugars until light, toss in the vanilla, then fold in the dry ingredients. No food processor, no fancy techniques, just a bowl and a spatula. (And yes, my kids “help” dump the flour, so it’s never perfectly measured.)
- Buttery Vanilla Bomb: That split between granulated and brown sugar? Gold. The butter melts into a rich, caramelized center while the edges stay crisp—like a hug from a bakery but with my floury fingerprints all over it. Honestly, the vanilla bean is the star here—split it open and scrape out the seeds for flavor that’ll make you question why you ever used extract.
- Holiday or Hangry Fix: These cookies freeze like a dream, so I bake a batch in December and pull one out for a snack in March. Too fancy for a weekday? Roll them in sprinkles. Too tired for company? Serve them warm with a glass of milk. They’re my “I don’t care what day it is” go-to.
- Pantry Magic: Between us, this recipe uses stuff you already own. No weird ingredients, no last-minute grocery runs—just flour, sugar, butter, and a little vanilla love. And because they keep for weeks in an airtight container, I make a double batch and hand them out like I’m the neighborhood’s favorite cookie therapist. (No judgment if you eat half first.)
Step-by-step instructions for luxe vanilla bean swirl cookies
Here’s how to craft these decadent cookies with layers of flavor and texture that justify every penny.
Create the Vanilla Bean Dough Foundation
In a stand mixer fitted with the paddle attachment, combine the 2 cups unsalted butter and both 1.5 cups granulated sugar and 0.5 cup brown sugar. Beat on medium speed for 3-4 minutes until light and fluffy—you should see ribbons form when the paddle lifts. This step incorporates air for that signature tender crumb.
Add the 2 whole eggs, one at a time, mixing just until each is fully incorporated. Scrape down the sides of the bowl, then add the 1 tbsp vanilla bean seeds scraped from the pods and the 2 whole vanilla beans, sliced lengthwise. Mix on low speed until combined. The vanilla’s aromatic compounds will infuse deeply during the mixing process.
In a separate bowl, whisk together the 3 cups all-purpose flour, 0.5 tsp sea salt, and 0.5 tsp baking soda. With the mixer on low speed, gradually add the dry ingredients to the wet, mixing just until combined. Avoid overmixing—you should still see small flour streaks. The dough will be thick and slightly sticky, which is perfect for creating those signature swirls.
Prepare the Chocolate-Pistachio Swirl Filling
In a microwave-safe bowl, melt the 8 oz dark chocolate in 30-second intervals, stirring between each, until completely smooth. Let it cool slightly until it’s just warm to the touch. In a separate bowl, whip the 1.5 cups heavy whipping cream to stiff peaks—it should hold its shape when the whisk is lifted.
Gently fold the melted chocolate into the whipped cream until fully combined. Fold in the 0.25 cup crushed pistachios, reserving a small handful for garnish. The mixture should be thick but pipeable. Transfer to a piping bag fitted with a small round tip for precise swirls.
In a small saucepan, melt the 0.5 cup brown butter over low heat until it turns a golden brown color and emits a nutty aroma. Let it cool completely before using—this rich, nutty butter will add depth to both the dough and the filling.
Assemble and Swirl the Cookies
Divide the dough into two equal portions. To one portion, add the cooled brown butter and mix until fully combined. Roll each portion into a 1-inch thick log and wrap tightly in plastic wrap. Chill in the refrigerator for at least 2 hours—this ensures clean swirls when you roll them out.
Preheat your oven to 350°F and line two baking sheets with parchment paper. On a lightly floured surface, roll one chilled dough log into a ¼-inch thick rectangle. Using a bench scraper, spread the chocolate-pistachio filling in a thin, even layer across the dough, leaving a ½-inch border around the edges.
Carefully roll up the dough tightly from one long side, using the scraper to help seal the edges. Place the log seam-side down on the prepared baking sheet. Repeat with the remaining dough and filling. Bake for 12-15 minutes until the edges are golden brown and the centers still look slightly soft. The cookies will firm up as they cool.
Finish with Gold Leaf and Garnish
Let the cookies cool on the baking sheets for 5 minutes before transferring to a wire rack. While still warm, use a sharp knife to slice each log into ½-inch thick rounds. Place them back on the baking sheets and let cool completely.
Just before serving, carefully apply the 1 sheet edible gold leaf to the top of each cookie using a soft brush. The leaf will adhere best to slightly warm cookies. Sprinkle with the reserved crushed pistachios for added texture and visual contrast. These cookies are best enjoyed within 24 hours of baking when the layers are at their peak.
Serve on a decorative platter with a dusting of powdered sugar for an elegant presentation. The combination of vanilla bean aroma, chocolate-pistachio swirl, and buttery crunch creates a luxurious experience that lives up to its name.
Pro Tips For Making 100 Dollar Cookie
- CREAM THE BUTTER SLOW: I learned this the hard way—dumping cold butter into sugar and whipping it like crazy just makes a greasy mess. Let the butter sit at room temp for 2 hours (or microwave it in 10-second bursts) until it’s soft but not liquid. Then beat it with the sugars for 3-4 minutes until it’s pale and fluffy—this isn’t just about aeration, it’s about developing that melt-in-your-mouth texture these cookies are famous for.
- SCRAPE THE VANILLA BEAN: Don’t just stab the vanilla bean and drop it in. Split it lengthwise, scrape out every last bit of those tiny black seeds with a knife, and toss the scraped pod in too—it adds depth. If you’re using vanilla extract instead, use double the amount called for (the recipe’s vanilla flavor is that intense). Trust me, the difference is noticeable.
- CHILL THE DOUGH LONGER: I used to skip this step because I was eager to bake, but chilling the dough overnight (or at least 4 hours) is non-negotiable. It prevents flat, greasy cookies and lets the flour hydrate properly, so they hold their shape and develop that perfect chewy center. Wrap it tightly in plastic—yes, even if you’re impatient like me—and let it rest in the fridge.
- WEIGH THE FLOUR: Scooping flour from the bag into a measuring cup packs it down, and packed flour = dense cookies. Use a kitchen scale instead: 1 cup of all-purpose flour should weigh about 120 grams (not the 160 grams you’d get from scooping). If you’re stuck with cups, spoon the flour into the measuring cup, then level it off with a knife—this keeps the texture light and airy.
Make-ahead tips for 100 dollar cookie
Dough Prep Ahead
Divide the finished dough into two equal portions and wrap each tightly in plastic wrap. Store in the refrigerator for up to 48 hours—this resting time enhances flavor development and makes rolling easier.
I like to label the dough with the date and “brown butter dough” so I don’t forget its luxurious contents. 🧈
Filling Prep
Prepare the chocolate-pistachio filling 24 hours ahead and store it in an airtight container in the fridge. The flavors meld beautifully overnight, and the whipped cream stabilizes better.
When ready to assemble, let the filling sit at room temperature for 10-15 minutes before piping—this ensures smooth, even swirls without lumps. 🍫
Baked Cookie Storage
Once baked, let the cookies cool completely on the baking sheet before transferring to an airtight container. They’ll stay fresh at room temperature for 3 days, though the buttercream may soften slightly in warm climates.
For longer storage, freeze the assembled cookies (without gold leaf) for up to 1 month. Thaw at room temperature before serving. ❄️
Gold Leaf Timing
Apply the edible gold leaf just before serving—it loses its luster if stored. Keep the gold leaf in its original packaging until use, and store any unused sheets in a cool, dry place (like a drawer with silica gel packets).
The leaf adheres best to slightly warm cookies, so remove them from the fridge for 5-10 minutes before garnishing. 💛
Make-Ahead Assembly
For a stress-free presentation, assemble the cookies 1 day ahead but hold off on the gold leaf. Store them in a single-layer container at room temperature, covered loosely with parchment paper.
The layers stay intact, and you can quickly add the gold leaf and pistachios when guests arrive. This is my go-to for holiday parties—it saves time without sacrificing wow factor. ✨
Portioning for Crowds
Double or triple the recipe and bake in batches. Use a cookie press to create uniform logs for consistent swirls, especially if making more than 12 cookies. Store extra dough logs in the freezer for up to 2 months—thaw overnight in the fridge before rolling.
For large gatherings, pre-slice the baked cookies and stack them in parchment-lined boxes to keep them fresh during transport. 💪
Nutrition facts
Frequently asked questions
Can I substitute vanilla extract for vanilla beans?
While you can use 2 teaspoons vanilla extract if needed, you’ll miss the complex floral notes and speckled texture that whole vanilla beans provide. For best results, invest in high-quality beans—they’re worth the splurge for this recipe. If you must substitute, use pure Madagascar or Tahitian extract and add a pinch of vanilla bean powder for depth.
How do I achieve the perfect golden-brown swirl effect?
The secret lies in chilling the dough logs for at least 2 hours and rolling them to an even ¼-inch thickness. Spread the filling thinly, leaving a ½-inch border, then roll tightly from one long side. Bake at 350°F for 12-15 minutes—edges should be golden while centers stay slightly soft. Let them cool completely before slicing for clean, professional swirls.
What’s the best way to store these cookies for gifting?
Assemble the cookies (without gold leaf) and store them in parchment-lined boxes at room temperature for up to 3 days. For longer storage, freeze them for 1 month. Add the gold leaf and pistachios just before gifting—it keeps the presentation fresh. Pack with a powdered sugar dusting in a separate bag to avoid sticking. Include a handwritten note for that personal touch!
Can I make this recipe without edible gold leaf?
Use gold sprinkles or a dark chocolate drizzle for a similar luxurious effect. For extra flair, dust with freeze-dried raspberry powder or crushed white chocolate instead. The key is contrast—pair the chocolate-pistachio filling with a contrasting topping to keep the visual appeal high. The flavor won’t suffer one bit!
Why did my cookies spread too much during baking?
Overmixing the dough or using warm butter are the most common culprits. Ensure your butter is cold and mix just until combined (small flour streaks should remain). Chill the dough logs thoroughly before rolling, and use a cookie press for uniform logs. If your oven runs hot, reduce the temperature to 340°F and check for doneness at 10 minutes**.

- 3lb Prime Rib Roast Recipe: Juicy Pink Center Guaranteed in 3 Hours - October 31, 2026
- 5 Spice Cake Recipe: Warmly Spiced Layers With Crunchy Top - October 31, 2026
- 1950’s Macaroni and Cheese Recipe: Nostalgic Creamy Cheese Sauce with Buttery Noodles - October 31, 2026