
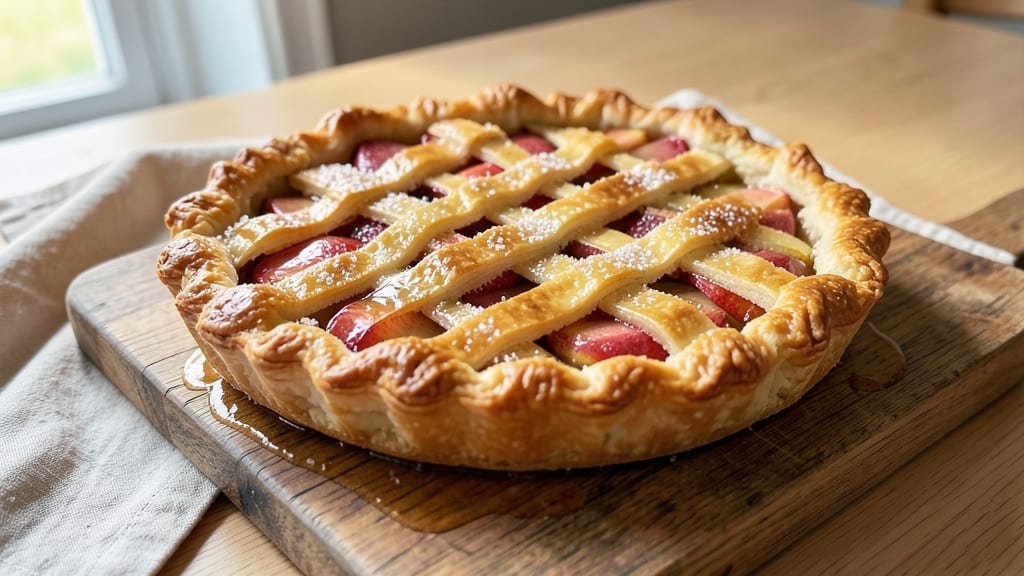
This 12-inch apple pie recipe delivers the perfect balance of buttery, flaky lattice crust and warm, spiced apple filling that bakes to golden perfection. 🍏 The secret lies in a cold butter crust that yields tender, crisp layers and a filling that stays thick and fragrant without turning soggy.
I’ve perfected this recipe over years of baking, ensuring every slice delivers that satisfying contrast of crisp crust and tender fruit.
What sets this recipe apart is the lattice crust, which creates a beautiful pattern while allowing steam to escape, preventing a soggy bottom. The filling combines tart and sweet apples with cinnamon, nutmeg, and just enough sugar to caramelize naturally during baking.
A touch of cornstarch ensures the filling sets properly while maintaining that classic pie texture. With a 30-minute prep time and 50-minute bake, this pie is perfect for special occasions or weekend baking.
By the time it emerges from the oven, you’ll have a pie with a golden brown crust, fragrant steam rising from the lattice, and filling that’s just thick enough to hold its shape.
The apples stay tender while developing deep caramel notes, and the crust maintains its flaky texture even after cooling. This is the kind of pie that makes your house smell like autumn and leaves everyone asking for seconds.
Serve warm with a scoop of vanilla ice cream or a dollop of whipped cream for the ultimate dessert experience. The lattice design makes it visually stunning as well as delicious, perfect for holidays or family gatherings. Here’s how to make it—step by step—for a pie that’s worth every bite.
Ingredients for 12 inch apple pie
Buttery crust, spiced apples, and golden lattice—just 14 ingredients for pie perfection.
| Ingredient | Amount | Notes |
|---|---|---|
| All-Purpose Flour 🌾 | 3 cups | Sifted for lighter texture |
| Unsalted Butter 🧈 | 1 cup | Cold, cubed for flakiness |
| Granulated Sugar 🍚 | ¾ cup | White or light brown |
| Large Eggs 🥚 | 1 whole | Cold for easier handling |
| Ice Water 💧 | ¼ cup | Chilled for dough stability |
| Salt 🧂 | ½ tsp | Fine sea salt preferred |
| Granulated Sugar 🍚 | 1 cup | For filling (white or light brown) |
| Cornstarch 🌾 | ¼ cup | Prevents soggy filling |
| Ground Cinnamon 🍃 | 2 tsp | Freshly ground preferred |
| Ground Nutmeg 🌿 | ½ tsp | Freshly grated nutmeg |
| Allspice 🌶️ | ¼ tsp | Or pinch of ground cloves |
| Mixed Apples 🍏 | 6 medium | Tart/sweet combo (e.g., Granny Smith + Honeycrisp) |
| Lemon Juice 🍋 | 1 tbsp | Freshly squeezed |
| Vanilla Extract 🌸 | ½ tsp | Pure vanilla preferred |
The butter is non-negotiable here. European-style unsalted butter (like Plugrá) gives that signature flakiness, but any good brand works if it’s cold. I always buy extra because it makes everything better. For the apples, mix tart and sweet varieties—Granny Smith keeps the filling firm, while Honeycrisp adds natural sweetness. Walmart or Costco usually have great prices on bulk apples, and the produce section at Trader Joe’s is my go-to for pre-washed convenience. If you can’t find allspice, a pinch of ground cloves works just as well—it’s all about that warm spice profile.
No all-purpose flour? Bread flour plus 1 tbsp cornstarch gives you that same tender texture. Running short on butter? Shortening works too, though it won’t be as flavorful. The cornstarch in the filling is crucial—it’s what keeps that perfect thick consistency. No cornstarch? Arrowroot powder at the same amount does the trick. For the apples, peeling is optional—I usually leave the skins on for extra fiber and color, but peel if you prefer a smoother texture. And if you’re feeling fancy, toss the sliced apples with a little extra lemon juice to keep them from browning while you work.
Keep the butter and flour mixture cold—wrap it in plastic and refrigerate for 30 minutes before rolling. The dough can be made a day ahead and stored wrapped tightly in the fridge for 24 hours. For the filling, mix everything together and let it sit for 15-20 minutes before baking—this helps the apples release their juices and develop those beautiful caramel notes. Leftovers? Store in an airtight container for 4 days, or freeze the whole pie for up to 3 months. Just thaw overnight in the fridge before reheating.
Why You’ll Love This Recipe
- No-Roll Shortcut Crust: I swear by this butter-and-flour mix—just pulse it in a food processor with ice water until it clumps. No rolling pin, no stress, and the flaky layers? Still chef’s kiss every time.
- Sweet-Tart Magic: That balance of granulated sugar and cinnamon in the filling? It’s the kind of flavor that makes you pause mid-slice. The butter in the crust melts into the apples, turning every bite into a warm hug.
- Weeknight Crowd-Pleaser: Perfect for game days, book club gatherings, or just because. A single 12-inch pie feeds six heartily, and it’s the one dessert that everyone actually finishes. (No sad, half-eaten cheesecake here.)
- Budget-Friendly Leftovers: Flour, butter, sugar—these are pantry staples that won’t break the bank. Plus, that pie keeps for days, so you’re not scrambling to bake again. Reheat slices with a sprinkle of powdered sugar? Instant dessert revival.
Step-by-step instructions for 12-Inch apple pie with lattice crust
Here’s how to build a showstopping pie with perfect flaky layers and spiced filling.
👨🍳 Step 1: Make the Crust Dough for Maximum Flakiness
In a large bowl, combine the 3 cups all-purpose flour and 0.5 teaspoon salt. Cut in the 1 cup unsalted butter (cold and cubed) using a pastry cutter or your fingers until the mixture resembles coarse crumbs with pea-sized butter pieces. This texture is crucial—it creates those signature flaky layers.
Add the 0.75 cup granulated sugar and mix until evenly distributed. Make a well in the center and add the 1 whole large egg and 0.25 cup ice water. Using a fork, gently stir until the dough just comes together—don’t overmix or you’ll develop gluten and lose that tender texture. Divide the dough into two equal discs, wrap each in plastic, and chill for at least 2 hours (or up to 2 days). The cold dough is easier to roll and prevents shrinking.
🍳 Step 2: Prepare the Spiced Apple Filling
Peel, core, and slice the 6 medium mixed apples into ¼-inch thick slices. Toss them immediately with 1 tablespoon lemon juice to prevent browning. In a large bowl, combine the sliced apples with 1 cup granulated sugar, 0.25 cup cornstarch, 2 teaspoons ground cinnamon, 0.5 teaspoon ground nutmeg, 0.25 teaspoon allspice, and 0.5 teaspoon vanilla extract. Mix gently but thoroughly to coat each apple slice evenly.
Transfer the apple mixture to a 9-inch pie dish and arrange the slices in a single layer, slightly overlapping. Press down gently to create a compact filling—this prevents the apples from floating to the top during baking. The filling should look like a perfect apple mosaic when viewed from above.
🥘 Step 3: Roll Out and Assemble the Crust
On a lightly floured surface, roll out one of the chilled dough discs into a 12-inch circle (about ⅛-inch thick). Gently fold the dough in half, then in half again to make handling easier. Unfold and carefully drape it over the filled pie dish, letting it extend 1 inch beyond the edges. Trim any excess dough hanging over the edge.
For the lattice top, roll out the second dough disc to 12×18 inches. Using a sharp knife or pizza cutter, make 8 vertical cuts (about 1½ inches apart). Then make 7 horizontal cuts (about 1½ inches apart), alternating the cuts so they don’t line up. This creates the classic lattice pattern. Unfold the lattice and carefully place it over the pie, pressing the edges to seal completely. Crimp the outer edge with a fork or your fingers for a decorative finish.
🔥 Step 4: Bake Until Golden and Bubbling
Preheat your oven to 375°F. Place the assembled pie on a baking sheet lined with parchment paper (this prevents soggy bottoms). Cut a few small slits in the top crust to allow steam to escape. Bake for 50-60 minutes until the crust is deep golden brown and the filling is bubbling through the lattice openings.
I know it’s tempting to peek early, but resist! The pie needs that full baking time to develop proper texture. For the last 10-15 minutes, you might see the lattice darken—this is perfect. The filling should be tender when pierced with a knife, with just a hint of resistance in the center. If the edges brown too quickly, cover them loosely with aluminum foil.
⏰ Step 5: Cool and Serve for Perfect Texture
Remove the pie from the oven and let it cool on a wire rack for at least 2 hours before slicing. This resting period allows the filling to set properly and prevents a runny mess. The lattice will crisp up even more as it cools, creating that beautiful contrast between tender apples and crisp crust.
Slice into 8 equal wedges and serve warm with a scoop of vanilla ice cream or whipped cream. The aroma alone will have everyone gathering around—this pie delivers on all promises of flaky crust, spiced filling, and that perfect balance of sweet and tart.
Pro Tips For Making 12 Inch Apple Pie
- Chill the Dough Properly: Pop your pie crust into the fridge for at least 30 minutes before rolling—this isn’t just a suggestion, it’s the thing that keeps your crust from shrinking like a sad balloon. I learned this the hard way when my first attempt looked like a sad, lopsided hat instead of a proper 12-inch circle.
- Cut Butter Cold, Not Soft: Use your unsalted butter straight from the fridge, cut into small cubes no bigger than a pea. Warm butter = tough crust, and nobody wants that. My grandmother swore by this, and she was right: the flakiness comes from tiny, icy butter pieces melting just enough in the oven.
- Prevent a Soggy Bottom: Blind-bake your bottom crust for 8-10 minutes with pie weights or dried beans before adding the filling—yes, even if you’re impatient like me. This guarantees a crisp base, not a mushy mess. (Pro move: Sprinkle a little sugar on the crust before baking for extra color.)
- Use Ice Water Sparingly: Measure your ice water precisely—just enough to hold the dough together without making it gummy. Too much water = tough crust; too little = dry, crumbly dough. I was skeptical until I tried it: the perfect balance is about 4-5 tablespoons, no more.
Perfect pairings for this 12 inch apple pie
Ice Cream Pairings
Vanilla bean ice cream is the classic choice—its creamy sweetness complements the pie’s spiced apples beautifully. I always use Häagen-Dazs Vanilla Bean or Ben & Jerry’s Vanilla for that rich, velvety texture.
For a twist, try cinnamon-infused vanilla ice cream to echo the pie’s warm spices. Serve a scoop alongside each slice to balance the tartness with cool, sweet cream. 🍦
Whipped Cream Options
Lightly sweetened whipped cream adds a cloud-like contrast to the pie’s dense filling. For extra flair, infuse the cream with ½ teaspoon vanilla extract or a pinch of cinnamon.
I love using Reddi-wip Vanilla for convenience or homemade whipped cream with heavy whipping cream and a touch of powdered sugar. A dollop on each slice makes every bite feel special.
Caramel Drizzle
Warm salted caramel drizzled over the pie adds a luxurious touch. I make my own with 1 cup granulated sugar, ½ cup heavy cream, and ¼ cup unsalted butter, simmered until golden.
For store-bought ease, Trader Joe’s Salted Caramel Sauce works perfectly. Drizzle just before serving to keep the crust crisp. The salt enhances the caramel’s sweetness while cutting through the pie’s richness.
Cheese Pairings
Sharp cheddar or brie adds a savory contrast that elevates the pie. I recommend Aged White Cheddar (like Cabot) or Brie for melting. Serve small cubes alongside the pie for guests to add to their plates.
The cheese’s tanginess balances the sweetness, creating a sophisticated flavor profile. For a lighter option, try goat cheese with honey drizzled on top.
Seasonal Variations
In summer, serve the pie with lemon sorbet to refresh the palate between bites. For autumn, pair it with spiced apple cider or pumpkin spice whipped cream.
In winter, a dark chocolate ganache drizzle adds decadence. Each pairing enhances the pie’s natural flavors while adapting to the season’s mood. 🍂
Beverage Pairings
A cup of chai tea or hot apple cider complements the pie’s warm spices beautifully. For coffee lovers, espresso cuts through the sweetness. I also enjoy a glass of dry Riesling—its acidity balances the pie’s richness.
For non-alcoholic options, sparkling apple cider adds a festive touch. The right drink completes the dessert experience. 🍷
Nutrition facts
Frequently asked questions
Can I use store-bought crust instead of homemade?
For convenience, use a pre-made pie crust from brands like Pillsbury or Whole Foods. Just chill it for 30 minutes before assembling to prevent shrinking. If using frozen crust, thaw it completely first—cold dough can make rolling difficult. The lattice technique works perfectly with store-bought dough too!
What’s the best way to prevent a soggy bottom?
Prevent soggy bottoms with these tricks: 1) Pre-bake the crust for 10 minutes at 375°F before adding filling, 2) Use a pie dish with a rim (like a standard 9-inch pie pan) to hold the filling, and 3) Add a thin cornstarch layer (1 tbsp) between crust and filling. Chill the pie for 15 minutes before baking to help the filling set faster.
How do I make the lattice crust look perfect?
For clean lattice lines, use a sharp knife or pizza cutter and press firmly but don’t cut all the way through. Alternate vertical and horizontal cuts so they don’t line up. When weaving, start with the second strip from the left—this creates a more stable pattern. Brush the lattice with egg wash (1 egg + 1 tbsp water) before baking for extra shine.
Can I make this pie ahead of time?
Yes! Assemble the pie (unbaked) and refrigerate for up to 24 hours before baking. For best results, bake it 1-2 hours before serving so the filling has time to set. You can also freeze the unbaked pie (wrapped tightly) for up to 3 months. Thaw overnight in the fridge before baking. The crust may need 5-10 extra minutes if frozen.
What if my apples are too watery?
If your filling releases too much liquid, try these fixes: 1) Increase cornstarch to ⅓ cup, 2) Add 1 tbsp lemon juice to the filling to help thicken, or 3) Pre-cook the apples for 5 minutes before assembling. For extra insurance, sprinkle 1 tbsp sugar over the filling before adding the top crust—this helps absorb moisture during baking.

- 6 Egg Cake Recipe with Oil: Light as Air With Buttery Moisture - October 4, 2026
- 4 Bean Casserole Recipe: One-Pan Heartiness With Smoky Paprika Depth - October 4, 2026
- 3-Ingredient Keto Mug Cake Recipe: Microwave Magic in 2 Minutes - October 4, 2026