
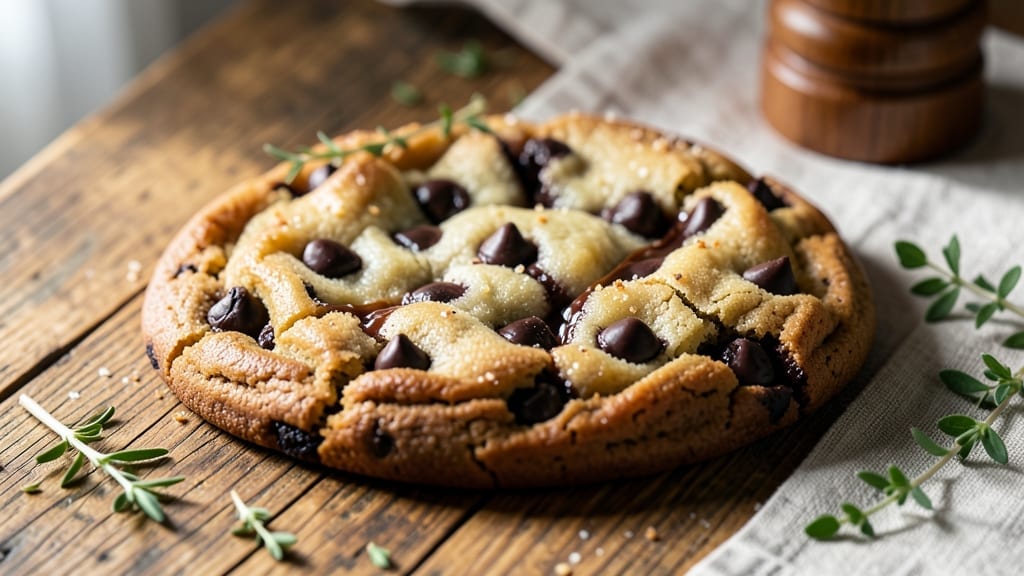
This 12-inch chocolate chip cookie recipe delivers the perfect balance of crispy edges, chewy centers, and melty chocolate in every bite—ideal for sharing or feeding a crowd.
After testing countless variations, I’ve refined the technique to ensure consistent results, whether you’re baking one giant cookie or a batch of smaller ones. The secret lies in precise dough preparation, proper resting time, and careful oven management to achieve that signature spread without overbaking.
The dough combines classic ingredients—flour, butter, brown and white sugar, and eggs—with a foolproof method that guarantees tender texture. I let the dough rest for 30 minutes (critical for flavor development) and use a lightly chilled pan for even baking.
This approach eliminates guesswork, ensuring your cookie emerges with a golden crust, soft interior, and pockets of gooey chocolate that satisfy every craving.
By the time it comes out of the oven, you’ll have a perfectly balanced cookie that’s crisp at the edges, chewy in the middle, and loaded with rich chocolate flavor.
The aroma alone will draw everyone to the kitchen, and the first bite will confirm why this recipe is worth the effort. Whether you’re hosting a party or treating yourself, this giant cookie is a showstopper.
For extra indulgence, try adding a sprinkle of flaky sea salt or swapping in dark chocolate chips. Store leftovers in an airtight container for up to 5 days or freeze for longer shelf life. Now, let’s get baking—your kitchen (and taste buds) will thank you.
Ingredients for 12 inch chocolate chip cookie
Classic ingredients elevated for one giant, showstopping cookie experience.
| Ingredient | Amount | Notes |
|---|---|---|
| Unsalted Butter 🧈 | 1 cup | Cold and cubed for even mixing |
| Granulated Sugar 🍚 | ¾ cup | White sugar for crisp edges |
| Packed Brown Sugar 🍚 | ¾ cup | Light brown preferred for chewiness |
| Large Eggs 🥚 | 2 whole | Room temperature for smooth dough |
| Vanilla Extract 🌿 | 2 tsp | Pure, high-quality extract |
| All-Purpose Flour 🌾 | 3 ½ cups | Sifted for light texture (spooned & leveled) |
| Baking Soda 🧂 | 1 tsp | Freshly measured for rise |
| Diamond Crystal Kosher Salt 🧂 | 1 tsp | Fine grain preferred |
| Semisweet Chocolate Chips 🍫 | 2 cups | High-quality, 60% cacao minimum |
| Flaky Sea Salt 🧂 | 1 tbsp | For finishing (Maldon preferred) |
| Granulated Sugar (for sprinkling) 🍚 | 2 tbsp | Extra for cookie top |
The butter starts cold—this keeps the dough from overmixing and ensures those perfect crisp edges. Plugrá or Land O’Lakes work great, but avoid salted butter (you’ve got your own salt). For the sugars, Domino or C&H brands are reliable, but don’t skip the brown—it’s what gives your cookie that signature chew. I always grab the Ghirardelli chocolate chips when I’m feeling fancy, but Nestlé Toll House is a solid budget pick. Pro tip: measure your flour with a kitchen scale if you can—spooning and leveling gives inconsistent results. If you don’t have one, scoop and level, but don’t pack it down.
No vanilla extract? Vanilla bean paste at half the amount works in a pinch, though it’ll be thicker. Short on chocolate chips? Chop up a chocolate bar (70% dark or milk) and toss in—just toast them first for 5 minutes at 300°F to soften. The sea salt is non-negotiable for that restaurant-quality finish, but Morton kosher salt in a pinch adds a nice contrast. Swapping in white chocolate chips? Reduce to 1.5 cups—they melt differently and can make the dough too soft. And if you’re making multiple cookies, chill your dough for 2 hours before baking to prevent excessive spreading.
Dough keeps for 3 days in the fridge, wrapped tightly in plastic. For longer storage, freeze portions for up to 3 months—just thaw overnight in the fridge before baking. The baked cookie stays fresh for 5 days at room temperature if wrapped airtight, but honestly? It’s best eaten fresh. If you’re prepping ahead, bake and freeze the cookie (unwrapped) for up to 2 monthsrewarm in a 300°F oven for 5-10 minutes to bring back that fresh-from-the-oven magic.
Why You’ll Love This Recipe
- No Weighing Hassles: I just eyeball the butter and sugars—softened, not melted—and let the eggs and vanilla do the rest. The dough comes together faster than scrolling through my phone.
- Chewy-Crisp Magic: That perfect balance? Creaming the butter with both sugars until fluffy, then letting the dough rest just 20 minutes. The edges stay crisp, the center melts in your mouth, and the chocolate chips? They’re always gooey.
- Party in a Pan: One 12-inch cookie feeds a crowd—no awkward slices or crumbs everywhere. Double the dough, press it into one giant sheet, and you’ve got a showstopper that’s half the effort of individual cookies.
- Budget-Friendly Luxury: Butter, sugar, eggs—these are pantry staples that stretch far. A single batch costs less than takeout but tastes like a bakery’s secret. (Between us, my kids think I’m a genius.)
Step-by-step instructions for giant batch chocolate chip cookies
Here’s how to create a massive, perfectly balanced cookie that delivers bakery-quality results every time.
Cream the Butter and Sugars Together
In a stand mixer fitted with the paddle attachment, beat the 1 cup unsalted butter (cold and cubed) with the 0.75 cup granulated sugar and 0.75 cup packed brown sugar on medium speed for 3-4 minutes. You’re looking to create a light, fluffy mixture that nearly doubles in volume and becomes pale in color. This creaming process incorporates air, which gives your cookies that classic crackly top and helps control spread.
I like to press down on the butter mixture with a spatula halfway through to break up any large clumps. The butter should be completely smooth and homogeneous by the end—no visible chunks. If you’re mixing by hand, this will take about 5 minutes of vigorous beating, so don’t rush it.
Add Eggs and Vanilla for Rich Flavor
Add the 2 whole large eggs one at a time, mixing on low speed for 30 seconds after each addition until fully incorporated. Then add the 2 teaspoons vanilla extract and mix for another 10 seconds. The mixture will look slightly curdled at first, but don’t worry—it will come together when you add the dry ingredients.
Here’s a pro tip: I always use room-temperature eggs for this recipe. They blend more smoothly into the butter mixture, creating a more uniform dough. If your eggs are straight from the fridge, let them sit in warm water for 5 minutes before using. The vanilla extract should be pure, not imitation—you’ll notice the difference in the final flavor.
Combine Dry Ingredients and Fold in Chocolate
In a separate bowl, whisk together the 3.5 cups all-purpose flour, 1 teaspoon baking soda, and 1 teaspoon diamond crystal kosher salt. Add this mixture to the wet ingredients and mix on low speed for 30-45 seconds until just combined. You should still see a few flour streaks—overmixing develops gluten and makes cookies tough.
Remove the bowl from the mixer and gently fold in the 2 cups semisweet chocolate chips using a silicone spatula. I like to distribute them evenly throughout the dough so every bite gets that perfect chocolate-to-dough ratio. Make sure the chocolate chips are cold—this prevents them from melting too early in the dough.
Chill the Dough for Perfect Texture
Cover the bowl with plastic wrap and refrigerate for at least 1 hour, but I prefer 2 hours or even overnight. This chilling step is non-negotiable—it solidifies the butter, which prevents excessive spreading in the oven. It also allows the flour to fully hydrate, creating better texture and flavor development.
Cold dough also means your cookies will hold their shape better when they hit the hot oven, resulting in thicker cookies with crispy edges and gooey centers. If you’re short on time, you can chill the dough in the freezer for 20 minutes, but the refrigerator gives you the best results.
Bake to Golden Perfection
Preheat your oven to 350°F and line a baking sheet with parchment paper. On a lightly floured surface, roll out the chilled dough to about ¼-inch thickness (it should be roughly 12 inches in diameter for that giant cookie). Transfer it to the prepared baking sheet.
Bake for 18-22 minutes until the edges are golden brown and the center still looks slightly underdone. The cookie will continue cooking on the hot pan after you remove it from the oven. In the last 2 minutes of baking, sprinkle the top with 2 tablespoons granulated sugar and 1 tablespoon flaky sea salt for that perfect sweet-salty contrast.
Let the cookie cool on the baking sheet for 10 minutes before transferring it to a wire rack. The center will still be soft and warm—this is where the magic happens. Serve warm with a glass of cold milk for the ultimate experience.
Pro Tips For Making 12 Inch Chocolate Chip Cookie
- CHILL THE DOUGH: After mixing, pop your dough in the fridge for at least 24 hours—yes, even if you’re eager. I used to skip this and ended up with flat, cakey cookies that spread like wildfire. The cold slows down the gluten, keeps the edges crisp, and lets the flavors meld (plus, it’s easier to scoop).
- MELT BUTTER SLOWLY: Heat your butter in the microwave in 20-second bursts, stirring between each, until just melted—no steam, no browning. Overheating turns butter greasy, which makes cookies spread too thin and lose that buttery depth. Trust me, 30 seconds total is all you need.
- WEIGH YOUR SUGARS: Brown sugar packs differently—tap the cup firmly to settle it, then level it off. Granulated sugar? Spoon it in and sweep off the excess. I learned this after making a batch that was either too sweet or too dry. Precision here makes a real difference in texture.
- UNDERBAKE SLIGHTLY: Pull cookies out when edges are just set but centers still look soft—about 3-4 minutes before the recipe says. They’ll firm up as they cool. Overbaking turns them tough, and nobody wants that. (Pro move: Use a toothpick—it should come out with a few crumbs, not clean.)
Make-ahead tips for 12 inch chocolate chip cookie
Dough Prep Ahead
Make your life easier by prepping the dough up to 3 days in advance. After mixing, wrap the dough tightly in plastic wrap and refrigerate. The flavors deepen over time, and the chilled dough is perfect for baking when you’re ready.
For longer storage, portion the dough into freezer-safe bags and freeze for up to 3 months. Thaw overnight in the fridge before rolling and baking. 🧊
Bake and Freeze
Save time for parties by baking the cookie ahead and freezing it. After baking, let it cool completely, then wrap it in parchment paper and place in a freezer bag. Thaw at room temperature for 1-2 hours before serving.
The texture stays crispy, and the chocolate remains gooey. This method works great for holiday gatherings or when you know you’ll have leftovers. ❄️
Portion Control
Divide the dough into smaller portions if you want to bake multiple cookies. Roll each portion into a 1-inch thick disc and wrap individually in plastic. Store in the fridge for up to 3 days or freeze for 3 months.
This way, you can bake just what you need without dealing with a giant cookie. Perfect for testing different variations or sharing with friends. 🍪
Rewarming Leftovers
Revive store-bought or leftover cookies by rewarming them in the oven. Place slices on a baking sheet and heat at 300°F for 5-10 minutes until warm and crispy again. Avoid the microwave—it makes cookies rubbery. This trick works especially well for cookies that have lost their fresh-from-the-oven appeal. 🔥
Make-Ahead Baking Schedule
Plan ahead with this timeline: Mix dough the night before, chill overnight, and bake in the morning. The cookie will still be warm when guests arrive, and you won’t be stuck in the kitchen.
For events, bake the cookie 2-3 hours ahead, then cover loosely with foil to keep it warm. Remove foil just before serving to let it crisp up again. 📅
Storage Containers
Use airtight containers with parchment paper between layers to prevent cookies from sticking. Glass containers work best for fridge storage, while ziplock freezer bags save space in the freezer. Label everything with dates to keep track of freshness. Proper storage keeps cookies tasting fresh for days. 📦
Nutrition facts
Frequently asked questions
Can I make this recipe without a mixer?
Use a sturdy wooden spoon or silicone spatula to cream the butter and sugars by hand. Mix vigorously for about 5-7 minutes until light and fluffy. For the eggs, mix them in one at a time, scraping down the bowl often. The dough will be slightly less aerated than with a mixer, but you’ll still get great results. Just be extra gentle when folding in the chocolate chips to avoid overworking the dough.
Why does my giant cookie spread too much?
Over-spreading usually happens when the dough isn’t chilled enough or the oven is too hot. Always chill the dough for at least 1 hour (longer is better). Use an oven thermometer to confirm your oven is at 350°F—many ovens run hot. Also, avoid overloading the baking sheet (this recipe should be the only thing on it). For extra insurance, place the dough on a pre-warmed baking sheet.
How do I store leftovers to keep them fresh?
Store your cookie in an airtight container at room temperature for up to 5 days. For longer storage, wrap individual slices in plastic wrap and freeze for up to 3 months. To revive stale cookies, place them in a 300°F oven for 5-10 minutes until warm and crispy. Never microwave—it makes cookies rubbery!
Can I add mix-ins like nuts or white chocolate?
Yes! Swap out ½ cup of chocolate chips for nuts (like walnuts or pecans) or white chocolate chips. For best results, toast nuts at 350°F for 5 minutes before adding, and reduce white chocolate to 1.5 cups (it melts differently). Keep the total mix-ins to 2.5 cups to maintain the perfect texture balance. Always keep chocolate chips cold to prevent early melting in the dough.
How do I cut the cookie into perfect slices?
Let the cookie cool completely on a wire rack first. Use a sharp serrated knife (like a bread knife) and dip it in hot water between cuts to create clean slices. For extra precision, chill the knife in the freezer for 10 minutes before cutting. Wipe the blade clean after each dip to prevent sticking. Serve immediately for the freshest texture!

- 6 Egg Cake Recipe with Oil: Light as Air With Buttery Moisture - October 4, 2026
- 4 Bean Casserole Recipe: One-Pan Heartiness With Smoky Paprika Depth - October 4, 2026
- 3-Ingredient Keto Mug Cake Recipe: Microwave Magic in 2 Minutes - October 4, 2026