
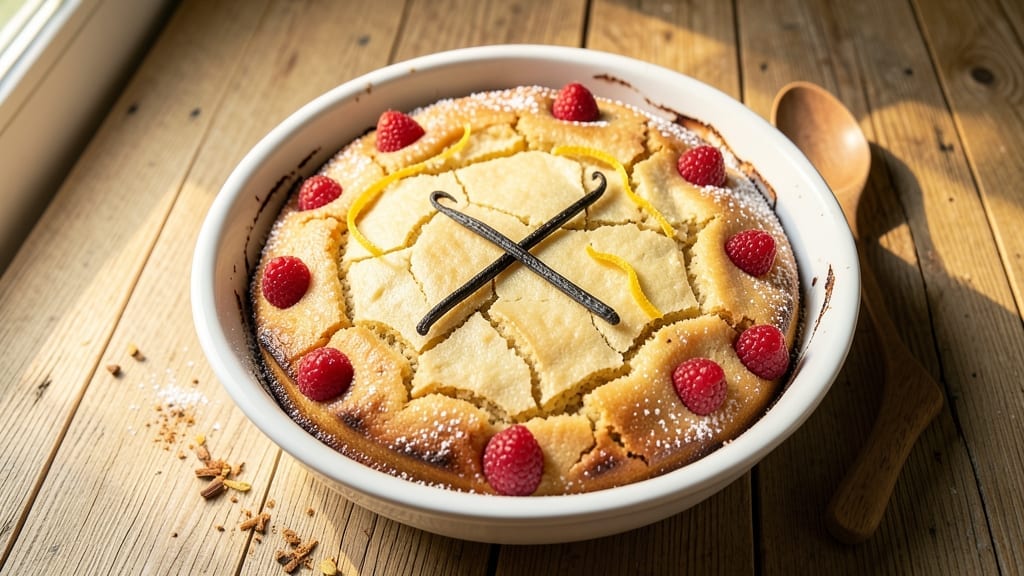
A 13×9 vanilla cake with a swirled vanilla bean center is the ultimate crowd-pleaser—elegant yet simple, with layers of creamy texture and aromatic depth. This one-pan recipe delivers moist, tender crumb and a signature ribbon of vanilla bean that transforms a basic cake into something restaurant-worthy.
The secret? A precise balance of butter, sugar, and vanilla extract, plus a clever swirling technique that keeps the center rich and flavorful without overmixing.
What sets this recipe apart is its foolproof method for achieving a perfectly domed cake with no cracks or dry edges. The batter comes together in a single bowl, and the baking time is carefully calibrated to ensure even cooking in a standard home oven.
No special equipment is needed—just a 13×9 baking pan, a whisk, and patience for the cooling process, which is where the magic of that vanilla bean swirl truly shines.
By the time you pull this cake from the oven, you’ll have a golden, fragrant masterpiece with a tender crumb and a swirl of vanilla bean that adds visual appeal and layers of flavor. The vanilla extract infuses every bite, while the swirl creates pockets of intensified sweetness.
This cake is ideal for birthdays, holidays, or any occasion where you want to impress without spending hours in the kitchen.
Serve it warm with a dusting of powdered sugar, or layer it with whipped cream and fresh berries for a showstopping dessert. The beauty of this recipe is its versatility—it works as a standalone cake, a trifle base, or even a simple yet sophisticated dessert for a dinner party.
Let’s get baking!
Ingredients for 13×9 vanilla cake
Twelve ingredients for a showstopping 13×9 vanilla cake with restaurant-style vanilla bean swirl.
| Ingredient | Amount | Notes |
|---|---|---|
| Unsalted Butter 🧈 | 1 cup | Room temperature, full-fat preferred |
| Granulated Sugar 🍚 | 2 cups | White or light brown |
| Vanilla Bean Paste 🌿 | 2 tbsp | High-quality, real vanilla bean |
| Pure Vanilla Extract 🍯 | 1 tbsp | Bottled vanilla, not imitation |
| Large Eggs 🥚 | 3 whole | Room temperature, separated |
| All-Purpose Flour 🌾 | 2 ½ cups | Sifted for even texture |
| Baking Powder 🧂 | 2 tsp | Aluminum-free preferred |
| Salt 🧂 | ½ tsp | Fine sea salt |
| Milk 🥛 | 1 cup | Whole milk preferred |
| Vanilla Bean 🌿 | 1 whole | Split lengthwise for swirl |
| Powdered Sugar 🍚 | ½ cup | For dusting, optional |
The butter and sugar are the foundation here. Use unsalted butter—it gives you control over the salt level, and room temperature is critical for proper creaming. Kirkland Signature or Land O’Lakes are reliable brands for consistent quality. The vanilla bean paste and extract work together: the paste delivers visible speckles of real vanilla, while the extract ensures deep flavor. For the vanilla bean, Madagascar bourbon beans are ideal—they’re aromatic and plentiful. If you can’t find them, Tahitian beans work too, but they’re more floral. Split the bean lengthwise and scrape out the seeds for the batter, then use the pod itself for the signature swirl.
No vanilla bean paste? Double the vanilla extract and add 1 tbsp vanilla sugar—it’s not the same, but close. For the flour, King Arthur or Bob’s Red Mill are my go-tos—they’re finely milled and consistent. If you’re gluten-sensitive, swap for a 1:1 gluten-free flour blend (like Bob’s Red Mill 1-to-1), but expect a slightly denser crumb. The baking powder is non-negotiable—aluminum-free ensures no metallic aftertaste. For the milk, whole works best for richness, but 2% or even evaporated milk will do in a pinch. If you’re out of powdered sugar, sifted granulated sugar works for dusting, though it won’t be as fine.
This cake is best served the day it’s made—flavor peaks after 24 hours as the vanilla infuses. Store at room temperature in an airtight container for up to 3 days, or refrigerate for 5 days. For longer storage, wrap tightly in plastic and freeze for up to 3 months. To serve, let it sit at room temperature for 30 minutes before slicing. The swirl is delicate, so slice carefully—it’s worth the effort for that stunning vanilla ribbon in every bite.
Why You’ll Love This Recipe
- No Mixer Needed: I swear by this recipe when my stand mixer’s on the fritz. Cream the butter and sugar by hand—it’s more work than usual, but the result? That velvety texture you’d expect from a machine. (Yes, even when my kids are “helping” by licking the bowl.)
- Vanilla Overload (Best Part): Between the vanilla bean paste and pure extract, this cake tastes like a bakery’s secret. The paste gives those little specks of magic, while the extract deepens the flavor—like a warm hug for your taste buds. (My husband steals slices before they even cool.)
- Bakes Like a Dream: One 13×9 pan, 30 minutes in the oven, and zero fuss. It’s my go-to for potlucks, birthday surprises, or when I forget to buy a cake. Slice it warm, or let it sit overnight for that perfect crumb—either way, it’s foolproof.
- Leftovers? More Like Leftovers: This cake keeps for days in the fridge, and slices reheat in seconds. I’ve sent it to work with coworkers, packed it in kids’ lunches, and even frozen portions for lazy mornings. Honestly, the only downside is having to resist eating the whole pan myself.
Step-by-step instructions for 13×9 vanilla bean cake
Here’s how to create a perfectly moist cake with a signature vanilla bean swirl.
Cream Butter and Sweeteners Together
In a large mixing bowl, combine the 1 cup unsalted butter and 2 cups granulated sugar. Using an electric mixer on medium speed, beat for 3-4 minutes until the mixture is light and fluffy, nearly doubling in volume. This step incorporates air, which creates a tender crumb. Scrape down the sides of the bowl with a spatula to ensure even mixing.
Add the 2 tablespoons vanilla bean paste and 1 tablespoon pure vanilla extract to the butter-sugar mixture. Mix on low speed for 30 seconds until fully combined. The paste will add depth of flavor while the extract enhances the aroma. Here’s the thing—vanilla bean paste contains real vanilla seeds, so it’s worth the extra cost for that authentic taste.
Add Eggs and Dry Ingredients
Add the 3 whole large eggs, one at a time, mixing on low speed after each addition. This gradual addition prevents the eggs from scrambling. After all eggs are incorporated, sift in the 2.5 cups all-purpose flour, 2 teaspoons baking powder, and ½ teaspoon salt. Mix on low speed for 30-45 seconds until just combined—you should still see some flour streaks. Overmixing develops gluten, which makes the cake tough.
In a separate bowl, whisk together the 1 cup milk and the scraped seeds from the split whole vanilla bean. This infusion adds an extra layer of vanilla flavor throughout the cake. With the mixer on low speed, gradually pour the milk mixture into the dry ingredients, mixing just until incorporated. The batter should be smooth and thick, similar to heavy cream.
Prepare the Vanilla Bean Swirl
Split the whole vanilla bean lengthwise and scrape out the seeds using the back of a knife. Set aside the seeds for the milk mixture. In a small bowl, combine the remaining vanilla bean halves with ½ cup powdered sugar. Using a fork, gently mash the vanilla bean halves to create a thick paste. This will form the signature swirl in the cake.
Pour half of the cake batter into the prepared 13×9-inch cake pan. Drop spoonfuls of the vanilla bean-sugar mixture evenly over the batter, then use a knife to gently swirl it into the batter. Pour the remaining batter over the swirl, creating a marbled effect. The swirl should be visible through the top layer of batter—this is what makes this cake special.
Bake to Golden Perfection
Preheat your oven to 350°F. Bake the cake for 35-40 minutes or until a toothpick inserted into the center comes out clean. The edges should be golden brown, but the top may appear slightly underdone—this is normal. If the top browns too quickly, tent the pan with aluminum foil after the first 20 minutes of baking.
I’ve found that baking time varies slightly with oven calibration, so start checking at the 30-minute mark. The cake is done when it springs back gently when pressed in the center. Remove from the oven and let it cool in the pan for 15 minutes, then transfer to a wire rack to cool completely before slicing. The cooling process allows the flavors to meld and the cake to set properly.
Pro Tips For Making 13×9 Vanilla Cake
- Cream Butter Slowly: Unsalted butter should be soft but not greasy when you start mixing—about 65°F. I learned this the hard way by using melted butter once and ending up with a dense, greasy cake. Use the “finger press” test: if it leaves a slight indent but holds its shape, you’re good.
- Whisk Eggs First: Beat your large eggs until they’re pale yellow and tripled in volume before adding sugar. This lightens the batter and gives you that classic vanilla cake texture. Skip this, and you’ll end up with a cake that’s more like a dense brownie.
- Don’t Overmix Dry Ingredients: Once you fold in the flour, stop mixing as soon as it’s just combined—overmixing develops gluten and makes the cake tough. I used to think “fully incorporated” meant “beat until smooth,” but that’s a mistake. Think “just until no streaks remain.”
- Use Both Vanilla Extracts: Split the vanilla—add half the pure extract to the dry ingredients and half the vanilla bean paste to the wet mix. The paste gives depth, while the extract distributes evenly. Sounds fussy, but it makes the flavor richer without tasting like you tried too hard.
Common mistakes when making this recipe
Overmixing the Batter
I’ve ruined more cakes than I’d admit by overmixing the batter after adding the dry ingredients. Once you incorporate the flour, baking powder, and salt, mix just until those streaks disappear—about 30-45 seconds on low speed.
Overmixing develops gluten, which makes the cake dense and tough. If your batter looks smooth but still has a few flour streaks, that’s perfect. 💫
Skipping Room-Temp Ingredients
Room-temperature butter and eggs are non-negotiable for this cake. Cold butter won’t cream properly, leading to a cake with a coarse texture. Let your butter sit out for 1-2 hours or microwave it in 10-second bursts until soft (but not melted).
Eggs should be at room temp too—cold eggs can cause the batter to curdle. Trust me, this small step makes a huge difference.
Incorrect Vanilla Bean Swirl Technique
The swirl is what makes this cake special, but rushing it can ruin the effect. Drop spoonfuls of the vanilla bean-sugar paste evenly over the first half of the batter, then use a knife to gently swirl it in.
Don’t overmix—just create gentle ribbons. If you stir too aggressively, the swirl will disappear, and you’ll lose that stunning vanilla ribbon in every slice. Patience here is key!
Baking Without a Thermometer
Oven temperatures vary wildly—even brand-new ovens. If your oven runs hot, your cake might bake too quickly, resulting in a dry top or burnt edges. Invest in an oven thermometer (like the Thermoworks Oven Thermometer) to ensure accurate 350°F readings.
If you don’t have one, start checking for doneness at 30 minutes—the cake is done when a toothpick comes out clean.
Cutting Too Soon
This is a common rookie mistake! The cake needs at least 15 minutes in the pan to set, followed by complete cooling on a wire rack. Cutting it too soon will smash the delicate vanilla bean swirl and make the cake gummy.
Let it cool for 1-2 hours before slicing—your patience will be rewarded with clean, beautiful slices. 🍰
Ignoring the Vanilla Bean Quality
Not all vanilla beans are created equal. Using a cheap imitation or low-quality bean paste will leave your cake tasting flat. Splurge on Madagascar bourbon beans or Tahitian beans—they’re worth it.
If you can’t find whole beans, Wilton or McCormick vanilla bean pastes are solid substitutes. Pro tip: Scrape out all the seeds from the bean—even the tiny ones add flavor! 🌿
Nutrition facts
Frequently asked questions
Can I make this vanilla cake without a vanilla bean?
Yes! Double the vanilla extract to 2 tablespoons and add 1 tablespoon vanilla sugar (made by blending vanilla bean powder with sugar). For best results, use high-quality pure vanilla extract—not imitation. The flavor won’t be identical, but it’ll still taste delicious with that classic vanilla aroma.
How do I adjust this recipe for a 9×13-inch pan?
This recipe is already designed for a 13×9-inch pan, but if you need to adapt it for a different size, use the pan size calculator: multiply the original baking time by 0.8 for a 9×13-inch pan. For example, if the recipe calls for 35-40 minutes, bake for 28-32 minutes instead. Always check for doneness with a toothpick.
Why did my cake turn out dense?
Dense cake usually means overmixing or cold ingredients. Make sure your butter and eggs are at room temperature and mix the batter only until just combined after adding flour. Also, avoid opening the oven door too early—temperature fluctuations can cause uneven baking. A oven thermometer helps ensure accurate 350°F readings.
Can I add mix-ins like chocolate chips?
While you can add ½ cup chocolate chips or ½ cup chopped nuts, avoid overloading the batter—too many mix-ins can make the cake sink in the center. Fold them in gently after mixing the wet and dry ingredients. For a swirled effect, distribute them evenly over the first half of the batter before swirling.
How long can I store this cake?
Store at room temperature in an airtight container for up to 3 days, or refrigerate for 5 days. For longer storage, wrap tightly in plastic and freeze for up to 3 months. Thaw overnight in the fridge before serving. The flavors actually improve after 24 hours as the vanilla infuses!

- 3lb Prime Rib Roast Recipe: Juicy Pink Center Guaranteed in 3 Hours - October 31, 2026
- 5 Spice Cake Recipe: Warmly Spiced Layers With Crunchy Top - October 31, 2026
- 1950’s Macaroni and Cheese Recipe: Nostalgic Creamy Cheese Sauce with Buttery Noodles - October 31, 2026