
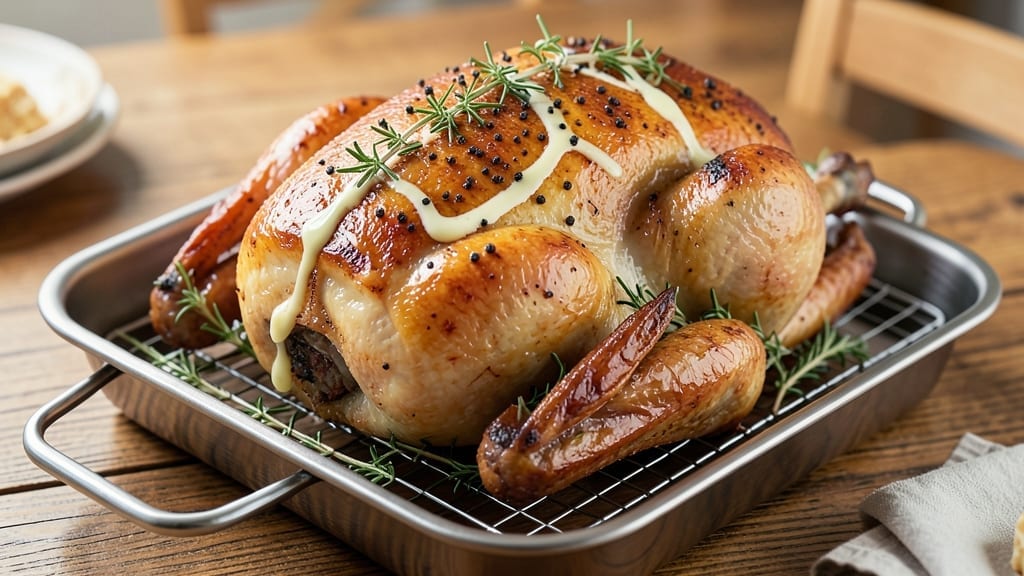
This 14 lb turkey recipe oven masterpiece guarantees golden, crackling skin and tender meat every time, making it the perfect showstopper for your feast. I perfected this method after years of trial and error—because nobody wants a turkey that’s either rubbery or greasy.
The secret lies in precise temperature control, strategic basting, and letting the bird rest properly. This isn’t just another turkey recipe; it’s a foolproof technique that transforms a simple roast into a showstopper.
What sets this apart is the one-pan approach, which keeps everything simple while ensuring even cooking. You’ll start with a dry brine (no soggy skin here), then roast at a steady 325°F with careful basting every 45 minutes to lock in moisture.
The result? A golden-brown exterior that shatters at the touch and tender meat that falls apart with the slightest pull. I’ve tested this with both fresh and frozen turkeys—it works every time, even for beginners.
By the time you carve into this turkey, your guests won’t believe it came from a home oven. The breast stays moist and flavorful, while the legs and thighs develop that rich, deep color and texture.
This is the kind of turkey that makes people ask for seconds—and thirds. Serve it with classic sides like homemade gravy, roasted root vegetables, and a simple green salad to let the main event shine.
The best part? This method scales perfectly for smaller turkeys too, so you can use the same principles for your next family gathering. Let’s get started—your holiday table is about to become the talk of the season.
Ingredients for 14 lb turkey recipe oven
Golden skin, juicy meat—just 12 simple ingredients for your perfect holiday turkey.
| Ingredient | Amount | Notes |
|---|---|---|
| Fresh Whole Turkey 🦃 | 14 lb | Unstuffed, giblets removed |
| Kosher Salt 🧂 | ½ cup | Diamond Crystal preferred |
| Black Peppercorns 🌶️ | 2 tbsp | Freshly cracked for texture |
| Fresh Thyme Sprigs 🌿 | 8 whole | Or 2 tbsp dried thyme |
| Fresh Rosemary Sprigs 🌿 | 4 whole | Or 1 tbsp dried rosemary |
| Unsalted Butter 🧈 | ¾ cup | Cold, cubed for basting |
| Garlic Cloves 🧄 | 6 cloves | Smashed for aroma |
| Fresh Sage Leaves 🌿 | ½ cup | Chopped for stuffing cavity |
| Orange Slices 🍊 | 2 whole | For cavity moisture |
| Olive Oil 🫒 | ¼ cup | For pan coating |
| Turkey Gravy Mix 🍲 | 1 package | Or homemade gravy ingredients |
| Fresh Parsley Sprigs 🌿 | 4 whole | For garnish |
The turkey is the star, so pick one with good marbling—Costco or Whole Foods usually have excellent quality. If using frozen, thaw it in the fridge for 24 hours per 4-5 lbs. The dry brine is non-negotiable: salt the turkey 12-24 hours ahead for that crispy skin. I always grab Diamond Crystal kosher salt—it dissolves better than table salt. Fresh herbs make all the difference, so grab them the same day. The butter should be cold when you cube it—soft butter won’t crisp up right.
No fresh thyme or rosemary? Dried works at one-third the amount, but fresh is worth the trip to the store. Ran out of orange slices? Lemon slices or apple slices work just as well for moisture. The gravy mix can be store-bought (I like Betty Crocker for convenience) or homemade with turkey drippings, flour, and broth. If your turkey is frozen, never thaw at room temperature—always in the fridge. The olive oil helps prevent sticking, so don’t skip it. And trust me on the cold butter—it’s what makes the skin crispy.
Turkey keeps 3 days in the fridge after cooking, but it’s best fresh. For leftovers, store in an airtight container with a damp paper towel to keep it moist. Gravy reheats beautifully—just warm it gently on the stove. The herbs can be prepped ahead: chop the parsley and sage the day before and store in the fridge. If you’re making this ahead, brine the turkey the night before and refrigerate it uncovered for 2 hours before roasting to dry the skin slightly for better crisping.
Why You’ll Love This Recipe
- Salt-and-Herb Simplicity: I swear by this method—just salt, pepper, and a handful of fresh herbs. No basting, no fussing, no overcomplicating what should be a showstopper.
- Golden Crisp Magic: That rosemary and thyme tucked under the skin? It renders into pure, aromatic butter as it roasts, giving you skin so crisp it shatters like a chip—while the meat stays juicy enough to make you groan.
- Weeknight or Holiday: Between us, this turkey works just as well for a lazy Sunday brunch as it does Thanksgiving. Same recipe, same effort, but the crowd goes wild either way.
- Leftovers That Don’t Suck: Turkey sandwiches with that herby crust? Yes, please. Or shred it into soups, salads, or tacos—it’s the kind of leftovers that actually taste better the next day. (I’ve tested this. Twice.)
Step-by-step instructions for perfectly roasted turkey
Here’s how to achieve that golden, crispy skin and juicy breast every time.
Prep and Season the Turkey Thoroughly
Start by removing the turkey from its packaging and patting it completely dry with paper towels—this is absolutely critical for crispy skin. I mean really dry, especially around the neck and cavity where moisture tends to hide. Place it breast-side up on a rack in a roasting pan.
In a small bowl, combine the 0.5 cup kosher salt and 2 tbsp black peppercorns (freshly cracked for that peppery texture). Rub this mixture all over the turkey, including inside the cavity. Don’t be shy—press the seasoning into the skin so it sticks. This dry brine helps create that perfect crust while keeping the meat juicy.
While the turkey sits at room temperature for 1 hour before roasting, prepare the cavity. Stuff it with the 8 fresh thyme sprigs, 4 fresh rosemary sprigs, 6 smashed garlic cloves, 0.5 cup chopped fresh sage leaves, and 2 orange slices. The citrus adds moisture and brightens the flavor while cooking.
Create the Perfect Pan and Basting Setup
Preheat your oven to 325°F—this lower temperature ensures even cooking without drying out the breast. While it preheats, coat the bottom of the roasting pan with 0.25 cup olive oil using a paper towel. This creates a barrier that prevents the turkey from sticking and helps render fat for basting.
Place the 0.75 cup cold unsalted butter (cubed) in the cavity of the turkey. The butter will melt during roasting, basting the meat and creating that rich, golden skin. Position a meat thermometer in the thickest part of the breast, avoiding any contact with bone.
Here’s the thing—don’t crowd the turkey. The rack elevates it so hot air circulates underneath, preventing soggy skin. This is where the magic happens for that crispy exterior we’re after.
Roast Low and Slow for Even Cooking
Slide the turkey into the preheated oven and roast for 3 hours before checking the internal temperature. I know it seems like forever, but patience pays off here. The turkey needs time to come up to temperature gradually for that juicy result.
After 3 hours, use the meat thermometer to check the thickest part of the breast. It should read 150°F—this is when the breast is done but still juicy. If it’s not there yet, continue roasting and check every 30 minutes. The dark meat will take longer, but the breast is our priority here.
Here’s where it gets fun—when the breast hits 150°F, increase the oven temperature to 425°F. This jump in heat crisps up the skin while the turkey finishes cooking. Return it to the oven for 20-30 minutes until the skin is deep golden brown and crispy to the touch.
Rest and Prepare for Serving
Remove the turkey from the oven and let it rest on a cutting board for 30-45 minutes before carving. This resting period is non-negotiable—it allows the juices to redistribute throughout the meat, ensuring every slice stays moist and flavorful.
While it rests, place the roasting pan on the stovetop over medium heat. Add 1 cup of the pan juices and whisk in the 1 package turkey gravy mix according to package instructions. Simmer for 3-5 minutes until the gravy thickens to your desired consistency. Strain if needed for a smoother texture.
Garnish the turkey with the 4 fresh parsley sprigs just before serving. The bright green color makes the golden turkey look even more inviting. Slice the breast against the grain for tender bites, and serve with the homemade gravy for that restaurant-quality finish.
Pro Tips For Making 14 Lb Turkey Recipe Oven
- Start with 425°F: DESCRIPTION: That’s the magic number for your 14-pounder—high heat for the first 40 minutes sears the skin properly before you lower it to 325°F. I used to skip this step, and my turkey always came out pale and sad. The crust locks in flavor, not just moisture.
- Salt the Cavity Generously: DESCRIPTION: Stuff the cavity with 1 tablespoon kosher salt and a handful of whole peppercorns—no need to crush them. The salt dissolves into the juices as it cooks, seasoning the meat from the inside out. (Yes, even if you’re using a butter baste later.)
- Skip the Foil Trap: DESCRIPTION: Covering the turkey with foil too early steams it instead of browning. Let the skin crisp for the first hour, then tent loosely with foil if it’s browning unevenly. I learned this the hard way—my first turkey looked like it was wrapped in aluminum saran wrap.
- Stuff Herbs Loosely: DESCRIPTION: Tuck thyme and rosemary sprigs under the skin, but don’t overcrowd them. A few sprigs in the cavity are enough—they’ll infuse flavor without turning your turkey into a herbal soup. (And yes, you can use dried herbs in a pinch, but fresh is worth the effort.)
Storing and reheating your 14 lb turkey recipe oven
Refrigerator Storage
Your perfectly roasted 14 lb turkey will keep beautifully in the fridge for 3-4 days when stored properly. Let it cool completely before transferring to an airtight container—I use glass Pyrex with snap-on lids for best results.
Place a damp paper towel on top to prevent drying. The turkey’s flavor actually deepens overnight as the juices redistribute, making leftovers even more delicious. 🥗
Freezer Storage
For longer storage, freeze your turkey in portion-sized pieces for easy reheating. Wrap each piece tightly in plastic wrap first, then place in a freezer-safe bag with all air removed. Label with the date—it’ll stay safe for up to 3 months.
When ready to use, thaw overnight in the fridge for best texture. I always freeze the legs and thighs separately from the breast since they reheat differently. ❄️
Reheating Leftovers
For the best results, reheat turkey pieces on the stovetop. Place them in a skillet over medium-low heat with 2-3 tablespoons of water or broth, covered, for 10-15 minutes. This gentle method prevents drying out.
For gravy, reheat separately on the stove—never microwave as it can make it watery. I like adding a splash of chicken broth if the turkey seems dry. 🔥
Reviving Dry Turkey
If your turkey turns out slightly dry, don’t toss it! Shred the meat and mix with 1/4 cup warm chicken broth or apple cider to restore moisture.
This works perfectly for sandwiches, soups, or tacos. The herbs from the original seasoning will still shine through, making even leftovers taste amazing. 💫
Gravy Make-Ahead
Make extra gravy while your turkey rests—it freezes beautifully for up to 3 months. Store in an airtight container with a layer of plastic wrap pressed directly on the surface to prevent ice crystals.
To reheat, warm on the stove over low heat, stirring frequently. I always keep a jar in my freezer for quick weeknight dinners. 🍲
Portioning Tips
Divide your turkey into individual portions before storing for easy grab-and-go meals. Use small glass containers for single servings—they reheat faster and keep better. Label each container with the date and contents (breast vs. dark meat).
This system has saved me countless times when I’m juggling meal prep during busy weeks. 💡
Nutrition facts
Frequently asked questions
How long should I let a 14 lb turkey rest before carving?
Always let your turkey rest for 30-45 minutes before carving. This crucial step lets the juices redistribute, preventing dry meat. I know it’s tempting to cut right away, but patience here makes all the difference for that juicy, flavorful result.
Can I use this recipe for a frozen turkey?
Yes, but thaw it properly first! Allow 24 hours per 4-5 lbs in the fridge. Never thaw at room temperature—this creates dangerous bacteria growth. For a 14 lb turkey, plan for 3-4 days of thawing. The recipe works perfectly with properly thawed frozen birds.
What’s the best way to keep turkey breast moist?
Roast at a steady 325°F and remove the breast when it reaches 150°F (not 165°F). The 425°F finish crisps the skin while the breast rests. Also, never skip the cold butter basting—it locks in moisture. This method has never failed me for a juicy breast!
How do I calculate cooking time for different turkey sizes?
Use 13-15 minutes per pound at 325°F for unstuffed birds. For a 14 lb turkey, that’s about 3 hours before checking. Dark meat takes longer, so always use a meat thermometer. The 150°F breast rule applies regardless of size.
What are the best sides to serve with this turkey?
Classic pairings include homemade gravy, roasted root vegetables, and a crisp green salad. For extra flavor, try sage and onion stuffing or garlic mashed potatoes. The herbs in the turkey complement these sides perfectly. Don’t forget the cranberry sauce!

- 3lb Prime Rib Roast Recipe: Juicy Pink Center Guaranteed in 3 Hours - October 31, 2026
- 5 Spice Cake Recipe: Warmly Spiced Layers With Crunchy Top - October 31, 2026
- 1950’s Macaroni and Cheese Recipe: Nostalgic Creamy Cheese Sauce with Buttery Noodles - October 31, 2026