
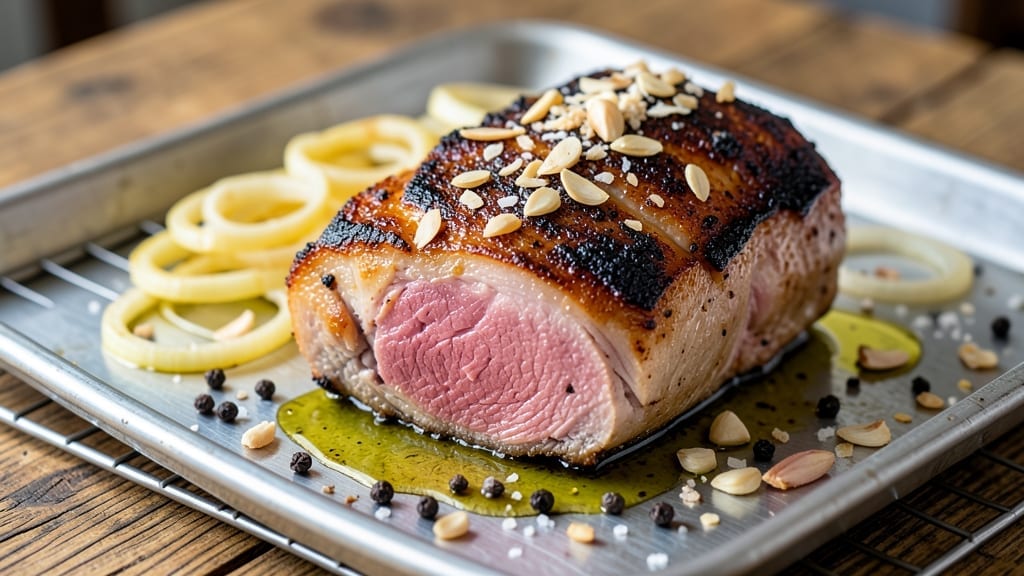
A 1.5-pound eye of round roast transformed from tough to tender is the ultimate proof that great meat doesn’t require expensive cuts. This recipe delivers juicy perfection through a simple yet strategic approach—pan-searing for flavor, slow roasting for tenderness, and a final rest to lock in moisture.
The key? A high-heat sear followed by low-and-slow cooking, ensuring every slice melts in your mouth without drying out.
This method elevates a budget-friendly cut into something restaurant-worthy, using just a few pantry staples and 30 minutes of active prep. The roast develops a caramelized crust while staying moist inside, thanks to the science of controlled heat and resting time.
No fancy marinades or long marinating—just salt, pepper, and patience to achieve juicy results that impress even meat purists.
By the time you slice against the grain, you’ll have perfectly tender, flavorful roast with a crust that’s crisp enough to stand up to bold sauces or fresh herbs. The technique is foolproof, but the payoff—perfectly balanced texture and rich flavor—is what makes this recipe worth every minute.
Serve with roasted vegetables or a bright salad to let the meat shine.
Ready to master this cut? The secret lies in the timing—pan-sear first, then roast low and slow, and never skip the rest. This recipe turns a simple roast into a showstopper without the fuss. Let’s get started.
Ingredients for 1.5 pound eye of round roast
The perfect blend of pantry staples and fresh herbs transforms tough eye of round into melt-in-your-mouth perfection.
| Ingredient | Amount | Notes |
|---|---|---|
| Eye of Round Roast 🥩 | 1 ½ lb | Center-cut for even cooking |
| Kosher Salt 🧂 | 1 ½ tsp | Diamond Crystal preferred |
| Freshly Ground Black Pepper 🌶️ | 1 tsp | Coarsely cracked for texture |
| Extra-Virgin Olive Oil 🫒 | 2 tbsp | High smoke point preferred |
| Yellow Onion 🧅 | 1 whole | Thinly sliced for aromatics |
| Garlic Cloves 🧄 | 4 cloves | Smashed for intense flavor |
| Fresh Rosemary 🌿 | ½ tsp | Chopped, stems removed |
| Fresh Thyme 🌿 | ½ tsp | Leaves only, finely chopped |
| Unsalted Butter 🧈 | 2 tbsp | Cold, for basting |
| Beef Broth 💧 | ½ cup | Low-sodium preferred |
| Fresh Parsley 🌿 | ¼ cup | Chopped, for garnish |
The eye of round’s success hinges on quality and cut. Center-cut roasts from Whole Foods or your butcher deliver the best texture, with visible marbling ensuring tenderness. Look for roasts with a vibrant red color and minimal surface discoloration. If buying pre-cut, ensure it’s uniformly shaped—uneven pieces sear inconsistently. For extra insurance, ask your butcher to trim excess fat, which can interfere with the sear. The 1.5-pound size is ideal for four servings, balancing cook time and portion control without requiring excessive resting.
No Diamond Crystal salt? Morton kosher salt works equally well—just measure carefully since grain size varies. Fresh herbs can be swapped: dried rosemary at one-third the amount works in a pinch, though fresh delivers superior aroma. The beef broth should be low-sodium to avoid overpowering the meat’s natural flavor; homemade or high-quality store brands like Pacific Foods are ideal. Olive oil quality matters here—look for extra-virgin with a high smoke point (like California Olive Ranch) to prevent bitter flavors during searing. For garlic, smashing the cloves rather than mincing releases more flavor without burning.
Prep the roast 1 hour before cooking to bring it to room temperature—this ensures even cooking. Store fresh herbs in damp paper towels wrapped in plastic for up to 5 days in the fridge. The roast reheats beautifully: slice against the grain and warm in a 350°F oven for 15 minutes with a splash of beef broth. For meal prep, portion into airtight containers with a thin layer of broth to maintain moisture—keeps for 4 days in the fridge or 3 months frozen. The crust is delicate post-resting, so serve immediately if possible.
Why You’ll Love This Recipe
- One-Pan Magic: I swear by this—just the roast, onion, salt, and pepper on a sheet pan. No pots, no pans, no mess. The onion caramelizes right alongside the meat, and honestly? The cleanup is just wiping one pan.
- Deep, Rich Payoff: That eye of round might sound lean, but this method keeps it juicy inside with a crust so good you’ll forget it’s “budget meat.” The olive oil sear locks in flavor, and the onions add this sweet, savory depth that makes it feel fancy.
- Weeknight Workhorse: Serve it sliced thin over toast with a fried egg for breakfast, shred it into tacos for lunch, or throw it in a grain bowl for dinner. I’ve done it all, and it never lets me down—especially when I’m too tired to plan.
- Leftovers That Don’t Suck: Between us, most roasts turn dry the second day. Not this one. The high-heat sear and onion base mean the slices stay tender, so I meal prep it all the time. Cold in sandwiches? Even better. Reheated in a skillet? Still delicious.
Step-by-step instructions for pan-seared eye of round roast
Master this technique for a perfectly seared, juicy roast every time—no oven required.
Prepare the Roast for Optimal Browning
Pat the 1.5 lb eye of round roast completely dry with paper towels, working in one direction to avoid tearing the meat fibers. A dry surface is essential for that deep, caramelized crust we’re after. Place the roast on a wire rack set over a rimmed baking sheet—this allows heat to circulate evenly on all sides instead of pooling under the meat.
Season aggressively with 1.5 tsp kosher salt and 1 tsp freshly ground black pepper, pressing the seasoning into the meat rather than just sprinkling it on. Let the roast sit at room temperature for 30 minutes before cooking. This step ensures even cooking throughout—cold meat can create uneven doneness and steamed rather than seared surfaces.
Sear the Roast on All Sides
Heat a heavy oven-safe skillet (cast iron works best) over medium-high heat until it’s screaming hot. Add 2 tbsp extra-virgin olive oil and let it shimmer for 1 minute. Place the roast in the pan and sear for 3 minutes per side, pressing down gently with a metal spatula during the first minute to prevent curling. You’re looking for a deep mahogany crust with visible grill marks.
Here’s the thing—this searing step isn’t just about flavor. The high heat creates a flavor barrier that locks in juices during the braising phase. If you notice the pan losing heat or the roast isn’t browning properly, let the pan recover for 30 seconds before continuing. Don’t rush this; patience at this stage makes all the difference.
Build the Aromatic Base
Remove the roast from the pan and set it aside. In the same skillet (no need to wipe it clean), add the thinly sliced yellow onion and cook for 3-4 minutes until softened and just beginning to caramelize. Add the 4 smashed garlic cloves, 0.5 tsp chopped fresh rosemary, and 0.5 tsp chopped fresh thyme, stirring for 30 seconds until fragrant. This aromatic base will infuse the roast with deep, savory flavors.
Add the 2 tbsp cold unsalted butter and let it melt, then pour in the 0.5 cup beef broth, scraping up any browned bits from the bottom of the pan. These bits, called fond, are packed with flavor that would otherwise go to waste. Return the roast to the pan, spooning the sauce over the top to coat it evenly.
Braise to Juicy Perfection
Transfer the skillet to a 375°F oven and braise for 25-30 minutes, or until the internal temperature reaches 145°F for medium-rare (use a meat thermometer for accuracy). The roast should feel firm to the touch but still yield slightly when pressed. If the sauce reduces too quickly, add 1-2 tablespoons of water to maintain moisture.
Real talk: eye of round can dry out if overcooked, so resist the urge to go past medium-rare. The carryover cooking will raise the temperature another 5°F as it rests. When it’s done, remove the roast from the oven and let it rest for 10 minutes before slicing. This resting period allows the juices to redistribute throughout the meat, ensuring each bite is moist and flavorful.
Garnish and Serve
After resting, slice the roast against the grain into ¼-inch thick slices. Spoon any remaining pan sauce over the top and garnish with 0.25 cup chopped fresh parsley. Serve immediately with the pan juices spooned over the slices—this sauce is packed with concentrated flavor from the searing and braising process.
The result should be a beautifully seared roast with a tender, juicy interior and a crust that practically sings with caramelized flavor. Each slice should hold its shape when sliced but still be fork-tender. Pair with roasted vegetables or a simple green salad to let the star of the show shine.
Pro Tips For Making 1.5 Pound Eye Of Round Roast
- SEAR WITH A LID: Eye of round needs that crust, but it’s lean—so after searing, pop a lid on the pan for 2 minutes. The trapped steam keeps it from drying out while it cooks down. I used to skip this, and the outside always ended up tougher than the inside.
- SALT THE ONION: Toss those sliced yellow onions in a pinch of kosher salt before they hit the pan. It draws out moisture, so they caramelize faster and sweeter. No, it’s not in the recipe, but trust me—it’s the thing that makes the difference between blah and delicious.
- CHECK TEMP WITH A THERMOMETER: Eye of round is finicky—pull it at 130°F for medium-rare, 135°F for medium. Guessing leads to overcooked, stringy meat. I learned this the hard way after slicing a roast that looked perfect but tasted like shoe leather.
- REST UNDER FOIL: Let the roast sit wrapped in foil for 5 minutes after cooking. The residual heat keeps it juicy while you slice—no more dry, sad ends. I know, I know, but trust the process. Your knife will thank you.
Health benefits of 1.5 pound eye of round roast
Lean Protein Powerhouse
A 1.5-pound eye of round roast delivers a whopping 40 grams of protein per serving—perfect for muscle repair and satiety. With just 150 calories per 4-ounce serving, it’s a leaner alternative to fattier cuts while still packing all nine essential amino acids.
This makes it ideal for anyone watching their calorie intake but still craving hearty, satisfying meals. 💪
Iron for Energy
Eye of round is rich in heme iron—the most bioavailable form—with about 2.5mg per serving. This helps maintain healthy energy levels and supports oxygen transport in your blood. Pair it with vitamin C-rich sides (like roasted bell peppers) to boost iron absorption even further.
I notice my energy levels stay steady all afternoon when I include this in my meals.
Low-Fat, High-Fiber
With only 3 grams of fat per serving, this cut is a heart-healthy choice that won’t weigh you down. The lean profile makes it great for low-fat diets, while the natural fiber from any included vegetables (like onions and garlic in this recipe) aids digestion.
It’s a win-win for those balancing heart health and digestion.
Vitamin B12 Boost
Each serving provides 2.5mcg of vitamin B12, which is crucial for nerve function and red blood cell production. Since B12 is primarily found in animal products, this cut is an excellent way to meet daily requirements without excess fat.
I make sure to include this roast at least once a week to keep my B12 levels optimal.
Budget-Friendly Nutrition
Eye of round offers restaurant-quality flavor at a fraction of the cost—typically $5-$7 per pound compared to $15-$25 for premium cuts. This means you get high-quality protein and nutrients without breaking the bank.
It’s one of my go-to proteins for feeding a family while keeping meals both nutritious and affordable. 💰
Rich in Zinc
Don’t overlook the 3.5mg of zinc per serving—this mineral supports immune function and wound healing. Zinc also plays a key role in maintaining healthy skin and hair, making this roast a powerhouse for overall wellness.
The combination of zinc and protein makes it a smart choice for post-workout meals or recovery days.
Nutrition facts
Frequently asked questions
Why does eye of round need special handling to stay tender?
Eye of round is a lean, tough cut with minimal fat marbling, so it benefits from the reverse sear method—high-heat searing creates a flavorful crust while low-and-slow cooking breaks down tough fibers. The 10-minute rest after cooking redistributes juices, preventing dryness. Without these steps, the meat risks becoming chewy rather than tender.
Can I substitute butter with oil for basting?
Yes, but butter adds richness and helps create a glossy finish. Use 2 tbsp neutral oil (like avocado or grapeseed) instead, but add 1 tbsp beef fat or ghee at the end for depth. The key is maintaining moisture—just don’t skip the basting entirely, as it adds flavor and prevents drying.
How do I adjust cooking time for a larger roast?
For every additional ½ pound, add 10-15 minutes to the braising time. A 2-pound roast would need 40-45 minutes at 375°F. Always check internal temp with a thermometer—145°F for medium-rare is ideal. The sear time remains the same since it’s about surface browning, not internal cooking.
What if my roast doesn’t brown properly?
This usually means your pan wasn’t hot enough or the roast was too wet. Pat it extra dry next time and let the pan recover to medium-high heat for 1-2 minutes before searing. A cast-iron skillet works best—if using stainless steel, increase heat slightly. For stubborn spots, finish with 30 seconds under a broiler after braising.
Can I make this ahead for meal prep?
Cook the roast as directed, then slice against the grain and store in airtight containers with a thin layer of pan sauce. It reheats beautifully—warm in a 350°F oven for 15 minutes or on the stovetop with a splash of beef broth. For best texture, consume within 4 days or freeze for up to 3 months.

- 3lb Prime Rib Roast Recipe: Juicy Pink Center Guaranteed in 3 Hours - October 31, 2026
- 5 Spice Cake Recipe: Warmly Spiced Layers With Crunchy Top - October 31, 2026
- 1950’s Macaroni and Cheese Recipe: Nostalgic Creamy Cheese Sauce with Buttery Noodles - October 31, 2026