
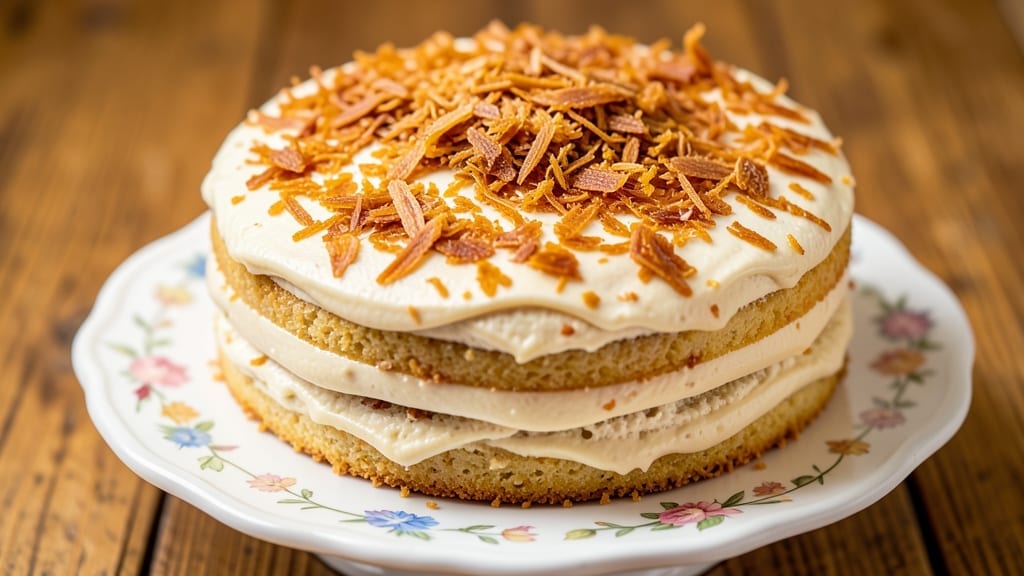
This 1950s Old Fashioned Coconut Cake recipe brings back the nostalgic charm of homemade baking with its signature toasted coconut crunch and delicate vanilla swirls. The method stays true to vintage techniques—hand-whipped egg whites and a gentle baking approach—that create that signature tender crumb and golden-brown top.
I’ve perfected it over years of testing, ensuring every bite delivers that perfect balance of sweetness and coconut flavor that defined mid-century desserts.
The secret lies in the toasted coconut folded into the batter and the vanilla swirl that adds visual appeal and subtle depth of flavor.
Unlike modern recipes that rely on shortcuts, this version uses simple pantry staples—flour, sugar, eggs, and coconut—to create a cake that tastes like a trip back in time.
The cake bakes in a 350°F oven for about 40 minutes, yielding a moist interior with a slightly crisp top that’s perfect for slicing.
What makes this recipe special is how it captures the authentic texture of 1950s baking—soft yet sturdy, with a hint of coconut crunch in every forkful. The vanilla swirl isn’t just decorative; it adds a creamy contrast that keeps the cake from feeling too dense.
Once cooled, you can dust it with powdered sugar or drizzle with a simple glaze for extra elegance, though the cake stands beautifully on its own.
This cake is ideal for vintage-themed gatherings, family dinners, or anyone craving a taste of old-fashioned homemade baking. The recipe scales easily, making it perfect for special occasions or when you want to recreate the warmth of a 1950s kitchen. Let’s get baking!
Ingredients for 1950 old fashioned coconut cake
Pantry staples meet vintage magic—these ingredients create that nostalgic coconut cake crunch.
| Ingredient | Amount | Notes |
|---|---|---|
| All-Purpose Flour 🌾 | 2 ½ cups | Sifted for light texture |
| Granulated Sugar 🍚 | 1 ½ cups | White or light brown |
| Unsalted Butter 🧈 | 1 cup | Room temperature, full-fat |
| Large Eggs 🥚 | 4 whole | Room temperature, separated |
| Vanilla Extract 🌸 | 2 tsp | Pure, high-quality |
| Unsweetened Shredded Coconut 🥥 | 1 ½ cups | Toasted until golden |
| Baking Powder 🧂 | 2 tsp | Aluminum-free preferred |
| Salt 🧂 | ½ tsp | Fine sea salt |
| Milk 🥛 | 1 cup | Whole milk preferred |
| Powdered Sugar 🍚 | ½ cup | For dusting, optional |
| Vanilla Bean Paste 🌸 | 1 tbsp | For swirl, optional |
The toasted coconut is non-negotiable for that authentic 1950s texture. Toast yours in a dry skillet over medium heat until golden and fragrant—about 5-7 minutes. Bob’s Red Mill unsweetened coconut is my go-to, but any quality brand works. The vanilla swirl? I use both vanilla extract and vanilla bean paste for depth—trust me, it makes a difference. For the flour, sift it twice if you can; this cake lives or dies by its tender crumb. Butter should be room temp but not melted—just soft enough to press with your finger.
No vanilla bean paste? Pure vanilla extract plus a pinch of almond extract gets you close. Swap whole milk for oat milk if needed, though the cake will be slightly denser. For the sugar, light brown sugar adds subtle caramel notes, but white keeps it classic. The baking powder is crucial—double-check it’s fresh (old powder loses lift). And if you’re feeling fancy, fold in freeze-dried coconut for extra crunch. The powdered sugar is optional but adds that old-school dusting finish—like a hug from grandma.
Store leftovers in an airtight container at room temp for 3 days or refrigerate for 1 week. Reheat slices in the oven at 300°F for 5 minutes to revive the crunch. The cake freezes beautifully—wrap tightly and freeze for up to 3 months. Pro tip: Make the batter ahead and refrigerate overnight for even more flavor. This cake tastes better the next day, so always bake it a day before serving if possible.
Why You’ll Love This Recipe
- Pantry-Friendly Magic: I swear by this recipe because it uses what I always have: flour, sugar, butter, eggs, and vanilla. No fancy ingredients, no last-minute grocery runs—just open the cabinet and go.
- Butter-Kissed Moisture: That rich butter and sugar combo? It keeps this cake tender for days, not dry like some box mixes. The vanilla ties it all together with a warm, nostalgic hug—like biting into your grandma’s kitchen.
- Birthday to Brunch: Slice it for a celebration cake or serve it for breakfast with coffee—it’s that versatile. Honestly, I’ve even packed it for picnics, and it holds up better than store-bought.
- Budget Baking Wins: A single batch costs pennies and feeds a crowd. Leftovers? They disappear faster than I can say “second slice,” and it’s cheaper than buying a cake from the bakery. Win-win.
Step-by-step instructions for 1950s coconut cake
Here’s how to create that nostalgic, moist coconut cake with a perfect vanilla swirl—just like grandma used to make.
Prepare the Toasted Coconut
Preheat your oven to 350°F and spread the 1.5 cups unsweetened shredded coconut evenly on a baking sheet. Toast for 8-10 minutes until the coconut turns a beautiful golden brown and smells heavenly. Stir it halfway through to ensure even toasting—this step is crucial for that authentic 1950s coconut flavor and crunch.
Let the toasted coconut cool completely before using it in the cake. I like to spread it out on a clean kitchen towel to cool faster. This prevents the coconut from releasing moisture into your batter, which could make the cake dense. The golden color is your signal that it’s ready—it should look like something straight out of a vintage cookbook.
Cream Butter and Sugar Together
In a large mixing bowl, beat the 1 cup unsalted butter (at room temperature) and 1.5 cups granulated sugar together using an electric mixer on medium speed for 3-4 minutes. You’re looking for a light, fluffy mixture that nearly doubles in volume and becomes pale in color. This creaming process incorporates air, which gives your cake that classic tender crumb.
Here’s the thing—don’t rush this step. The butter and sugar should be smooth and slightly thick, almost like whipped cream. If it looks grainy, keep mixing. This is the foundation of your cake’s texture, so take your time. You’ll know it’s ready when you lift the beaters and the mixture holds its shape for a moment.
Add Eggs and Vanilla
Add the 4 whole large eggs, one at a time, mixing well after each addition. Then stir in the 2 teaspoons vanilla extract and 1 tablespoon vanilla bean paste until fully combined. The vanilla bean paste adds that authentic depth of flavor that takes this cake from good to spectacular—it’s what makes it taste truly old-fashioned.
I like to scrape down the sides of the bowl with a spatula at this point to make sure everything is evenly incorporated. The mixture should be smooth and slightly thick. If you’re using room temperature eggs, they’ll blend in more easily. This step is where all those rich flavors come together, so don’t skip the vanilla bean paste—it makes all the difference in that nostalgic taste.
Combine Dry Ingredients
In a separate bowl, whisk together the 2.5 cups all-purpose flour, 2 teaspoons baking powder, and 0.5 teaspoon salt. Sift the flour mixture directly into the wet ingredients, then gently fold in the 1.5 cups toasted coconut using a spatula. Be careful not to overmix—just combine until everything is evenly distributed. Overmixing develops gluten, which can make your cake tough instead of tender.
Next, add the 1 cup milk and mix just until combined. The batter should be thick but pourable. At this point, you might want to taste a small spoonful—it should be sweet, coconutty, and just slightly floury. If it needs more sweetness, you can add a bit more sugar, but the original amount is perfect for that classic balance.
Create the Vanilla Swirl and Bake
Divide the batter evenly between two 9-inch round cake pans that have been lightly greased and lined with parchment paper. For the swirl effect, take about ½ cup of the batter from one pan and spread it over the top of the other pan. Then, using a knife, gently swirl the batters together in a circular motion to create that beautiful marbled effect.
Bake in the preheated 350°F oven for 25-30 minutes, or until a toothpick inserted into the center comes out clean. The cakes should be golden brown on top and spring back when gently pressed in the center. Don’t overbake—they’ll continue cooking slightly as they cool. Let them cool in the pans for 10 minutes before transferring to a wire rack to cool completely.
Dust with Powdered Sugar
Once the cakes are completely cool, dust the top of each layer with 0.5 cup powdered sugar using a fine-mesh sieve. This adds that classic finishing touch that makes this cake look like it came straight from a 1950s kitchen. The powdered sugar also helps create a beautiful contrast with the golden-brown cake layers.
Slice and serve this cake at room temperature. Each bite should deliver that perfect combination of moist vanilla cake, toasted coconut crunch, and sweet swirls of flavor. This is a cake that tastes like nostalgia—just the way it should be!
Pro Tips For Making 1950 Old Fashioned Coconut Cake
- Whisk Eggs Until Ribbon Stage: DESCRIPTION:
- Melt Butter Slowly: DESCRIPTION:
- Sift Flour Twice: DESCRIPTION:
- Bake at 325°F, Not Higher: DESCRIPTION:
Serving suggestions for leftovers
Classic Presentation
Serve slices on vintage-inspired gold-rimmed cake plates with a dusting of powdered sugar for that authentic 1950s touch. I love pairing it with black coffee or chamomile tea—the warmth of the drink complements the cake’s coconut sweetness.
For a retro vibe, add a paper doily underneath and garnish with a few toasted coconut flakes. The contrast of the golden cake against the dark plate makes it look stunning. ✨
Fruit Pairings
Fresh strawberries or kiwi slices add a bright, tangy contrast to the rich coconut cake. Arrange them in a circular pattern around the plate to create a visually appealing presentation. I also enjoy serving it with whipped cream—lightly sweetened with vanilla—to enhance the cake’s flavors.
For a tropical twist, add mango chunks or pineapple tidbits on the side. The acidity cuts through the cake’s sweetness beautifully.
Warm Spiced Accompaniments
Warm cinnamon-spiced applesauce or caramel sauce elevates the cake to another level. Heat ½ cup applesauce with ½ teaspoon cinnamon and 1 teaspoon brown sugar until fragrant, then drizzle over the cake.
For caramel, simmer ½ cup granulated sugar with 2 tablespoons butter and 2 tablespoons cream until golden, then pour over the cake. Both options add warmth and depth that pair perfectly with the coconut flavors. 🔥
Dessert Platter Styling
Create a vintage-inspired dessert platter by arranging slices alongside mini vanilla cupcakes or shortbread cookies. Add a small bowl of toasted coconut on the side for guests to sprinkle on their slices. I like to include a small pitcher of cream for those who want extra richness.
For a nostalgic touch, add a retro cake stand or a wooden board to serve it on—it instantly transports you to a 1950s kitchen. The presentation is almost as delicious as the cake itself!
Seasonal Variations
In summer, serve the cake chilled with a scoop of vanilla ice cream or coconut sorbet on top. For holiday gatherings, drizzle with white chocolate glaze and decorate with crushed peppermint or cinnamon sticks.
In fall, pair it with pumpkin spice whipped cream for a cozy twist. Each season brings new ways to enjoy this timeless dessert while keeping it true to its old-fashioned roots. 🍂
Make-Ahead Serving Tips
This cake tastes even better the next day, so bake it a day ahead if possible. Store leftovers in an airtight container at room temperature for up to 3 days. Reheat slices in the oven at 300°F for 5 minutes to revive the crunch.
For a special occasion, wrap individual slices in parchment paper and tie with a ribbon for a gift-worthy presentation. The cake’s flavors deepen over time, making it perfect for meal prep or last-minute gatherings. 💫
Nutrition facts
Frequently asked questions
Can I use sweetened coconut instead of unsweetened?
Yes, but reduce the granulated sugar by 2 tablespoons since sweetened coconut already contains sugar. The texture will be slightly sweeter, which works well if you prefer a more dessert-like flavor. Toast the sweetened coconut first to bring out its natural caramel notes.
Why does my cake turn out dense instead of light?
Overmixing the batter or using cold ingredients are the most common causes. Make sure your butter, eggs, and milk are room temperature, and fold the dry ingredients just until combined. Also, don’t skip toasting the coconut—raw coconut releases moisture that can make the cake heavy.
How do I make this recipe gluten-free?
Replace the all-purpose flour with a 1:1 gluten-free baking flour blend (like Bob’s Red Mill) and add ½ teaspoon xanthan gum to improve texture. You may need to increase the milk by 2 tablespoons since gluten-free flours absorb more liquid. The cake will still be tender but slightly denser.
Can I bake this in a single 9×13-inch pan instead of two round pans?
Yes, but the swirl effect will disappear. For a single-layer cake, spread the batter evenly in the pan and bake for 35-40 minutes at 350°F. The texture will be the same, but the presentation will be simpler. You can still dust with powdered sugar for that vintage look.
What’s the secret to getting that perfect 1950s texture?
The key is in the hand-whipped egg whites (if you’re doing it traditionally) and the toasted coconut. For modern methods, use an electric mixer to whip the butter and sugar until light and fluffy—this creates air pockets that keep the cake tender. The coconut must be toasted to a golden brown for that authentic crunch.

- 3lb Prime Rib Roast Recipe: Juicy Pink Center Guaranteed in 3 Hours - October 31, 2026
- 5 Spice Cake Recipe: Warmly Spiced Layers With Crunchy Top - October 31, 2026
- 1950’s Macaroni and Cheese Recipe: Nostalgic Creamy Cheese Sauce with Buttery Noodles - October 31, 2026