
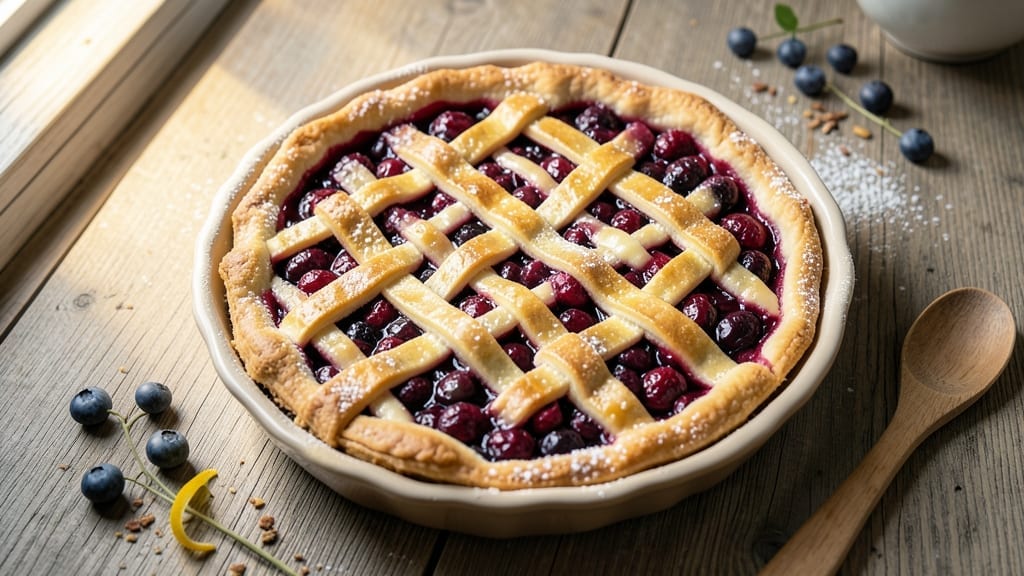
This 2 crust blueberry pie recipe delivers the perfect balance of buttery lattice crust and juicy blueberry filling that bakes to golden perfection every time.
The secret lies in a well-seasoned filling that thickens just enough to hold its shape, while the lattice pattern creates delicate, crispy edges that make each slice worth savoring.
I’ve perfected this technique over years of baking, ensuring no soggy bottoms or undercooked centers—just tender, flavorful pie that tastes like summer all year round.
What sets this recipe apart is the foolproof lattice crust, which requires no special tools beyond a sharp knife and steady hands. The filling combines fresh or frozen blueberries with a precise sugar-to-berry ratio, plus a touch of cornstarch to create that ideal balance between sweet and tangy.
Baking time is carefully calibrated to achieve a deep golden crust while keeping the filling bubbly and just set in the center—no guesswork required.
By the time you pull this pie from the oven, you’ll have a showstopping dessert with a crisp lattice crown that holds its shape beautifully when sliced. The blueberries remain juicy yet firm, releasing their aroma as you cut into the warm, buttery crust.
Serve it warm with a scoop of vanilla ice cream or a dollop of whipped cream for the ultimate comfort dessert that feels both rustic and refined.
This recipe works equally well for holidays, family gatherings, or a special weekend treat—it’s the kind of pie that makes every occasion feel celebratory.
The lattice technique might seem intimidating at first, but I’ll walk you through every step to ensure your first attempt looks like it came from a professional bakery. Let’s get started on creating your perfect blueberry pie.
Ingredients for 2 crust blueberry pie
These 12 simple ingredients create a showstopping blueberry pie with golden lattice crust and juicy filling.
| Ingredient | Amount | Notes |
|---|---|---|
| Fresh Blueberries 🫐 | 4 cups | Firm, unwashed berries preferred |
| Granulated Sugar 🍚 | 1 ½ cups | White or light brown preferred |
| All-Purpose Flour 🌾 | ½ cup | For thickening filling |
| Cornstarch 🌾 | 2 tbsp | For perfect thickening |
| Lemon Juice 🍋 | 2 tbsp | Freshly squeezed |
| Unsalted Butter 🧈 | 1 cup | Cold, cubed for crust |
| All-Purpose Flour 🌾 | 3 cups | For crust (plus extra for dusting) |
| Granulated Sugar 🍚 | ½ cup | For crust sweetness |
| Salt 🧂 | 1 tsp | Fine sea salt preferred |
| Ice Water 💧 | ½ cup | For dough binding |
| Vanilla Extract 🌸 | 1 tsp | Pure vanilla preferred |
| Ground Cinnamon 🌿 | ½ tsp | Optional for filling warmth |
The blueberries make or break this pie. Fresh is ideal—look for deep purple, plump berries at Whole Foods or local farmers markets—but frozen works too (just don’t thaw them first). I always buy extra—two cups for the filling, two more for garnish. The sugar ratio matters: too much and it’s cloying, too little and the filling won’t set. Domino sugar dissolves beautifully, but any granulated works. For the crust, use European-style butter if you can find it—higher fat content means flakier layers. Keep everything cold until mixing.
No fresh blueberries? Frozen will work—just toss them in the filling straight from frozen. Running short on vanilla? Almond extract at half the amount gives a nice twist. The cornstarch is non-negotiable for that perfect set—arrowroot works too if you’re out. For the crust, if you can’t find European butter, Land O’Lakes or Plugrá are solid substitutes. The dough needs to be cold and handleable—chill it 30 minutes before rolling if your kitchen’s warm. And trust me on the ice water—it’s what makes the dough tender without being greasy.
This pie tastes even better the next day, so bake it morning and serve it evening. Store leftovers in an airtight container at room temperature for 2 days, or freeze for 3 months. I always wrap the whole pie in plastic wrap before putting it in the freezer—thaw overnight in the fridge before serving. The lattice crust stays crisp for hours, but if it softens, just reheat at 350°F for 10 minutes to restore its crunch.
Why You’ll Love This Recipe
- No Fuss Assembly: I swear by this method—just toss the blueberries with sugar and cornstarch, then pour. The lemon juice brightens them up without extra effort, and the two crusts? Store-bought or homemade, no one judges. (Yes, even on a Tuesday night.)
- Taste That Stops You: That perfect balance of tart berries, buttery crust, and just enough sweetness? It’s like summer in a dish. The cornstarch thickens the filling just right, so every bite is juicy but not soggy—no one will believe it’s this simple.
- Weekend or Weeknight: Bring it to a potluck, pack slices for lunch, or serve it warm with ice cream. The two crusts make it sturdy enough for picnics but still feel special enough for company. My kids beg for seconds, and honestly, so do I.
- Budget-Friendly Luxury: Fresh blueberries might seem pricey, but a single batch stretches for days—leftover slices reheated with a sprinkle of cinnamon? Pure magic. Plus, using all-purpose flour and cornstarch keeps costs low without sacrificing flavor. My wallet and taste buds win.
Step-by-step instructions for a perfect 2 crust blueberry pie
Here’s how to create a showstopping blueberry pie with a delicate lattice crown and juicy filling.
Prepare the Blueberry Filling
In a large bowl, gently combine the 4 cups fresh blueberries, 1.5 cups granulated sugar, 0.5 cup all-purpose flour, 2 tbsp cornstarch, 2 tbsp lemon juice, and 0.5 tsp ground cinnamon. I always use a rubber spatula to fold everything together just until the blueberries are evenly coated—don’t mash them or you’ll get a mushy filling.
Transfer the mixture to a 9-inch pie dish and spread it evenly. The filling should reach about halfway up the sides of the dish. Place the dish in the refrigerator while you prepare the crust—this chilling step helps prevent a soggy bottom when baking.
Make the Pie Crust Dough
In a food processor, pulse the 1 cup unsalted butter (cold and cubed) with the 3 cups all-purpose flour, 0.5 cup granulated sugar, 1 tsp salt, and 0.5 tsp ground cinnamon until the mixture resembles coarse crumbs. Add the 0.5 cup ice water and pulse until the dough just comes together—it should hold when pressed but still be slightly crumbly.
Divide the dough into two equal portions. Wrap each portion tightly in plastic wrap and refrigerate for at least 1 hour. This resting time relaxes the gluten and makes the dough easier to roll out. I like to flatten each disk slightly before wrapping to prevent cracking when rolling later.
Roll and Fit the Bottom Crust
Preheat your oven to 375°F. On a lightly floured surface, roll out one portion of the chilled dough to a 12-inch circle, about 1/8-inch thick. Transfer the rolled dough to the pie dish and gently press it into the bottom and up the sides, leaving about 1/2-inch overhang. Trim the excess dough, leaving about 1/4-inch border.
Fold the overhang under itself to create a neat edge. Crimp the edges with your fingers or a fork to seal the crust. Prick the bottom of the crust all over with a fork to prevent air bubbles from forming during baking. Line the crust with a round of parchment paper and fill it with pie weights or dried beans to prevent puffing.
Create the Lattice Topping
Roll out the second portion of dough to a 12-inch circle. Using a sharp knife or pizza cutter, cut the dough into 12 strips about 1/2-inch wide. Arrange 6 strips horizontally across the pie, spacing them evenly about 1/2-inch apart. Fold back every other strip and place the remaining strips perpendicular to create the classic lattice pattern.
Unfold the folded strips and press gently to seal the lattice to the bottom crust. Brush the lattice and bottom crust with a beaten egg (optional) for a golden finish. Bake the pie for 15 minutes, then remove the pie weights and brush the lattice with additional egg wash if desired.
Bake to Golden Perfection
Return the pie to the oven and bake for an additional 40-45 minutes, until the crust is deep golden brown and the filling is bubbling vigorously. The pie is done when the filling is thickened and the lattice is crisp. If the edges brown too quickly, cover them with aluminum foil.
Let the pie cool completely on a wire rack before slicing—this allows the filling to set properly and prevents a runny mess. The lattice will crisp up as it cools, creating that perfect balance of flaky crust and juicy filling in every bite. Serve warm with vanilla ice cream for the ultimate experience!
Pro Tips For Making 2 Crust Blueberry Pie
- Prep Berries First: Toss your blueberries with 1–2 tablespoons of sugar before adding the rest—this prevents them from sinking to the bottom like a sad, watery layer. I learned this the hard way after cutting into a pie where the filling was all clustered at the edges.
- Blind-Bake the Bottom: Roll out your bottom crust, weigh it down with pie weights or dried beans, and bake at 375°F for 10–12 minutes before adding filling. This stops soggy bottoms, and no, you don’t need to chill the crust afterward—just work fast.
- Skip the Overmixing: When tossing blueberries with sugar, cornstarch, and lemon juice, stir just enough to coat—overmixing turns the filling into glue. My grandmother swore by this, and she was right: lumps disappear during baking, but mush doesn’t.
- Vent the Top Crust: Cut a few slits in the top crust before baking, or the steam will puff it up like a balloon and crack it open. Use a sharp knife and cut deep—this isn’t decorating, it’s functionality. (Yes, even if it looks weird.)
Wine and beer pairings for this recipe
White Wine Pairings
A crisp Sauvignon Blanc from New Zealand or Loire Valley is my go-to choice for this blueberry pie. The bright acidity and citrus notes in wines like Cloudy Bay Sauvignon Blanc or Oyster Bay Sauvignon Blanc cut through the sweetness of the berries while complementing the buttery crust.
Look for wines with honeydew melon or grapefruit undertones—these flavors mirror the pie’s natural sweetness without overpowering it. Serve slightly chilled at 45-50°F for the best experience. 🍷
Rosé Wine Options
For a lighter, more refreshing pairing, try a dry rosé with subtle berry notes. I love Whispering Angel or Miraval Rosé—their strawberry and raspberry hints harmonize beautifully with the blueberries while the wine’s crispness balances the pie’s richness.
A rosé with 10-12% alcohol works best, as it won’t overwhelm the delicate flavors. Chill thoroughly before serving to highlight its freshness.
Beer Pairings
A Belgian Witbier like Stella Artois or Hoegaarden adds a fun, effervescent contrast to the pie’s density. The corianander and orange peel notes in these beers complement the blueberries’ tartness, while the carbonation cleanses your palate between bites.
For a darker option, try a honey-brown ale such as Samuel Smith’s Nut Brown Ale—its caramel and toasted malt flavors pair wonderfully with the pie’s buttery crust. 🍺
Cider Complements
Don’t overlook dry hard cider as a fantastic pairing! A crisp, unsweetened cider like Strongbow Original or Woodchuck Hard Cider enhances the pie’s berry flavors without competing. The apple acidity cuts through the sugar, while the hint of spice in some ciders echoes the cinnamon in the filling.
Serve at 40-45°F for the best balance of sweetness and tartness.
Dessert Wine Harmony
If you prefer something richer, a Moscato d’Asti or Riesling Kabinett from Germany brings a lovely sweetness that mirrors the pie’s natural sugars. These wines have peach and floral notes that elevate the blueberries’ aroma.
Opt for a semi-sweet Riesling with 10-11% alcohol to avoid overwhelming the pie. Serve slightly chilled at 50-55°F for a perfect dessert pairing.
Nutrition facts
Frequently asked questions
Can I use frozen blueberries instead of fresh?
Yes, but use them straight from the freezer—don’t thaw first! Frozen berries work perfectly in this recipe, as the cold temperature helps thicken the filling naturally. Just make sure to drain any excess liquid from thawed berries if you accidentally thawed them, or reduce your sugar slightly (1.25 cups instead of 1.5 cups) to balance the moisture.
How do I prevent the crust from getting soggy?
Prevent soggy bottoms with these tricks: 1) Chill the filled pie for 30 minutes before baking, 2) Prick the bottom crust thoroughly with a fork, and 3) Pre-bake the bottom crust for 10 minutes with pie weights before adding filling. The cornstarch in the filling also helps absorb excess moisture during baking.
What’s the best way to make the lattice look perfect?
Use a sharp knife or pizza cutter for clean strips, and keep them 1/2-inch wide. Press the strips gently but firmly to seal them to the bottom crust, then fold every other strip back before adding the perpendicular strips. Brush with egg wash after baking to enhance the golden color and crispness. If the lattice looks uneven, don’t worry—it still tastes amazing!
Can I make this pie ahead of time?
This pie actually tastes better the next day. Assemble and bake it up to 2 days ahead, then store it in an airtight container at room temperature. For longer storage, freeze the whole pie (unwrapped) for up to 3 months. Thaw overnight in the fridge before serving. The lattice stays crisp, and the flavors meld beautifully.
Why did my filling turn out runny?
Runny filling usually means one of three things: 1) Underbaked pie (needs 40-45 minutes total), 2) Too much liquid (use frozen berries straight from freezer), or 3) Not enough thickener (cornstarch is key—don’t skip it!). If it’s slightly underdone, return to oven for 5-10 minutes to set properly.

- 3lb Prime Rib Roast Recipe: Juicy Pink Center Guaranteed in 3 Hours - October 31, 2026
- 5 Spice Cake Recipe: Warmly Spiced Layers With Crunchy Top - October 31, 2026
- 1950’s Macaroni and Cheese Recipe: Nostalgic Creamy Cheese Sauce with Buttery Noodles - October 31, 2026