
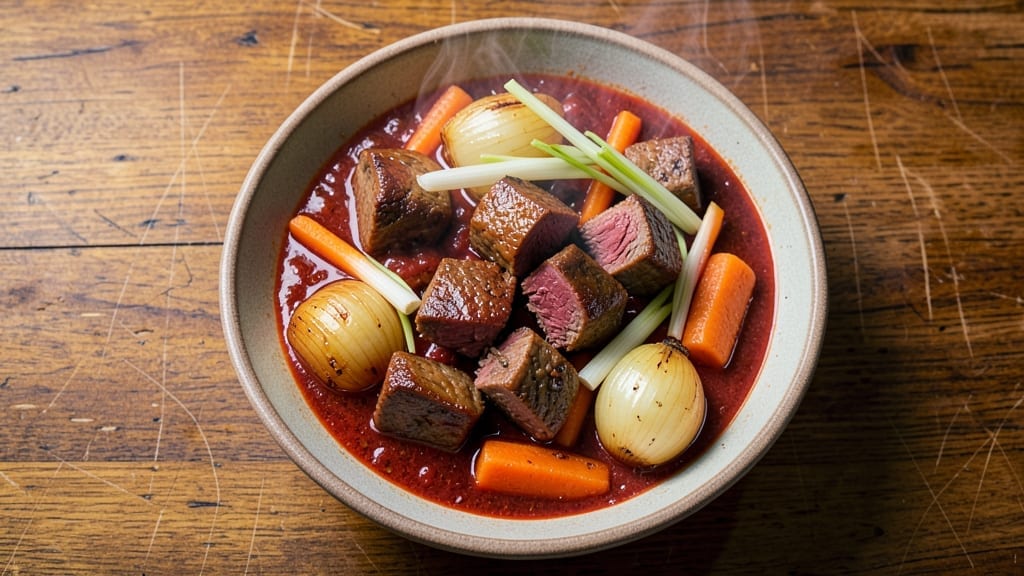
A 2-hour beef stew transforms tough cuts into melt-in-your-mouth perfection with just the right balance of slow simmering and bold flavors. The secret lies in proper browning of the beef and deglazing the pan to capture rich, caramelized fond—this step alone builds depth that shortcuts can’t replicate.
I’ve refined this method to deliver restaurant-quality results without requiring an overnight commitment, making it ideal for busy weeknights when you still crave hearty comfort food.
This recipe focuses on three essential techniques: browning the beef in batches to ensure maximum flavor extraction, building layers of aromatic vegetables, and maintaining a gentle simmer that tenderizes the meat while allowing flavors to meld.
The result is a stew with deep, complex notes where the beef practically falls apart at the touch of a fork. What sets this apart is how it achieves that professional depth in just two hours—no need for overnight soaking or extended simmering.
By the time you serve this stew, you’ll have a pot filled with tender beef chunks swimming in a velvety broth infused with caramelized vegetables and aromatic herbs.
The aroma alone will have everyone gathering at the table, and each bite delivers that perfect combination of tender meat, crisp vegetables, and richly developed sauce. This is the kind of dish that transforms a simple dinner into an experience.
Pair it with crusty bread for soaking up every last drop of that flavorful broth, or serve alongside roasted potatoes for a complete meal. The leftovers reheat beautifully, making it perfect for meal prep or feeding a crowd.
Here’s how to create this comforting classic in just two hours—no shortcuts, just smart techniques that deliver professional results at home.
Ingredients for 2 hour beef stew
The perfect balance of beefy richness and aromatic vegetables—just 14 ingredients for restaurant-quality depth.
| Ingredient | Amount | Notes |
|---|---|---|
| Chuck Roast Beef 🥩 | 2 lb | Cut into 1.5-inch cubes, trimmed of fat |
| Yellow Onion 🧅 | 1 whole | Chopped into 0.5-inch dice |
| Carrots 🥕 | 3 medium | Peeled, cut into 1-inch chunks |
| Celery Stalks 🌿 | 3 whole | Chopped into 0.5-inch pieces |
| Garlic Cloves 🧄 | 4 cloves | Minced, not pre-minced jarred |
| Tomato Paste 🍅 | ½ cup | Smooth, not chunky |
| Beef Broth 💧 | 3 cups | Low-sodium preferred |
| Red Wine 🍷 | 1 cup | Bold dry variety like Cabernet |
| Fresh Thyme 🌿 | 2 sprigs | Or 1 tsp dried thyme |
| Fresh Rosemary 🌿 | 1 sprig | Wooden spoon to crush leaves |
| Olive Oil 🫒 | 2 tbsp | Extra-virgin for richness |
| All-Purpose Flour 🌾 | 2 tbsp | For thickening |
| Salt 🧂 | 1 ½ tsp | Diamond Crystal preferred |
| Ground Black Pepper 🌶️ | 1 tsp | Freshly cracked |
| Bay Leaves 🌿 | 2 whole | Remove before serving |
The beef is non-negotiable here. Chuck roast delivers that melt-in-your-mouth texture—sirloin or round stays tough. Most grocery stores carry it pre-cut, but if you’re buying a whole roast, ask the butcher to cube it for you. Costco and Walmart often have it on sale frozen, which saves money and keeps well. Look for good marbling—those little white fat streaks are what make the stew rich and tender. The carrots and celery should be firm with no soft spots, and the onions should smell fresh, not bitter. Fresh herbs are worth the extra few dollars—they make all the difference in that final aromatic punch.
No red wine? Substitute with beef broth plus 1 tbsp balsamic vinegar—it adds depth without alcohol. Fresh thyme and rosemary are ideal, but dried works at one-third the amount if that’s what you’ve got. The tomato paste can be from a tube or a can—just make sure it’s smooth, not chunky. For the flour, King Arthur or Gold Medal brands work perfectly for thickening. If you’re short on time, pre-chopped mirepoix from the store saves 10 minutes of prep. The beef broth should be low-sodium—Swanson or Pacific Foods are great choices, or make your own from scratch if you’re feeling ambitious.
This stew tastes even better the next day—plan ahead. Store in an airtight container for up to 5 days in the fridge, or freeze for 3 months. For reheating, add a splash of water or broth to prevent drying out. I always make a double batch because it reheats so beautifully for lunches. The herbs can be stripped from their stems and frozen in ice cube trays with a little olive oil—just toss them straight into the pot when you’re ready to cook. The beef cubes will keep in the fridge for 3 days before cooking, but use them sooner for best texture.
Why You’ll Love This Recipe
- Deep Umami Magic: Between the slow-braised chuck roast and the garlic cloves sizzled in the pot, this stew has that rich, meaty depth that makes you forget it’s just a weeknight dinner. Honestly, the first bite after two hours of simmering? It’s like biting into a hug.
- Weeknight to Potluck: Make a double batch on Sunday and you’ve got lunch for Tuesday, dinner for Thursday, and leftovers for your coworker’s birthday potluck. Between us, this stew tastes even better the next day—so why not make it twice?
- Budget Hero: A chuck roast stretches farther than you’d think, and the veggies (onion, carrots, celery) are the kind that last forever in your fridge. I’ll be real: this is the recipe I turn to when I’m pinching pennies, and no one ever guesses it’s the cheaper cut.
Step-by-step instructions for deep-rich beef stew
Here’s how to build layers of flavor through slow simmering and proper technique.
🍳 Step 1: Sear the Beef for Deep Flavor
Heat the 2 tablespoons olive oil in a heavy Dutch oven over medium-high heat until shimmering. Working in batches to avoid crowding, add the 2 lb chuck roast beef cut into 1.5-inch cubes and sear for 2-3 minutes per side until deeply browned. This step creates the Maillard reaction that forms the stew’s rich foundation.
Don’t rush this—you want each piece to develop a deep, caramelized crust. I press down gently on the beef with a spoon during the first minute to prevent curling. Once all pieces are browned, transfer them to a plate and set aside. The beef will continue cooking gently in the stew, so no need to fully cook it here.
👨🍳 Step 2: Build the Aromatic Base
In the same Dutch oven, reduce heat to medium and add the 1 whole yellow onion chopped into 0.5-inch dice, 3 medium carrots cut into 1-inch chunks, and 3 whole celery stalks chopped into 0.5-inch pieces. Cook for 5-6 minutes until the vegetables soften slightly and begin to release their natural juices.
Add the 4 cloves minced garlic, 0.5 cup tomato paste, 1.5 teaspoons salt, and 1 teaspoon freshly cracked black pepper. Stir for 1 minute until the garlic becomes fragrant and the tomato paste darkens slightly. This aromatic base forms the flavor backbone of your stew—don’t skip this step. The tomato paste will deepen the color and complexity.
🍳 Step 3: Deglaze and Develop the Sauce
Pour in the 1 cup red wine and scrape up all the browned bits from the bottom of the pot with a wooden spoon. This deglazing step captures all the meaty flavor that would otherwise stick to the pot. Let the wine simmer for 3-4 minutes until it reduces by about half and becomes slightly syrupy.
Sprinkle the 2 tablespoons all-purpose flour over the mixture and stir vigorously for 1-2 minutes until fully incorporated. This creates a light roux that will help thicken the stew as it simmers. The flour should blend completely with no visible streaks—this ensures a smooth, velvety texture rather than a grainy one.
🥘 Step 4: Simmer for Maximum Flavor Development
Return the seared beef to the pot along with the 3 cups beef broth, 2 sprigs fresh thyme, 1 sprig fresh rosemary (crush the leaves with a wooden spoon), and 2 whole bay leaves. Bring to a gentle boil, then immediately reduce heat to low to maintain a barely simmering state. Cover partially and cook for 1 hour 30 minutes.
Here’s the key: you want the stew to bubble gently, with just tiny bubbles breaking the surface. If it boils vigorously, the beef will toughen. Check occasionally and add hot water if the liquid reduces too much—you want the beef mostly submerged. The vegetables should become fork-tender while the beef melts in your mouth.
⏰ Step 5: Finish and Adjust Seasoning
Remove the bay leaves and adjust seasoning if needed. Taste the stew and add more salt or pepper as necessary—remember, the beef will have absorbed some of the seasoning during cooking. The stew should be rich and flavorful, with the vegetables tender but still holding their shape.
Let the stew sit off heat for 10 minutes before serving. This resting period allows flavors to meld completely. Serve with crusty bread to soak up every last drop of that luxurious beef broth. The result is a deeply satisfying stew where each bite delivers layers of caramelized beef, aromatic vegetables, and wine-infused richness.
Pro Tips For Making 2 Hour Beef Stew
- SEAR THE ONIONS FIRST: I used to toss everything in at once, but searing the onions (and any other aromatics) for 5 minutes until they’re deep golden—almost caramelized—gives the stew a richness that just simmering won’t. The extra effort pays off in flavor, especially when you’re working with a short cook time.
- CUT CARROTS UNIFORM: Big chunks of carrot stay tough and undercooked in 2 hours. Aim for ½-inch slices or matchsticks so they soften evenly without turning to mush. (Yes, it’s a pain to chop them small, but your stew will thank you.)
- DON’T CROWD THE PAN: If you’re browning the chuck roast, work in batches—overloading the pan steams the meat instead of searing it, which means bland, gray beef instead of flavorful, caramelized crust. A hot pan and patience make all the difference.
- ADD LIQUID IN STAGES: Start with just enough broth or water to deglaze the pan after searing, then add the rest later. This keeps the surface of the stew hot enough to develop fond (the browned bits that make flavor) without boiling off too fast. Add the full liquid in the last 30 minutes if needed.
Essential equipment for great 2 hour beef stew
Dutch Oven Essentials
A heavy-duty Dutch oven is non-negotiable for this recipe. I rely on my Lodge 5.5-quart cast iron Dutch oven—it retains heat beautifully and handles the high heat needed for searing while preventing scorching.
If you don’t own one, a Le Creuset stoneware Dutch oven is another excellent choice, though it requires preheating longer. Avoid thin, lightweight pots—they can’t maintain even heat, leading to uneven cooking and potential burning. 🔥
Precision Tools
Invest in a high-quality meat thermometer like the ThermoWorks Smoke to monitor internal beef temperature—aim for 195-200°F for perfect tenderness. A wooden spoon is crucial for deglazing and stirring without scratching your pot.
For chopping vegetables efficiently, a sharp chef’s knife (I use Mercer Culinary Genesis) paired with a cutting board (like John Boos bamboo) makes prep a breeze. Pre-measuring spices with a spice scale ensures accuracy.
Heat Control Must-Haves
Your stove’s medium-high heat setting is critical for searing—most stoves run 350-400°F at this level. A kitchen timer helps track the 1 hour 30 minutes simmer time precisely.
For even heat distribution, place your Dutch oven on the center burner of a gas stove or the middle rack of an electric one. If your stove has hot spots, rotate the pot occasionally. A lid with a chimney (like All-Clad’s) helps control steam and prevents overflow during simmering.
Optional Upgrades
For wine lovers, a wine funnel ensures no precious drops are wasted when adding the 1 cup red wine. A fine-mesh strainer helps remove bay leaves cleanly before serving.
If you’re prepping ahead, glass storage containers with tight seals (like Pyrex) preserve flavor and texture for up to 5 days in the fridge. For freezing, quart-sized freezer bags save space and prevent freezer burn.
The $50 spent on these tools pays off in flavor and convenience every time. ✨
Nutrition facts
Frequently asked questions
Can I use a different cut of beef for this stew?
While chuck roast is ideal for its tenderness and flavor, you can substitute with stew meat or brisket—both work well. Avoid lean cuts like sirloin or round, as they lack the fat needed for rich flavor and tenderness. If using a tougher cut, increase simmering time by 15-20 minutes to ensure perfect texture.
What if I don’t have red wine? Can I substitute?
Replace the 1 cup red wine with 1 cup beef broth plus 1 tablespoon balsamic vinegar for depth, or use 1 cup apple cider for a sweeter note. For a non-alcoholic option, try 1 cup cranberry juice—it adds acidity and color. The key is balancing acidity and richness to mimic wine’s contribution.
How do I prevent the stew from getting too thick?
Add 1-2 tablespoons hot water or broth while simmering if the stew thickens too much. The flour roux will naturally thicken as it cooks, but maintaining a barely simmering state prevents over-reduction. For extra insurance, stir in 1/4 cup broth during the final 10 minutes of cooking to adjust consistency.
Can I make this stew in a slow cooker?
Yes! Brown the beef first in a skillet, then transfer everything to a 6-quart slow cooker and cook on low for 8 hours or high for 4-5 hours. The slow cooker method is perfect for hands-off prep, but you may need to add 1/2 cup broth if the stew reduces too much. The flavors will develop just as deeply—it’s all about the simmer time.
Why does my beef stew taste bland?
Bland flavor usually comes from skipping the browning step or not deglazing the pan. Always sear the beef until deeply browned and scrape up all the fond with wine or broth. Taste as you go—add salt gradually (beef absorbs seasoning), and boost umami with 1 teaspoon Worcestershire sauce or 1/2 teaspoon smoked paprika at the end.

- 3lb Prime Rib Roast Recipe: Juicy Pink Center Guaranteed in 3 Hours - October 31, 2026
- 5 Spice Cake Recipe: Warmly Spiced Layers With Crunchy Top - October 31, 2026
- 1950’s Macaroni and Cheese Recipe: Nostalgic Creamy Cheese Sauce with Buttery Noodles - October 31, 2026