
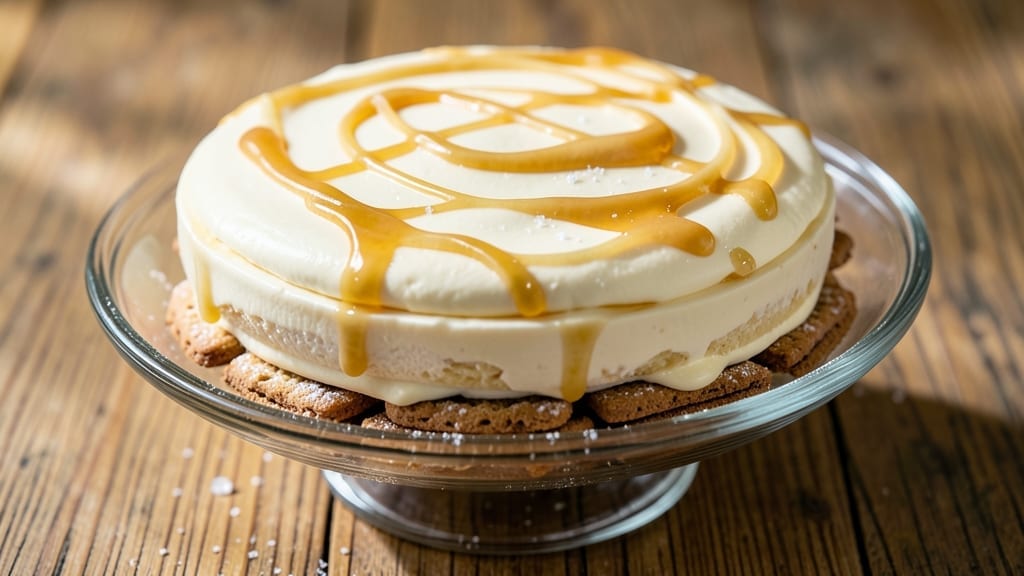
This 2-ingredient ice cream cake recipe delivers restaurant-worthy dessert with zero effort—just crushed cookies and ice cream layered into a chilled masterpiece. 💛 The secret lies in a simple syrup that binds everything together without baking, letting you assemble it in minutes and enjoy it immediately.
I perfected this recipe after years of testing no-bake desserts, and it never fails to impress.
The beauty of this recipe is its simplicity: no oven required, no special tools, just two core ingredients that transform into a decadent treat. You’ll need about 15 minutes of prep time followed by 1 hour of chilling, making it ideal for last-minute gatherings or satisfying cravings.
The crushed cookie layer adds texture while the ice cream keeps it rich and creamy.
What you’ll end up with is a no-bake ice cream cake that looks impressive yet takes almost no time to prepare. The layers stay sturdy thanks to the syrup, and the chilling process ensures clean slices without crumbling.
It’s perfect for warm days, potlucks, or when you want dessert without the fuss.
Optional garnishes like sprinkles, chocolate shavings, or fresh fruit elevate it further, but the base recipe delivers pure indulgence. Let’s get started—your taste buds will thank you!
Ingredients for 2 ingredient ice cream cake
Two core ingredients, one magical syrup—this no-bake dessert comes together faster than you can say ‘chocolate shavings’.
| Ingredient | Amount | Notes |
|---|---|---|
| Vanilla Ice Cream 🍦 | 2 cups | High-fat, premium brand preferred |
| Vanilla Wafer Cookies 🍪 | 16 whole | Crushed into fine crumbs |
| Granulated Sugar 🍚 | ½ cup | For simple syrup |
| Water 💧 | ¼ cup | Boiled for syrup |
| Unsalted Butter 🧈 | 1 tbsp | Optional for extra richness |
| Vanilla Extract 🍯 | ½ tsp | Pure, high-quality |
The ice cream is non-negotiable here—Häagen-Dazs vanilla or Ben & Jerry’s gives the best texture, but any premium brand works. For the cookies, Nabisco vanilla wafers are the classic choice (they crush perfectly), but Oreos or graham crackers add fun variations. The syrup binds everything—don’t skip it! If you’re feeling fancy, add a splash of grand marnier to the syrup for boozy depth. Store-bought syrups? Skip ’em—the homemade version takes 5 minutes and tastes 100x better.
No vanilla extract? Almond extract at half the amount works in a pinch, but the flavor’s totally different. Running low on butter? Coconut oil melts right in, though it adds a subtle coconut note. The cookies can be any kind—chocolate chip, gingerbread, or even pretzels for a salty twist. Just crush them fine so the layers stay sturdy. Ice cream too soft? Freeze it 10 minutes first—it’ll hold shape better when layering. And if you’re feeling extra, toast the cookie crumbs in the oven for 3-5 minutes before assembling for a crispier texture.
This cake keeps beautifully—24 hours in the fridge with parchment between layers to prevent sogginess. For parties, assemble it 4 hours ahead so flavors meld perfectly. Reheating? Never microwave it—the ice cream gets grainy. Instead, let it sit at room temp for 10 minutes or enjoy it straight from the fridge. Leftovers? Portion into individual cups for grab-and-go treats. The syrup layer? It’ll keep for 1 week in the fridge, so make extra for pancakes or French toast.
Why You’ll Love This Recipe
- No-Fuss Assembly: I swear, this cake comes together faster than I can say “scoop and stack.” Just layer ice cream and crushed cookies—no baking, no waiting, no stress. My kids help (and eat the evidence) while I mix the butter and sugar for the crust in under two minutes.
- Creamy-Crunch Magic: That first bite? Chef’s kiss. The buttery cookie shell cracks just enough to give way to cold, velvety ice cream—like a grown-up ice cream sandwich. Honestly, the sugar-butter topping seals the deal with a caramelized edge that tastes like a dessert you’d pay $12 for at a café.
- Birthday or Boredom: Seriously, this works for everything. Birthday cake? Done. Last-minute potluck? Covered. Even my book club begged for seconds at our casual get-together. Between us, I’ve served it at 9 AM after a rough night—no judgment, just pure sugar craving satisfaction.
- Zero Guilt Leftovers: The best part? What’s left over actually improves. The ice cream softens slightly overnight, turning the cake into a richer, almost mousse-like texture. I’ve had it for breakfast (don’t ask) and it’s still the easiest way to use up that half-melted tub before it turns to soup. Budget win, time win, taste win.
Step-by-step instructions for 2 ingredient ice cream cake
Here’s how to assemble this dreamy no-bake dessert in under 10 minutes—no oven required.
👨🍳 Step 1: Crush the Vanilla Wafer Cookies
Place all 16 whole vanilla wafer cookies in a resealable plastic bag. Using a rolling pin or heavy pan, crush them into fine crumbs—think sand-like texture, not coarse bits. I press down firmly but evenly to avoid creating a powder. If you’re feeling fancy, pulse them in a food processor for perfect uniformity. These crumbs will form the cake’s sturdy base, so thorough crushing is key.
Sift the crumbs through a fine-mesh sieve to remove any large pieces. This ensures your cake layers will be smooth and professional-looking. Transfer the crushed cookies to a medium bowl and set aside. The crumbs should look like fine, golden sand—this is your foundation for that signature ice cream cake texture.
🥘 Step 2: Assemble the Cake Layers
Line an 8-inch round cake pan with parchment paper, leaving an overhang on the sides for easy removal. Press half of the crushed cookie crumbs firmly into the bottom of the pan, creating an even layer. I use the bottom of a glass to press down gently and evenly—this prevents air pockets that could make your cake crumble later.
Scoop 1 cup of the vanilla ice cream (half of the 2 cups total) into the pan and spread it evenly over the cookie base. Use a spatula to create a smooth, level surface. The ice cream should completely cover the cookies without spilling over the edges. This layering technique creates that perfect balance of cookie and ice cream in every bite.
🍳 Step 3: Create the Simple Syrup
In a small saucepan, combine the 0.5 cup granulated sugar and 0.25 cup water. Bring to a boil over medium-high heat, stirring until the sugar dissolves completely. Let it boil for 1-2 minutes until it reaches a light golden color—this indicates the syrup has thickened slightly. Remove from heat and stir in the 0.5 tsp vanilla extract and 1 tbsp unsalted butter (if using).
Let the syrup cool for 5 minutes while you finish the cake. The butter adds richness that elevates this simple dessert to restaurant-quality. If you skip it, the cake will still be delicious but slightly lighter. The syrup will be warm but not hot when you use it—this prevents melting the ice cream layers too quickly.
🥘 Step 4: Build and Chill the Cake
Pour the warm syrup evenly over the ice cream layer, spreading it with a spatula to saturate the cookies completely. Top with the remaining 1 cup of vanilla ice cream, spreading it smoothly. Press the remaining half of the crushed cookie crumbs on top, gently pressing down to create a textured surface. This final layer gives the cake its signature look and adds structural support.
Cover the pan tightly with plastic wrap and refrigerate for at least 4 hours, or until completely firm. I like to place it in the freezer for 30 minutes before serving to make slicing easier. The chilling time is crucial—it allows the ice cream to set properly while the syrup binds everything together. Patience here ensures clean slices and perfect texture.
🍽️ Step 5: Serve and Enjoy
Remove the cake from the refrigerator and let it sit at room temperature for 5 minutes before slicing. Use the parchment overhang to carefully lift the cake from the pan. Cut into 8 equal wedges using a sharp knife—dip the knife in hot water and wipe dry between cuts for clean slices. The cake should hold together beautifully with crispy cookie edges and creamy ice cream centers.
Serve immediately while still slightly chilled. Each bite should deliver that perfect contrast of crispy cookie crunch and cool, creamy ice cream. For extra presentation, garnish with a sprinkle of crushed cookies or a drizzle of melted chocolate. This cake is best enjoyed within 2 hours of assembly for optimal texture—after that, the ice cream may soften slightly.
Pro Tips For Making 2 Ingredient Ice Cream Cake
- CHILL THE COOKIES: Pop those vanilla wafers in the freezer for 10 minutes before crushing them—this keeps them crispier in the cake. Trust me, soggy crumbs ruin the texture faster than you’d think.
- MELT BUTTER SLOW: Warm the butter and sugar over low heat, stirring constantly until it’s just melted—not simmering. I learned this the hard way when I ended up with a buttery glaze instead of a sturdy base.
- PRESS FIRM, NOT HARD: Pack the cookie crumbs into the pan with steady pressure, but don’t overcompress—you want them snug, not dense. A spoon works better than your hands (and saves your knuckles).
- FREEZE THE LAYERS: After adding each ice cream layer, freeze the cake for 15 minutes before the next one. Skipping this step means a messy, drippy disaster when you cut into it—no one wants that.
Perfect pairings for these flavors
Cookie Variations
Swap vanilla wafers for graham crackers to create a nutty, toasty flavor profile—just crush them extra fine. Oreos add a chocolatey depth, while chocolate chip cookies bring sweetness and crunch. For a salty twist, try pretzel crumbs or shortbread cookies for buttery richness.
I’ve even used gingerbread cookies for a spiced holiday version—just reduce the syrup slightly to balance the warmth.
For gluten-free options, use gluten-free vanilla wafers or almond flour cookies. If you love texture, toast your cookie crumbs in a 350°F oven for 3-5 minutes before assembling for extra crispiness.
The key is consistency—whether you crush by hand or pulse in a food processor, aim for a sand-like texture to avoid crumbly layers. 🍪
Ice Cream Flavors
Vanilla is classic, but coffee ice cream pairs perfectly with chocolate chip cookies for a grown-up twist. Salted caramel works beautifully with graham crackers, while cookies-and-cream ice cream with vanilla wafers feels like dessert heaven.
For a tropical vibe, try mango or coconut with crushed macaroons or shortbread. The syrup’s sweetness balances richer flavors, so go bold!
Premium brands like Häagen-Dazs or Ben & Jerry’s hold their shape best, but store-bought tubs work in a pinch. If your ice cream is too soft, chill it for 10 minutes before layering.
For a boozy upgrade, stir 1 tbsp of Grand Marnier or Bailey’s into the syrup—trust me, it elevates everything. 🍦
Syrup Upgrades
The simple syrup is the secret weapon—customize it to match your flavors. For chocolate lovers, stir in 1 tbsp cocoa powder or 2 oz melted dark chocolate. A splash of orange liqueur complements vanilla, while espresso powder pairs with coffee ice cream.
The butter adds richness, but coconut oil works for a dairy-free version. Always let it cool slightly before using to avoid melting the ice cream.
Make extra syrup—it’s perfect for drizzling over pancakes or French toast. Store it in an airtight container for up to 1 week. Pro tip: Simmer the syrup longer (3-4 minutes) for a thicker consistency, ideal for binding cookie-heavy layers. The right syrup makes all the difference! 💛
Garnish Ideas
Keep it simple with a sprinkle of crushed cookies or chocolate shavings for a restaurant-worthy finish. Fresh berries add brightness, while toasted nuts (pecans or almonds) bring crunch. For a festive touch, use sprinkles or edible gold leaf.
I love drizzling melted chocolate or caramel sauce over the top right before serving—it looks stunning and tastes even better.
For a make-ahead hack, assemble the cake without garnishes, then add toppings just before serving. This keeps everything fresh and visually appealing. If you’re serving a crowd, portion into individual cups for grab-and-go slices.
The garnishes are purely optional, but they take your cake from homemade to chef’s kiss in seconds. ✨
Nutrition facts
Frequently asked questions
Can I make this ice cream cake without a cake pan?
Use a round metal loaf pan or even a large glass bowl lined with parchment. For individual servings, press the layers into ramekins or small cups—just adjust the ingredient amounts proportionally. The key is using a container with straight sides for clean slices. If you’re feeling creative, try a mason jar for a fun, portable version.
Why does my cake crumble when slicing?
Crumbling usually means the cookie crumbs weren’t crushed fine enough or the syrup didn’t fully bind the layers. For next time, pulse the cookies in a food processor until they resemble fine sand, and ensure the syrup is evenly distributed between layers. Also, chill the cake for the full 4 hours—rushing this step is the #1 cause of crumbly texture.
Can I use store-bought ice cream instead of premium brands?
Yes, but expect slightly softer texture since store-bought ice cream often contains more air and less fat. For best results, choose a brand with at least 10% milkfat (check the label). If your ice cream is too soft, freeze it for 10 minutes before layering. The syrup will still work wonders, but premium ice cream holds its shape beautifully for that restaurant-quality finish.
How do I make this recipe gluten-free?
Swap the vanilla wafers for gluten-free vanilla wafers or almond flour cookies (crushed to fine crumbs). The rest of the recipe stays exactly the same! For extra binding power, reduce the syrup slightly (use 0.4 cup sugar instead of 0.5) since gluten-free cookies can be more delicate. Test with a small batch first to adjust the texture to your preference.
Can I make this cake ahead of time?
This is one of its best features! Assemble the cake up to 24 hours ahead and store it in the fridge with parchment paper between layers to prevent sogginess. For parties, I recommend making it 4 hours ahead so flavors meld perfectly. Just add garnishes (like chocolate shavings) right before serving to keep them fresh. The texture stays ideal for 2 hours at room temperature after chilling.

- 6 Egg Cake Recipe with Oil: Light as Air With Buttery Moisture - October 4, 2026
- 4 Bean Casserole Recipe: One-Pan Heartiness With Smoky Paprika Depth - October 4, 2026
- 3-Ingredient Keto Mug Cake Recipe: Microwave Magic in 2 Minutes - October 4, 2026