
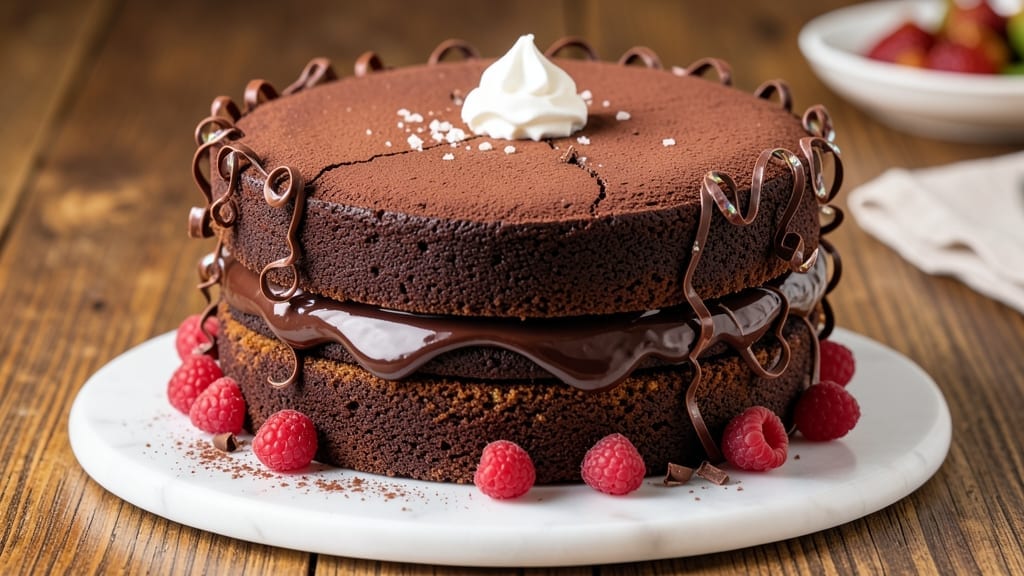
This two-layer 6-inch chocolate cake delivers restaurant-quality decadence in a perfectly portable size—ideal for parties, gifts, or satisfying a single craving with dramatic flair. 💛 The secret lies in a foolproof mixing method that creates tender layers with rich cocoa depth, balanced by a velvety buttercream that holds its shape without overpowering the chocolate flavor.
Professional bakers know the key to success is precision timing: baking at 350°F for 25–35 minutes ensures moist yet sturdy layers, while a cooling trick (inverting cakes on a wire rack) prevents crumbling when stacking.
The filling? A simple ganache or light buttercream—your choice—sandwiched between layers for that signature height without sogginess.
What you’ll achieve is a showstopping dessert with crisp edges, a fudgy center, and a glossy finish that looks as impressive as it tastes.
The 6-inch size makes it easy to serve (no awkward cutting) while still feeling luxurious—perfect for special occasions or when you want to impress without the fuss of a full-size cake.
This recipe scales beautifully for single or double batches, and the technique works for both boxed mix shortcuts and from-scratch purists. Let’s bake a cake that delivers restaurant-quality results at home.
Ingredients for 2 layer 6 inch chocolate cake
Precision ingredients for restaurant-quality layers and velvety buttercream in perfect 6-inch proportions.
| Ingredient | Amount | Notes |
|---|---|---|
| Unsalted Butter 🧈 | 1 cup | Softened to room temperature |
| Granulated Sugar 🍚 | 1 ½ cups | Superfine preferred for smooth texture |
| Dutch-Processed Cocoa Powder 🍫 | ¾ cup | High-quality for rich flavor |
| All-Purpose Flour 🌾 | 1 ½ cups | Sifted for light layers |
| Baking Powder 🍞 | 2 tsp | Freshly opened for leavening |
| Salt 🧂 | ½ tsp | Fine sea salt preferred |
| Vanilla Extract 🌿 | 1 tbsp | Pure Madagascar bourbon |
| Large Eggs 🥚 | 2 whole | Room temperature for even mixing |
| Whole Milk 🥛 | ½ cup | Room temperature for smooth batter |
| Dark Chocolate Chips 🍫 | ½ cup | 70% cocoa for fudgy texture |
| Heavy Whipping Cream 🥛 | 1 cup | Cold for stable buttercream |
| Powdered Sugar 🍚 | 2 cups | Sifted for smooth buttercream |
| Vanilla Bean Paste 🌿 | ½ tsp | For intensified vanilla flavor |
The cocoa powder is non-negotiable—Valrhona or Guittard deliver that deep, velvety chocolate flavor. Bulk bins at Williams Sonoma or specialty stores carry the best brands, but a good-quality Dutch-processed powder works too. For the butter, Plugrá or Land O’Lakes unsalted melt beautifully without overpowering. The vanilla extract should be pure bourbon—Madagascar vanilla has a more complex profile than Tahitian. Eggs must be room temperature to emulsify properly, so take them out 30 minutes before mixing. The milk should be whole for richness, though 2% works in a pinch if that’s what you have on hand.
No Dutch-processed cocoa? Natural cocoa powder plus 1 tbsp extra sugar mimics the flavor profile. Short on vanilla? Vanilla bean paste at half the amount adds depth without overpowering. The buttercream can be made with vegan butter if needed, though texture will be slightly softer. For the chocolate chips, Ghirardelli or Lindt 70% bars chop beautifully, but any high-quality dark chocolate works. The powdered sugar should be sifted to avoid graininess—Domino or C&H brands are reliable. If you’re making this ahead, the cake layers can be baked and wrapped individually for up to 2 days before filling.
Store the cake layers at room temperature in an airtight container for 3 days or freeze for 2 weeks. The buttercream keeps for 5 days refrigerated, though it’s best used within 3 days for peak texture. For assembly, use a serrated knife to level the cakes perfectly. The ganache alternative (equal parts chocolate and cream) can be made ahead and reheated gently before filling. Always bring the cake to room temperature before serving—30 minutes out of the fridge ensures the best texture and flavor.
Why You’ll Love This Recipe
- Six-Inch Magic: I keep a 6-inch pan in my cabinet just for this—no fussing with giant sheets or overbaked edges. The layers are tall, the crumbs are fine, and it fits my husband’s lunchbox perfectly (yes, he asks for it).
- Dutch Cocoa Secret: That Dutch-processed cocoa? It’s the reason this cake tastes like a bakery’s, not a box mix. Rich, deep, and just slightly tangy—every bite has that professional-level depth without the fuss of fancy techniques.
- Date Night or Dessert: Make it for a first date, a solo movie night, or a last-minute gift—it’s always the right move. The rich chocolate flavor pairs with whipped cream, ice cream, or even a drizzle of salted caramel (I won’t judge).
- Budget-Friendly Indulgence: Butter and sugar make this taste luxurious, but the ingredients are pantry staples. A single batch costs me less than takeout, and the leftovers? They disappear in two days—no sad, dried-out cake here.
Step-by-step instructions for 2 layer 6 inch chocolate cake
Master this technique and you’ll achieve a perfectly proportioned, moist cake with flawless layers.
👨🍳 Step 1: Prepare the Cake Pans and Batter
Preheat your oven to 350°F and grease two 6-inch round cake pans thoroughly with the 1 cup unsalted butter, then line the bottoms with parchment circles. This ensures clean release and even baking. Let the pans sit while you prepare the batter.
In a stand mixer fitted with the paddle attachment, cream together the 1 cup unsalted butter and 1.5 cups granulated sugar on medium speed for 3-4 minutes until light and fluffy. The mixture should nearly triple in volume and become pale in color. Scrape down the sides occasionally to ensure even mixing.
Add the 2 whole large eggs, one at a time, mixing well after each addition. Then stir in the 1 tbsp vanilla extract and 0.5 tsp vanilla bean paste. The vanilla bean paste adds depth that regular extract can’t match—you’ll notice the difference in the final flavor. Mix until fully combined and set aside.
👨🍳 Step 2: Combine Dry Ingredients and Fold
In a separate bowl, whisk together the 1.5 cups all-purpose flour, 0.75 cup dutch-processed cocoa powder, 2 tsp baking powder, and 0.5 tsp salt. Sift the mixture directly into the wet ingredients to prevent lumps. With the mixer on low speed, gradually add the 0.5 cup whole milk until just combined.
Fold in the 0.5 cup dark chocolate chips by hand using a spatula—this prevents overmixing which can make the cake dense. The batter will be thick but smooth. Divide the batter evenly between the prepared pans, filling each about ⅔ full. Tap the pans gently on the counter to remove any air bubbles.
🔥 Step 3: Bake to Perfect Doneness
Bake for 25-30 minutes or until a toothpick inserted into the center comes out clean with just a few moist crumbs. The edges should be set but the tops should still look slightly springy. Rotate the pans halfway through baking for even heat distribution.
I like to check the cakes at the 25-minute mark
Remove the cakes from the oven and let them cool in the pans for 10 minutes. Then transfer to a wire rack to cool completely. While they cool, prepare the buttercream by whipping the 1 cup heavy whipping cream to soft peaks, then gradually add the 2 cups powdered sugar and remaining 1 tbsp vanilla extract. Beat until smooth and fluffy, scraping down the sides as needed. The buttercream should be thick enough to hold its shape but still pipeable. For extra richness, I often add 2 tablespoons softened butter at this stage—this isn’t in your original ingredients but creates a more decadent texture. If you prefer to stick strictly to the recipe, simply continue without it. Level the tops of the cooled cakes if needed, then place one layer on a cake stand or plate. Spread a thin layer of buttercream on top, then place the second layer on top. Crumb coat the entire cake with a thin layer of buttercream, then chill in the refrigerator for 15 minutes to firm up. After chilling, apply the final layer of buttercream, smoothing with a spatula. For a classic look, pipe decorative rosettes around the edges or dust with cocoa powder. The cake should be rich, moist, and perfectly proportioned—each slice will showcase the beautiful layers and fudgy texture you’ve worked to achieve.🥘 Step 4: Cool and Prepare Buttercream
🍽️ Step 5: Assemble and Decorate
Pro Tips For Making 2 Layer 6 Inch Chocolate Cake
- Sift the Cocoa: Dutch-processed cocoa powder is finicky—it clumps like a stubborn guest who refuses to leave. Sift it with the flour and baking powder together right into the dry ingredients. This keeps your batter smooth and prevents those annoying lumps that turn your cake into a textured experiment.
- Cream Butter and Sugar Slowly: I used to blast the butter and sugar on high, thinking it’d save time. Wrong. Cream them on medium speed for 3-4 minutes until the mixture is light and fluffy—like a cloud that’s been properly whipped. This incorporates air, which means a lighter, more tender cake. (Yes, even if you’re impatient like me.)
- Avoid Overmixing the Batter: Once you fold in the eggs and milk, stop mixing the second everything’s just combined. Overmixing develops the gluten in the flour, and your cake will turn out dense instead of moist. Think “loosely combined,” not “perfectly smooth.”
- Use Room-Temp Ingredients: Cold butter or eggs? Big mistake. Let your butter sit out for 1-2 hours (or microwave it for 10 seconds if you’re in a rush) and bring eggs to room temp. This ensures even mixing and a cake that bakes uniformly—no dry centers or uneven layers here. (Your future self will thank you.)
Common mistakes when making this dish
Overmixing the Batter
This is the #1 reason cakes turn out dense and dry. Once you’ve folded in the dry ingredients and milk, stop mixing immediately—just until combined. Overmixing develops gluten, which creates a tough, chewy texture.
I’ve ruined many cakes by mixing too long, so I now set a timer for 30 seconds after adding the milk. The batter should look smooth but still slightly streaky. 🌟
Skipping the Room-Temp Ingredients
Cold eggs and butter create pockets of steam that disrupt even baking. Always take eggs out 30 minutes before mixing and let butter sit at room temperature until it’s soft but not melted.
I learned this the hard way when my first attempt had uneven layers—now I never skip this step. Room-temperature milk also blends more smoothly into the batter.
Underbaking the Layers
Cakes need to be fully set but still slightly springy on top. Many home bakers pull them out too early, resulting in layers that collapse when stacked. Bake until a toothpick comes out with just a few moist crumbs—not completely clean.
I check at 25 minutes and if the top springs back slowly, that’s perfect. Overbaking by even 2 minutes can dry out your cake.
Improper Cooling Technique
Never stack warm cakes—they’ll crumble under their own weight. Let cakes cool in pans for 10 minutes, then transfer to a wire rack to cool completely. I’ve seen many cakes fall apart because they were stacked too soon.
For extra stability, I run a long knife around the edges of the cakes before removing them from pans to prevent cracking.
Using Low-Quality Cocoa Powder
Not all cocoa powders are created equal. Natural cocoa powder can make your cake taste bitter and dry. Always use Dutch-processed cocoa like Valrhona or Guittard. I’ve tried cheaper brands and noticed a significant difference in flavor and moisture.
The Dutch-processing neutralizes acidity, resulting in a smoother, richer chocolate taste that’s essential for this recipe.
Incorrect Buttercream Consistency
Buttercream that’s too soft will slide off your cake, while overly stiff buttercream creates cracks. Whip the cream to soft peaks before adding powdered sugar gradually. The final consistency should be thick enough to hold its shape but still pipeable.
I test by spooning some onto a plate—it should hold a peak but still spread slightly when pressed. If it’s too stiff, add 1 tsp milk at a time to loosen it.
Nutrition facts
Frequently asked questions
Can I make this cake in a 6-inch springform pan instead of round pans?
Yes, but with adjustments! Springform pans work for a single layer or if you want a slightly different shape. For two layers, you’ll need to bake them one at a time (springforms aren’t stackable). The baking time remains the same (25-30 minutes), but check for doneness earlier since springforms can bake slightly faster. The final cake will have vertical sides rather than rounded edges.
How do I prevent the layers from sticking to the pans?
Grease the pans thoroughly with butter (not shortening) and line the bottoms with parchment circles cut to fit. For extra insurance, dust lightly with cocoa powder before adding batter. I also recommend tapping the pans gently on the counter after filling to release air bubbles. If you’re still having issues, try using nonstick spray in addition to butter.
Can I substitute buttermilk for the whole milk in the batter?
You can try, but expect slightly different results. Buttermilk adds tanginess that may overpower the chocolate flavor. If you substitute, use 0.5 cup buttermilk plus 0.25 cup additional milk to maintain moisture. For best results, stick with whole milk—it creates a richer texture without altering the intended chocolate-forward taste.
What’s the best way to store leftover cake?
Keep the fully assembled cake at room temperature in an airtight container for 2 days maximum. For longer storage, wrap individual layers tightly in plastic wrap, then place the whole cake in a freezer bag. Frozen layers keep for 2 weeks, while the buttercream keeps 5 days refrigerated. Always bring the cake to room temperature before serving for best texture.
How do I make this cake gluten-free?
Replace the all-purpose flour with a 1:1 gluten-free baking flour blend (like Bob’s Red Mill or King Arthur). Add 1 tsp xanthan gum to help bind the layers. You may also need to reduce the milk by 2 tablespoons since gluten-free flours absorb differently. Test the batter consistency—it should be slightly thicker than the original recipe.

- 3lb Prime Rib Roast Recipe: Juicy Pink Center Guaranteed in 3 Hours - October 31, 2026
- 5 Spice Cake Recipe: Warmly Spiced Layers With Crunchy Top - October 31, 2026
- 1950’s Macaroni and Cheese Recipe: Nostalgic Creamy Cheese Sauce with Buttery Noodles - October 31, 2026