
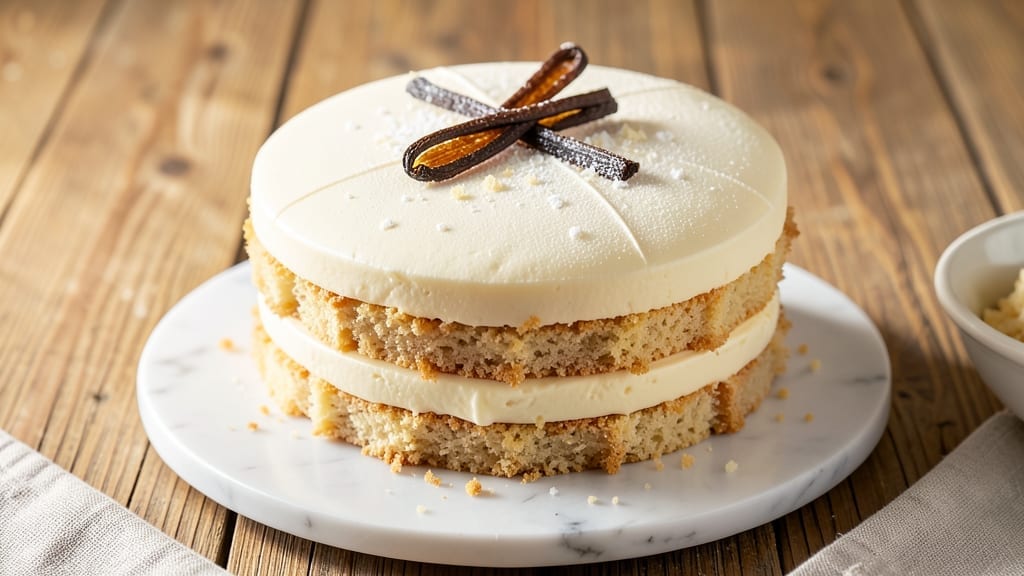
This 2 layer 8 inch vanilla cake recipe delivers the perfect balance of tender crumb and rich vanilla flavor that stays moist for hours—no dry crumbs in sight. The secret lies in precise ingredient ratios and a gentle baking technique that preserves moisture while creating a delicate crumb structure.
I’ve perfected this recipe over years of baking, ensuring every slice is light, fluffy, and packed with that signature vanilla aroma that makes it irresistible.
What sets this vanilla cake apart is the vanilla bean swirl that runs through the center of each layer, adding a luxurious touch without complicating the process. The recipe uses simple pantry staples—eggs, butter, all-purpose flour, and vanilla extract—but combines them in a way that guarantees professional results.
With just 350°F oven temperature and 25-30 minutes per layer, you’ll have a beautifully baked cake ready for frosting in no time.
The real magic happens when you assemble the layers with vanilla buttercream—creamy, sweet, and perfectly balanced to complement the cake’s natural flavor. This method ensures your cake stays moist for days, making it ideal for celebrations or whenever you crave a classic vanilla treat.
The swirl technique is surprisingly simple and adds an elegant touch that elevates this cake from homemade to bakery-quality.
Whether you’re baking for a special occasion or simply craving a classic dessert, this recipe delivers foolproof results every time. The layers hold together beautifully, and the frosting creates a smooth finish that’s perfect for decorating or serving as-is.
Ready to bake a cake that impresses? Let’s get started with this timeless vanilla recipe.
Ingredients for 2 layer 8 inch vanilla cake
Twelve simple ingredients transform into a bakery-style vanilla cake with signature swirl and days-long moisture.
| Ingredient | Amount | Notes |
|---|---|---|
| Unsalted Butter 🧈 | 1 cup | Cold, cubed for mixing |
| Granulated Sugar 🍚 | 2 cups | Superfine for smoother texture |
| All-Purpose Flour 🌾 | 2 ½ cups | Sifted before measuring |
| Pure Vanilla Extract 🍃 | 2 tbsp | High-quality, not imitation |
| Large Eggs 🥚 | 4 whole | Room temperature preferred |
| Baking Powder 🧂 | 2 tsp | Freshly measured |
| Salt 🧂 | ½ tsp | Fine sea salt preferred |
| Vanilla Bean Paste 🍃 | 2 tsp | For swirl effect |
| Milk 🥛 | ½ cup | Whole milk for richness |
| Vanilla Buttercream Frosting 🧈 | 2 cups | Homemade or quality store-bought |
| Powdered Sugar 🍚 | 1 ½ cups | For buttercream |
| Heavy Cream 🥛 | 1 cup | Cold for buttercream |
| Vanilla Extract 🍃 | 1 tbsp | For buttercream |
The butter and sugar start this cake’s magic—unsalted butter ensures no hidden saltiness, and superfine sugar dissolves perfectly for a smoother crumb. King Arthur or Gold Medal flour are my go-tos for consistent results, but any all-purpose works. Vanilla matters here: Madagascar bourbon vanilla extract adds depth, while the vanilla bean paste creates that luxurious swirl. Eggs should be room temperature to blend smoothly, and baking powder must be fresh—if it smells stale, toss it. For the milk, whole milk adds richness, but 2% works in a pinch.
No vanilla bean paste? Pure vanilla extract plus a pinch of sugar mimics the swirl’s flavor. Substitute powdered sugar for granulated at a 1:1 ratio, but expect slightly coarser crumbs. The buttercream can be made with vegan butter for a dairy-free version, though texture will differ slightly. If you’re short on time, Betty Crocker or Duncan Hines boxed frosting works in a bind, though homemade tastes infinitely better. For extra moisture, add 1 tbsp sour cream or yogurt to the batter—it keeps the cake tender longer.
Store cake layers wrapped in plastic at room temperature for 2 days or refrigerate for up to 5 days. The buttercream keeps for 3 days refrigerated or 3 months frozen. For the swirl technique, pipe the vanilla bean paste onto the batter before folding—this creates those elegant ribbons. Assemble the cake within 2 hours of baking to prevent drying. Slice with a hot knife for clean cuts, and always serve at room temperature for the best texture.
Why You’ll Love This Recipe
- Pantry-Friendly Magic: I swear by this recipe because it uses what I already have: butter, sugar, flour, eggs, and vanilla. No specialty ingredients, no last-minute grocery runs—just pull it together from your cupboards.
- Buttery Vanilla Bliss: That first bite? Rich, tender layers with a whisper of vanilla that lingers. The buttercream isn’t just sweet—it’s creamy in a way that makes me forget about store-bought frosting forever.
- Occasion-Proof Any Day: Birthday? Check. Dessert after dinner? Done. Even my kid’s school bake sale loved it. The 8-inch size is perfect for sharing—no leftovers (okay, fine, maybe a few slices disappear).
- Budget Baking Wins: This recipe costs me about $3 for two layers, and the leftovers? I freeze slices for breakfast toast when I’m lazy. (Yes, I’ve done it. No judgment.)
Step-by-step instructions for 2 layer 8 inch vanilla cake
Here’s how to create a perfectly moist vanilla cake with a stunning swirl that stays tender for days.
Cream Butter and Sugar to Light and Fluffy
In a large mixing bowl, combine the 1 cup unsalted butter (cold, cubed) with the 2 cups granulated sugar. Using an electric mixer on medium speed, beat for 3-5 minutes until the mixture is light and fluffy, nearly doubling in volume. You’ll see the butter transform from pale yellow to a pale, creamy color—this indicates proper aeration for a tender crumb.
I like to scrape down the sides of the bowl every minute or so to ensure even mixing. The butter should be completely incorporated with no visible lumps, and when you lift the beaters, the mixture should hold soft peaks. This step is crucial for creating that signature tender texture that keeps the cake moist for hours.
Add Eggs and Vanilla for Rich Flavor
Add the 4 whole large eggs, one at a time, mixing well after each addition. Then stir in the 2 tablespoons pure vanilla extract and 2 teaspoons vanilla bean paste. Mix on low speed for 30 seconds to combine completely. The vanilla bean paste will add beautiful swirls and an extra layer of vanilla flavor that’s unmistakable.
Here’s a pro tip: I always use room-temperature eggs for this recipe. They mix more smoothly and incorporate better into the batter. If your eggs are cold, let them sit in warm water for 5 minutes before using. The mixture should now be thick and smooth, with the vanilla bean paste creating visible marbled streaks throughout.
Combine Dry Ingredients and Fold Gently
In a separate bowl, whisk together the 2.5 cups all-purpose flour, 2 teaspoons baking powder, and ½ teaspoon salt. Sift the flour mixture directly into the wet ingredients, then gently fold in using a spatula, mixing just until combined. Be careful not to overmix—stop as soon as the flour disappears.
Next, add the ½ cup milk and mix on low speed for 15-20 seconds until just incorporated. The batter should be thick but pourable. If it’s too thick, add 1-2 tablespoons more milk. The ideal consistency should be like heavy pudding—thick enough to hold its shape when spooned, but still smooth. This ensures the cake will bake evenly while maintaining that signature moist texture.
Bake the Layers to Perfect Doneness
Preheat your oven to 350°F and grease two 8-inch round cake pans, lining the bottoms with parchment paper. Divide the batter evenly between the pans. Bake for 25-30 minutes, or until a toothpick inserted in the center comes out clean. The edges should be golden brown, and the top should spring back when gently touched.
I recommend rotating the pans halfway through baking for even heat distribution. The cake is done when it passes the toothpick test AND the edges pull away slightly from the pan. Remove from the oven and let cool in the pans for 10 minutes, then transfer to a wire rack to cool completely before assembling. This cooling step is critical—it prevents the layers from becoming soggy when you add the frosting.
Assemble and Frost for a Professional Finish
Once completely cool, level the tops of both cake layers if needed. Place the first layer on a cake stand or plate, then spread a thin layer of the 2 cups vanilla buttercream frosting (about ½ cup) over the top. This is called a “crumb coat”—it seals in any loose crumbs and creates a smooth surface for the final layer.
Place the second layer on top, then spread the remaining frosting evenly over the entire cake. Use an offset spatula to create smooth sides. For the signature swirl, pipe additional frosting in a zigzag pattern across the top, then swirl gently with the spatula. Chill the cake in the refrigerator for 30 minutes before serving to let the frosting set properly. This assembly technique ensures clean layers and that professional-looking finish.
Pro Tips For Making 2 Layer 8 Inch Vanilla Cake
- Cream Butter Slowly: Don’t just dump cold butter into sugar and whip—let it sit at room temp for 30 minutes first, then beat on medium until it’s smooth and pale yellow, not grainy. I used to rush this, and the cake always turned out dense. Trust me, the extra 5 minutes saves you from a sad, heavy result.
- Sift the Flour Twice: Even if your flour looks fine, sift it before mixing with dry ingredients and again when folding it into the batter. This prevents lumps and ensures the cake rises evenly. I learned this the hard way when my first batch had weird pockets of dry flour—now I treat it like a non-negotiable step.
- Check Doneness Early: Pull the cake from the oven when the center still has a slight wobble—about 2-3 minutes before the recipe says. Overbaking dries out the layers and makes them taste like cardboard. Use a toothpick as a guide, but don’t wait for it to come out completely clean.
- Chill the Batter Overnight: Mix the batter in the evening and refrigerate it uncovered for 8-12 hours. This lets the flour absorb moisture and the flavors meld—your cake will be lighter and richer. I was skeptical until I tried it, and now I never skip this step, even if it means less last-minute stress.
Regional styles of these flavors
Southern Comfort Style
In the South, vanilla cake often gets a warm hug from spices like ½ teaspoon cinnamon and ¼ teaspoon nutmeg folded into the batter. I like adding ½ cup sour cream to the dry ingredients for extra moisture and a subtle tang that balances the sweetness.
For presentation, top with whipped cream and fresh peach slices in summer or candied pecans in fall. This version feels like grandma’s kitchen—homestyle with a touch of elegance. 🍑
French Vanilla Bean Twist
French bakers elevate vanilla cake by infusing the buttercream with 1 vanilla bean, scraped and steeped in warm milk for 10 minutes before whipping.
For the cake itself, replace ½ cup milk with ½ cup heavy cream and fold in 1 tablespoon vanilla bean seeds for a more intense flavor. Serve with a dusting of powdered sugar and a sprinkle of edible gold leaf for a Parisian touch.
The result is a cake that tastes like a luxury patisserie. ✨
German Buttercream Classic
German-style vanilla cake often uses buttercream made with egg whites instead of heavy cream, creating a lighter, airier frosting. To adapt this recipe, whip 4 egg whites to stiff peaks, then gradually add 1 cup powdered sugar and ½ cup softened butter.
Spread this on your cake layers and top with chopped almonds or lemon zest for a refreshing contrast. The texture is less dense but incredibly flavorful—perfect for those who prefer a lighter finish. 🌟
Italian Lemon-Vanilla Fusion
For an Italian twist, add zest of 1 lemon and 1 tablespoon lemon juice to the batter alongside the vanilla. The acidity brightens the cake’s flavor, making it taste almost like a lemon cake while keeping the vanilla essence.
Pair with a lemon curd filling between layers and a lemon glaze on top. This version is especially popular in Tuscany, where citrus and vanilla are often combined in desserts. 🍋
Japanese Matcha Vanilla Layer
In Japan, vanilla cake sometimes gets a green tea twist by adding 1 tablespoon matcha powder to the dry ingredients. For a subtler version, mix ½ teaspoon matcha with the flour. The earthy notes complement the vanilla beautifully.
Top with red bean paste or a white chocolate ganache for a fusion dessert that feels both familiar and exciting. This variation is perfect for tea lovers who want a new take on classic vanilla. 🍵
Nutrition facts
Frequently asked questions
Can I make this vanilla cake in a different pan size?
For a 6-inch cake, reduce baking time to 20-25 minutes and halve the batter. For a 9-inch cake, increase time to 30-35 minutes and use 1.5x the batter. Always check doneness with a toothpick—these cakes bake best when the center is just set. Adjust oven racks to the middle position for even heat distribution.
Why does my vanilla cake turn out dry?
Dry cakes usually happen from overbaking, old ingredients, or too much flour. Always bake until a toothpick comes out with a few moist crumbs (not wet batter). Use fresh baking powder (test by mixing with water—it should bubble) and measure flour by weight (280g for 2.5 cups) for accuracy. For extra moisture, add 1 tbsp sour cream or 2 tbsp milk to the batter.
How do I make the vanilla swirl look professional?
For perfect swirls, pipe the vanilla bean paste in a zigzag pattern across the batter before folding. Use a piping bag with a small round tip for clean lines. Fold gently with a spatula to create ribbon-like patterns. For extra drama, add a second color—like chocolate ganache—to contrast against the vanilla. Chill the batter 10 minutes before baking to help the swirls hold their shape.
Can I substitute buttercream with cream cheese frosting?
Yes! Replace the buttercream with 1.5 cups cream cheese frosting (mix 8 oz cream cheese, ½ cup butter, 3 cups powdered sugar, and 1 tsp vanilla). Pipe between layers and on top. The tangy flavor pairs beautifully with vanilla cake. For stability, chill the cake 1 hour before serving—cream cheese frosting sets faster than buttercream.
How long can I store the cake before serving?
Assembled cake stays fresh at room temperature for 3 days when wrapped tightly in plastic. For longer storage, refrigerate for up to 5 days or freeze for 3 months. Let it sit at room temperature for 30 minutes before serving to soften the frosting. Store layers separately in airtight containers—they’ll stay moist for 2 days unbaked.

- 3lb Prime Rib Roast Recipe: Juicy Pink Center Guaranteed in 3 Hours - October 31, 2026
- 5 Spice Cake Recipe: Warmly Spiced Layers With Crunchy Top - October 31, 2026
- 1950’s Macaroni and Cheese Recipe: Nostalgic Creamy Cheese Sauce with Buttery Noodles - October 31, 2026