
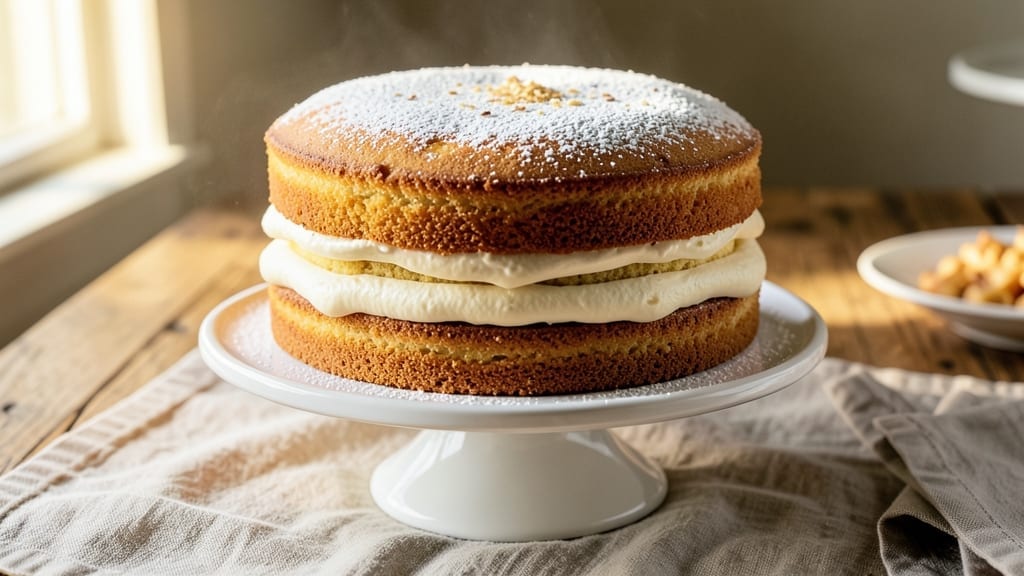
This 2-layer butter cake recipe delivers the perfect balance of rich vanilla and decadent chocolate swirls—every slice is a celebration of texture and flavor. 💛 The secret lies in a moist, tender crumb that stays fresh for days, thanks to a precise baking technique and a velvety buttercream that binds the layers effortlessly.
I’ve perfected this recipe over years of baking, ensuring each batch rises with golden perfection and a crack-free top.
The foundation begins with a simple yet foolproof batter that combines butter, sugar, and eggs for maximum tenderness. Baking the layers at 350°F for 25-30 minutes guarantees a light, airy crumb, while the chocolate swirl adds a stunning visual contrast.
Once cooled, the layers are generously filled with buttercream, creating a luscious, creamy center that melts with every bite.
What you’ll achieve is a cake that’s as impressive to look at as it is to eat—moist, fluffy layers separated by a swirl of rich chocolate, all crowned with a smooth buttercream finish.
The combination of vanilla’s sweetness and chocolate’s depth makes this cake a crowd-pleaser for birthdays, holidays, or just because. This recipe is designed to deliver restaurant-quality results at home.
Ready in just under 2 hours (including cooling and filling), this cake is perfect for beginners and experienced bakers alike. The instructions are clear, the ingredients are simple, and the outcome is always worth the effort. Let’s get baking!
Ingredients for 2 layer butter cake
Rich butter, tender layers, and velvety chocolate swirls—here’s what transforms simple ingredients into restaurant-quality cake.
| Ingredient | Amount | Notes |
|---|---|---|
| Unsalted Butter 🧈 | 1 cup | Cold, cubed for creaming |
| Granulated White Sugar 🍚 | 2 cups | Superfine preferred for smoothness |
| Large Eggs 🥚 | 4 whole | Room temperature for even mixing |
| All-Purpose Flour 🌾 | 2 ½ cups | Sifted, spooned lightly |
| Baking Powder 🧂 | 2 tsp | Diamond Crystal preferred |
| Salt 🧂 | ½ tsp | Fine sea salt |
| Pure Vanilla Extract 💧 | 1 tbsp | High-quality Madagascar bourbon |
| Whole Milk 🥛 | ½ cup | Room temperature |
| Dark Chocolate Chips 🍫 | 1 cup | 60% cocoa, semi-sweet |
| Confectioners' Sugar 🍚 | 3 cups | Sifted for buttercream |
| Heavy Whipping Cream 🥛 | 1 ½ cups | Cold, full-fat preferred |
| Vanilla Bean Paste 💧 | 1 tsp | For enhanced vanilla flavor |
The butter quality makes or breaks this cake. European-style unsalted butter from brands like Plugrá or Land O’Lakes delivers the best flavor and texture. If your butter has a yellow tint, that’s a good sign—it means higher fat content. For the chocolate swirl, 60% cocoa semi-sweet chips melt smoothly without overpowering the vanilla. I always buy Ghirardelli or Guittard for consistent quality. The flour should be sifted before measuring—those little lumps can create dense pockets in your cake. Keep your ingredients at room temperature for at least 30 minutes before starting; this ensures even mixing and a tender crumb.
No superfine sugar? Pulse granulated sugar in a food processor for 30 seconds—it’ll give you that same silky texture. Running out of vanilla extract? Vanilla bean paste at half the amount adds depth without liquid. For the buttercream, if you can’t find heavy whipping cream, 35% whipping cream plus 1 tbsp powdered milk works in a pinch. The baking powder is crucial—Diamond Crystal measures differently than other brands, so use exactly 2 tsp if that’s what you have. For the chocolate swirl, melt the chips with 1 tbsp butter for a smoother consistency. And if you’re short on time, pre-made chocolate ganache can replace the melted chips, though it’ll be slightly richer.
This cake stays moist for 5-6 days when wrapped tightly in plastic at room temperature, but for longer storage, refrigerate for up to 1 week. The buttercream will firm up slightly in the fridge—bring it to room temperature before serving. For freezing, wrap each layer individually in plastic wrap, then foil. Thaw overnight in the fridge before assembling. The cake reheats beautifully in the oven at 300°F for 10 minutes if it’s been chilled too long—just add a splash of milk to the buttercream before reheating to restore its creaminess.
Why You’ll Love This Recipe
- No-Fuss Layers: I swear by this recipe because it’s actually foolproof. Cream butter and sugar until light, fold in eggs one at a time—no one’s judging if your mixer gets a little frothy. The layers come out tender, not dense, and the butter flavor? It’s the real deal.
- Butter Bliss: That first bite of rich, velvety crumb? It’s all in the butter. We’re talking real unsalted butter here—no shortcuts—whipped with sugar until it’s airy enough to melt in your mouth. Honestly, the flavor alone makes it worth the effort.
- Party or Picnic: This cake handles everything. Frost it with cream cheese for a wedding dessert or slather it with jam for a quick breakfast cake. Even my picky nephew devours it. Between us, it’s the one cake I always bake for gatherings—no one asks for seconds because they’re already planning their next slice.
- Budget Baking: Five ingredients, zero weird substitutions. Flour, sugar, butter, eggs—stuff you already have. I’ve made this cake for birthdays, holidays, and even just because, and it never disappoints. Plus, leftovers? They last days if you can resist them.
Step-by-step instructions for vanilla and chocolate swirl cake
Master this technique and you’ll achieve a perfectly layered cake with a rich chocolate swirl.
👨🍳 Step 1: Cream Butter and Sugar to Light and Fluffy
In a stand mixer fitted with the paddle attachment, beat the 1 cup unsalted butter (cold, cubed) and 2 cups granulated white sugar on medium speed for 3-4 minutes. You’re looking for a pale, creamy texture that nearly doubles in volume and leaves faint ribbons when the paddle is lifted. This thorough creaming incorporates air, creating a tender crumb.
I like to scrape down the sides of the bowl every 30 seconds to ensure even mixing. The butter should be completely incorporated with no visible lumps, and the mixture should feel light when you press it between your fingers. This step is critical—under-creaming leads to dense cake layers.
👨🍳 Step 2: Incorporate Eggs and Dry Ingredients
Add the 4 whole large eggs (room temperature) one at a time, mixing on low speed after each addition until fully incorporated. Then add the 1 tbsp pure vanilla extract and mix for another 10 seconds. The mixture will appear slightly curdled, but that’s normal.
In a separate bowl, whisk together the 2.5 cups all-purpose flour, 2 tsp baking powder, and 0.5 tsp salt. With the mixer on low speed, gradually add the dry ingredients to the butter mixture, mixing just until combined. Avoid overmixing—stop as soon as the flour disappears. The batter should be smooth and slightly thick, like pudding.
🥘 Step 3: Divide Batter and Add Chocolate Swirl
Pour half of the batter into a 9-inch round cake pan lined with parchment paper. Sprinkle half of the 1 cup dark chocolate chips evenly over the batter. Using a spatula, gently swirl the chocolate into the batter in a circular motion, creating a marbled effect.
Pour the remaining batter over the chocolate layer. Using the spatula, create gentle swirls through the top layer to incorporate some chocolate into the vanilla batter. This creates the signature marbled effect while keeping distinct flavor zones. Tap the pan gently on the counter to remove any air bubbles.
🔥 Step 4: Bake Until Golden and Springy
Preheat your oven to 350°F. Bake the cake for 25-30 minutes, or until a toothpick inserted in the center comes out clean and the top springs back when pressed gently. The edges should be golden brown while the center remains slightly soft—this ensures a moist crumb.
I recommend checking for doneness at the 25-minute mark as ovens vary. If the top browns too quickly, tent the cake with foil. The cake should pull away slightly from the sides of the pan, indicating it’s fully baked. Let it cool in the pan for 10 minutes, then transfer to a wire rack to cool completely.
🍳 Step 5: Prepare Vanilla Buttercream Filling
In a stand mixer fitted with the whisk attachment, beat the 1.5 cups heavy whipping cream (cold) until soft peaks form. Gradually add the 3 cups confectioners’ sugar (sifted) and 1 tsp vanilla bean paste, mixing on medium speed until smooth and fluffy. The buttercream should be thick enough to hold its shape but still pipeable.
For the filling, spread about 1/3 of the buttercream evenly over the cooled cake layer. This thin layer prevents the cake from becoming soggy while providing flavor. The remaining buttercream will be used for frosting after assembling both layers.
🥘 Step 6: Assemble and Frost the Cake
Place the second cake layer on top of the filled first layer. Gently press down to create a clean surface. Spread the remaining buttercream evenly over the entire cake, creating a smooth base for the final frosting. Use an offset spatula to achieve a professional finish, working from the center outward.
For the final touch, pipe decorative swirls or rosettes around the edges using any remaining buttercream. The contrast of the vanilla frosting against the chocolate swirls creates a stunning visual effect. Chill the cake in the refrigerator for 30 minutes before slicing to allow the buttercream to set slightly.
Pro Tips For Making 2 Layer Butter Cake
- Cream Butter Until Pale: DESCRIPTION:
- Sift Flour Like a Pro: DESCRIPTION:
- Don’t Overmix the Batter: DESCRIPTION:
- Rotate the Pan Mid-Bake: DESCRIPTION:
Perfect pairings for this recipe
Fruit Toppings
A fresh berry compote takes this cake to another level. Simmer 1 cup mixed berries (strawberries, blueberries, raspberries) with 2 tbsp sugar and 1 tsp lemon juice for 5 minutes until syrupy.
Spread over the cake before adding frosting for vibrant color and tart contrast. I love using fresh strawberries sliced into thin fans for an elegant presentation. 🍓
Caramel Drizzle
For a luxurious finish, drizzle warm caramel sauce over the buttercream. Heat ½ cup heavy cream with ½ cup granulated sugar until dissolved, then simmer for 8 minutes until golden.
Cool slightly and drizzle artistically over the cake. The salty-sweet balance complements the vanilla and chocolate perfectly. Store-bought caramel sauce works too—just warm it gently.
Whipped Cream Garnish
Lightly pipe whipped cream rosettes around the edges for a cloud-like effect. Mix 1 cup heavy whipping cream with 1 tbsp powdered sugar and pipe using a star tip.
Dust with cocoa powder or crushed chocolate sprinkles for extra flair. This adds a delicate, airy contrast to the dense cake layers. 💫
Chocolate Ganache
Replace the buttercream with rich chocolate ganache for a decadent twist. Heat 1 cup heavy cream and pour over 8 oz chopped dark chocolate, stirring until smooth. Cool to 85°F before spreading between layers.
The ganache’s glossy finish makes the chocolate swirls pop even more. For extra indulgence, add ½ tsp espresso powder to the chocolate before melting.
Nutty Crunch
Toast ½ cup chopped pecans or walnuts in a dry skillet over medium heat for 3-4 minutes until fragrant. Sprinkle over the frosting before chilling. The nutty crunch contrasts beautifully with the cake’s soft texture.
For a sweeter touch, toss the nuts with 1 tbsp brown sugar before toasting. This adds both texture and flavor complexity.
Nutrition facts
Frequently asked questions
Can I make this cake without a stand mixer?
Yes! You can achieve the same results using a hand mixer or even a sturdy whisk. For the butter and sugar, beat them vigorously for 5-7 minutes until light and fluffy. When mixing the dry ingredients, use a large spoon or spatula to fold them in gently. Just be prepared to work a little harder—this step is the most physically demanding without a mixer.
How do I prevent the cake from cracking on top?
Cracking usually happens when the cake bakes too quickly or the oven is too hot. To avoid this, make sure your oven is fully preheated to 350°F, and place a baking sheet on the lower rack to create steam. Also, avoid opening the oven door during the first 20 minutes of baking. If your cake browns too fast, tent it with foil. The key is slow, even baking for a crack-free finish.
What’s the best way to level the cake layers?
Use a long serrated knife or a cake leveler for clean, even layers. First, let the cake cool completely on a wire rack. Place it on a flat surface and gently run the knife back and forth over the top, rotating the cake slightly with each pass. Wipe the knife clean between cuts. For extra precision, use a cake jig or a piece of string to guide your cuts.
Can I bake the cake layers in advance?
Bake the layers up to 2 days ahead and store them wrapped tightly in plastic at room temperature. For longer storage, freeze the layers individually in plastic wrap for up to 1 month. Thaw overnight in the fridge before assembling. This is actually a great time-saver for busy bakers—just assemble and frost when you’re ready.
Why is my buttercream too runny?
Buttercream can become too thin if the cream wasn’t cold enough or if the sugar was added too quickly. To fix it, chill the bowl for 10 minutes and re-whip with an extra ½ cup powdered sugar. For a quick fix, add 1 tablespoon cold butter** and whip again. Always use cold ingredients and sift the powdered sugar to avoid lumps that can make the buttercream grainy.

- 3lb Prime Rib Roast Recipe: Juicy Pink Center Guaranteed in 3 Hours - October 31, 2026
- 5 Spice Cake Recipe: Warmly Spiced Layers With Crunchy Top - October 31, 2026
- 1950’s Macaroni and Cheese Recipe: Nostalgic Creamy Cheese Sauce with Buttery Noodles - October 31, 2026