
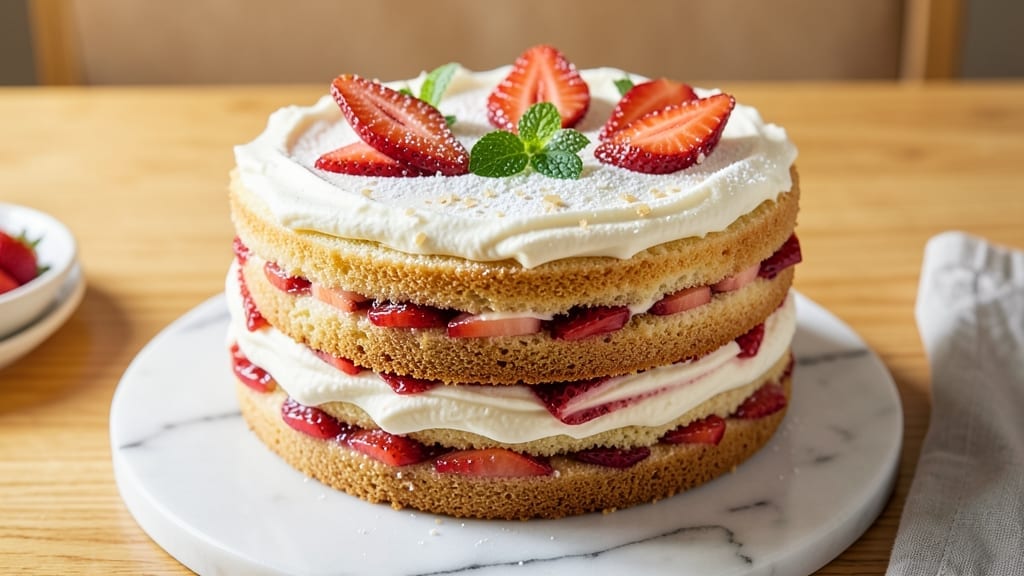
This 2-layer strawberry cake recipe delivers the perfect balance of velvety moist layers and bursts of fresh berries in every bite. The secret lies in a simple yet foolproof method that ensures tender crumb and a luscious strawberry filling that keeps the cake irresistibly juicy.
I’ve perfected this recipe over years of baking, and it’s become a crowd-pleaser at every celebration—whether it’s a birthday, brunch, or just a sweet treat for yourself.
The foundation starts with a classic vanilla cake batter, enriched with sour cream for that signature moist texture that stays fresh even after a few days.
Between the layers, a homemade strawberry jam—made with fresh berries and just enough sugar—creates a vibrant, fruity center that keeps the cake from feeling dry.
The frosting is where the magic happens: a light buttercream swirled with strawberry puree for a delicate, floral finish that complements the berries without overpowering them.
What you’ll end up with is a cake that’s visually stunning and utterly delicious—a tower of golden layers with a glossy frosting that looks as good as it tastes. The strawberry filling peeks through the cuts, offering a sweet-tart contrast that makes each bite unforgettable.
This recipe is designed to be beginner-friendly, with clear instructions that guide you through every step, from mixing the batter to decorating the finished cake.
For those looking to customize, you can easily swap out ingredients for vegan alternatives—just use plant-based butter, flax eggs, and dairy-free sour cream. Serve it with fresh whipped cream or a scoop of vanilla ice cream for the ultimate indulgence. Let’s get baking!
Ingredients for 2 layer strawberry cake
Here’s what you need to create a velvety strawberry cake with layers that stay moist and berries bursting in every bite.
| Ingredient | Amount | Notes |
|---|---|---|
| All-Purpose Flour 🌾 | 2 ½ cups | Sifted for light texture |
| Granulated Sugar 🍚 | 2 cups | Divided for batter and filling |
| Unsalted Butter 🧈 | 1 ½ cups | Room temperature for smooth mixing |
| Large Eggs 🥚 | 4 whole | Room temperature preferred |
| Sour Cream 🥛 | 1 cup | Full-fat for moisture |
| Vanilla Extract 🌿 | 2 tsp | Pure, high-quality extract |
| Baking Powder 🧂 | 2 tsp | Freshly measured |
| Salt 🧂 | ½ tsp | Fine sea salt |
| Fresh Strawberries 🍓 | 2 lbs | Hull and slice for filling |
| Lemon Juice 🍋 | 1 tbsp | Freshly squeezed |
| Heavy Whipping Cream 🥛 | 2 cups | Cold for buttercream |
| Powdered Sugar 🍚 | 3 cups | Sifted for smooth frosting |
| Strawberry Puree 🍓 | ½ cup | Optional for frosting swirl |
The flour and sugar form the backbone of this cake, so King Arthur or Gold Medal brands are ideal—they bake evenly without drying out. Butter matters too: Land O’Lakes or Plugrá work best for that rich, tender crumb. Strawberries should be ripe but firm—overripe ones turn mushy in the filling. I always buy extra and freeze half for smoothies later. The sour cream is non-negotiable for moisture; full-fat is a must—low-fat versions won’t give the same result. For the vanilla, Heinz or Nielsen-Massey extracts are reliable, but any pure extract will do.
No fresh strawberries? Frozen unsweetened berries work in a pinch—just thaw and drain them first. Swap powdered sugar for confectioners’ sugar if that’s what you have, but sift it well. Running short on buttercream? A simple glaze of powdered sugar + lemon juice can still make the cake look stunning. For the frosting, if you skip the strawberry puree, add a splash of vanilla extract** to keep it flavorful. The eggs can be separated if you prefer a lighter texture, but the whole eggs here ensure richness. Always measure flour by scooping and leveling—don’t pack it down.
Store the cake layers in an airtight container between parchment paper for up to 2 days at room temperature. The frosting keeps for 3 days in the fridge, but the cake itself tastes best within 48 hours. For make-ahead prep, bake the layers and freeze them unfrosted for up to 1 month. Assemble the cake right before serving—this keeps the layers moist. If you’re not decorating immediately, cover the top with plastic wrap to prevent drying. Leftovers? Slice and freeze portions for 2 weeks**—they reheat beautifully in the microwave.
Why You’ll Love This Recipe
- No Mixer Needed: The sour cream keeps this cake tender, and honestly? You don’t even need an electric mixer. A sturdy wooden spoon and your arm muscles do the job—no fancy equipment, no fuss. I’ve made this in a dorm kitchen, a tiny apartment, and even a camper van. It’s that unfussy.
- Strawberry Magic: That first layer of cake is buttery and just sweet enough, but the real star? The second layer’s strawberry filling—thick, jammy, and bursting with flavor. The sour cream in the batter balances the sugar, so every bite is rich without being cloying. (Yes, even my picky 10-year-old niece begs for seconds.)
- Party Ready: This cake holds up beautifully for gatherings—no wilting, no soggy middle. Serve it at a brunch, a birthday, or just because. The layers stay distinct, the frosting stays smooth, and the strawberry flavor shines whether it’s room temp or chilled. I’ve taken slices to potlucks and had people ask for the recipe before dessert even ended.
- Budget-Friendly Luxury: You’re using pantry staples—flour, sugar, butter—so the cost per serving is dirt cheap. A single cake feeds 12, and leftovers? They’re even better the next day. The sour cream adds richness without breaking the bank, and the strawberries? You can use frozen ones in a pinch. It’s the kind of treat that feels special but won’t drain your wallet.
Step-by-step instructions for 2 layer strawberry cake
This method delivers perfectly balanced layers—tender, moist cake with vibrant strawberry filling.
Prepare the Strawberry Filling and Prep Ingredients
Begin by hulling and slicing the 2 lbs of fresh strawberries. Toss them with the 1 tbsp lemon juice in a bowl to prevent browning. Let them sit for 10 minutes while you prepare the cake batter. For the filling, combine the sliced strawberries with ½ cup of the 2 cups granulated sugar and let it macerate—this draws out their juices, creating a luscious filling. Keep this mixture at room temperature until needed.
Next, sift together the 2.5 cups all-purpose flour, 2 tsp baking powder, and 0.5 tsp salt in a medium bowl. This ensures a light, airy texture without lumps. Set aside—we’ll add it to the wet ingredients in the next step. Also, take the 1.5 cups unsalted butter out of the refrigerator to soften while you work. Room temperature butter mixes more smoothly into the batter.
Cream Butter and Sugar for the Cake Batter
In a large mixing bowl, combine the softened 1.5 cups unsalted butter and 1½ cups of the 2 cups granulated sugar. Using an electric mixer on medium speed, beat for 3-5 minutes until the mixture is light and fluffy, nearly doubling in volume. You’ll see the color lighten slightly—this indicates proper aeration. Scrape down the sides of the bowl occasionally to ensure even mixing.
Add the 4 whole large eggs, one at a time, mixing well after each addition. Then stir in the 1 cup sour cream and 2 tsp vanilla extract. The batter should be smooth and creamy. Here’s the thing—adding the sour cream keeps the cake moist, while the vanilla extract enhances the strawberry flavor. Mix just until combined to avoid overdeveloping the gluten.
Combine Dry Ingredients and Bake the Cake Layers
Gradually add the sifted dry ingredients to the wet mixture in three additions, mixing on low speed just until incorporated after each addition. This prevents overmixing, which can make the cake dense. Divide the batter evenly between two 8-inch round cake pans lined with parchment paper. Smooth the tops with a spatula.
Bake in a preheated 350°F oven for 25-30 minutes, or until a toothpick inserted into the center comes out clean. Rotate the pans halfway through baking for even browning. Let the cakes cool in the pans for 10 minutes, then transfer to a wire rack to cool completely. This prevents them from becoming soggy when assembling the cake.
Assemble the Cake with Strawberry Filling
Once the cakes are completely cool, level the tops if needed with a serrated knife. Place the first cake layer on a cake stand or plate. Spread the macerated strawberry mixture evenly over the top, leaving a small border for the frosting. Replace the second cake layer on top, pressing down gently to secure.
For the frosting, beat the 2 cups heavy whipping cream and 3 cups powdered sugar together until stiff peaks form. You can pipe this around the sides of the cake or spread it evenly with a spatula. For extra flair, pipe swirls of the 0.5 cup strawberry puree onto the frosting before serving. The contrast of the vibrant puree against the creamy frosting adds a beautiful touch.
Pro Tips For Making 2 Layer Strawberry Cake
- Cream Butter Properly: Beat the butter and sugar until it’s pale and fluffy—about 3-5 minutes with a mixer. I used to rush this, and the cake turned dense. Take the extra time; it makes all the difference in texture.
- Chill the Batter: Let the cake batter rest in the fridge for 20-30 minutes before baking. My grandmother swore by this, and she was right: it prevents sinking and gives you a more even rise.
- Don’t Overmix the Strawberries: Mash the strawberries just enough to break them down—no need for a smooth purée. Lumps add texture, and forcing them through a sieve makes the filling too watery.
- Rotate the Pan Mid-Bake: Swap the cake pans front to back halfway through baking. I learned this the hard way—uneven heat in my oven meant one side came out dry. A quick swap fixes it every time.
Troubleshooting great 2 layer strawberry cake
Dense Cake Layers
If your cake layers turn out dense instead of light and airy, you’re likely overmixing the batter or using cold butter. I’ve found that mixing the dry ingredients into the wet mixture just until combined—not until smooth—prevents gluten overdevelopment.
Also, ensure your butter is soft but not melted (it should dent when pressed with a finger). If you’re in a hurry, let it sit at room temperature for 30 minutes before creaming. 🌡️
Dry or Crumbly Cake
Dry cake often results from overbaking or using too much flour. I recommend checking for doneness at 22-25 minutes—a toothpick should come out with moist crumbs, not dry ones. If your cake still feels dry, the issue might be old baking powder (replace it with fresh) or overmixing.
For extra moisture, brush the cooled layers with a simple syrup made from ½ cup warm water + ¼ cup sugar before frosting.
Filling Too Watery
A watery strawberry filling usually means the berries weren’t properly macerated or too much juice was released. To fix this, pat the sliced strawberries very dry with a paper towel before mixing with sugar.
If the filling still separates, thicken it by simmering with 1 tsp cornstarch (mixed with 1 tbsp water) for 2-3 minutes until it gels slightly. For next time, use firm but ripe strawberries—they release just enough juice without turning mushy. 🍓
Frosting Too Soft
Buttercream that’s too soft or melts quickly is usually due to warm cream or overbeating. Chill your mixing bowl and beaters in the freezer for 10 minutes before whipping. Also, ensure your heavy whipping cream is cold (not refrigerated for too long—just taken straight from the fridge).
If the frosting still softens, add 1 tbsp powdered sugar at a time until it holds its shape. For stability, pipe the frosting in layers and chill the cake for 15 minutes between coats.
Cake Cracks or Shifts
Cracks or shifting layers often happen when the cake cools too quickly or isn’t level. Let the cakes cool in the pans for 10 minutes, then transfer to a wire rack to finish cooling completely before assembling.
If your layers are uneven, trim the tops with a serrated knife to create a flat surface. For extra stability, place a thin layer of frosting between the layers before adding the filling—this acts as a glue. 💡
Frosting Separates
Separation occurs when fat (butter or cream) and sugar aren’t properly emulsified. To fix it, gently fold in the powdered sugar with a spatula until smooth, then whip briefly on medium speed. For prevention, add the sugar gradually while mixing, and avoid overbeating.
If your frosting still separates, try adding 1 tsp lemon juice (it helps stabilize the mixture). For a smoother finish, strain the frosting through a fine-mesh sieve before piping.
Nutrition facts
Frequently asked questions
Can I use frozen strawberries instead of fresh for the filling?
Yes, but with a few adjustments! Use 2 cups frozen unsweetened strawberries (thawed and drained well) instead of fresh. Add 1 extra tablespoon of sugar to the filling since frozen berries release less natural sweetness. For best results, pat them completely dry with paper towels before mixing to prevent a watery filling.
How do I make this recipe vegan?
Swap the butter for vegan butter (like Miyoko’s or Earth Balance), use flax eggs (1 tbsp ground flax + 3 tbsp water per egg), and replace sour cream with dairy-free sour cream (like Kite Hill). For the frosting, use coconut cream whipped with powdered sugar. The texture will be slightly different but still delicious!
Can I bake just one layer for a smaller cake?
Use an 8-inch round pan for a single layer, reducing the batter by half. Bake for 20-25 minutes at 350°F. For assembly, spread the filling on top and decorate with frosting. This works perfectly for individual servings or a quick dessert option.
How far ahead can I make this cake?
You can prep everything 1 day ahead! Bake the layers, cool completely, and store them wrapped in plastic at room temperature. Assemble the cake just before serving to keep it fresh. The frosting should be made fresh or stored separately in the fridge for up to 3 days. For best results, serve within 24 hours of full assembly.
What’s the best way to store leftovers?
Slice the cake and store it in an airtight container at room temperature for 2 days. For longer storage, freeze slices wrapped tightly in plastic for up to 2 weeks. To serve, microwave for 10-15 seconds** to restore moisture. The filling may separate slightly when frozen, but it reheats beautifully!

- 3lb Prime Rib Roast Recipe: Juicy Pink Center Guaranteed in 3 Hours - October 31, 2026
- 5 Spice Cake Recipe: Warmly Spiced Layers With Crunchy Top - October 31, 2026
- 1950’s Macaroni and Cheese Recipe: Nostalgic Creamy Cheese Sauce with Buttery Noodles - October 31, 2026