
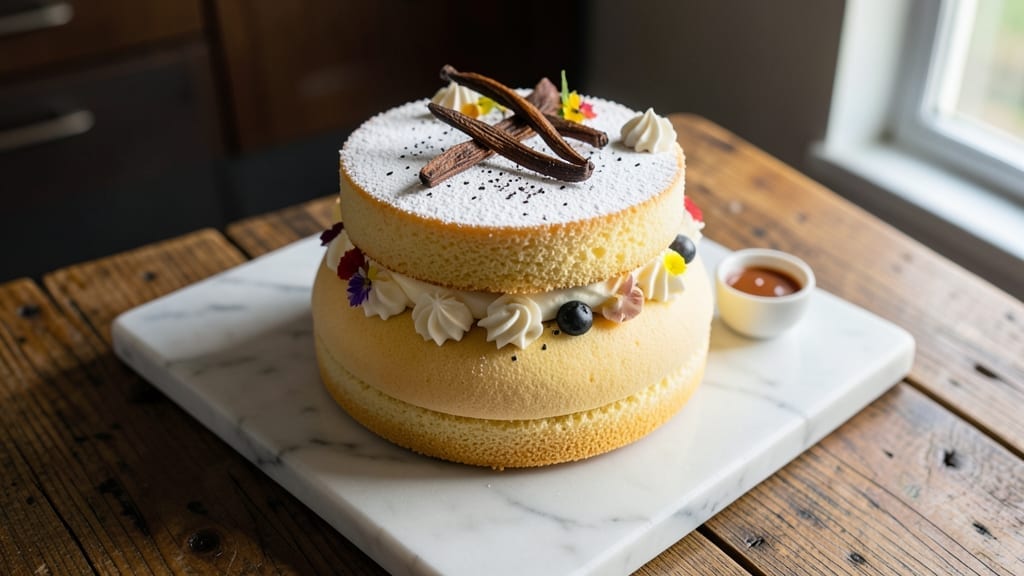
Mastering a 2-tier sponge cake with light-as-air layers and a vanilla bean swirl transforms any dessert occasion into something extraordinary. The secret lies in precise measurements, gentle folding, and patience during cooling—each step ensures those signature layers stay tender and the filling stays perfectly swirled.
I’ve perfected this technique after years of trial and error, and the result is a cake that looks as impressive as it tastes.
This recipe delivers foolproof results with simple ingredients: cake flour for tender crumb, vanilla bean for depth, and a stable buttercream that holds the layers without sinking. Baking at the right temperature and cooling gradually prevents cracks while maintaining that signature sponge cake lightness.
The two-tier structure creates a dramatic presentation, but the assembly is surprisingly straightforward once you know the tricks.
By the time you’re finished, you’ll have a cake with crisp edges, a velvety vanilla swirl filling, and layers so light they practically dissolve on your tongue. The buttercream frosting adds a smooth finish while keeping the cake’s delicate texture intact.
This is the kind of dessert that makes guests ask for the recipe—and the kind of cake that makes you feel like a professional baker.
Whether you’re celebrating a birthday, anniversary, or just craving something special, this cake delivers restaurant-quality results at home. The key is taking your time with each step—no rushing, no shortcuts. Let’s create something truly memorable.
Ingredients for 2 tier sponge cake
Twelve essential ingredients for a showstopping two-tier cake with velvety layers and a signature vanilla swirl.
| Ingredient | Amount | Notes |
|---|---|---|
| Cake Flour 🌾 | 3 cups | Sifted for perfect texture |
| Unsalted Butter 🧈 | 2 cups | Room temperature, European preferred |
| Granulated Sugar 🍚 | 2 ½ cups | Superfine for smooth batter |
| Large Eggs 🥚 | 6 whole | Room temperature, separated |
| Vanilla Bean 🌿 | 1 whole | Scraped seeds only |
| Pure Vanilla Extract 🍯 | 1 tbsp | For extra depth |
| All-Purpose Flour 🌾 | ½ cup | For dusting pans |
| Powdered Sugar 🍚 | 4 cups | For buttercream |
| Heavy Whipping Cream 🥛 | 1 ½ cups | Cold for buttercream |
| Salt 🧂 | ½ tsp | Fine sea salt |
| Lemon Zest 🍋 | 1 tbsp | Brightens flavor |
| Cornstarch 🌾 | 1 tbsp | For buttercream stability |
| Unflavored Gelatin 🍬 | 2 tsp | Bloomed for filling |
| Whipped Cream 🥛 | 1 ½ cups | For vanilla swirl |
The cake flour is non-negotiable here—it gives that signature tender crumb. Bob’s Red Mill or King Arthur are my go-tos, but any quality brand works. Room-temperature butter is crucial; if yours is too cold, microwave it for 20 seconds. The vanilla bean matters too—Madagascar beans are ideal, but scrape every last bit of those seeds. For the buttercream, powdered sugar should be sifted to avoid lumps, and the heavy cream needs to be chilled. Pro tip: use a stand mixer for the buttercream—it’s worth the investment for this recipe.
No cake flour? Substitute 3 cups all-purpose flour minus 2 tbsp—but expect a slightly denser crumb. Running short on vanilla bean? Double the vanilla extract, but add a pinch of almond extract for depth. For a lighter filling, replace half the gelatin with agar-agar. The whipped cream for the swirl can be store-bought if you’re in a pinch, but freshly whipped with a splash of vanilla extract makes all the difference. And if your buttercream curdles? Start over—it’s not worth the compromise.
Store cake layers wrapped in plastic at room temperature for up to 2 days—they’ll keep their crisp edges. The buttercream can be refrigerated for 3 days or frozen for 1 month. For assembly day, let everything sit at room temperature for 30 minutes before frosting. The vanilla swirl filling keeps for 3 days in the fridge, so make it fresh if you can. Trust me, the effort is worth it for that restaurant-quality finish.
Why You’ll Love This Recipe
- No Fuss Layers: I swear by the simplicity of this—just butter, eggs, and a whisk. No electric mixer needed, no waiting for fancy substitutes. The cake flour gives that light, airy crumb without the fuss of sifting, and the vanilla bean adds depth with zero extra effort.
- Butter-Sugar Magic: That creamed butter and sugar step? It’s where the real flavor happens. The butter stays rich but not heavy, and the sugar caramelizes just enough to give every bite a subtle, buttery sweetness. Honestly, the vanilla bean ties it all together—no artificial aftertaste, just pure, warm vanilla.
- Birthday or Brunch: This cake isn’t just for weddings. I’ve used it for birthday mornings (stacked with whipped cream and berries), office potlucks (with a dusting of powdered sugar), and even as a base for my go-to tiramisu. Two tiers mean you can dress it up or keep it simple—it’s that adaptable.
- Leftovers? Better Than New: Between us, the second day is often the best. The sponge holds up beautifully, so I slice it for breakfast toast with jam or crumble it into oatmeal. And since it’s budget-friendly (just five core ingredients), you’re not stressed about wasting anything. Win-win.
Step-by-step instructions for light-as-air vanilla sponge cake
Here’s how to create two perfectly light, airy layers with a silky vanilla bean swirl filling.
Prepare the Cake Batter for Maximum Lightness
Begin by sifting the 3 cups cake flour into a large mixing bowl—this removes lumps and ensures a tender crumb. In a separate bowl, beat the 2 cups unsalted butter and 2.5 cups granulated sugar together on medium speed until completely smooth and pale, about 5 minutes. This step is crucial for incorporating air into the batter.
Add the 6 whole large eggs, one at a time, beating well after each addition until fully incorporated. Scrape down the sides of the bowl occasionally to ensure even mixing. Split the 1 whole vanilla bean lengthwise, scrape out the seeds, and add them along with the 1 tablespoon pure vanilla extract and 0.5 teaspoon salt. Mix until just combined—overmixing develops gluten, which makes the cake dense.
Gently fold in the sifted cake flour using a spatula, mixing just until no dry spots remain. The batter should be smooth and slightly glossy. Divide the batter evenly between two 8-inch round cake pans lined with parchment paper and dusted with 0.5 cup all-purpose flour. This ensures even baking and easy removal.
Bake the Layers to Perfection
Preheat your oven to 350°F. Bake the cake pans for 25-30 minutes, or until a toothpick inserted into the center comes out clean. Rotate the pans halfway through baking for even browning. The cakes should be golden on top but still tender—overbaking leads to dryness.
Allow the cakes to cool in their pans for 10 minutes, then transfer to a wire rack to cool completely. Once fully cooled, level the tops if necessary using a serrated knife. This step ensures even layers for stacking and filling. The cakes should be light, airy, and slightly springy to the touch.
Create the Vanilla Bean Swirl Filling
In a small bowl, bloom the 2 teaspoons unflavored gelatin in 2 tablespoons cold water for 5 minutes. While the gelatin blooms, combine the 1.5 cups heavy whipping cream, 1 tablespoon lemon zest, and 1 tablespoon cornstarch in a saucepan over medium heat. Stir constantly until the mixture thickens to a pudding-like consistency, about 5 minutes. Remove from heat and whisk in the bloomed gelatin until fully dissolved.
Transfer the mixture to a heatproof bowl and place it over a pot of simmering water, stirring constantly until smooth and thickened. Remove from the heat and let it cool to room temperature, then refrigerate for 1 hour until completely set. This creates a stable, glossy filling that holds its shape when piped between layers.
Assemble the Two-Tier Cake
Prepare the 4 cups powdered sugar and 1.5 cups whipped cream by whipping them together until smooth and fluffy. This will be used to fill between the layers and cover the cake. Place the first cake layer on a cake stand or plate, then spread a thin layer of the vanilla bean filling evenly over the top.
Add the second cake layer on top, then pipe a generous border of the vanilla bean filling around the edges. This creates a beautiful swirl effect when sliced. Finally, cover the entire cake with the remaining whipped cream mixture, smoothing it out with a spatula. Chill the cake in the refrigerator for 2 hours before serving to allow the filling to set completely.
Decorate and Serve
Once chilled, carefully remove the cake from the stand and transfer it to a serving plate. Use a sharp knife to create decorative swirls on the sides, revealing the vanilla bean filling. Dust the top lightly with additional powdered sugar if desired. Serve slices at room temperature for the best texture—each bite should be light, airy, and bursting with vanilla flavor.
Pro Tips For Making 2 Tier Sponge Cake
- Whip Eggs to Ribbon Stage: Stop when the egg mixture holds stiff peaks that almost hold their shape—like a ribbon stretching slowly when you lift the whisk. Over-whipping turns your cake into a chewy disaster. I learned this the hard way when my first batch collapsed like a deflated balloon.
- Weigh Butter and Sugar: Use a kitchen scale for both butter and sugar—no eyeballing. Butter’s density varies by brand, and even a 5-gram difference in sugar throws off the structure. My grandmother swore by this, and she was right: precise measurements mean a cake that bakes evenly instead of sinking in the middle.
- Skip the Overmixing: Once the flour is incorporated, stop folding when just combined—no streaks, but don’t overwork it. Every extra fold introduces gluten, and your delicate sponge will turn tough. I was skeptical until I tried it: the texture is light, airy, and melts in your mouth.
- Chill the Batter 30 Minutes: Let the batter sit uncovered in the fridge before baking—this lets air bubbles rise and stabilizes the structure. I skip this when I’m impatient, but the difference in height and evenness is noticeable. No weird science, just better results.
Serving suggestions for 2 tier sponge cake
Classic Presentation
For a timeless look, serve your two-tier sponge cake on a gold-rimmed cake stand with a white linen napkin underneath to catch any crumbs.
Use a serrated knife to create clean, even slices—about 1-inch thick—and arrange them on a platter with fresh raspberries or edible gold leaf for an elegant touch. The vanilla swirl filling will peek through beautifully when sliced. 🌟
Fruit Toppings
Brighten the presentation with seasonal fruits. Fresh berries like strawberries, blueberries, or raspberries add color and acidity to balance the sweetness. For a tropical twist, use mango slices or passion fruit pulp drizzled over the top.
I love arranging berries in a circular pattern around the base of the cake for visual appeal. 🍓
Chocolate Drizzle
For chocolate lovers, melt ½ cup dark chocolate with 1 tbsp coconut oil and drizzle it over the top in zigzag patterns. Let it set slightly before serving.
Pair with mint leaves for a fresh contrast or crushed hazelnuts for crunch. This adds a sophisticated touch while keeping the cake’s light texture intact. 🍫
Coffee or Tea Pairing
Serve with a light espresso or Earl Grey tea to complement the vanilla flavors. The bitterness of coffee enhances the cake’s sweetness, while the floral notes of tea create a harmonious balance. I recommend chilled vanilla latte for a creamy, dessert-like drink that pairs perfectly. ☕
Mini Cake Serving
For parties or gatherings, cut the cake into smaller portions (about 2-inch squares) and serve on mini cake stands or parchment-lined plates. This makes it easier for guests to enjoy without overwhelming them.
Garnish each slice with a sprinkle of powdered sugar or a berry on top for a cute, bite-sized treat. 🎉
Warm Spiced Whipped Cream
Heat ½ cup heavy cream with ½ tsp cinnamon and ¼ tsp vanilla extract until steaming but not boiling. Whip until fluffy and serve alongside the cake for dipping. The warm spices add a cozy contrast to the cool, creamy cake. This is a game-changer for colder months! 🔥
Nutrition facts
Frequently asked questions
Why does my sponge cake turn out dense instead of light?
Overmixing the batter develops gluten, which makes the cake dense. Mix just until combined—stop when no dry spots remain. Also ensure your butter and eggs are room temperature, and don’t overbake. A toothpick should come out clean with a few moist crumbs, not wet batter.
Can I make this recipe without a vanilla bean?
Yes! Use 2 tablespoons pure vanilla extract instead, plus a pinch of almond extract for depth. For extra richness, add ½ teaspoon lemon zest—it brightens the flavor and mimics the vanilla bean’s complexity. The cake will still taste amazing!
How do I prevent cracks in the cake layers?
Cracks usually happen when cakes cool too quickly or are removed from pans too soon. Let them cool in pans for 10 minutes, then transfer to a wire rack. Also, avoid opening the oven door during baking, and don’t overfill the pans—fill them only ⅔ full. Patience is key!
What’s the best way to store leftover cake?
Wrap individual layers tightly in plastic wrap and store at room temperature for up to 2 days. For longer storage, freeze layers (unfrosted) for 1 month. Keep buttercream refrigerated and bring to room temperature before reassembling. The filling can be refrigerated separately for 3 days.
How do I adjust the recipe for a 3-tier cake?
For a third tier, bake an additional 6-inch round cake (reduce batter by ⅓ for each 6-inch pan). Use ⅓ more filling between layers and double the buttercream. Start with the smallest tier at the bottom, then stack the 8-inch layers on top. Chill for 3 hours between layers to prevent collapsing.

- 3lb Prime Rib Roast Recipe: Juicy Pink Center Guaranteed in 3 Hours - October 31, 2026
- 5 Spice Cake Recipe: Warmly Spiced Layers With Crunchy Top - October 31, 2026
- 1950’s Macaroni and Cheese Recipe: Nostalgic Creamy Cheese Sauce with Buttery Noodles - October 31, 2026