
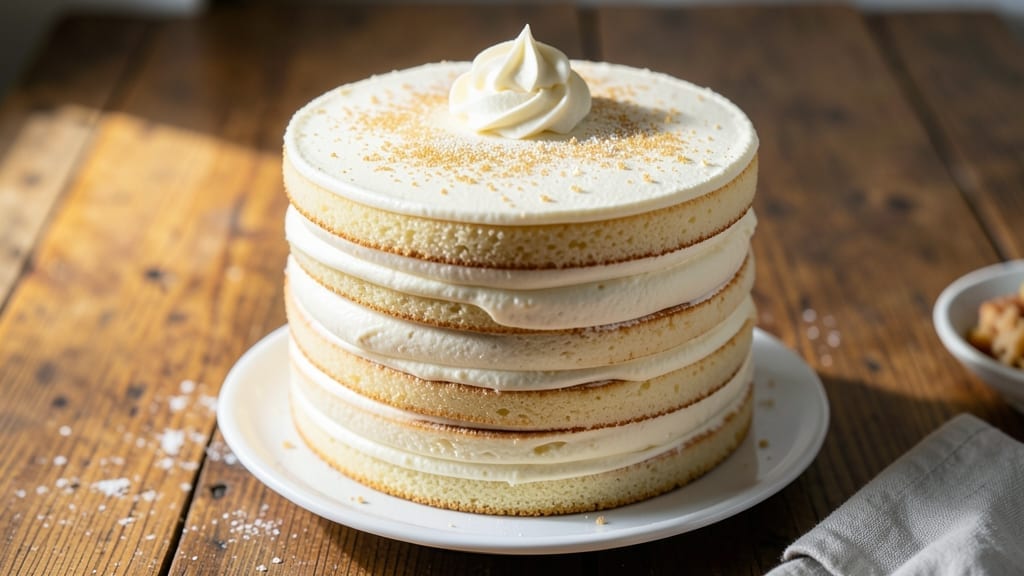
A 20 layer cake isn’t just dessert—it’s a masterpiece of patience, precision, and vanilla buttercream perfection. 🌟 This recipe breaks down the intimidating process into manageable steps, ensuring each layer stays stable, each frosting swirl is flawless, and every bite delivers that signature cloud-like texture.
I’ve baked and assembled cakes like this for years, and the secret lies in the details—from perfectly baked layers to the right buttercream consistency.
The foundation starts with from-scratch vanilla cake, baked in small pans to guarantee even cooking and a tender crumb. Between each layer comes the real magic: homemade vanilla buttercream, whipped to pipeable perfection, that holds its shape while remaining luscious.
Chilling the cake between layers prevents sogginess, and a sturdy cake board keeps the tower from toppling. This isn’t just a cake—it’s a foolproof project that yields professional results at home.
What you’ll end up with is a staggering centerpiece that looks like it belongs in a bakery display case. The layers are perfectly aligned, the buttercream swirls are smooth and symmetrical, and the final dusting of powdered sugar gives it that elegant finish.
Each slice reveals that signature cake-buttercream harmony—light, airy, and rich—that makes this cake legendary.
Whether you’re celebrating a milestone birthday, a wedding, or just want to impress your guests, this 20-layer cake delivers. The process is methodical but rewarding, and the final product is worth every minute. Let’s get started on creating your edible masterpiece.
Ingredients for 20 layer cake
Twenty flawless layers demand precision—start with these essential ingredients for cloud-like perfection.
| Ingredient | Amount | Notes |
|---|---|---|
| All-Purpose Flour 🌾 | 10 cups | Sifted for light texture |
| Unsalted Butter 🧈 | 5 cups | Room temperature, European style preferred |
| Granulated Sugar 🍚 | 10 cups | Divided for cake and buttercream |
| Large Eggs 🥚 | 20 whole | Room temperature, separated |
| Pure Vanilla Extract 🌿 | 2 tbsp | High-quality, Madagascar bourbon preferred |
| Baking Powder 🍃 | 2 tbsp | Diamond Crystal preferred |
| Salt 🧂 | 1 tsp | Fine sea salt |
| Whole Milk 🥛 | 2 cups | Room temperature |
| Powdered Sugar 🍚 | 15 cups | Confectioners sugar, sifted |
| Heavy Cream 🥛 | 4 cups | Cold, full-fat preferred |
| Vanilla Bean Paste 🌿 | 4 tbsp | For intense vanilla flavor |
| Cake Pans 🍰 | 20 whole | 3-inch round pans, non-stick |
| Parchment Paper 📄 | 20 sheets | For cake layer lining |
| Cake Board 🪑 | 1 whole | Sturdy, 12-inch diameter |
| Powdered Sugar Dusting 🍚 | 1 cup | For final presentation |
The butter matters most here—European-style stays softer for that tender crumb. Plugrá or Kerrygold are my go-tos, but any good unsalted butter works if it’s at room temperature. Flour? King Arthur or Gold Medal for reliability, but sift it—no lumps in your layers. Eggs should be separated: whites whipped to stiff peaks for stability, yolks folded into buttercream. Vanilla isn’t just extract—Madagascar bourbon paste gives that bakery-quality depth. Pro tip: weigh your sugar if you can—1 cup granulated sugar can vary by 10g between brands. For the cake pans, 3-inch diameter is ideal—any larger and your layers won’t hold their shape when stacked.
No European butter? Crisco or vegetable shortening works in a pinch, but texture suffers. Short on vanilla paste? Double the extract, but add a pinch of salt to balance. The baking powder is non-negotiable—Diamond Crystal measures differently than others, so if your recipe calls for 2 tbsp, use 1 tbsp of it. For the buttercream, heavy cream can be swapped for whipped topping spray (like Reddi-wip) if you’re in a hurry, but it won’t hold swirls as well. Powdered sugar? Domino is my favorite—it’s finer and dissolves better. And if you’re making this ahead, freeze the buttercream in blocks to soften faster later.
This cake isn’t a last-minute project—plan ahead. The buttercream stays stable for 3 days refrigerated or 3 months frozen (wrap tightly in plastic). Cake layers? Room temperature for 2 hours before assembly to prevent melting. Work in a cool room (65°F or below) to keep buttercream from softening. Once stacked, cover with a damp towel overnight to prevent drying. The final dusting of powdered sugar? Do it just before serving—humidity ruins it fast. And for the love of cake, use a turntable when decorating—your arms will thank you.
Why You’ll Love This Recipe
- No Fuss Layers: I swear by this method—just mix the butter, sugar, and eggs until it’s light, then fold in the flour and vanilla. No electric mixer required, no stressing over overmixed batter. The secret? Whipping the butter and sugar until it’s pale and fluffy (yes, I use a hand mixer, but elbow grease works too).
- Butter-Sugar Magic: That first bite? Pure comfort. The layers are tender, not dense, because the butter is creamed properly, and the vanilla cuts through the richness just enough to keep it from being heavy. Honestly, I’ve tried boxed mixes, but this—with real butter and sugar—tastes like a bakery’s secret.
- Party or Patience: Between us, this cake is my go-to for birthdays, but it’s also the star of my “I have company but no time” playbook. Bake one layer at a time, let them cool, then stack with filling (I use whipped cream or jam). No one will guess it’s not store-bought.
- Budget-Friendly Luxury: A 20-layer cake sounds extravagant, but this recipe stretches further than you’d think. The ingredients are pantry staples, and leftovers? They disappear faster than you can say “second slice.” I’ve even repurposed scraps into cake pops—because waste is for amateurs.
Step-by-step instructions for building a 20-Layer vanilla buttercream cake
Let’s tackle this ambitious project together—precision is key for perfect layers.
👨🍳 Step 1: Prepare the Cake Pans and Prep Ingredients
Begin by lining each of the 20 whole cake pans with parchment paper, pressing it firmly into the bottom and sides. Grease the paper lightly with a tiny bit of the 5 cups unsalted butter to prevent sticking. Arrange the pans in order on your counter—this keeps your workflow organized during baking.
Measure out and separate the 20 whole large eggs, keeping yolks and whites in separate bowls. Sift the 10 cups all-purpose flour with the 2 tbsp baking powder and 1 tsp salt into a large bowl. Divide the 10 cups granulated sugar into two portions: 8 cups for the cake batter and 2 cups for the buttercream. Place the 2 cups whole milk in a small pitcher and the 2 tbsp pure vanilla extract in a separate small bowl.
🍳 Step 2: Bake the Cake Layers
Preheat your oven to 350°F and position racks in the upper and lower thirds for even baking. In a stand mixer fitted with the paddle attachment, cream together 4 cups of the 5 cups unsalted butter (room temperature) and the 8 cups granulated sugar on medium-high speed for 5-7 minutes until light and fluffy. Scrape down the sides as needed.
Add the 20 egg yolks, one at a time, mixing well after each addition. In a separate bowl, whisk together the dry ingredients, then alternate adding the dry mixture and 2 cups whole milk to the butter mixture, beginning and ending with the dry ingredients. Mix just until combined—don’t overmix. Divide the batter evenly among the 20 cake pans, filling each about ⅔ full.
Bake for 18-22 minutes until a toothpick inserted into the center comes out clean. Rotate pans halfway through for even baking. Let layers cool in pans for 5 minutes, then transfer to a wire rack to cool completely. Once fully cooled, level the tops with a serrated knife if needed.
🥘 Step 3: Prepare the Vanilla Buttercream
In a large mixing bowl, beat the remaining 1 cup unsalted butter (room temperature) on medium speed until smooth. Gradually add the 15 cups powdered sugar and mix until fully incorporated. Add the 4 tbsp vanilla bean paste and 2 tbsp pure vanilla extract, mixing until well combined.
In a separate bowl, whip the 4 cups heavy cream (cold) to stiff peaks. Gently fold the whipped cream into the buttercream mixture until smooth and fluffy. Chill the buttercream for 30 minutes before assembling the cake—this makes it easier to work with and prevents melting.
👨🍳 Step 4: Assemble the Cake Layers
Place the first cake layer on the cake board and spread a thin layer of buttercream on top. Add the second layer and repeat, continuing this process until all layers are stacked. After the final layer is added, apply a thin crumb coat of buttercream and chill the cake for 15 minutes to firm up.
Once chilled, apply the final layer of buttercream, smoothing it with a spatula or bench scraper. Use a serrated knife to trim any uneven edges. Dust the top with the 1 cup powdered sugar dusting for a professional finish. Chill the cake for an additional 2 hours before slicing to allow the buttercream to set properly.
Pro Tips For Making 20 Layer Cake
- Weigh Your Butter: DESCRIPTION: Scoop-and-level butter messes up your butter-to-flour ratio—this cake demands precision. Use a kitchen scale for 227g (1 cup) unsalted butter, packed lightly into the measuring cup (no mashing). I learned this the hard way when my first 20-layer cake turned out dense—turns out, packing butter too tightly adds extra moisture where you don’t need it.
- Room Eggs First: DESCRIPTION: Cold eggs from the fridge won’t emulsify properly, and your batter will look curdled no matter how much you whisk. Pop those eggs in a bowl of warm water for 10 minutes before cracking—this ensures smooth, airy layers. (Yes, even if you’re impatient like me.)
- Rotate Pans Mid-Bake: DESCRIPTION: Your oven’s hot spots will wreck an even rise. After 15 minutes, swap the pans front-to-back and top-to-bottom. I was skeptical until I tried it—now my layers bake uniformly, and no one guesses I didn’t use a professional oven.
- Sift Flour Twice: DESCRIPTION: Clumps in your flour mean uneven texture, and a 20-layer cake has zero room for error. Sift the flour directly into the butter (no mixing yet), then sift it again after adding sugar. Sounds weird, but it works—your layers will be light, not gritty. (Your future self will thank you.)
Essential equipment for this recipe
Stand Mixer Essentials
Your stand mixer is the backbone of this project—I swear by my KitchenAid Artisan Series with the 5-quart bowl. The paddle attachment is non-negotiable for creaming butter and sugar, while the whisk attachment transforms egg whites into stable meringues for layering.
A cooling paddle attachment helps maintain buttercream consistency during mixing. For 20 layers, consider renting a heavy-duty mixer like the KitchenAid Professional 600 if your current model struggles with large batches. 💪
Precision Tools
A digital kitchen scale is your best friend—measurements matter in baking. I use a OXO Good Grips scale for accuracy, especially with powdered sugar and flour. For leveling cake layers, a serrated knife works best, but a cake leveler ensures perfectly even tops.
Don’t skip the offset spatula—it’s essential for spreading buttercream between layers without tearing the cake. A bench scraper helps smooth frosting edges like a pro.
Cake Assembly Gear
Your cake board must be sturdy—opt for a 12-inch diameter board made of plywood or MDF with a non-slip mat underneath. A turntable (like the Wilton Cake Stand) makes decorating 20 layers manageable—your arms will thank you.
For stacking, use a cake dowel set (¼-inch thick) to support the height. I also recommend plastic wrap for covering the cake overnight to prevent drying.
Chilling Solutions
Chilling is critical—your refrigerator should have space for the cake board and layers. A cooling rack helps layers dry faster after baking. For buttercream, I freeze blocks in ziplock bags for easy softening later.
A thermometer ensures your workspace stays at 65°F or below—ideal for preventing buttercream from melting during assembly. Pro tip: Use a cake collar (a cardboard ring) to support the sides while decorating.
Decorating Extras
For the final touch, a fine-mesh sieve dusts powdered sugar evenly. A piping bag with a star tip adds decorative swirls if you want extra flair. I also keep edible gold leaf on hand for a luxurious finish.
Don’t forget a sharp serrated knife for clean cuts when slicing—it’s worth investing in a Japanese pull knife for precision. 🌟
Nutrition facts
Frequently asked questions
Can I bake 20 layers at once, or should I bake them in batches?
Baking all 20 layers at once is possible, but I recommend baking in batches of 4-6 layers per oven load. This ensures even baking and prevents oven temperature fluctuations. Use both upper and lower racks for even heat distribution, and rotate pans halfway through baking. A 350°F oven works best for consistent results.
How do I keep the cake from collapsing when stacking 20 layers?
Prevent collapse by chilling each layer for 10 minutes before adding buttercream, and use a thin crumb coat between layers. Place a cake dowel in the center of each layer to support the height. A sturdy 12-inch cake board with a non-slip mat also prevents toppling. Work in a cool room (65°F or below) to keep buttercream firm.
What’s the best way to store a partially assembled 20-layer cake?
Store between layers by wrapping each one individually in plastic wrap and refrigerating. For partially stacked sections, cover with a damp towel and plastic wrap to prevent drying. The buttercream stays stable for 3 days refrigerated or 3 months frozen (wrap tightly in plastic). Let all components reach room temperature before reassembling.
Can I substitute buttercream with another frosting?
While buttercream is ideal for stability and flavor, you could use ganache or cream cheese frosting in a pinch. Ganache needs to be slightly thicker (add powdered sugar) to hold swirls, and cream cheese frosting requires extra vanilla for flavor balance. Test stability with a small test layer first—these frostings may not hold as well for such a tall cake.
How do I transport a 20-layer cake without it toppling?
Use a cake carrier with wheels or a sturdy wooden cake board with handles. Wrap the entire cake in plastic wrap, then secure it with a cake collar (cardboard ring) to prevent shifting. Transport in a cool vehicle (not trunk) and avoid temperature changes. For extra support, insert additional dowels at the base before transport.

- 3lb Prime Rib Roast Recipe: Juicy Pink Center Guaranteed in 3 Hours - October 31, 2026
- 5 Spice Cake Recipe: Warmly Spiced Layers With Crunchy Top - October 31, 2026
- 1950’s Macaroni and Cheese Recipe: Nostalgic Creamy Cheese Sauce with Buttery Noodles - October 31, 2026