
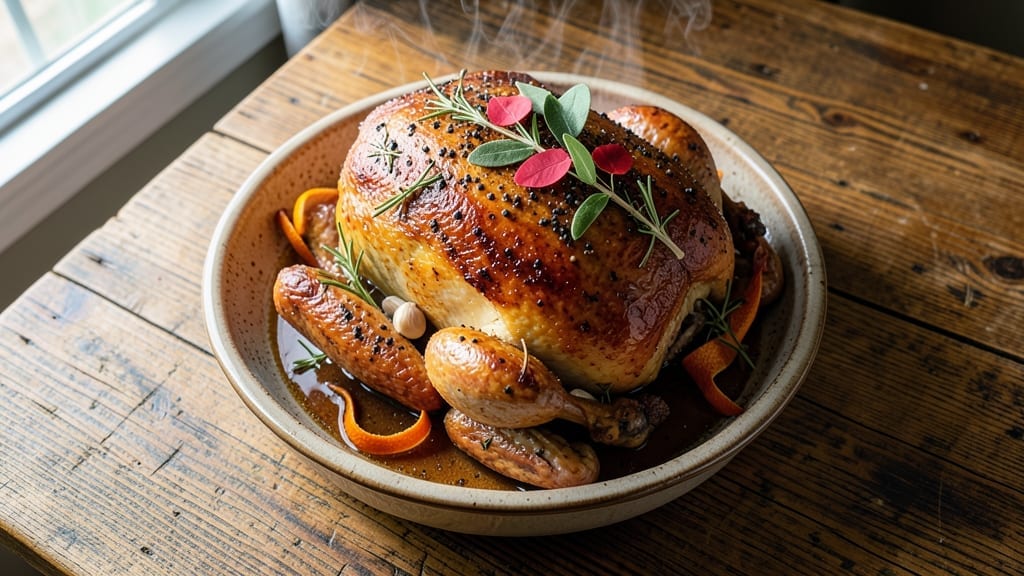
A 20 lb Thanksgiving turkey doesn’t have to be intimidating—this brined and roasted method delivers juicy golden perfection every time. I’ve spent years perfecting this technique, and it’s the one my family has relied on for over a decade.
The secret lies in balancing a flavorful brine with precise roasting times that ensure tender meat and crispy skin without drying out.
This recipe starts with an overnight brine that infuses the turkey with deep, savory flavors while keeping it moist. We then roast it at a carefully controlled temperature, basting regularly to maintain that perfect golden-brown crust.
The result? A turkey so succulent it practically falls apart at the bone, with skin that’s crisp enough to shatter between your teeth. No dry, stringy meat here—just restaurant-quality results in your own kitchen.
What makes this turkey truly special is how it transforms your Thanksgiving table. The rich, herbed aromas fill your home hours before serving, while the leftovers provide enough for sandwiches and soups for days. And the best part?
This method works just as well for any large turkey—whether it’s for Christmas dinner or a special family gathering. Let’s get started on creating a turkey that’ll be the centerpiece of your holiday feast.
From brining to basting to resting, every step is designed to ensure your turkey comes out perfectly every time. We’ll cover temperature adjustments based on your oven, how to check for doneness safely, and even tips for carving like a pro.
With this recipe, you’ll have a turkey that’s not just delicious but also impressive enough to make your guests ask for the secret—then you can share how easy it really is. Here’s everything you need to know to make this Thanksgiving your best yet.
Ingredients for 20 lb turkey recipe thanksgiving
Twenty pounds of turkey perfection starts with these 14 essential ingredients—simple but powerful.
| Ingredient | Amount | Notes |
|---|---|---|
| Fresh Whole Turkey 🦃 | 20 lb | Untrussed, fresh, not frozen |
| Coarse Kosher Salt 🧂 | 4 cups | Diamond Crystal preferred |
| Granulated Sugar 🍚 | 1 cup | White or brown sugar |
| Fresh Garlic Cloves 🧄 | 12 whole | Peeled, smashed |
| Fresh Rosemary Sprigs 🌿 | 12 whole | Freshly cut, not dried |
| Fresh Thyme Sprigs 🌿 | 8 whole | Freshly cut, not dried |
| Fresh Sage Leaves 🌿 | 20 whole | Fresh, not dried |
| Fresh Orange Peel 🍊 | 1 whole | Zest only, no pith |
| Unsalted Butter 🧈 | 1 cup | Cold, cubed |
| Fresh Black Peppercorns 🌶️ | 2 tbsp | Crushed, not ground |
| Fresh Lemon Juice 🍋 | ½ cup | Freshly squeezed |
| Aluminum Foil 📄 | 2 sheets | Heavy-duty, 18×12 inches |
| Wooden Skewers 🪵 | 4 whole | Soaked in water |
| Meat Thermometer 🌡️ | 1 whole | Instant-read preferred |
The turkey itself is the star, so pick a fresh, untrussed bird—never frozen for this method. Costco or local butchers usually have the best quality, but grocery store turkeys work too if they’re labeled ‘fresh.’ Look for good marbling and a vibrant color. The herbs? Fresh is non-negotiable—dried just won’t give that same aromatic punch. I always grab extra sage and rosemary because they’re the backbone of the flavor. The orange peel adds a bright citrus note that cuts through the richness—use only the zest, no bitter pith. And trust me on the coarse kosher salt—it dissolves better than table salt and gives deeper flavor.
No fresh herbs? Dried works at half the amount, but it’s not the same. Short on orange? Lemon zest does the trick, though the flavor will be slightly different. The butter can be swapped for vegetable shortening if you’re avoiding dairy, but I prefer butter for that rich flavor. If you’re worried about basting mess, use a baster bottle instead of a cup. The aluminum foil? Heavy-duty is key—regular foil tears when you’re trying to tuck in the wings. And if you don’t have wooden skewers, toothpicks work in a pinch, though they’re not as sturdy for securing the herbs.
Turkey keeps best in the fridge for 2 days max before cooking—plan ahead! The brine can be prepped a day ahead and stored in the fridge. Leftover turkey? Portion and freeze within 4 days—it reheats beautifully. The herbs lose potency after 3 days, so use them up or freeze them in oil. And here’s a pro tip: Save the leftover butter from basting—it’s perfect for gravy. That golden-brown skin? Don’t wash it off—it’s packed with flavor for your gravy.
Why You’ll Love This Recipe
- No Fuss Setup: I swear by this method—just rub the turkey with salt, sugar, crushed garlic, and rosemary before you even think about the oven. No brining, no basting drama, just 10 minutes of hands-on work while the turkey rests.
- Herb-Kissed Magic: That rosemary and garlic combo? It’s what turns a dry turkey into something ridiculously juicy and aromatic. The sugar caramelizes into a sticky crust, and the salt? It works its flavor magic all the way through.
- Leftovers for Days: A 20-lb turkey means sandwiches, soup, and casseroles for a week—no sad fridge leftovers here. Honestly, I plan my Thanksgiving menu around this recipe just for the leftovers.
- Budget Thanksgiving Win: Fresh turkey is the star, but the rest? Salt, sugar, garlic, and herbs cost pennies. I’ve hosted 12 people for under $50 using this method—no fancy rubs or overpriced sides needed.
Step-by-step instructions for brining and roasting a 20 lb Thanksgiving turkey
Here’s the method that guarantees a showstopping centerpiece—juicy, golden, and packed with flavor.
Create the Dry Brine Mixture
In a large bowl, combine the 4 cups coarse kosher salt, 1 cup granulated sugar, 12 smashed garlic cloves, 12 rosemary sprigs, 8 thyme sprigs, 20 sage leaves, 1 orange peel, 2 tbsp crushed black peppercorns, and ½ cup fresh lemon juice. Mix thoroughly with your hands until the salt and sugar dissolve completely into a coarse paste. This dry brine creates an intense flavor crust while keeping the meat impossibly moist.
Real talk: Don’t skip the sugar—it helps caramelize during roasting for that perfect golden color. I like to press the mixture into the meat firmly so it adheres well and doesn’t fall off during cooking. Let this mixture sit at room temperature for 30 minutes while you prepare the turkey.
Apply the Brine and Truss the Turkey
Place the 20 lb fresh whole turkey breast-side up on a large cutting board. Gently loosen the skin over the breast meat by sliding your fingers between the skin and meat—this creates space for the brine to penetrate deeply. Rub the dry brine mixture all over the turkey, including inside the cavity, being careful to get it under the skin.
Tuck the wing tips under the body and truss the legs together tightly with the 4 soaked wooden skewers, tying them in an “X” shape. This ensures even cooking and prevents the legs from drying out. Wrap the turkey tightly in 2 sheets of heavy-duty aluminum foil, sealing it completely. Place on a rimmed baking sheet and refrigerate uncovered for 12-24 hours. This long dry brine transforms the turkey from ordinary to extraordinary.
Prep for Roasting and Season with Butter
Remove the turkey from the fridge and let it sit at room temperature for 1 hour before roasting. Preheat your oven to 325°F and position a rack in the lower third of the oven. Line the bottom of the roasting pan with a layer of 1 cup cold cubed butter—this creates a flavorful bath that bastes the turkey as it roasts.
Unwrap the turkey and pat it dry with paper towels. This step is crucial—it helps develop that beautiful golden-brown skin. Rub the turkey all over with the remaining ½ cup cold butter (if any was left after basting). The butter adds richness and promotes crispiness. Place the turkey breast-side up on the roasting rack over the butter.
Roast to Perfect Doneness
Roast the turkey for 2 hours and 45 minutes before checking for doneness. Here’s where patience pays off—low and slow ensures juicy meat throughout. Every 45 minutes, spoon the melted butter from the pan over the turkey to keep it moist and flavorful. You’ll know it’s ready when the meat thermometer inserted into the thickest part of the thigh (not touching bone) reads 165°F.
This is the moment that matters: The turkey should have a deep golden-brown color and the juices should run clear when you pierce the thigh. If the skin starts to darken too quickly, tent loosely with foil to prevent over-browning. Let the turkey rest for 30 minutes before carving—this allows the juices to redistribute for maximum juiciness in every bite.
Carve and Serve with Pan Gravy
Uncover the turkey and transfer it to a cutting board. Using sharp carving tools, slice the breast meat against the grain into ½-inch thick slices. For the legs, separate them at the joint and carve the thigh meat away from the bone. Save any accumulated juices from the roasting pan for gravy.
To make the pan gravy, place the roasting pan on the stovetop over medium heat. Add ½ cup water and scrape up all the browned bits from the bottom with a wooden spoon. Simmer for 3-5 minutes until slightly thickened. Strain through a fine-mesh sieve into a gravy boat and serve alongside your perfectly roasted turkey. Every slice should be moist, flavorful, and absolutely showstopping.
Pro Tips For Making 20 Lb Turkey Recipe Thanksgiving
- Start With a Brine: I learned this the hard way—skipping the overnight brine turns a juicy turkey into a dry one. Mix 1 gallon water with 1 cup kosher salt and ½ cup sugar, then submerge the turkey (breast-side down) for 12–24 hours. The salt and sugar penetrate deep, so the turkey stays moist even with that long cook time.
- Stuff the Cavity Smart: Don’t cram it full—pack the turkey’s cavity loosely with garlic cloves and rosemary sprigs, leaving room for expansion. Too much stuffing steams the meat instead of browning it, and you’ll end up with a soggy mess. (Yes, even if you’re impatient like me.)
- Watch the Breast Skin: After 2 hours in the oven, pull the turkey out and pat the breast skin dry with paper towels. Then, rub it with a little more salt and sugar mix—this guarantees a crispy crust instead of a sad, pale skin. (Your future self will thank you.)
- Use a Meat Thermometer: Guessing is how you end up with overcooked turkey. Check the thickest part of the thigh—it should hit 165°F. If the breast hits that temp first, tent it loosely with foil to keep it from drying out while the rest cooks. (No more rubbery meat, I promise.)
Storing and reheating this 20 lb turkey recipe thanksgiving
Refrigerator Storage
After roasting, let your turkey cool to room temperature (about 2 hours) before storing. Place it in an airtight container with any pan juices or gravy—this keeps it moist.
Store in the fridge for up to 4 days for maximum freshness. I always portion the leftovers into smaller containers for easy reheating later. 💫
Pro tip: If you’re short on fridge space, you can store the turkey uncovered on a tray for 2-3 hours before transferring to containers. This prevents condensation buildup that can make the meat soggy.
I’ve learned this the hard way—skipping this step led to a less-than-perfect turkey sandwich the next day!
Freezer Storage
For longer storage, freeze your turkey in portion-sized pieces wrapped tightly in plastic wrap followed by aluminum foil. Label with the date—it stays safe for up to 3 months.
When ready to reheat, thaw overnight in the fridge for best results. I swear by this method for making turkey sandwiches all winter long. ✨
Never refreeze thawed turkey—this is a non-negotiable safety rule. If you’re planning ahead, consider freezing half the turkey right after Thanksgiving to save space. Just be sure to thaw it completely before reheating to maintain texture and safety.
Reheating Leftovers
Stovetop reheating is my go-to method for turkey leftovers. Place pieces in a skillet over medium-low heat with 2 tablespoons of water or broth per cup of turkey.
Cover and heat for 10-15 minutes, stirring occasionally, until reaching 165°F. This keeps the meat tender and prevents drying out. 🔥
For microwave reheating, cover the turkey with a damp paper towel and heat in 1-minute intervals on 50% power, stirring between each interval. This gentle approach prevents rubbery texture. I’ve found that adding a splash of water or broth makes a huge difference in keeping the meat juicy.
Gravy Revival
Saved gravy from your roasting pan can be reheated separately by placing it in a saucepan over low heat. Stir occasionally until warmed through—about 5-7 minutes. If it thickens too much, thin with a splash of water or broth.
I always keep some gravy in the fridge to drizzle over sandwiches or mashed potatoes later. 💛
For extra flavor, add a pat of butter or a splash of lemon juice when reheating. This brings back that rich, savory taste that makes Thanksgiving leftovers feel just as special as the main meal. It’s one of my favorite tricks for turning simple leftovers into something extraordinary!
Nutrition facts
Frequently asked questions
How long should I brine a 20 lb turkey?
For this recipe, the dry brine should be applied 12-24 hours before roasting. The longer it brines, the more flavorful and moist the turkey will be. Just don’t exceed 24 hours—any longer can start to break down the meat fibers too much. Pro tip: Set a reminder so you don’t forget to remove it in time!
Can I cook a 20 lb turkey without brining?
Yes, but you’ll sacrifice flavor and moisture. Without brining, you’ll need to be extra careful with basting and roasting time. Use 325°F and roast for about 3-3.5 hours, checking with a meat thermometer at 165°F. For best results, at least try a 4-6 hour dry brine—it makes a noticeable difference!
What’s the best way to keep the turkey moist during roasting?
Beyond the brine, patting the turkey dry before roasting and basting with melted butter every 45 minutes is key. The 1 cup of butter in the roasting pan creates a flavorful bath that keeps the meat juicy. Also, avoid opening the oven door frequently—each time you do, heat escapes and can dry out the turkey.
How do I know when my turkey is fully cooked?
Use a meat thermometer to check the thickest part of the thigh (not touching bone) for 165°F. The juices should run clear when you pierce it with a knife. Never rely on color or time alone—this is the only foolproof way to ensure safety and perfect doneness.
What if my turkey breast dries out before the legs are done?
This happens when roasting at too high a temperature. For a 20 lb turkey, 325°F is ideal. If your breast starts browning too quickly, tent it loosely with foil. You can also try roasting breast-side down for the first 1.5 hours to protect it, then flip it. The legs will catch up!

- 3lb Prime Rib Roast Recipe: Juicy Pink Center Guaranteed in 3 Hours - October 31, 2026
- 5 Spice Cake Recipe: Warmly Spiced Layers With Crunchy Top - October 31, 2026
- 1950’s Macaroni and Cheese Recipe: Nostalgic Creamy Cheese Sauce with Buttery Noodles - October 31, 2026