
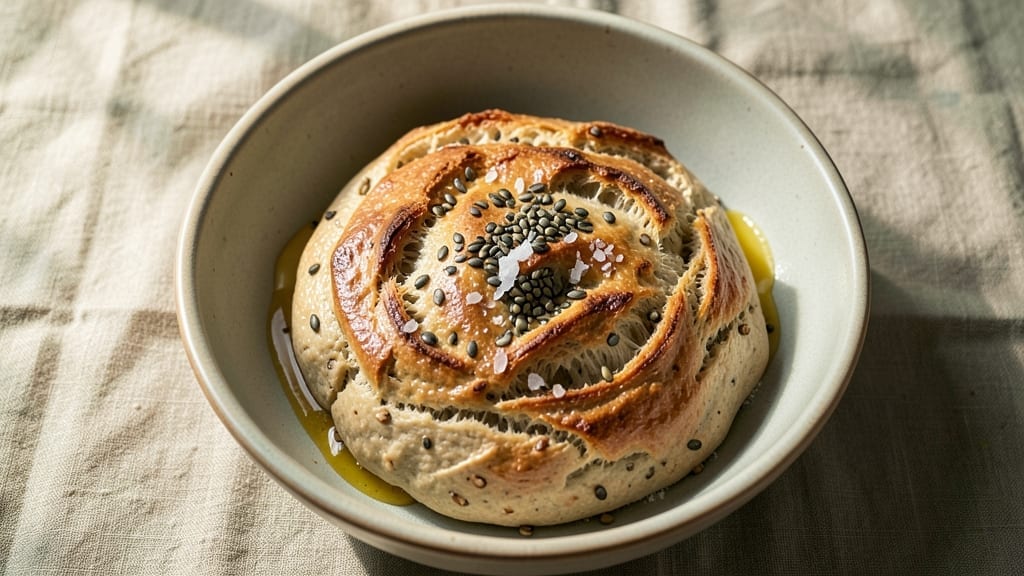
Mastering 24-hour sourdough bread transforms your kitchen into a bakery, and this recipe delivers restaurant-quality crust with minimal fuss. The secret lies in the slow fermentation—24 hours of patient development creates deep flavor and an open crumb structure that store-bought loaves can’t match.
I’ve refined this method over years to ensure consistent results, even for beginners.
This process starts with a well-fed starter (maintain 100% hydration for best results) and progresses through a single bulk fermentation period. The dough rests overnight in the refrigerator, allowing gluten to relax and flavors to meld naturally.
No kneading required—just mix, ferment, shape, and bake for a loaf that’s crisp on the outside and tender inside.
By the time you pull it from the oven, you’ll have a loaf with a golden, crackly crust and an open crumb that’s impossible to resist. The 24-hour fermentation eliminates the need for commercial yeast while developing complex, tangy flavors.
This method also works beautifully with add-ins like seeds or herbs for customization.
Perfect for breakfast, sandwiches, or gifting—this bread keeps well for days when stored properly. Let’s get started on your artisan loaf journey!
Ingredients for 24 hour sourdough bread
Four flours, two fermentations, and one overnight rest create restaurant-quality sourdough at home.
| Ingredient | Amount | Notes |
|---|---|---|
| Active Sourdough Starter 🍞 | ½ cup | 100% hydration, well-fed (fed 12-24 hours prior) |
| All-Purpose Flour 🌾 | 3 ½ cups | Unbleached, high protein (11-12%) preferred |
| Bread Flour 🌾 | 1 ½ cups | For improved gluten structure (optional) |
| Whole Wheat Flour 🌾 | ½ cup | For added nutrition and subtle flavor |
| Granulated Sugar 🍚 | ¼ cup | Enhances starter activity and crust browning |
| Unsalted Butter 🧈 | ¼ cup | Cold, cubed, for enriched dough texture |
| Large Eggs 🥚 | 2 whole | Room temperature, for structure and richness |
| Warm Water 💧 | 1 ½ cups | 95-100°F, for optimal hydration |
| Sea Salt 🧂 | 1 ½ tsp | Fine grain, Diamond Crystal preferred |
| Olive Oil 🫒 | 2 tbsp | Extra-virgin, for dough handling |
| Cornmeal 🌽 | ¼ cup | For dusting and preventing sticking |
| Sesame Seeds 🌱 | 1 tbsp | Optional topping for visual appeal |
| Ice Water 🧊 | ¼ cup | For final shaping and tension |
The sourdough starter is the heart of this loaf—King Arthur or a well-maintained home culture works best. Look for a starter that’s bubbly, slightly domed, and has a tangy aroma. If using store-bought, Bob’s Red Mill or Authentic Foods starters are reliable. The flour blend matters too: King Arthur or Caputo bread flour elevates texture. For the butter, Plugrá or Land O’Lakes unsalted provide consistent fat content. Pre-ferment the starter 12-24 hours before baking to ensure peak activity—this is non-negotiable for proper rise.
No bread flour? All-purpose plus 1 tbsp vital wheat gluten mimics the effect. Short on whole wheat? Substitute with spelt flour for similar nutrition. The sesame seeds can be swapped for poppy seeds or flaxseeds if preferred. For a lighter crumb, replace 0.25 cup whole wheat with more bread flour. The olive oil can be avocado oil if unavailable, but stick to extra-virgin for flavor. If your kitchen runs hot, reduce water by 0.125 cup to prevent overproofing during bulk fermentation.
Store the starter in a glass jar with a loose lid in the fridge—it’ll last indefinitely if fed weekly. The mixed dough can be refrigerated for up to 24 hours before shaping, but bake within 8 hours of final proof. For long-term storage, slice the cooled loaf and freeze portions—3 months in a sealed bag preserves freshness. The crust stays crisp for 2 days at room temperature when wrapped in a cotton towel, but the crumb softens after 24 hours
Why You’ll Love This Recipe
- No-Knead Magic: The dough comes together in five minutes—just toss the flours, starter, and a pinch of sugar. Honestly, I’ve made sourdough that took hours of kneading, but this? It’s the kind of recipe that lets you mix while watching a movie.
- Tangy-Sweet Crust: That little bit of granulated sugar caramelizes just enough to give the crust a subtle crunch, while the whole wheat adds a nutty depth. Between us, the first slice out of the oven is the reason I keep making it—warm, chewy, and packed with flavor.
- Weeknight Wonder: I bake this on Sundays, but it’s my secret weapon for lazy Tuesdays too. The loaves keep beautifully for days, so I can toast one for breakfast or pack slices for lunch without a second thought. (Yes, even on a Tuesday night.)
- Budget-Friendly Staple: Using all-purpose and bread flour keeps costs low, and the whole wheat adds fiber without breaking the bank. Plus, once you’ve got the starter going, the only real expense is flour—and you’ll go through it fast.
Step-by-step instructions for 24-Hour sourdough bread
Precision timing and technique create the perfect balance of tangy flavor and airy texture.
Mix the Dough and Bulk Ferment
In a large mixing bowl, combine the 0.5 cup active sourdough starter, 3.5 cups all-purpose flour, 1.5 cups bread flour, 0.5 cup whole wheat flour, and 0.25 cup granulated sugar. Create a well in the center and add the 2 whole large eggs, 1.5 cups warm water, and 1.5 tsp sea salt. Gently mix with a wooden spoon until a shaggy dough forms.
Add the 2 tbsp olive oil and mix again, then turn the dough onto a lightly floured surface. Knead for 8-10 minutes until smooth and elastic, with a slight resistance when pulled. The dough should pass the “windowpane test”—stretch a small piece until it thins enough to see light through without tearing. If it tears, knead for another minute.
Place the dough in a lightly oiled bowl, cover with a damp kitchen towel, and let it bulk ferment at room temperature (70-75°F) for 4-5 hours. You’ll know it’s ready when it has nearly doubled in size and leaves a slow, gentle impression when poked with a finger. This stage develops gluten structure and flavor complexity.
Cold Proof and Shape the Dough
Transfer the bulk-fermented dough to a clean, oiled bowl and refrigerate for 12-16 hours. The cold slows fermentation, allowing flavors to meld and gluten to relax for easier shaping. This is where the dough develops its signature tang and depth.
Remove the dough from the fridge and let it sit at room temperature for 30-45 minutes until pliable. On a lightly floured surface, gently shape the dough into a round loaf by stretching and folding the edges toward the center. This technique tightens the gluten structure and creates an even crumb. Place the shaped dough seam-side up in a cornmeal-dusted loaf pan.
Cover the pan with a damp towel and let the dough proof at room temperature (70-75°F) for 1-1.5 hours, or until it has risen 1-2 inches above the pan. The dough should feel springy when pressed gently—this indicates it’s ready for baking. Avoid over-proofing, which can lead to a dense crumb.
Preheat and Bake for Crispy Crust
Preheat your oven to 425°F with a Dutch oven placed inside for 45-60 minutes. The Dutch oven traps steam, creating a crispy crust and chewy interior. While the oven heats, score the dough with a sharp razor or knife by making a ½-inch deep slash down the center of the loaf. This controls expansion and adds a professional touch.
Carefully transfer the loaf pan to the preheated Dutch oven. Bake for 30 minutes, then remove the lid and bake for an additional 15-20 minutes until the bread is deep golden brown and sounds hollow when tapped on the bottom. The internal temperature should reach 190-200°F.
Remove the bread from the pan and place it on a wire rack to cool for at least 1 hour before slicing. This resting period allows the gluten to relax and the crumb to set. For extra flair, brush the cooled loaf with a bit of melted butter and sprinkle with 1 tbsp sesame seeds while still warm for added texture and visual appeal.
Optional Final Touches
For an enriched dough variation, incorporate the 0.25 cup cold, cubed unsalted butter during the final kneading stage. This adds richness and tenderness to the crumb, though it requires an additional 10 minutes of kneading to fully distribute the fat. The butter should be cold to prevent over-softening the dough.
If using the 0.25 cup ice water for shaping, add it gradually during the final stretch-and-fold technique. The ice water tightens the gluten and improves oven spring, resulting in a taller, more open crumb. Use it sparingly—too much can make the dough stiff and difficult to handle.
Pro Tips For Making 24 Hour Sourdough Bread
- Weigh Your Flours: Digital scales are your best friend here—especially when mixing bread flour and whole wheat. I learned this the hard way: scooping whole wheat into cups packs it too tightly, throwing off hydration and making your dough stubborn. Weigh everything to 1 gram for consistency, or your 24-hour timeline will feel like a guessing game.
- Skip the Whole Wheat Rush: Whole wheat absorbs water like a sponge, so don’t add it all at once during autolyse. Mix 70% of your flours first (bread + all-purpose), let that hydrate for 30 minutes, then fold in the whole wheat with the starter. Your dough will handle the extra bulk better, and you’ll avoid a gummy, dense loaf.
- Proof at Room Temp: That cozy 75°F (24°C) corner isn’t just a myth—it’s where your dough shines. If your kitchen runs cold, proof the final shape in a turned-off oven with the light on (yes, it’s weird). A slow, steady rise keeps the whole wheat from overproofing and collapsing. I used to ignore this, and my crusts turned sad and flat.
- Steam the First 10 Minutes: Don’t just bake—steam. Place a metal tray with boiling water on the oven floor when you load your dough. The burst of steam guarantees a crisp, blistered crust on the whole wheat-heavy loaf. I skipped this once and ended up with a dense top that tasted underwhelming. Worth the extra step.
Pro cooking tips for 24 hour sourdough bread
Starter Prep Secrets
Your starter is the foundation—feed it 1:1:1 ratio (starter:flour:water) 12-24 hours before baking for peak activity. I use King Arthur bread flour for consistency, but whole wheat adds depth. Store it in a glass jar with a loose lid to allow gas escape while preventing contamination.
A well-fed starter should be bubbly, slightly domed, and smell tangy—like yogurt with a hint of vinegar. 💫
Dough Hydration Hacks
The 1.5 cups warm water (95-100°F) is critical—too hot kills yeast, too cold slows fermentation. I add the water last to maintain proper dough temperature. For sticky dough, wet your hands slightly instead of over-flouring.
The 2 tbsp olive oil improves oven spring and prevents cracking. If your kitchen is humid, reduce water by 0.125 cup to avoid gummy texture.
Cold Proof Mastery
Refrigerating the dough for 12-16 hours is non-negotiable—it builds flavor and relaxes gluten. I place dough in a lightly oiled bowl with a damp towel to prevent drying. The cold slows fermentation, giving you control over timing.
When ready to bake, let it sit at room temp for 30-45 minutes until pliable. This final rise creates that signature open crumb structure. ❄️
Scoring Like a Pro
Score your dough with a sharp razor or lame at a 45-degree angle, cutting ½-inch deep down the center. This controls expansion and creates that beautiful ear. I press firmly but not too hard—you want to see the dough resist slightly.
For a rustic look, make a zigzag pattern instead of a straight line. The score should be made just before baking when the dough is fully proofed.
Dutch Oven Steam Trick
Preheating the Dutch oven at 425°F for 45-60 minutes creates the perfect steam environment. I place a metal tray on the lower rack and pour ½ cup hot water into it before adding the dough. This extra moisture gives you that professional bakery crust.
After 30 minutes, remove the lid to let the crust brown properly. The bread is done when it sounds hollow when tapped on the bottom. 🔥
Cooling for Crumb Perfection
Never slice bread immediately—let it cool on a wire rack for at least 1 hour (2 hours is better). This allows gluten to relax and prevents gummy slices. For extra crunch, brush the cooled loaf with melted butter and sprinkle with sesame seeds while still warm.
I store leftovers wrapped in a cotton towel to maintain freshness for up to 3 days at room temperature. Freeze slices for longer storage.
Nutrition facts
Frequently asked questions
Can I use this 24-hour method with a new sourdough starter?
Not ideal! Your starter needs to be active and well-fed—look for bubbles, a domed shape, and a tangy aroma. If it’s new or sluggish, feed it 1:1:1 ratio (starter:flour:water) every 12 hours for 3-5 days before attempting this recipe. A young starter won’t provide enough lift during the overnight fermentation.
Why does my dough smell sour after cold proofing?
A slightly tangy aroma is normal and actually desirable! The 12-16 hour cold proof enhances fermentation, developing that classic sourdough flavor. If it smells overly harsh or like vinegar, your starter may be overfed or too acidic. Try reducing the starter amount by 25% next time. The smell should mellow during baking.
What if my dough doesn’t rise during the 24-hour fermentation?
Check these first: starter strength (should be bubbly), room temperature (70-75°F), and hydration. If your kitchen is cold, try wrapping the bowl in a light towel or placing it near a warm spot. For future attempts, verify your starter’s activity by doing a float test—drop a spoonful in water; if it floats, it’s ready.
Can I make this recipe without a Dutch oven?
Yes! Use a baking steel or place a cast-iron skillet on the oven rack with ½ cup boiling water below it. For a loaf pan version, bake at 425°F for 40 minutes with steam (pour water in the pan), then 15 minutes uncovered. The crust won’t be as crispy, but the texture will still be excellent.
How do I know when the bread is fully baked?
Look for deep golden brown crust, a hollow sound when tapped on the bottom, and an internal temperature of 190-200°F. The edges should pull away from the pan slightly. If unsure, bake 5 more minutes—underbaked bread continues cooking as it cools. A toothpick inserted should come out clean (or with a few moist crumbs).

- 3lb Prime Rib Roast Recipe: Juicy Pink Center Guaranteed in 3 Hours - October 31, 2026
- 5 Spice Cake Recipe: Warmly Spiced Layers With Crunchy Top - October 31, 2026
- 1950’s Macaroni and Cheese Recipe: Nostalgic Creamy Cheese Sauce with Buttery Noodles - October 31, 2026