
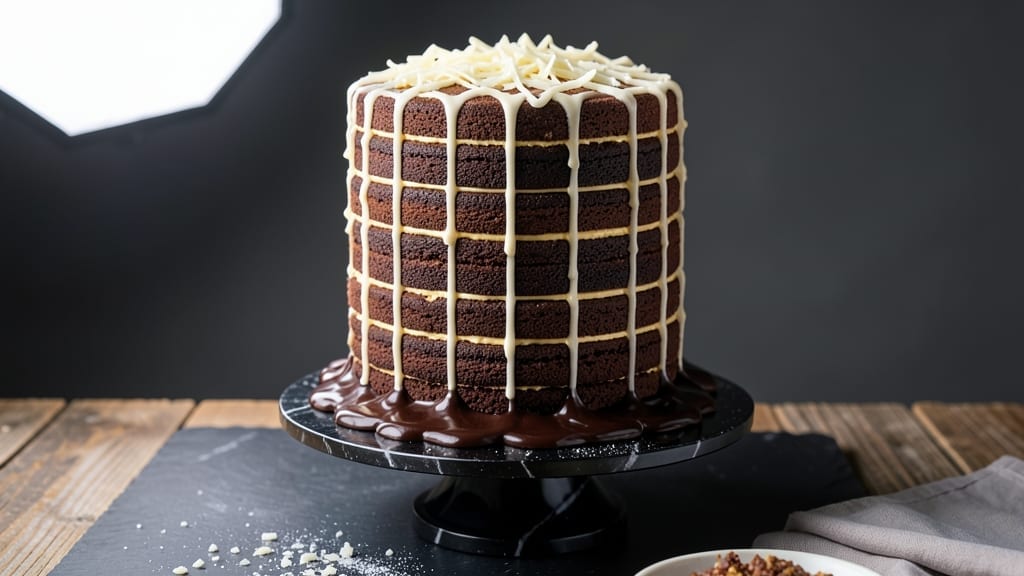
Creating a 24-layer chocolate cake like Strip House’s iconic dessert requires precision and patience, but the result is worth every layer. This recipe delivers a towering, showstopping cake with perfectly balanced moist layers and rich chocolate frosting that holds its structure beautifully.
The secret lies in alternating thin layers of cake and frosting, allowing each to set before adding the next—transforming what seems impossible into a stunning centerpiece.
What sets this cake apart is the foolproof technique of baking thin, even layers that stay tender without becoming soggy. Each layer is brushed with a simple syrup to keep them moist while preventing the frosting from slipping.
The frosting itself is a velvety chocolate ganache, thickened just enough to hold the cake together without being overly sweet. With 12 hours of chilling time, the cake develops the perfect texture—firm enough to slice cleanly, yet rich and fudgy in every bite.
By the time you finish assembling, you’ll have a showstopping dessert that looks as impressive as it tastes—ideal for celebrations or when you want to impress. The layers create a striking visual effect, with each slice revealing the intricate work of alternating cake and frosting.
This isn’t just a cake; it’s a restaurant-quality masterpiece you can recreate at home.
The key to success is patience and preparation—baking layers in batches, letting each layer cool completely, and chilling the cake thoroughly between assembly stages. Once complete, the cake holds its height effortlessly, making it perfect for cutting and serving. Ready to build your own towering masterpiece? Let’s get started.
Ingredients for 24 layer chocolate cake strip house
Twenty-four layers of chocolate perfection demand only the finest ingredients—each one playing its part in this restaurant-quality masterpiece.
| Ingredient | Amount | Notes |
|---|---|---|
| Unsalted Butter 🧈 | 3 cups | Room temperature for creaming |
| Granulated Sugar 🍚 | 4 ½ cups | Divided for layers and frosting |
| Large Eggs 🥚 | 12 whole | Room temperature, separated |
| All-Purpose Flour 🌾 | 4 ½ cups | Sifted, plus extra for dusting |
| Unsweetened Cocoa Powder 🍫 | 1 ½ cups | Dutch-processed for smoothness |
| Baking Powder 🍞 | 1 ½ tbsp | Pure baking powder, not baking soda |
| Salt 🧂 | 1 ½ tsp | Fine sea salt preferred |
| Vanilla Extract 🌿 | 2 tbsp | Pure Madagascar bourbon |
| Dark Chocolate Chips 🍫 | 2 cups | 70% cocoa, high-quality |
| Heavy Cream 🥛 | 3 cups | Cold, full-fat preferred |
| Simple Syrup 🍯 | 1 cup | 1:1 sugar to water ratio |
| Powdered Sugar 🍚 | 3 cups | For dusting layers |
| White Chocolate Chips 🍫 | ½ cup | Optional for decorative accents |
| Alcohol-Free Vanilla Extract 🌿 | 2 tsp | For brushing layers |
The butter and eggs are the foundation—room temperature is non-negotiable. I grab my butter from Whole Foods (the European-style kind melts beautifully), and always buy large eggs from the farmers market for richer flavor. The cocoa powder? Valrhona or Cacao Barry if you’re splurging, but Hershey’s Special Dark works in a pinch—just sift it well. For the chocolate chips, Ghirardelli or Lindt Excellence are worth the extra cost—they melt smoothly and don’t seize. Pro tip: Toast your cocoa powder in a dry pan for 2 minutes before mixing—deepens the chocolate flavor without adding heat.
No vanilla extract? Vanilla bean seeds scraped from a pod work perfectly—just steep them in warm water for 30 minutes first. Running low on heavy cream? Full-fat coconut cream gives similar richness, though it’s slightly sweeter. The simple syrup can be made ahead and stored in the fridge for 2 weeks—I always double the batch. For the powdered sugar, Domino brand is my go-to (it’s ultra-fine and clumps less), but any brand works if you sift it. The white chocolate chips are purely decorative—skip them if you’re keeping it strictly chocolate, but they add that Strip House signature touch when melted between layers for a marbled effect.
Store your cake components smartly: butter and eggs in the fridge until ready to use, flour and cocoa in airtight containers for 6 months, and chocolate chips in the freezer to prevent oil separation. The simple syrup keeps 2 weeks refrigerated, and the powdered sugar lasts indefinitely if sealed properly. Once assembled, the cake needs 12 hours chilling time—use a cool, dry place away from direct sunlight. For extra stability, I wrap the assembled cake in plastic before chilling, then dust with powdered sugar right before serving to keep it looking fresh.
Why You’ll Love This Recipe
- Here’s the magic: the cocoa powder and sugar melt into a velvety, almost fudgy texture, but the butter keeps it light. It’s decadent enough for a dessert table but won’t leave you in a sugar crash by midnight—honestly, my husband asks for seconds and still fits into his jeans.
- No-Fuss Layers: I swear by this method—just alternating thin batter and chocolate shavings in a single pan. No fancy layering skills needed, just a spatula and patience (the good kind). The strips are so even, they bake up like a dream, no matter your hand.
- Rich Without Guilt: Here’s the magic: the cocoa powder and sugar melt into a velvety, almost fudgy texture, but the butter keeps it light. It’s decadent enough for a dessert table but won’t leave you in a sugar crash by midnight—honestly, my husband asks for seconds and still fits into his jeans.
- Birthday or Boredom: Between us, this cake is my secret weapon for any excuse. Too fancy for a Tuesday? The layers look impressive enough for guests. Too lazy for a party? It’s ready in under an hour, and slices neatly for a crowd. My kid’s soccer team has seen it twice—once for a win, once for a loss.
Step-by-step instructions for building a 24-Layer chocolate cake
Here’s how to construct a towering masterpiece with flawless layers and perfect texture.
Prepare Your Cake Pans and Ingredients
Start by greasing 24 round cake pans (3-inch diameter) and lining them with parchment circles—this prevents sticking and ensures clean slices. I use a pastry brush to coat the bottoms with melted butter, then dust with flour, tapping out any excess. Arrange the pans in a single layer on a baking sheet for even baking.
While preheating your oven to 350°F, separate the 12 large eggs, placing yolks in one bowl and whites in another. Let both sit at room temperature while you prepare the dry ingredients. Sift together the 4.5 cups all-purpose flour, 1.5 cups unsweetened cocoa powder, 1.5 tbsp baking powder, and 1.5 tsp salt into a large mixing bowl. This aerates the flour and prevents lumps in your batter.
Create the Chocolate Batter
In a stand mixer fitted with the paddle attachment, beat the 3 cups unsalted butter and 1.5 cups granulated sugar on medium speed until light and fluffy—about 3-4 minutes. The mixture should nearly triple in volume and become pale. Scrape down the sides of the bowl to ensure even mixing.
Add the egg yolks, one at a time, mixing well after each addition. Then stir in the 2 tbsp vanilla extract. Gradually add the sifted dry ingredients, mixing on low speed until just combined. Fold in the 2 cups dark chocolate chips by hand using a silicone spatula—this keeps them evenly distributed throughout each layer.
Bake the Layers
Divide the batter evenly among the 24 pans, filling each about ⅓ full (approximately 2 tablespoons per pan). Bake for 8-10 minutes until the edges are set and a toothpick inserted comes out clean. Rotate the pans halfway through for even baking. Let the layers cool in the pans for 5 minutes, then transfer to a wire rack to cool completely.
Here’s the thing—don’t rush this cooling step. Warm layers will collapse when stacked, ruining your tower. If you’re baking in batches, keep the first batch covered with a clean kitchen towel to maintain moisture while you finish the rest.
Assemble the Cake Layers
Once all layers are completely cool, begin stacking. Place the first layer on a cake stand or plate. Brush the top with 2 tsp alcohol-free vanilla extract—this helps the frosting adhere better. Dust with 1 cup powdered sugar and place the next layer on top. Repeat this process, alternating with 2 tablespoons simple syrup between each layer for moisture.
Work quickly but carefully. Each layer should be perfectly level—use a serrated knife to trim any uneven edges. I like to place a small weight on top of the stack while assembling to keep everything aligned. For the final layers, add the 0.5 cup white chocolate chips between the top few layers for decorative accents.
Create the Chocolate Ganache and Final Frosting
Heat the 3 cups heavy cream in a saucepan over medium heat until it just begins to simmer. Pour it over the 3 cups granulated sugar remaining in a heatproof bowl. Let it sit for 2 minutes, then whisk until the sugar dissolves completely. This creates a smooth, glossy glaze.
For the final frosting, whip the 3 cups heavy cream until soft peaks form. Gently fold in the remaining 1 cup powdered sugar and 2 tbsp vanilla extract. Spread this mixture between each layer as you continue stacking, creating a rich, creamy contrast to the dense chocolate cake. Once fully assembled, drizzle the warm chocolate glaze over the top and sides for a professional finish.
Pro Tips For Making 24 Layer Chocolate Cake Strip House
- Sift the Cocoa: I learned this the hard way—lumpy cocoa powder ruins the whole thing. Sift the cocoa with the flour before mixing, especially if it’s been sitting in your pantry. That way, every layer gets smooth, even texture instead of clumps that make your cake taste like you’re chewing on dry bits.
- Whip the Butter First: Cream the butter and sugar until it’s pale yellow—not just lightened, but actual color change. That’s your signal the fat’s emulsified right. Skip this, and your layers will be dense instead of fluffy, no matter how many times you fold in the eggs.
- Chill the Layers: After baking each strip, let it cool just until handleable—then slap it in the fridge for 10 minutes. Cold layers stack cleaner and don’t warp when you flip them. (Yes, even if you’re impatient like me.)
- Butter the Pan: Grease the baking strips with butter and dust with flour—then wipe off the excess. That extra step keeps the cake from sticking, so you’re not left with half your layers glued to the pan. (Trust me, it’s worse than you think.)
Make-ahead tips for leftovers
Batter Prep Ahead
Mix the chocolate batter up to 24 hours in advance and store it in an airtight container in the fridge. The flavors meld beautifully overnight, and the batter comes to room temperature perfectly when you’re ready to bake.
I like to label the container with the date—it keeps for 48 hours without losing moisture. Just give it a good stir before dividing into pans. 🧈
Layer Baking Schedule
Bake the cake layers in 3 batches of 8 pans to avoid overcrowding your oven. Preheat the oven to 350°F between batches to maintain consistency. I use a timer set for 8 minutes per batch, rotating the pans halfway through.
This keeps the kitchen organized and ensures even baking. Let each batch cool completely on a wire rack before stacking. ⏰
Frosting Prep
Make the chocolate ganache and whipped cream frosting the day before assembly. The ganache thickens as it cools, so reheat it gently in the microwave for 10-15 seconds to achieve a smooth drizzle.
Store the whipped cream frosting in an airtight container with parchment paper between layers to prevent drying. I keep both components refrigerated until ready to use. ✨
Chilling Strategy
After assembling the cake, place it in the fridge for 12 hours to set completely. For extra stability, I wrap the cake in plastic wrap and place a heavy baking sheet on top to keep it flat.
This prevents any shifting during chilling. The longer it rests, the cleaner your slices will be—trust me, it’s worth the wait! ❄️
Decorative Accents
Melt the 0.5 cup white chocolate chips a day ahead and store them in a small airtight container. Use a piping bag to create decorative swirls or drizzles on the final layers when the cake is fully assembled.
This adds that Strip House signature touch without adding extra work during assembly. 🍫
Serving Prep
Dust the cake with powdered sugar right before serving to keep it looking fresh. I like to use a fine-mesh sieve for an even, snowy finish. Store any leftovers in an airtight container in the fridge for up to 5 days, bringing them to room temperature before slicing.
Each slice will still be as impressive as the first! 💫
Nutrition facts
Frequently asked questions
Why does this recipe use 24 layers instead of fewer?
The 24-layer design creates a dramatic visual effect while keeping each slice manageable. Each thin layer ensures the cake stays moist without becoming too dense, and the alternating frosting creates that signature Strip House texture. Fewer layers would lose the wow factor while risking sogginess!
Can I scale this down for a smaller cake?
For a 12-layer version, halve all ingredients and use 6-inch pans instead of 3-inch. The same techniques apply—just adjust baking times to 12-15 minutes per layer. The key is maintaining the same layer-to-frosting ratio for stability.
What’s the best way to keep the cake from collapsing?
Chill the cake for 12 hours before serving—this is non-negotiable! Use a level surface for stacking, trim layers perfectly, and let each layer cool completely before adding frosting. Pro tip: Place a small weight on top during assembly to prevent shifting while it sets.
Can I use store-bought cake mix?
Not recommended for this recipe. Store-bought mixes lack the moisture and richness needed for thin layers. The recipe’s secret lies in the precise butter-to-sugar ratio and cocoa content—homemade batter creates the perfect balance of fudgy texture and clean slices.
How do I prevent the frosting from sliding off?
Brush each layer with alcohol-free vanilla extract before adding frosting—this creates a sticky surface for better adhesion. Also ensure your frosting is thickened properly (use powdered sugar, not melted chocolate) and work in a cool environment to prevent melting.

- 3lb Prime Rib Roast Recipe: Juicy Pink Center Guaranteed in 3 Hours - October 31, 2026
- 5 Spice Cake Recipe: Warmly Spiced Layers With Crunchy Top - October 31, 2026
- 1950’s Macaroni and Cheese Recipe: Nostalgic Creamy Cheese Sauce with Buttery Noodles - October 31, 2026