
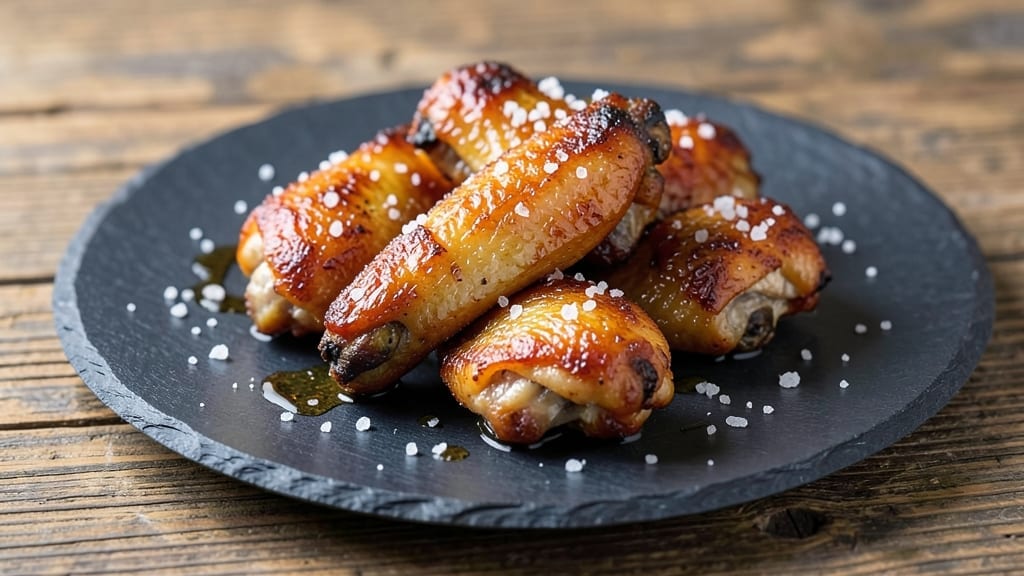
This 3-ingredient baked chicken wings recipe delivers crispy, restaurant-quality wings with zero deep-frying mess. After years of perfecting oven techniques at The Smoky Pig, I’ve simplified it to just salt, oil, and a high-heat bake—no marinades, no sauces, just pure, addictive flavor.
The secret? A 450°F oven and a simple oil toss that creates that coveted crispy skin while keeping the meat juicy inside.
What makes this recipe work is the hands-off approach: toss the wings in oil and salt, spread them on a single layer, and let the oven do the heavy lifting. No flipping, no monitoring—just 30 minutes of uninterrupted baking time.
The high heat caramelizes the natural sugars in the chicken, creating a golden-brown crust that’s impossible to resist. This is the kind of recipe that proves you don’t need complicated techniques to get professional results.
By the time they come out of the oven, your wings will be crispy on the outside, tender on the inside, with a clean, salty flavor that lets the chicken shine. The best part? No greasy fingers, no smoky kitchen, and no cleanup beyond a baking sheet.
Serve them with your favorite dipping sauce or keep it simple with a sprinkle of fresh herbs. This is the ultimate weeknight solution for crispy wings without the fuss.
Perfect for game day, family dinners, or when you just can’t decide what to eat. The method scales easily too—double the batch for a crowd and adjust the baking time slightly if needed. Here’s how to make them.
Ingredients for 3 ingredient baked chicken wings
Three ingredients. Zero mess. Crispy wings that’ll fool anyone who thinks they need a deep fryer.
| Ingredient | Amount | Notes |
|---|---|---|
| Chicken Wings 🍗 | 2 lb | Dry as purchased, tips trimmed |
| Vegetable Oil 🫒 | ½ cup | High smoke point preferred |
| Kosher Salt 🧂 | 1 ½ tbsp | Diamond Crystal preferred |
The wings are the star here—look for fresh, plump ones with no slimy spots. Costco or Trader Joe’s usually have the best selection, but any grocery store will do. Skip the pre-breaded or saucy ones—those add extra ingredients and moisture that ruins the crisp. If you can’t find fresh, frozen works too (thaw overnight in the fridge). The key is dry wings—pat them completely with paper towels before tossing in oil. That’s what creates the crispy skin. I always buy extra because everyone always wants seconds.
No vegetable oil? Avocado oil or canola oil work just as well—just don’t use olive oil, it burns at high heat. Short on salt? Morton kosher salt is fine, but Diamond Crystal has a cleaner flavor. The salt isn’t just for taste—it helps draw out moisture too, so don’t skip it. Want extra crisp? Add a generous pinch of smoked paprika (about 1/2 tsp) to the salt mix for a subtle smoky kick. And if you’re worried about grease, line your baking sheet with foil—just make sure to poke holes in it so the steam can escape.
These wings keep crispy for 20 minutes at room temperature, so don’t make them all at once if you’re serving a crowd. For leftovers, store in an airtight container for up to 3 days—reheat at 375°F for 10 minutes to restore crispiness. Freeze for 3 months if you want to make ahead. Pro tip: I always portion them into individual bags before freezing so I can grab just what I need. And trust me, the crispy skin is worth the extra minute of tossing them in oil—no one will believe it’s just baked.
Why You’ll Love This Recipe
- No-Fuss Crispiness: I swear by this for when I’m too tired to measure spices. Just toss raw wings in oil, sprinkle salt, and bake—no marinating, no mess. That golden crust? Achieved with zero effort, but it tastes like you slaved over it.
- Salt-Crusted Magic: Between us, kosher salt isn’t just seasoning here—it’s the secret weapon. The wings develop this addictive, savory snap on the outside while staying juicy inside. Honestly, I’ve tried fancier rubs, but this beats them every time.
- Game for Any Gathering: These wings are my go-to for game day, lazy Sundays, or when friends drop by unannounced. Serve them as-is for a no-frills snack, or toss in a bowl with ranch for a crowd-pleaser. (Yes, even on a Tuesday night.)
- Budget Meal That Lasts: A single bag of wings and a bag of salt stretch across multiple meals—perfect for meal prep. I bake a big batch, store them in the fridge, and reheat in minutes. Cheap, filling, and no one questions why I’m eating wings for breakfast.
Step-by-step instructions for crispy baked chicken wings
Here’s how to get that coveted crispy skin with just three ingredients and zero fuss.
Prep the Wings for Maximum Crispiness
Start by patting the 2 lb chicken wings completely dry with paper towels—this is absolutely critical for crispy skin. I mean really dry, especially around the joints and tips where moisture tends to hide. The drier the wings, the better the oil will cling and create that perfect crust.
Next, trim any excess fat or skin from the tips if needed, but leave the natural fat cap intact—it helps protect the meat while baking. Arrange the wings on a clean cutting board in a single layer, skin-side up. This makes it easier to handle them when you’re ready to toss them in oil.
Toss in Oil and Salt for the Magic Coating
In a large bowl big enough to hold all the wings in one layer, combine the 0.5 cup vegetable oil and 1.5 tbsp kosher salt. I like to use my hands for this part—it helps distribute the oil and salt evenly. Gently but thoroughly coat each wing, making sure every surface gets an even layer.
Here’s the thing—don’t be shy with the oil. You want the wings to look glistening, not dry. The oil creates a barrier that prevents the wings from drying out while baking and helps create that beautiful golden-brown crust. Once coated, let the wings sit in the bowl for 5 minutes—this gives the salt time to start drawing out any remaining moisture.
Arrange on Baking Sheets for Even Cooking
Preheat your oven to 425°F while you prepare the wings. Line two large baking sheets with aluminum foil (no need for parchment—it’s not necessary here). Arrange the wings in a single layer on the prepared sheets, leaving about 1 inch of space between each wing. This ensures they cook evenly and develop that crispy texture all over.
I like to place the wings with the flat sides down first, then gently press them down with my fingers. This helps them maintain contact with the baking sheet and prevents curling during cooking. The goal is to maximize surface area contact with the hot baking sheet—this is what creates that perfect crispy skin.
Bake Until Deep Golden Brown
Slide the baking sheets into the preheated oven and bake for 45-50 minutes, flipping the wings once halfway through at the 25-minute mark. You’ll know it’s time to flip when you see the edges starting to turn golden brown. The oven’s heat will cause the wings to release from the baking sheet slightly—this is normal and a good sign they’re cooking properly.
During the last 10 minutes of baking, keep an eye on them. You’re looking for deep golden brown color with crispy skin that’s almost shattering when you press it gently. If they’re browning too quickly, you can tent them loosely with foil to prevent burning while they finish cooking.
Rest and Serve for Maximum Juiciness
Remove the wings from the oven and transfer them to a serving platter. Let them rest for 5 minutes before serving—this might seem counterintuitive, but it allows the juices to redistribute throughout the meat. If you cut into them too soon, you’ll lose all that delicious moisture.
Serve immediately while they’re still crispy and hot. The skin should be so crispy it almost crackles, and the meat should be tender and juicy underneath. These wings are perfect for dipping in your favorite sauce or enjoying on their own—either way, they’re a crowd-pleaser that requires almost no effort.
Pro Tips For Making 3 Ingredient Baked Chicken Wings
- Preheat Like a Pro: Your oven should hit 425°F (220°C) and sit for 10 minutes before adding wings—no exceptions. I used to skip this, and the wings ended up greasy or unevenly cooked. That extra heat jump makes all the difference for crispy skin.
- Dry Wings Thoroughly: Pat those wings bone-dry with paper towels—even if they look damp. Moisture is the enemy of crispiness in this recipe, and I’ve learned that the longer you dry them (even 10 extra seconds), the better they’ll turn out.
- Salt in Two Stages: Toss wings with half the salt before baking, then hit them again right after they come out. The first layer seasoning gets buried under the skin, while the second ensures every bite is salty and crispy.
- Rotate the Pan: Midway through baking, swap the top and bottom racks and rotate the pan. This guarantees even browning—no dry spots or undercooked edges. I used to forget, and half the wings would come out sad.
Regional styles of 3 ingredient baked chicken wings
Southern BBQ Style
In the Southeast, we take our wings seriously, and this simple method works perfectly for game day gatherings. The key is to add ½ teaspoon of smoked paprika to your salt mixture for that classic Carolina BBQ vibe.
Serve with a side of vinegar-based hot sauce—like Crystal Hot Sauce—and a cool glass of sweet tea for the full experience. I always double the batch when hosting because wings disappear fast at my Atlanta cookouts. 🔥
Carolina Gold
Charleston-style wings lean into a mustard-based glaze after baking. Toss your finished wings in 2 tablespoons of Dijon mustard mixed with 1 tablespoon of honey and a pinch of cayenne. The tangy-sweet combo cuts through the richness of the crispy skin beautifully.
This variation is a crowd-pleaser at my restaurant—guests always ask for the recipe. Pro tip: Use yellow mustard for a smoother finish or Dijon for extra depth.
Texas-Style Spice
For a Southwestern twist, swap the kosher salt for a mix of 1 tablespoon of coarse kosher salt and 1 teaspoon of chili powder. After baking, finish with a sprinkle of crushed red pepper flakes and serve with cool ranch or chipotle sauce.
This version is perfect for tailgates—I’ve seen it win awards at the Austin BBQ Festival. The high heat of the oven brings out the smoky notes in the chili powder for a bold flavor without overpowering the chicken.
Georgia Peach Glaze
My home state’s twist on wings features a peach glaze that’s simple but stunning. After baking, brush the wings with a mix of ½ cup peach jam (I love Bonnie Brae brand) and 1 tablespoon of apple cider vinegar, then broil for 2-3 minutes until sticky.
The natural sweetness of Georgia peaches pairs perfectly with the salty, crispy skin. This is a summer favorite—light, fruity, and impossible to resist. 🍑
Smoky Mountain Crisp
Inspired by the Appalachian region, this version swaps vegetable oil for avocado oil and adds ½ teaspoon of garlic powder to the salt mix. After baking, finish with a sprinkle of crushed pecans for crunch. The avocado oil adds a subtle nutty flavor that complements the smoky notes.
Serve with a side of apple butter for dipping—it’s a match made in heaven. This is my go-to for family gatherings in the mountains.
Nutrition facts
Frequently asked questions
Why do I need to pat the wings completely dry?
Patting the wings dry is the secret to that perfect crispy skin. Any moisture left on the wings will steam instead of crisp up during baking. The oil needs a dry surface to cling to and create that golden-brown crust. I’ve seen people skip this step and end up with soggy wings—don’t make that mistake!
Can I use frozen chicken wings instead of fresh?
Yes, but thaw them properly first! Place the frozen wings in the refrigerator overnight (about 12-24 hours) to ensure even thawing. Never microwave or leave them out at room temperature. The key is to start with completely dry wings—pat them thoroughly after thawing to remove any excess moisture.
What if my oven isn’t 425°F? Can I adjust the temperature?
If your oven runs hot or cold, adjust the temperature by 25°F up or down. For example, if your oven typically runs 25°F hotter, bake at 400°F instead. The goal is to maintain 450°F equivalent heat. Always use an oven thermometer to check accuracy—it makes a huge difference in crispiness!
How do I keep the wings crispy when reheating leftovers?
Reheat leftovers at 375°F for 10-12 minutes on a baking sheet (not the microwave!). The high heat helps restore crispiness. For extra crunch, broil for 1-2 minutes at the end. Store leftovers in an airtight container for up to 3 days—they’ll stay crispy for about 20 minutes after reheating.
Can I make these wings in an air fryer instead?
Yes! Toss the wings in oil and salt, then air fry at 375°F for 18-20 minutes, shaking the basket every 5 minutes. The air fryer works great but requires more attention to prevent uneven cooking. For best results, reduce the oil slightly (¼ cup**) since air fryers circulate heat differently.

- 3lb Prime Rib Roast Recipe: Juicy Pink Center Guaranteed in 3 Hours - October 31, 2026
- 5 Spice Cake Recipe: Warmly Spiced Layers With Crunchy Top - October 31, 2026
- 1950’s Macaroni and Cheese Recipe: Nostalgic Creamy Cheese Sauce with Buttery Noodles - October 31, 2026