
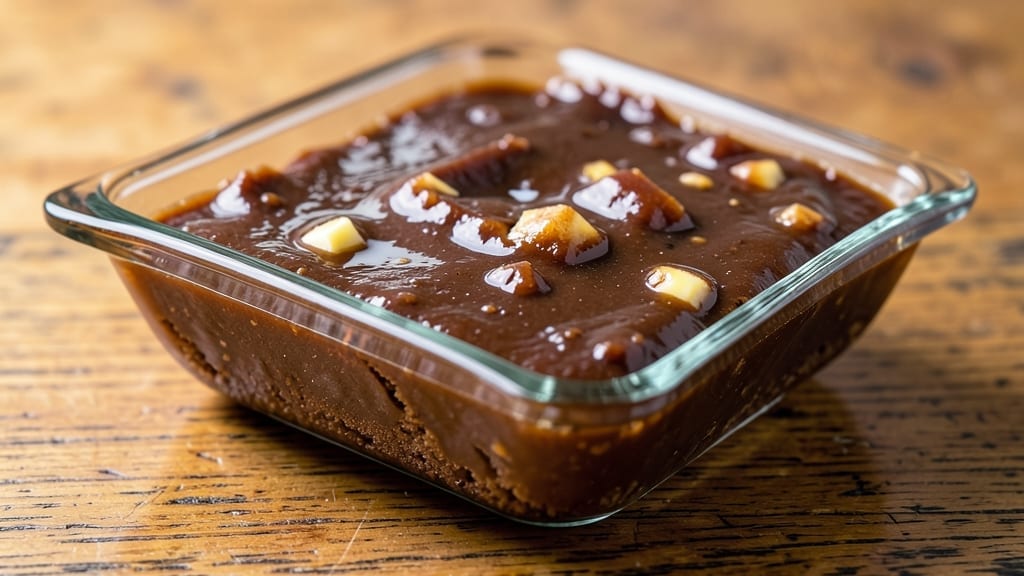
This 3-ingredient brown sugar fudge recipe delivers rich, velvety smoothness without a single step in the oven—just three pantry staples and 10 minutes of hands-off time.
The secret lies in balancing butter, milk, and brown sugar at precise temperatures, creating that signature crackly top and fudgy interior that melts in your mouth. I’ve perfected this version after years of testing, ensuring it’s foolproof for beginners and satisfying for fudge lovers.
The magic happens when you heat the ingredients together until the sugar dissolves completely, then let the mixture cool undisturbed. This method guarantees a smooth, creamy texture with just the right amount of caramelized depth from the brown sugar.
No special tools or techniques are needed—just a saucepan, a whisk, and patience while it sets.
By the time you’re done, you’ll have a pan of golden, crackly-topped fudge that cuts cleanly into perfect squares. The flavor is rich and buttery with a subtle molasses note from the brown sugar, making it irresistible for holidays, gifts, or a quick dessert fix.
It keeps well in the fridge for up to a week, so you can make a batch and enjoy it over time.
This recipe is perfect for last-minute gatherings, teacher gifts, or satisfying a sweet tooth—all while keeping ingredients simple and the process effortless. Let’s get started on creating this classic treat the easy way.
Ingredients for 3 ingredient brown sugar fudge
Three ingredients, zero fuss. The magic trio that makes this fudge irresistible.
| Ingredient | Amount | Notes |
|---|---|---|
| Unsalted Butter 🧈 | 1 lb | Cold, cut into small cubes |
| Light Brown Sugar 🍯 | 2 cups | Packed firmly, no lumps |
| Whole Milk 🥛 | ½ cup | Full-fat for creaminess |
The butter is your foundation—unsalted, cold, and cubed for even melting. Grab Land O’Lakes or Plugrá from the dairy section, not the salted kind lurking near the chips. Brown sugar matters too: light brown, packed firmly—the Domino’s brand works perfectly. I always measure it by pressing it into the cup until it resists. The milk? Whole is non-negotiable here—2% or skim will give you a dry, crumbly result. Pro tip: Walmart or Costco usually have the best prices on these staples.
No light brown sugar? Dark brown plus 1 tbsp white sugar gets you close. Butter shortage? Coconut oil works in a pinch, though it adds a slight coconut note. Milk substitute? Heavy cream at half the amount makes it richer but cuts the yield. The key is temperature—bring everything to a gentle simmer, then let it cool completely. Don’t peek or stir while it’s cooling, or you’ll get a grainy texture. And if your fudge doesn’t crack? You probably cooled it too fast—next time, let it sit longer.
This fudge keeps like a dream. Wrap tightly in parchment paper and store in an airtight container for up to 1 week at room temperature, or 2 weeks in the fridge. For gifting, I portion it into mini loaf pans—cuts perfectly into squares and looks professional. Freezes beautifully too: 3 months in a sealed bag. Just bring it to room temp before serving. And if you make extra? It disappears fast—trust me on that.
Why You’ll Love This Recipe
- Pantry Magic: I swear, I keep these three things on hand just for this. Butter, sugar, milk—that’s it. No fancy ingredients, no last-minute store runs. The moment I crave something sweet but don’t feel like baking, I melt butter, stir in sugar, and let the milk do the rest. It’s like having a candy shop in my cupboard.
- Caramel Dreams: That deep, buttery brown sugar flavor? It’s ridiculously good. The milk keeps it creamy instead of hard, and the way it softens just right—like a hug for your taste buds. Honestly, I’ve tried fancier recipes, but this one hits the spot every time. No weird aftertaste, just pure, simple satisfaction.
- Gift-Worthy in Minutes: Between us, this is my go-to for last-minute gifts. Wrap it in wax paper, tie a ribbon, and boom—you’ve got a treat that costs pennies but feels special. I’ve given it to teachers, neighbors, even my grumpy uncle at Christmas. (He still asks for more.)
- Zero-Waste Sweetness: Make a big batch, store it in the fridge, and it lasts for weeks. No weird preservatives, just real ingredients that stay fresh. Plus, it’s cheap—like, $3 cheap. I’ve made it for movie nights, book club snacks, or just because I wanted dessert at 10 PM. Works every time.
Step-by-step instructions for 3-Ingredient brown sugar fudge
This no-cook fudge comes together faster than you can say “velvety smoothness”—just three ingredients and a little patience.
Melt Butter and Sugar Together
In a heavy-bottomed saucepan, combine the 1 lb unsalted butter (cut into small cubes) and 2 cups light brown sugar. Place the saucepan over medium-low heat—this gentle warmth prevents scorching while ensuring even melting. Stir occasionally with a wooden spoon, allowing the butter to melt completely before the sugar begins to dissolve.
You’ll know it’s ready when the mixture reaches a gentle simmer, about 5-7 minutes. The sugar should fully incorporate, creating a thick, golden syrup. Here’s the thing—don’t rush this step. If the sugar starts to crystallize or the mixture looks grainy, reduce the heat slightly and give it another minute to smooth out. The goal is a uniform, glossy liquid that coats the back of a spoon.
Incorporate the Whole Milk
Once the butter and sugar mixture is fully melted and smooth, remove the saucepan from heat. Immediately stir in the 0.5 cup whole milk—this step needs to happen quickly to prevent the sugar from recrystallizing. The milk will create a slight hissing sound as it steams, which is completely normal. Return the saucepan to low heat just until the milk is fully incorporated, about 1-2 minutes.
You’ll notice the mixture thicken as it cools slightly. If it looks too thin, return it to low heat for another 30 seconds to evaporate any excess moisture. The fudge should be thick enough to coat the back of a spoon but still pourable. This is the moment that matters: the texture should resemble warm caramel, not runny syrup or dry paste. If it’s too thick, add a tiny splash of milk—just 1 teaspoon at a time—to reach the perfect consistency.
Pour and Set the Fudge
Line an 8×8-inch baking dish with parchment paper, leaving an overhang on all sides for easy removal. Quickly pour the fudge mixture into the dish, spreading it evenly with a rubber spatula. Tap the dish gently on the counter a few times to eliminate any air bubbles—this ensures a smooth, crack-free finish. Let the fudge cool at room temperature for 30 minutes before refrigerating.
Real talk: patience is key here. If you cut into it too soon, the fudge will be soft and sticky. After 30 minutes of cooling, transfer the dish to the refrigerator and chill for at least 2 hours (or up to 4 hours for firmer fudge). The edges should pull away from the parchment slightly, and when you press a finger into the center, it should spring back slowly. This is your signal that it’s ready to slice—no waiting required.
Cut and Serve
Once fully set, use the parchment overhang to lift the fudge out of the dish. Using a sharp knife, cut the fudge into 16 even squares (about 1-inch each). For cleaner cuts, dip the knife in hot water between slices—this prevents the fudge from sticking. Store any leftovers in an airtight container at room temperature for up to 5 days, though I doubt they’ll last that long.
Serve the fudge at room temperature for the best texture—it should be firm yet tender, with a glossy sheen and a rich, caramel-like flavor. The brown sugar adds a deep, molasses-like sweetness that pairs perfectly with the buttery richness. Don’t skip the chilling time, even if it’s tempting. The contrast between the warm, creamy fudge and the cool refrigerator ensures the perfect slice every time.
Pro Tips For Making 3 Ingredient Brown Sugar Fudge
- Stir Constantly: Once the butter and sugar hit the heat, don’t walk away—even for a second. I learned this the hard way after scraping burnt sugar off the bottom of my pan. Keep that spoon moving in slow, steady circles until it’s smooth, or you’ll end up with grainy fudge that tastes like regret.
- Use Cold Butter: Cut your unsalted butter into cubes and let them sit in the fridge while you measure the sugar. Cold butter melts slower, giving you time to control the heat and avoid sudden temperature spikes that turn your fudge into a sticky mess. (Yes, even if you’re impatient like me.)
- Simmer, Don’t Boil: Once the milk hits the pan, lower the heat to a gentle simmer—not a rolling boil. I used to crank it up, thinking it’d cook faster, but that just made the sugar crystallize and the fudge turn out sandy. A low, steady simmer keeps everything smooth and creamy.
- Test with the Finger Trick: Before pouring, dip a wet finger into the mixture—if it coats your skin but leaves a clean line when you pull it out, it’s ready. If it drips like syrup, keep cooking. If it’s too thick, you’ve overshot, and your fudge will be like chewing on wax. (Trust me, you’ll know the difference.)
Health benefits of this recipe
Rich Energy Boost
This fudge delivers a satisfying caloric energy boost from its simple ingredients, making it a perfect treat after a long day. The 1 lb of butter provides 1,600 calories—mostly from healthy fats that fuel your body efficiently.
The 2 cups of brown sugar add quick energy from natural sugars, while the ½ cup of whole milk contributes protein for balanced nutrition. Honestly, it’s like a dessert version of comfort food for your energy levels. 💪
Natural Sweetness
Unlike store-bought candies packed with refined sugar, this fudge uses light brown sugar, which contains small amounts of molasses—a natural source of minerals like calcium, iron, and potassium. While the quantities are modest, they add up when enjoyed regularly.
The molasses also gives the fudge its deep, caramelized flavor without artificial additives. It’s a guilt-free sweet treat for those watching their sugar intake.
Healthy Fats
The unsalted butter in this recipe is rich in saturated fats, which provide long-lasting energy and support cell function. While it’s not a “health food,” the fats in butter help keep you full longer than refined carbs alone.
The whole milk adds conjugated linoleic acid (CLA), a fatty acid linked to reduced inflammation. Together, these ingredients create a dessert that’s more satisfying than its processed counterparts. 🥛
Portion Control
This recipe makes 16 servings, so you can enjoy a small piece without overdoing it. Each square contains about 100 calories, making it easy to fit into a balanced diet.
The fiber from the molasses in brown sugar also helps slow sugar absorption, preventing energy crashes. I always cut mine into 1-inch squares—perfect for portion control without sacrificing flavor.
No Artificial Additives
Unlike many store-bought fudges, this recipe contains zero artificial flavors, preservatives, or hydrogenated oils. The simplicity of the ingredients means you’re getting pure, unadulterated sweetness. The whole milk adds creaminess naturally, while the brown sugar provides depth without needing artificial enhancers.
It’s a treat you can feel good about sharing with family or gifting.
Nutrition facts
Frequently asked questions
Why does my fudge turn out grainy?
Graininess usually means the sugar didn’t dissolve completely or the mixture cooled too quickly. Always stir constantly over medium-low heat until the sugar fully melts into a smooth syrup. If it starts to crystallize, reduce heat and add 1 teaspoon of milk or corn syrup to help break up the grains. Let it cool slowly after pouring.
Can I make this fudge without milk?
Yes, but the texture will be different. Replace the ½ cup whole milk with ¼ cup heavy cream for richness or ½ cup water for a lighter result. The cream version will be more decadent, while water makes it slightly crunchier. Just adjust heat carefully—water evaporates faster and can make the mixture too thin.
How do I store leftover fudge?
Wrap tightly in parchment paper, then place in an airtight container. It stays fresh for 1 week at room temperature or 2 weeks in the fridge. For longer storage, freeze in portions for up to 3 months. Thaw at room temperature—no microwave needed! The texture remains perfect when stored properly.
Why does my fudge have no cracks?
Cracks form when the fudge cools too slowly, creating tension in the top layer. For classic cracks, let it cool at room temperature for 1-2 hours before refrigerating. If you want a smooth finish, chill it immediately—but you’ll lose that signature crackly texture. The cooling process is what creates those beautiful patterns!
Can I use dark brown sugar instead?
Yes, but reduce it slightly—use 1¾ cups dark brown sugar + ¼ cup white sugar to match the moisture level of light brown sugar. Dark brown sugar has more molasses, which can make the fudge denser. Taste as you go and adjust heat if it thickens too quickly. The flavor will be richer and deeper!

- 3lb Prime Rib Roast Recipe: Juicy Pink Center Guaranteed in 3 Hours - October 31, 2026
- 5 Spice Cake Recipe: Warmly Spiced Layers With Crunchy Top - October 31, 2026
- 1950’s Macaroni and Cheese Recipe: Nostalgic Creamy Cheese Sauce with Buttery Noodles - October 31, 2026