
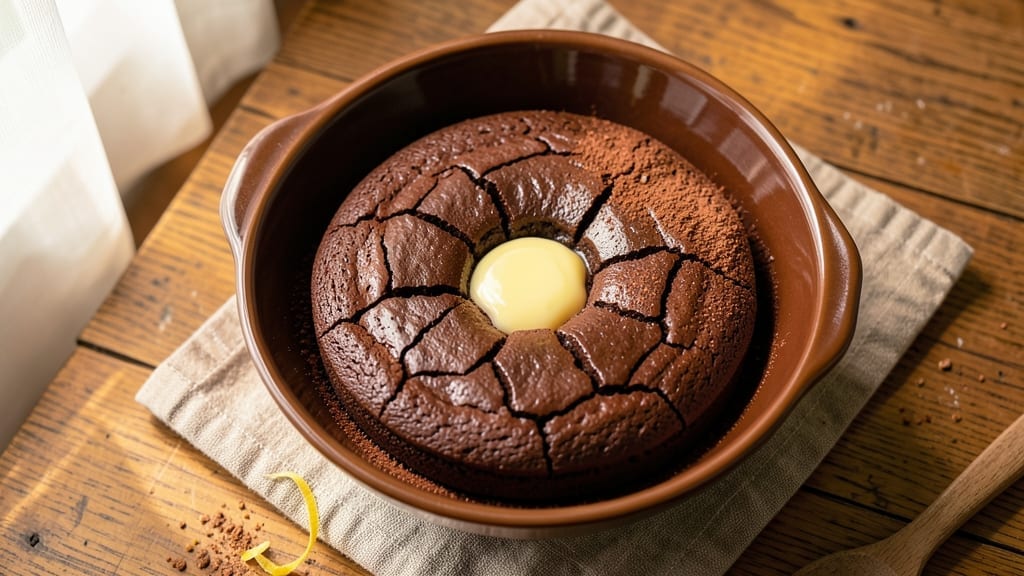
A flourless chocolate cake with just three ingredients delivers the richest, fudgy center and crispy top you’ve ever tasted—no mixing bowls to wash, no measuring cups to stress over.
This recipe is the dessert equivalent of a game-changer, built on the perfect balance of melted chocolate, eggs, and butter that transforms into a decadent, single-serving cake in under 30 minutes.
The secret lies in the high-heat bake, which creates that coveted crispy crust while keeping the inside dangerously gooey.
What makes this recipe truly remarkable is its simplicity—no flour, no sugar, no fuss. The eggs bind everything together while adding structure, and the butter ensures that crispy top that shatters when you cut in.
It’s the kind of dessert that feels indulgent yet requires almost no effort, making it perfect for last-minute cravings or when you’re craving something sweet but don’t want to spend hours in the kitchen.
By the time it emerges from the oven, you’ll have a cake that looks and tastes like it came from a high-end patisserie—deep, glossy, and irresistible.
The texture is what truly sets it apart: a fudgy center that melts in your mouth and a crispy top that adds just the right contrast. It’s the kind of dessert that disappears in seconds, leaving you reaching for another slice.
While this recipe is naturally gluten-free and grain-free, it does contain butter and eggs, so it’s not suitable for vegan diets. However, with just a few simple swaps, you can adapt it to fit other dietary needs—like using coconut oil instead of butter or flax eggs. Let’s get baking!
Ingredients for 3 ingredient flourless chocolate cake
Three ingredients, zero stress—just chocolate, eggs, and butter for a showstopper cake.
| Ingredient | Amount | Notes |
|---|---|---|
| Dark Chocolate Bars 🍫 | 8 oz | High-quality, 70% cocoa or higher |
| Large Eggs 🥚 | 4 whole | Room temperature for best mixing |
| Unsalted Butter 🧈 | ½ cup | Cold, cut into small cubes |
The chocolate is everything here. Ghirardelli or Lindt bars melt the smoothest, but anything with 70% cocoa or higher works—just chop it finely for even melting. Eggs should be at room temperature (takes 10 minutes), and organic pastured eggs add extra richness if you’re splurging. The butter? Cold is key—cut it into small cubes so it melts gradually and creates that crispy top. European-style butter like Plugrá has more fat, which makes the texture even better.
No high-cocoa chocolate? Dutch-process cocoa powder plus 2 tbsp oil gets you close—mix them together before adding to eggs. Eggs must be room temp, but if you’re in a rush, whisk them in the microwave for 20 seconds. Butter substitutes? Coconut oil works for vegan versions, but it adds a slight coconut flavor. For a lighter texture, some people add a pinch of espresso powder to the chocolate, but it’s totally optional. The key is keeping everything cold until the last minute—don’t let the butter soften too early!
This cake bakes fast—20-25 minutes max—so preheat your oven to 400°F and have your pan ready. The crispy top forms quickly, so don’t overbake. Keeps at room temperature for 2 days in an airtight container, though it’s best eaten fresh. For make-ahead prep, bake the cake, cool completely, then wrap tightly in plastic wrap. Reheats beautifully in the microwave for 10 seconds—just watch it like a hawk so the top doesn’t dry out.
Why You’ll Love This Recipe
- No-Fuss Magic: I swear by this when I’m too tired to measure. Just melt chocolate, mix in eggs and butter—no sifting, no folding, no stress. The cake rises like it’s been baked for hours, but I’m in and out of the kitchen faster than a microwave dinner.
- Rich Without Effort: That first bite? Pure chocolate euphoria—deep, fudgy, with none of the dryness I hate in store-bought cakes. The eggs bind it just right, and the butter keeps it moist without tasting greasy. (Yes, even my chocolate-averse husband licks the plate.)
- Date Night Ready: Serve it warm with a scoop of vanilla ice cream, and suddenly you’re the hero of the evening. No fancy decorating, no last-minute grocery runs—just slice, plate, and watch everyone’s eyes light up. (Bonus: It’s the only dessert I make that feels special without the effort.)
- Pantry Staple Power: I keep a stash of dark chocolate and eggs on hand just for this. No specialty ingredients, no wasted leftovers (it disappears in one sitting), and the cost? A fraction of what a bakery cake would be. My go-to when I need a treat but my wallet’s screaming.
Step-by-step instructions for 3-Ingredient flourless chocolate cake
Here’s how to create a decadent chocolate cake with just three ingredients—crispy top, fudgy center, guaranteed.
Melt Chocolate and Butter Together
Place the 8 oz dark chocolate bars and 0.5 cup unsalted butter (cut into small cubes) in a heatproof bowl set over a saucepan of simmering water. Stir occasionally until completely melted and smooth—about 5 minutes. The chocolate should look glossy and the butter fully incorporated, with no lumps remaining.
Remove the bowl from heat and let it cool slightly for 2 minutes. This prevents the eggs from scrambling when mixed in later. I like to test the temperature by touching the back of my hand—it should feel warm but not hot. If it’s too hot, place it back in the fridge for another minute to cool down.
Whisk in Room-Temperature Eggs
Add the 4 whole large eggs to the melted chocolate mixture. Using a hand mixer or whisk, beat on medium speed for 3-4 minutes until the batter is thick, smooth, and nearly tripled in volume. You’ll see ribbons form when you lift the whisk—this indicates proper aeration for that perfect texture.
Here’s the thing—room-temperature eggs mix better and create a lighter batter. If your eggs are cold, the batter will be denser and the cake may turn out more cakey than fudgy. If you’re in a hurry, let them sit at room temperature for 10 minutes before using.
Bake Until Crispy and Set
Preheat your oven to 350°F. Pour the batter into a 6-inch round cake pan (or similar size) that’s been lightly greased with butter. Bake for 25-30 minutes until the edges are deep golden brown and the center still has a slight wobble when gently shaken.
Don’t overbake—this is where the magic happens. The cake will continue setting as it cools, and you want that crispy top with a fudgy center. A toothpick inserted in the center should come out with a few moist crumbs, not wet batter. If it comes out clean, it’s overdone and will be dry.
Cool and Serve with Patience
Let the cake cool in the pan for 10 minutes, then transfer it to a wire rack to cool completely. This resting period is crucial—it allows the cake to set properly and prevents it from collapsing when sliced. I know it’s tempting to dig in immediately, but trust me, the wait is worth it.
Once fully cooled, slice into wedges and serve. The top should be crispy enough to hold its shape, while the center remains rich and fudgy. Store leftovers in an airtight container in the fridge for up to 3 days, though I doubt they’ll last that long!
Pro Tips For Making 3 Ingredient Flourless Chocolate Cake
- Melt Chocolate Slowly: If you chuck the chocolate bars straight into a hot pan, you’ll end up with scorched edges and grainy texture. Instead, chop them into small pieces and melt them in a heatproof bowl set over simmering water—stirring every 30 seconds until smooth. I learned this the hard way after scraping burnt chocolate off my first attempt.
- Use Room-Temp Eggs: Cold eggs from the fridge won’t blend properly, leaving you with a lumpy batter and a cake that’s dense instead of fudgy. Let them sit out for at least 30 minutes before cracking them in—just don’t skip this, even if you’re impatient like me.
- Don’t Overmix the Batter: Once you fold in the eggs and butter, stop mixing the second everything comes together. Overworking the batter introduces air, which causes cracks in the cake as it bakes. A few gentle swirls are all you need—your future self will thank you.
- Bake Until Slightly Under: This cake sets as it cools, so pull it out when the edges are just set but the center still jiggles like Jell-O. If you wait for a toothpick to come out clean, you’ll end up with a dry, rubbery texture. Let it rest 10 minutes before slicing—yes, even if you’re starving.
Essential equipment for this dish
Essential Mixing Tools
Your mixing game makes or breaks this cake’s texture. A hand mixer (like the KitchenAid KHM522ER or Ninja BM601) is ideal for aerating the eggs properly—those ribbons I mentioned? That’s your mixer doing its job.
If you don’t have one, a whisk works, but you’ll need strong arms for 4-5 minutes of vigorous whisking. A medium-sized mixing bowl (8-10 cups) prevents spills when the batter triples in volume. 🥣
Heat Control Gear
For melting the chocolate and butter, a double boiler (or a heatproof bowl over a saucepan) is non-negotiable. I use a stainless steel mixing bowl from OXO because it handles high heat without warping.
A kitchen thermometer (like the Thermoworks Thermapen) ensures your melted chocolate stays between 110-120°F—too hot, and the eggs scramble. A wooden spoon for stirring keeps the chocolate smooth without scratching your bowl.
Baking Essentials
The right pan is everything. A 6-inch round cake pan (like All-Clad Stainless Steel) gives that perfect height-to-width ratio for crispy edges. Grease it lightly with butter and dust with flour (or cocoa powder) to prevent sticking—this cake isn’t forgiving if it tears.
A wire rack for cooling is a must; it prevents sogginess from residual heat. Pro tip: Line the pan with parchment paper for easy removal, but skip the greasing if you’re using parchment—just press it into the corners.
Optional Upgrades
Want to take it to the next level? A digital scale (like OXO Good Grips) ensures precise chocolate measurements—critical for balance. For the crispy top, I swear by European-style butter (like Plugrá or Kerrygold), which has higher fat content.
A small offset spatula helps spread the batter evenly in the pan. And if you’re feeling fancy, a cake tester (or clean toothpick) checks doneness without guessing. 🧑🍳
Nutrition facts
Frequently asked questions
Why does this cake need only three ingredients?
Eggs act as the binder and leavening agent, butter creates the crispy top and rich flavor, and chocolate provides the structure and deep cocoa taste. This minimalist approach focuses on high-quality ingredients to maximize flavor and texture without fillers or additives. The eggs also help aerate the batter for that perfect fudgy yet crispy contrast!
Can I make this cake in a different pan size?
Yes, but adjust baking time accordingly. A 7-inch pan needs about 20 minutes, while an 8-inch pan will take closer to 25 minutes. The key is to bake until the edges are golden and the center has a slight wobble. Always use an oven thermometer to ensure accurate temperature—some ovens run hot or cold.
What if my cake turns out too dense?
Overmixing the eggs or using cold eggs are the most common culprits. Make sure your eggs are room temperature and whisk just until the batter is thick and smooth—no need to overbeat. Also, ensure your chocolate and butter mixture is only warm (not hot) before adding the eggs to prevent scrambling. A quick fix? Add 1 tablespoon of melted butter to the batter before baking for extra moisture.
How do I store leftovers?
Wrap cooled slices tightly in plastic wrap or store in an airtight container in the fridge for up to 3 days. For longer storage, freeze slices on a tray first, then transfer to a freezer bag for up to 1 month. To reheat, microwave for 10-15 seconds—just watch closely so the top doesn’t dry out!
Can I make this cake vegan?
Not with these exact ingredients, but you can adapt it! Replace butter with coconut oil and use flax eggs** (1 tbsp ground flaxseed + 3 tbsp water per egg). For chocolate, choose vegan dark chocolate bars (70% cocoa or higher). The texture will be slightly different—more cake-like than fudgy—but still delicious. The crispy top may also be less pronounced.

- 6 Egg Cake Recipe with Oil: Light as Air With Buttery Moisture - October 4, 2026
- 4 Bean Casserole Recipe: One-Pan Heartiness With Smoky Paprika Depth - October 4, 2026
- 3-Ingredient Keto Mug Cake Recipe: Microwave Magic in 2 Minutes - October 4, 2026