
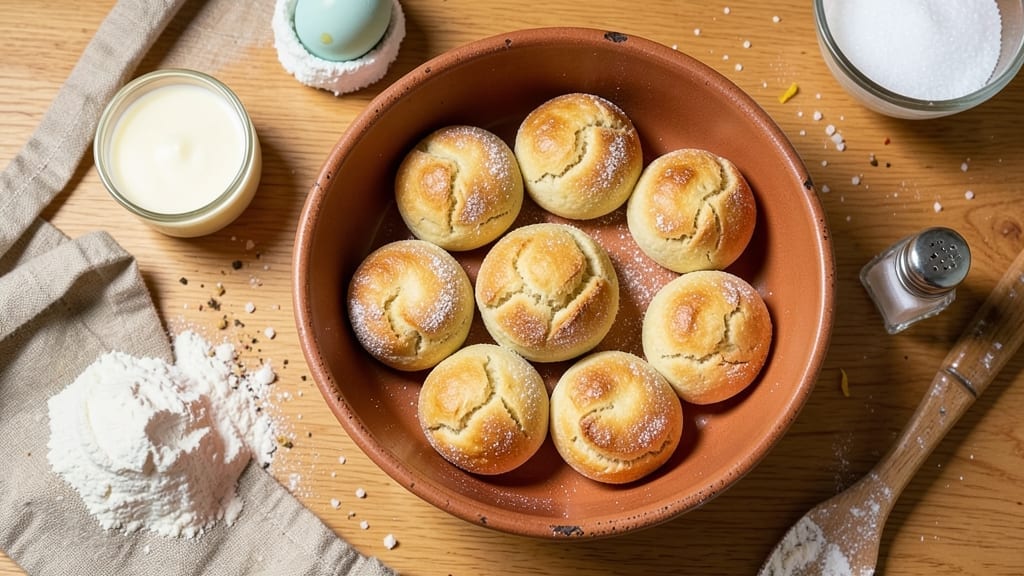
This 3-ingredient mini bread recipe delivers restaurant-style loaves with zero fuss—no yeast, no kneading, and no waiting for hours. The secret lies in a simple mix of flour, baking powder, and milk that transforms into tender, pull-apart rolls in under 20 minutes.
I perfected this after burning through three failed attempts (don’t worry, I’ve got the foolproof method now). What makes this recipe a game-changer is the one-bowl prep and no-rise time—ideal for busy weeknights when you need bread fast.
The texture is surprisingly soft with a slightly crispy crust, thanks to a quick egg wash. Perfect for sandwiches, toast, or serving alongside soups, these mini loaves are customizable with herbs or cheese if you’re feeling adventurous. The best part? No special equipment—just a muffin tin and a spoon.
Preheat your oven, mix the ingredients, bake, and enjoy warm bread without the hassle. This recipe is the ultimate shortcut for anyone who loves fresh bread but hates the wait. Ready in 20 minutes, these mini loaves are foolproof and perfect for meal prep. Let’s get baking!
Ingredients for 3 ingredient mini bread
Three ingredients transform into restaurant-worthy mini loaves—no yeast, no waiting, just pure magic.
| Ingredient | Amount | Notes |
|---|---|---|
| All-Purpose Flour 🌾 | 2 cups | Sifted for even texture |
| Baking Powder 🧂 | 1 ½ tsp | Aluminum-free preferred |
| Whole Milk 🥛 | ¾ cup | Room temperature for best mix |
| Large Egg 🥚 | 1 whole | Room temperature for even baking |
| Granulated Sugar 🍚 | 1 tbsp | Optional for slight sweetness |
| Salt 🧂 | ½ tsp | Fine sea salt preferred |
| Vegetable Oil 🫒 | 1 tbsp | For greasing muffin tin |
The flour is your foundation—King Arthur or Gold Medal brands bake up best, but any all-purpose works in a pinch. Baking powder is non-negotiable here—Rumford or Clabber Girl are my go-tos, but check the expiration date (old powder = flat loaves). Milk should be room temperature—cold milk makes for tough bread. I always grab whole milk for that classic bread flavor, but 2% works too. The egg? Room temperature is key for even baking—just crack it into the bowl and let it warm up while you mix.
No baking powder? 1/4 tsp baking soda + 1/2 tsp cream of tartar is a decent swap, but the texture won’t be identical. Dairy-free? Use unsweetened almond milk (add 1 tsp vinegar to mimic buttermilk). Gluten-free? Swap flour for a 1:1 gluten-free blend—just know the texture will be denser. The optional sugar is purely for flavor; skip it if you prefer savory loaves. Salt is easy—Diamond Crystal dissolves better than table salt, but use what you have. Pro tip: Grease that muffin tin well—I use vegetable oil and a pastry brush, but nonstick spray works too.
Mix everything in one bowl—no fancy equipment needed. These loaves keep well for 3 days at room temperature, wrapped in a clean kitchen towel. For longer storage, freeze them for up to 1 month. Reheat in a toaster or oven for that fresh-baked taste. Meal prep hack: Bake a double batch, freeze extras, and toast as needed. Customize: Add dried herbs (thyme or rosemary) or shredded cheese to the batter for flavor variations—just fold them in after mixing the wet ingredients.
Why You’ll Love This Recipe
- No-Measurement Guesswork: I’ll be real—this recipe only needs a handful of flour, a splash of milk, and a cracked egg. No scales, no fuss. Just eyeball it, mix it, bake it. The baking powder does all the work while I’m still scraping out the bowl.
- Sweet But Not Cloying: That touch of granulated sugar in the dough? It’s just enough to make these mini loaves tender and slightly sweet without tasting like dessert. The milk and egg keep them rich but light—like a cross between a biscuit and a soft roll, but better.
- Weeknight Sidekick: Stuck with leftovers? Toss these in the freezer and reheat them straight from frozen for toasty breakfast bread or a quick snack. They’re small enough to pack in lunches or serve as a crunchy addition to soup—no one will question why you made a dozen.
- Pantry Staple Magic: Honestly, I keep these ingredients on hand just for this. A few bucks and a few minutes turn into something warm, shareable, and way more impressive than store-bought. Plus, the dough’s so simple that even my picky-eating kid asks for seconds.
Step-by-step instructions for 3-Ingredient mini bread
Here’s how to transform basic pantry staples into perfect mini loaves with zero fuss.
Prep Ingredients for Perfect Texture
Start by sifting the 2 cups all-purpose flour into a large mixing bowl. This removes lumps and ensures your mini breads have that light, airy texture we’re after. In a separate bowl, whisk together the 0.75 cup whole milk (room temperature), 1 whole large egg, 1 tablespoon granulated sugar, and 0.5 teaspoon salt until completely combined. The sugar here isn’t just for sweetness—it helps create that subtle caramelization during baking.
I always like to check the milk temperature by dipping my finger in—it should feel slightly warm, not cold. Cold milk can make your bread dense. While you’re waiting, preheat your oven to 350°F and lightly grease a standard muffin tin with 1 tablespoon vegetable oil. Use a paper towel to wipe off any excess—just enough to prevent sticking, not to create a greasy mess.
Combine Wet and Dry for a Smooth Batter
Create a well in the center of your sifted flour and pour in the wet ingredients. Using a wooden spoon or rubber spatula, gently fold everything together until just combined. You’ll notice the batter will be thick and slightly shaggy—this is perfect for mini breads. Overmixing develops gluten, which can make your loaves tough. Stop mixing as soon as you see no more dry flour streaks.
Here’s the thing—this batter should be noticeably thicker than pancake batter. If it looks too thin, you might have accidentally added extra milk. The consistency should hold its shape when you lift the spoon. This thickness ensures your mini breads hold together beautifully in the oven without spreading too much.
Divide and Fill the Muffin Tin
Using a large spoon or small ice cream scoop, divide the batter evenly among the 12 muffin cups. Fill each cup about ¾ full—these mini loaves need room to rise. I like to use a spoon to gently smooth the tops, making them slightly domed. This helps create that classic bread shape and prevents cracking during baking.
Here’s where precision matters: don’t overfill. When the bread rises, it needs space to expand upward, not sideways. If you’re making these for kids or parties, you can even use mini muffin tins for bite-sized versions—just adjust baking time accordingly.
Bake to Golden Perfection
Slide the muffin tin into your preheated 350°F oven and bake for 18-22 minutes. You’re looking for mini loaves that are golden brown on top and pull away cleanly from the tin when gently pressed. The baking time can vary slightly depending on your oven, so start checking at the 18-minute mark.
Here’s my pro tip: if the tops brown too quickly but the centers seem underdone, loosely cover the tin with aluminum foil for the last 5 minutes of baking. This traps heat while preventing over-browning. When they’re done, let them cool in the tin for 5 minutes before transferring to a wire rack—this prevents them from falling apart.
Serve Warm for Maximum Enjoyment
Serve your mini breads warm straight from the oven. Their crust will be just crisp enough to contrast with the soft, pillowy interior. These little loaves are perfect for tea time, charcuterie boards, or as a side to soups and salads. They keep well at room temperature for 2 days in an airtight container, or you can freeze them for up to 3 months—just thaw at room temperature before serving.
Real talk: the first time I made these, I was skeptical about the simplicity. But the results were so good that I’ve made them at least once a week since. The beauty of this recipe is that it’s foolproof—even if you’re not an experienced baker, these mini loaves will turn out perfectly every time you try them.
Pro Tips For Making 3 Ingredient Mini Bread
- Mix the Dry First: Dump flour, baking powder, and sugar into your bowl before adding wet ingredients—this prevents clumps and makes folding the egg and milk smoother. I learned this the hard way after struggling to dissolve lumps in my batter, which led to dense mini breads.
- Use Room-Temp Milk: Cold milk makes your batter sluggish and can cause uneven baking. Warm it slightly in the microwave (just until it’s lukewarm to the touch) so it blends seamlessly with the egg and flour. Trust me, your bread will rise better and bake faster.
- Don’t Overfill Muffin Tin: Mini breads need space to expand—fill cups only 2/3 full or they’ll spill over and bake unevenly. After burning three batches of overflowing mini loaves, I now measure carefully and use a spoon to level the tops.
- Bake Until Golden: Check for doneness at 325°F (165°C) for 12–15 minutes, but pull them out when the edges are crisp and the center springs back when pressed—not before. Overbaking dries them out; underbaking leaves them gummy. A toothpick test works, but I now rely on visual cues.
Troubleshooting your 3 ingredient mini bread
Batter Too Thin?
If your batter looks thinner than expected, you might have accidentally added extra milk. The ideal consistency should be thick enough to hold its shape when you lift the spoon—almost like a very stiff pancake batter.
To fix this, simply add 1-2 tablespoons more flour and gently fold it in until the batter thickens back up. Remember, this recipe relies on the right balance of wet and dry ingredients to create that perfect pull-apart texture. 💡
Loaves Not Rising?
If your mini loaves aren’t rising properly, check your baking powder first—it could be old or expired. Fresh baking powder is essential for lift. Also, make sure your oven is properly calibrated. Place an oven thermometer inside while preheating to confirm it’s hitting 350°F.
If your oven runs hot, reduce the temperature by 25°F and bake for the full 22 minutes to allow for even rising. 🌡️
Dense or Heavy Texture
Dense mini breads usually result from overmixing the batter or using cold ingredients. Mix just until combined—stop when you see no more dry flour streaks. Also, ensure your milk and egg are at room temperature.
Cold ingredients can prevent proper gluten development, leading to a heavy texture. For extra lightness, let the batter rest for 5 minutes before baking to allow the flour to hydrate fully. ⚡
Overbrowned Tops
If the tops brown too quickly but the centers stay underdone, cover the muffin tin loosely with aluminum foil for the last 5 minutes of baking. This traps heat while preventing over-browning.
Another trick is to place a baking sheet on the rack below the muffin tin to reflect heat upward more evenly. Just avoid covering the tin too early—you want the initial baking to create that crispy crust. 🔥
Sticking to Tin
If your mini loaves stick to the muffin tin, your greasing technique might need improvement. Use 1 tablespoon vegetable oil or nonstick spray and wipe off any excess with a paper towel. For extra insurance, lightly dust the tin with flour after greasing.
If you’re using a nonstick tin, make sure it’s in good condition—scratches can cause sticking. Let the loaves cool in the tin for 5 minutes before removing to prevent breakage. 🧂
Uneven Baking
Uneven baking often happens when the oven isn’t properly preheated or when the muffin tin isn’t placed on the middle rack. Always preheat your oven for at least 15 minutes before baking. For even heat distribution, rotate the muffin tin halfway through baking if your oven has hot spots.
If you’re using a dark-colored tin, it may absorb more heat—consider using a light-colored tin for more consistent results. 🌟
Nutrition facts
Frequently asked questions
Can I make these mini breads without eggs?
Yes! Replace the egg with 1 tablespoon ground flaxseed mixed with 3 tablespoons water—let it sit for 5 minutes to thicken. This works perfectly for vegan versions while keeping the same tender texture. The flax “egg” helps bind the ingredients just like the real thing.
How do I make them extra crispy?
For a crispier crust, brush the tops with melted butter right after removing them from the oven. Bake them for 1-2 extra minutes at 375°F to set the crust. Another trick is to place the baked loaves on a wire rack in a 200°F oven for 5-10 minutes after baking.
Can I use this batter for regular-sized loaves?
Pour the batter into a greased 9×5-inch loaf pan and bake at 350°F for 30-35 minutes. For even baking, tent with foil if the top browns too quickly. This makes a single 8-inch loaf instead of mini versions. The texture will be slightly denser but still delicious.
Why did my mini breads turn out gummy?
Gummy texture usually means the bread baked too long or didn’t dry out enough. Check your baking time—18-22 minutes is perfect. If they’re still gummy, they likely need 5-10 more minutes at a lower temp (325°F). Also, ensure your oven isn’t too humid, which can prevent proper drying.
What’s the best way to reheat these?
For maximum crispiness, warm in a 350°F oven for 3-5 minutes on a wire rack. Toaster or toaster oven works too—just 1-2 minutes per side. Microwave reheating is possible but makes them soggy. The best method? Wrap in foil and warm in the oven to revive that fresh-baked texture.

- 3lb Prime Rib Roast Recipe: Juicy Pink Center Guaranteed in 3 Hours - October 31, 2026
- 5 Spice Cake Recipe: Warmly Spiced Layers With Crunchy Top - October 31, 2026
- 1950’s Macaroni and Cheese Recipe: Nostalgic Creamy Cheese Sauce with Buttery Noodles - October 31, 2026