
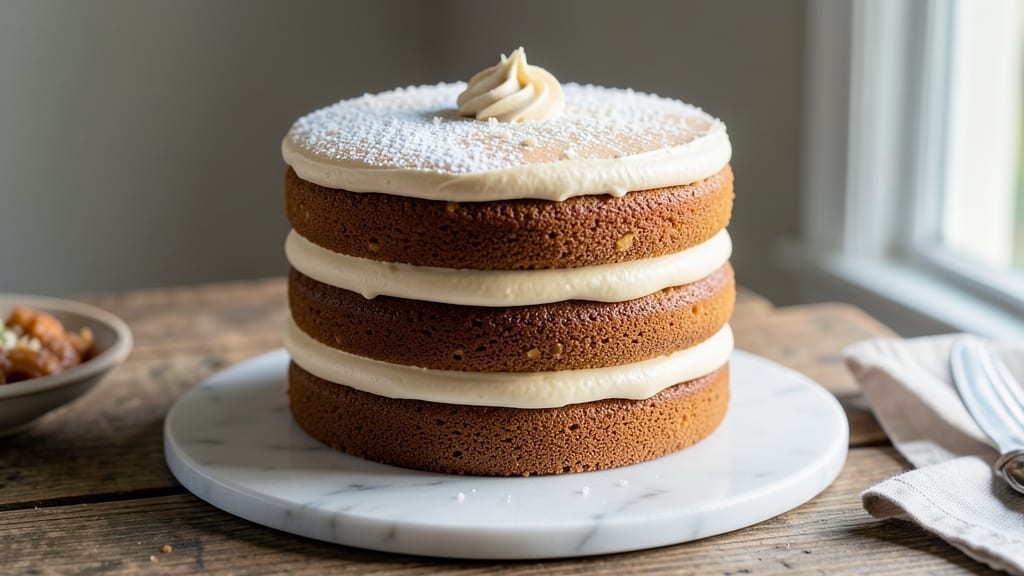
A three-layer 6-inch cake transforms any celebration into a showstopper without the fuss of a full-size dessert. This recipe delivers a perfectly balanced tower of vanilla sponge, rich chocolate layer, and berry-infused filling—each slice offering a symphony of textures and flavors.
The secret lies in precise baking times and careful layering, ensuring every bite is moist, tender, and bursting with fruit. The beauty of this mini cake is its versatility—ideal for intimate gatherings, gift-giving, or even a special treat for two.
With three distinct layers, you can customize flavors to suit any occasion, from classic vanilla to decadent chocolate. The key to success? Baking each layer at 350°F for 12-15 minutes, then cooling completely before assembly to prevent crumbling.
What you’ll end up with is a mini tower of elegance: a vanilla base with a velvety texture, a fudgy chocolate middle, and a berry filling that adds a refreshing contrast. The layers are held together with a light buttercream, creating a structure that’s sturdy yet delicate.
Decorate with fresh berries or a dusting of powdered sugar for a finishing touch that’s as beautiful as it is delicious. Whether you’re baking for a birthday, anniversary, or just because, this foolproof recipe ensures professional results every time. Let’s get started on creating your perfect mini cake.
Ingredients for 3 layer 6 inch cake
Six ingredients for the base, plus specialty touches to build your perfect mini tower.
| Ingredient | Amount | Notes |
|---|---|---|
| All-Purpose Flour 🌾 | 2 ½ cups | Sifted for light texture |
| Granulated Sugar 🍚 | 2 cups | Divided for layers and filling |
| Unsalted Butter 🧈 | 1 ½ cups | Room temperature, softened |
| Large Eggs 🥚 | 6 whole | Room temperature, separated |
| Vanilla Extract 🌿 | 2 tbsp | Pure, high-quality extract |
| Baking Powder 🧂 | 2 tsp | Spoon-and-level measurement |
| Salt 🧂 | ½ tsp | Fine sea salt preferred |
| Milk 🥛 | ½ cup | Room temperature, whole preferred |
| Dark Chocolate Chips 🍫 | 1 ½ cups | 70% cocoa or semi-sweet |
| Fresh Mixed Berries 🍓 | 1 ½ cups | Raspberries, blueberries, or strawberries |
| Lemon Zest 🍋 | 1 tbsp | From 1 large lemon |
| Powdered Sugar 🍚 | 2 cups | For buttercream frosting |
| Heavy Cream 🥛 | 1 cup | Cold, for whipped buttercream |
| Cornstarch 🌾 | 1 tbsp | For berry filling stability |
The flour here isn’t just any flour—King Arthur or Gold Medal make all the difference for tender layers. Sift it twice if you can, especially for the chocolate layer where you want that melt-in-your-mouth texture. Butter matters too: Plugrá or Land O’Lakes work well, but avoid tub butter—it’s too soft. Room temperature is key, so take it out 30 minutes before baking. For the berries, local farmers’ markets have the freshest picks, but frozen works in a pinch if you’re short on time. Just thaw and drain them well to avoid soggy layers.
No vanilla extract? Almond extract at half the amount gives depth, though it’s not identical. For chocolate, Ghirardelli chips are my go-to—they melt smoother than store brands. Substituting milk? Oat milk works best for texture, but avoid almond milk—it’s too thin. The lemon zest might seem small, but it brightens the berry filling (trust me on this). For powdered sugar, Domino is the most reliable brand—it dissolves perfectly. And if you’re short on time, pre-made buttercream from a tube works, but homemade tastes worlds better.
Store your cake layers in an airtight container with parchment between them for up to 3 days. The buttercream keeps well for 2 days in the fridge, but rewhip it before using. Fresh berries? Use within 24 hours for the filling, or freeze them for longer storage. The whole cake assembles beautifully the day of serving—just let it sit at room temperature for 30 minutes before slicing. Leftovers? They reheat beautifully in the microwave for 10 seconds—just cover with a damp paper towel to keep them moist.
Why You’ll Love This Recipe
- No Mixer Needed: I’ve made this cake with just a whisk and a fork—no stand mixer required. The butter and sugar get creamed by hand until light and fluffy, and the eggs fold in like butter. Honestly, it’s the kind of recipe that proves you don’t need fancy tools for something impressive.
- Vanilla Buttercream Bliss: That rich, velvety buttercream between the layers? It’s made with just butter, sugar, and vanilla extract—no shortcuts, no artificial flavors. The first bite of moist cake with that smooth, slightly sweet frosting is pure comfort. Between us, it’s the kind of frosting that makes people ask for the recipe.
- Portion Perfection: Six-inch layers mean you get three perfect servings—no wasted cake here. It’s ideal for a cozy dessert with coffee, a lunchbox treat, or even a last-minute gift. I’ve wrapped these in parchment and tied them with ribbon for birthdays, and they’re always the hit.
- Budget-Friendly Indulgence: Flour, sugar, butter, eggs, and vanilla—these are pantry staples that won’t break the bank. A single batch costs me less than takeout, and the leftovers? They last days in the fridge (if they last that long). It’s the kind of recipe that makes fancy desserts feel totally doable.
Step-by-step instructions for assembling your vanilla-chocolate-berry cake tower
Here’s how to build a stunning three-layer cake with perfect texture in each tier.
Prepare the Vanilla and Chocolate Cake Layers
Preheat your oven to 350°F and grease three 6-inch round cake pans, lining the bottoms with parchment circles. In a large mixing bowl, cream together the 1.5 cups unsalted butter and 1 cup granulated sugar (from the 2 cups total) until light and fluffy, about 3-4 minutes. Add the 6 egg yolks one at a time, mixing well after each addition.
In a separate bowl, whisk together the 2.5 cups all-purpose flour, 2 teaspoons baking powder, and 0.5 teaspoon salt. Sift this dry mixture into the butter mixture in three additions, alternating with 0.25 cup milk (from the 0.5 cup total) starting and ending with flour. Mix until just combined. Divide the batter evenly between two prepared pans.
For the chocolate layer, repeat the same process but add 1.5 cups dark chocolate chips to the butter-sugar mixture before incorporating the eggs. Divide this batter into the third prepared pan. Bake all layers for 25-30 minutes or until a toothpick inserted comes out clean. Cool in pans for 10 minutes before transferring to a wire rack to cool completely.
Create the Berry Filling and Lemon Curd
In a small saucepan, combine the 1.5 cups fresh mixed berries, 1 tablespoon lemon zest, and 1 tablespoon cornstarch. Cook over medium heat until the berries break down and the mixture thickens to a jam-like consistency, about 8-10 minutes. Strain through a fine-mesh sieve to remove seeds, then cool completely.
For the lemon curd, whisk together 0.5 cup granulated sugar (remaining from the 2 cups total), 0.5 cup unsalted butter (remaining from the 1.5 cups total), 3 egg yolks (remaining from the 6 total), and 1 tablespoon lemon zest. Cook in a double boiler over medium-low heat, stirring constantly, until thickened and smooth, about 10 minutes. Cool to room temperature.
Assemble the Cake Tower with Buttercream
Prepare the buttercream by beating the 1.5 cups unsalted butter (remaining) until smooth, then gradually add the 2 cups powdered sugar and 2 tablespoons vanilla extract, mixing until light and fluffy. In a separate bowl, whip the 1 cup heavy cream to soft peaks, then fold gently into the buttercream.
Level the cooled cake layers if needed, then place the vanilla layer on a cake stand or plate. Spread a thin layer of buttercream on top, then add the lemon curd and half of the berry filling. Repeat with the chocolate layer, then the final vanilla layer. Crumb coat the entire cake with buttercream, then chill for 30 minutes.
Apply the final buttercream layer, smoothing the sides and creating decorative swirls on top. Pipe additional buttercream rosettes or berry decorations as desired. Chill for 1 hour before slicing to ensure clean cuts.
Pro Tips For Making 3 Layer 6 Inch Cake
- Weigh Your Butter: I learned this the hard way—packing butter into measuring cups leaves air pockets that throw off your cake’s texture. Use a kitchen scale for 6-inch layers; 1 cup of butter should weigh exactly 227 grams. No guesswork, no dense spots.
- Cool Layers Completely: That first layer might look done, but cutting into it too soon is a one-way ticket to soggy cake. Let each layer cool on a wire rack for 15 minutes, then refrigerate for 20 before adding filling. Trust me, your frosting will thank you.
- Skip the Overmixing: Your mixer’s on the fritz, and so is your cake if you beat the batter into submission. Mix the dry ingredients with the wet just until combined—about 20 seconds after the flour disappears. Overmixing develops gluten, and your cake will turn out tough instead of tender.
- Use Room-Temp Eggs: Cold eggs from the fridge can curdle your butter and make the batter look curdled. Let them sit in warm water for 5 minutes before cracking them in. Your cake’s structure will be smoother, and you’ll avoid that weird grainy texture.
Pro cooking tips for great 3 layer 6 inch cake
Precision Baking
Baking each 6-inch layer at 350°F for exactly 12-15 minutes is critical—overbaking dries out the sponge, while underbaking leaves it gummy. I use an instant-read thermometer to check for 210°F internal temperature before removing from the oven. This ensures even doneness across all layers. 🌡️
Layer Cooling Strategy
Never skip the 10-minute rest in pans before transferring to a wire rack. This prevents cracking when cooling. I also recommend cooling layers completely (about 2 hours) before assembly—this prevents the buttercream from melting and creating a soggy base. Trust me, patience here makes all the difference.
Buttercream Mastery
For a light, airy buttercream, whip the 1 cup heavy cream to stiff peaks before folding into the butter mixture. I use a hand mixer on high for 3-4 minutes to incorporate all the 2 cups powdered sugar smoothly.
If your buttercream is too thick, add 1-2 teaspoons milk to loosen it without compromising stability. 🥛
Assembly Tricks
Level your layers with a serrated knife before stacking—uneven layers create wobbly towers. I brush each cake surface with 1 tablespoon apricot jam before adding filling to create a moisture barrier. For extra stability, chill the assembled cake for 30 minutes before adding the final buttercream layer.
Filling Consistency
The berry filling should be thick but pourable—like a loose jam. If it’s too runny, add ½ teaspoon cornstarch and simmer for 1-2 minutes longer. For the lemon curd, cook it until it coats the back of a spoon (170°F internal temp) to prevent separation.
Strain both fillings through a fine-mesh sieve for silky smoothness.
Decorating Like a Pro
Use a piping bag with a star tip to create swirls on the top layer—this adds visual appeal without extra effort. I like to dust the sides with powdered sugar using a fine-mesh sieve for a professional finish.
For extra flair, pipe berry decorations around the base of the cake before chilling. 💫
Nutrition facts
Frequently asked questions
Can I bake these layers in advance?
Bake the cake layers up to 2 days ahead and store them in an airtight container with parchment between each layer. For the filling, make the berry mixture and lemon curd 1 day ahead—they keep well in the fridge. Just assemble the cake the day of serving for the freshest texture.
How do I prevent the layers from sliding?
Use a thin layer of buttercream or jam between layers as a glue. Chill the cake for 30 minutes after assembly before adding the final frosting. For extra stability, place a cake collar (a ring made from parchment or plastic wrap) around the base while chilling to support the sides.
Can I substitute the berry filling?
Yes! Try a raspberry jam or chocolate ganache for a different flavor profile. For a lighter option, use whipped cream mixed with 1 teaspoon vanilla extract. Just ensure your filling isn’t too wet—it should be thick enough to hold its shape but still spreadable.
Why did my cake layers crack?
Cracking usually happens when layers cool too quickly or are moved before fully set. Let them cool in the pans for 10 minutes first, then transfer to a wire rack. Also, avoid opening the oven door too soon—sudden temperature changes can cause cracks. If it happens, simply level the top before frosting.
How do I make this cake gluten-free?
Replace the all-purpose flour with a 1:1 gluten-free baking flour blend (like Bob’s Red Mill). Add ½ teaspoon xanthan gum to help bind the layers. For the chocolate layer, use gluten-free chocolate chips. Keep an eye on baking time—gluten-free cakes often need 2-3 extra minutes to set properly.

- 3lb Prime Rib Roast Recipe: Juicy Pink Center Guaranteed in 3 Hours - October 31, 2026
- 5 Spice Cake Recipe: Warmly Spiced Layers With Crunchy Top - October 31, 2026
- 1950’s Macaroni and Cheese Recipe: Nostalgic Creamy Cheese Sauce with Buttery Noodles - October 31, 2026