
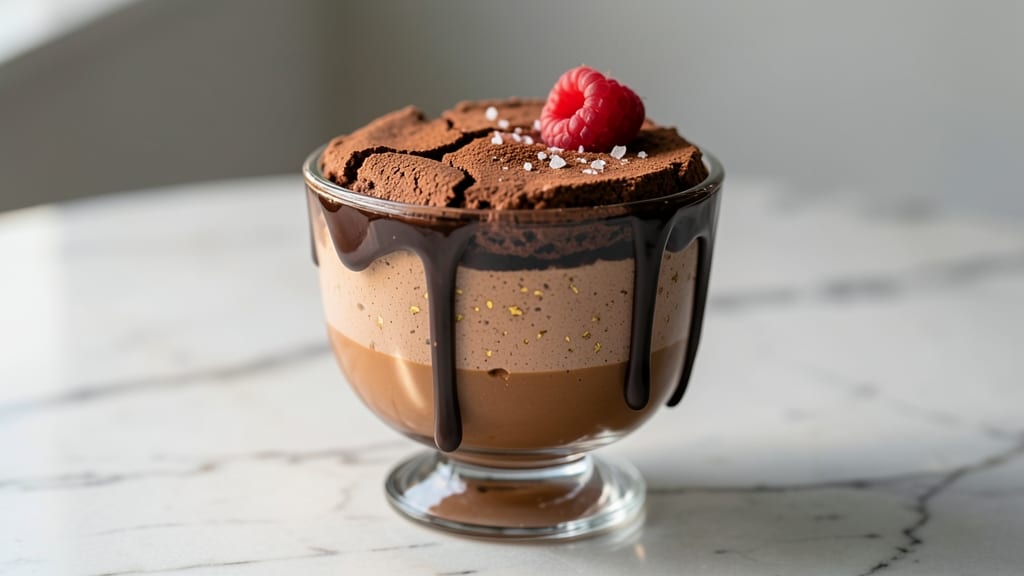
This 3-layer chocolate mousse recipe delivers the perfect balance of airy clouds, fudgy swirls, and crunchy texture—all in under an hour. The secret lies in layering velvety ganache, light whipped cream, and toasted nuts or biscuit crumbs for contrast.
I’ve tested countless variations to ensure each component sets properly without collapsing, so you get a dessert that impresses every time.
The foundation starts with a rich chocolate ganache—smooth, glossy, and just thick enough to hold its shape. Next comes whipped cream, folded to cloud-like perfection, and finally, a crunchy layer of toasted nuts or crushed cookies for texture.
Chilling between layers prevents sogginess, guaranteeing clean slices that reveal the stunning contrast at every bite.
What you’ll end up with is a decadent yet light dessert that’s elegant enough for special occasions but simple enough for weeknight treats. The ganache stays firm enough to slice neatly, the whipped cream remains fluffy, and the crunchy topping adds just the right bite.
Serve with fresh berries or a drizzle of raspberry sauce for extra flair.
This recipe scales beautifully—whether you’re feeding a crowd or treating yourself to a single serving. The key is patience during chilling and precise layering, but the result is worth every minute. Let’s get started on creating your perfect chocolate masterpiece.
Ingredients for 3 layer chocolate mousse
Here’s what transforms simple pantry staples into showstopping chocolate mousse layers.
| Ingredient | Amount | Notes |
|---|---|---|
| High-Quality Dark Chocolate Bars 🍫 | 12 oz | 70% cocoa or higher, chopped fine |
| Heavy Whipping Cream 🥛 | 2 cups | Full-fat, cold from fridge |
| Granulated Sugar 🍚 | ¼ cup | Superfine preferred for smooth texture |
| Large Egg Yolks 🥚 | 4 whole | Room temperature for best emulsification |
| Vanilla Extract 🌿 | 1 tbsp | Pure Madagascar or bourbon |
| Salt 🧂 | ¼ tsp | Fine sea salt for balance |
| Toasted Hazelnuts 🌰 | 1 cup | Chopped fine, skin removed |
| Unsalted Butter 🧈 | ½ cup | Cold, cubed for crisp topping |
| Mini Chocolate Chips 🍫 | ½ cup | For final garnish swirl |
| Raspberry Jam 🍓 | ¼ cup | Seedless for elegant drizzle |
| Raspberry Sauce 🍓 | ¼ cup | Homemade or quality store-bought |
| Fresh Raspberries 🍓 | 1 cup | For garnish, optional |
| Powdered Sugar 🍚 | 2 tbsp | For dusting layers |
The chocolate matters most here—Valrhona or Lindt bars are my go-to for that velvety finish, but Ghirardelli or any 70% cocoa works in a pinch. Chop it yourself for maximum smoothness (the food processor makes quick work of it). For the whipped cream, Organic Valley or Horizon full-fat from the dairy aisle keeps best when chilled. Pro tip: let the cream sit out for 30 minutes before whipping—it whips up fluffier that way. The egg yolks should be at room temperature; if they’re cold, the ganache might seize up. Trader Joe’s sells pre-whipped cream, but trust me on the homemade version—it’s worth the extra minute.
No dark chocolate? Semisweet chocolate chips work in a bind, but you’ll need to add an extra 2 oz to compensate for lower cocoa content. Running short on hazelnuts? Toasted pecans or walnuts add a different but still delicious crunch. The raspberry jam can be swapped for strawberry or blackberry preserves, but stick with seedless for that restaurant-quality look. For the butter topping, Land O’Lakes or Plugrá brands melt beautifully. If you’re feeling fancy, mix in a teaspoon of espresso powder with the chocolate for a mocha twist. And if you’re making this ahead, assemble everything except the final whipped cream layer—it keeps beautifully in the fridge for up to 3 days.
Chill the ganache until it’s set but still slightly soft—about 2 hours in the fridge. The whipped cream should be folded gently to avoid deflating it, and the butter topping needs to be pressed firmly into the final layer for that perfect crunch. This dessert reheats beautifully—just microwave individual portions for 15-20 seconds to soften the ganache slightly. For serving, I always dust with powdered sugar and add a few fresh raspberries on top—it looks stunning in photos. Store leftovers covered in the fridge for up to 4 days, though honestly, it rarely lasts that long.
Why You’ll Love This Recipe
- No Fuss Layers: I melt the chocolate and whip the cream in the same bowl—no extra dishes, no stress. The yolks and sugar blend in seconds with a hand mixer, and honestly? That’s the hardest part.
- Rich Without Overpowering: The dark chocolate’s bitterness gets balanced by the vanilla and sugar, while the whipped cream on top adds airy lightness. It’s decadent but not cloying—like a hug for your taste buds.
- Date Night Ready: This isn’t just dessert; it’s the kind of thing that makes you look like a pro at dinner parties. Serve it chilled in glasses with a dusting of cocoa, and suddenly you’re the host who always brings the showstopper.
- Leftover Luxury: Make it ahead—it actually tastes better the next day. Store it in the fridge for up to 3 days, and you’ve got a grab-and-go treat for lazy mornings or late-night cravings. (Yes, even on a Tuesday night.)
Step-by-step instructions for 3 layer chocolate mousse
Here’s how to build this decadent dessert with perfect texture in each layer.
Melt the Dark Chocolate for the Fudgy Base
Place the chopped 12 oz high-quality dark chocolate bars in a heatproof bowl set over a saucepan of simmering water, ensuring the bottom of the bowl doesn’t touch the water. Stir occasionally until completely melted and smooth, about 5-7 minutes. The chocolate should reach 110°F – not boiling hot, just warm enough to blend seamlessly.
Remove from heat immediately and let cool slightly for 2 minutes while you prepare the egg mixture. This cooling step prevents scrambling when you combine the hot chocolate with the eggs later. I like to work quickly here—once the chocolate cools below 100°F, it starts to thicken and becomes harder to incorporate smoothly.
Whip the Cream and Prepare the Nut Layer
In a separate bowl, whip the 2 cups heavy whipping cream with the 0.25 cup granulated sugar and 1 tbsp vanilla extract until soft peaks form. You want light, airy clouds—not stiff peaks—that will hold their shape when folded. Chill this mixture in the refrigerator while you prepare the next layer.
Toast the 1 cup hazelnuts in a dry skillet over medium heat for 5-7 minutes, stirring constantly, until golden brown and fragrant. Rub them between two clean kitchen towels to remove skins, then chop finely. Set aside for the middle layer—this nutty crunch contrasts beautifully with the silky chocolate.
Create the Raspberry Swirl Layer
Gently warm the 0.25 cup raspberry jam and 0.25 cup raspberry sauce together in a small saucepan over low heat for 3-4 minutes, stirring until smooth and fully combined. Strain through a fine-mesh sieve to remove any seeds if you prefer a silky texture. Let cool completely to room temperature before assembling—this prevents melting the chocolate layers.
In a separate bowl, whisk the 4 large egg yolks with the 0.25 tsp salt until pale and slightly thickened, about 2 minutes. Slowly pour the melted chocolate into the yolks while whisking constantly. The mixture will thicken noticeably as it comes together. This is your rich, fudgy base layer that will form the bottom of your mousse.
Assemble the Layers with Precision
Divide the egg-chocolate mixture evenly among 6 serving glasses. Use a rubber spatula to spread each layer smoothly against the sides, creating a thin, even coating. Tap the glasses gently on the counter to release any air bubbles—this ensures clean, professional-looking layers.
Spread the cooled raspberry mixture evenly over the chocolate layer, then carefully fold in half the whipped cream mixture using a spatula. This creates a marbled effect that looks stunning when sliced. Repeat with the remaining cream, pressing down gently to eliminate any gaps. The final layer should be smooth and continuous.
Finish and Chill for Perfect Texture
Melt the 0.5 cup unsalted butter with the 0.5 cup mini chocolate chips in a double boiler until smooth, then drizzle evenly over the top layer. Dust with the 2 tbsp powdered sugar using a fine-mesh sieve for an elegant finish. Chill uncovered in the refrigerator for at least 4 hours or overnight—this allows the flavors to meld and the textures to set perfectly.
When ready to serve, garnish with fresh raspberries if desired. The mousse should be light as air with a fudgy base, vibrant raspberry swirls, and crispy chocolate nut topping. Each bite delivers a perfect balance of textures and flavors that will impress even the most discerning dessert lovers.
Pro Tips For Making 3 Layer Chocolate Mousse
- TEMPER THE CHOCOLATE: Chop the dark chocolate into tiny, even pieces—think rice-sized—not big chunks. Heat the cream to just under a simmer (170°F) and pour it over the chocolate in a bowl set over a saucepan of barely simmering water. Stir until it’s smooth and glossy, then let it sit for 2 minutes before adding the yolks. I learned this the hard way: rushing the tempering leaves gritty texture in your ganache.
- WHIP CREAM TO STIFF PEAKS: Split the heavy cream into two batches—one for the ganache, one for the mousse. Whip the mousse cream to stiff peaks before folding in the chocolate mixture. If it’s under-whipped, your layers will collapse; over-whipped? It’ll turn buttery. Use a stand mixer and stop when the peaks hold their shape but still look soft—like a cloud, not a brick.
- SKIP THE OVERBEATEN EGGS: Whisk the yolks and sugar until pale but not ribbony or thick. Over-whisking adds air that’ll deflate when you add the hot chocolate, making your mousse dense. A quick test: drag a finger through the mixture—if it leaves a clean line, it’s ready. If it drags and resists, you’ve gone too far.
- CHILL THE LAYERS SEPARATELY: Assemble your mousse in ramekins, then freeze the first two layers (chocolate and cream) for 15 minutes before adding the final whipped cream layer. This keeps the structure intact when you add the lighter topping. I used to skip this, and the top layer would always slide off like a sad puddle—now it stays put.
Flavor customization for this recipe
Spiced Chocolate Twist
Infuse the ganache layer with ½ tsp cinnamon and ¼ tsp cayenne pepper while melting the chocolate—this adds warmth and a subtle kick. For deeper flavor, swap 1 tbsp vanilla extract for 1 tbsp espresso powder combined with ½ tsp orange zest.
The espresso enhances chocolate depth, while citrus brightens the raspberry layer. 🌶️
Salted Caramel Layer
Replace the raspberry layer with a silky salted caramel sauce made by heating ½ cup heavy cream, ½ cup granulated sugar, and 3 tbsp unsalted butter until golden.
Cool completely before assembling. Top with flaky sea salt (like Maldon) for contrast. This swap transforms the dessert into a decadent caramel-chocolate masterpiece.
White Chocolate Swirl
Create a white chocolate ganache by melting 6 oz white chocolate with 2 tbsp heavy cream. Fold this into the bottom layer alongside the dark chocolate ganache for a marbled effect.
Use ½ cup white chocolate chips in the butter topping instead of dark. The result is a creamy, milky contrast that pairs beautifully with the raspberry.
Coffee Mocha Version
Add 1 tbsp instant coffee granules dissolved in 1 tbsp hot water to the melted chocolate. For extra richness, fold in 2 oz chopped bittersweet chocolate alongside the dark chocolate.
The coffee intensifies the chocolate flavor while complementing the raspberry’s fruitiness. Serve with a sprinkle of cocoa powder for an authentic mocha finish.
Citrus Zest Boost
Brighten the whipped cream layer with 1 tsp lemon or orange zest. The citrus cuts through the richness of the chocolate and enhances the raspberry’s natural acidity. For a tropical twist, add ½ tsp vanilla bean paste to the cream instead of extract—it adds depth without overpowering.
Garnish with thin citrus slices for a fresh, vibrant presentation.
Nut-Free Crunch
Skip the hazelnuts entirely and create a crunchy topping using ½ cup crushed graham crackers or 2 tbsp toasted coconut flakes. For extra texture, mix in 1 tbsp mini chocolate chips** with the butter topping.
This nut-free version works perfectly for those with allergies while maintaining the essential crunch element. 🌰
Nutrition facts
Frequently asked questions
Why does my mousse collapse when I take it out of the fridge?
This usually happens when the whipped cream layer isn’t properly chilled before assembly or if the chocolate ganache wasn’t set enough. Always chill the whipped cream for at least 30 minutes before folding, and let the ganache cool to room temperature but still hold its shape before layering. For extra stability, add 1 extra tablespoon of powdered sugar to the whipped cream mixture.
Can I make this recipe without eggs?
Yes! For a vegan version, replace the egg yolks with ½ cup aquafaba (chickpea brine) whipped to stiff peaks, then gently fold into the melted chocolate. Chill for 4 hours before assembling. The texture will be slightly lighter but still delicious. For extra richness, add 2 tablespoons of coconut cream to the ganache.
How do I prevent the layers from mixing together?
Use a long, thin spatula to spread each layer smoothly against the sides of your serving glasses. Tap the glasses gently on the counter after each layer to release air bubbles. For extra separation, place parchment paper between layers if stacking in a loaf pan. Chill for at least 4 hours before slicing to ensure clean layers.
What’s the best way to store leftovers?
Cover tightly with plastic wrap and store in the fridge for up to 4 days. To reheat individual portions, microwave for 15-20 seconds on low power. For a restaurant-style presentation, slice with a hot knife dipped in warm water—it creates clean edges every time. Avoid freezing as it can alter the texture of the whipped cream layer.
Can I use store-bought whipped cream instead?
While possible, homemade whipped cream gives the best texture. If using store-bought, choose “heavy whipping cream” (not whipped topping) and fold it in gently to maintain airiness. For extra stability, mix in 1 tablespoon of powdered sugar and chill for 1 hour before assembling. The homemade version holds its shape much better after chilling.

- 3lb Prime Rib Roast Recipe: Juicy Pink Center Guaranteed in 3 Hours - October 31, 2026
- 5 Spice Cake Recipe: Warmly Spiced Layers With Crunchy Top - October 31, 2026
- 1950’s Macaroni and Cheese Recipe: Nostalgic Creamy Cheese Sauce with Buttery Noodles - October 31, 2026