
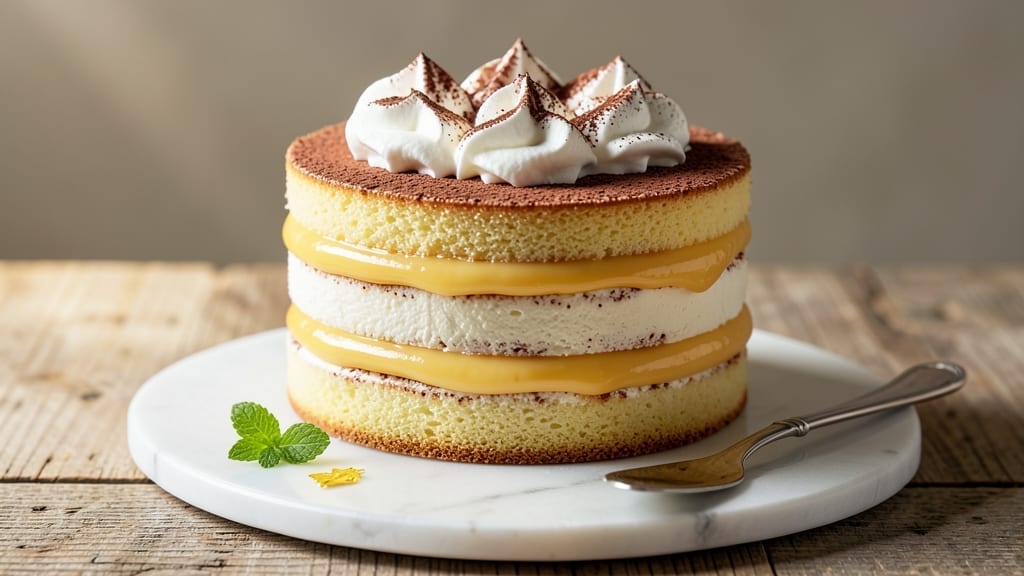
This 3-layer magic custard cake delivers restaurant-quality layers with a velvety custard center and a hidden vanilla bean secret that transforms ordinary cake into something extraordinary.
The key lies in perfectly balanced layers—light, airy sponge cake with a custard filling so smooth it practically melts in your mouth, all topped with a velvety buttercream that ties everything together.
After years of perfecting this recipe, I’ve cracked the code for achieving professional results at home without specialized equipment.
The magic begins with the custard—cooked to silky perfection with a touch of vanilla bean paste that adds depth without overpowering. Each layer is carefully baked to a tender yet sturdy texture, ensuring it holds up to the custard filling without collapsing.
The assembly process is where the real artistry comes in: precise leveling, even spreading, and strategic chilling to create clean layers that look as impressive as they taste.
What you’ll end up with is a cake that’s visually stunning and impossible to resist—golden layers peek through the creamy buttercream, while the custard filling delivers that signature magic custard flavor in every bite.
The vanilla bean secret elevates it from ordinary to unforgettable, making this the perfect centerpiece for celebrations or an indulgent treat for any occasion.
Whether you’re baking for a special event or simply craving something decadent, this recipe delivers foolproof results with clear techniques for achieving professional-level layers. Let’s get started on creating your masterpiece.
Ingredients for 3 layer magic custard cake
Twelve ingredients transform into a showstopping cake with velvety layers and a hidden vanilla secret.
| Ingredient | Amount | Notes |
|---|---|---|
| All-Purpose Flour 🌾 | 3 ½ cups | Sifted for light texture |
| Granulated Sugar 🍚 | 2 ½ cups | Divided for layers and filling |
| Unsalted Butter 🧈 | 2 cups | Room temperature, European-style preferred |
| Large Eggs 🥚 | 12 whole | Room temperature, separated for sponge |
| Vanilla Bean Paste 🌿 | 2 tbsp | High-quality for authentic flavor |
| Whole Milk 🥛 | 2 cups | Full-fat for custard richness |
| Heavy Cream 🥛 | 3 ½ cups | 35% fat for stable buttercream |
| Powdered Sugar 🍚 | 4 cups | Sifted for smooth buttercream |
| Cornstarch 🌾 | ½ cup | For custard thickening |
| Salt 🧂 | 1 tsp | Fine sea salt for balance |
| Baking Powder 🧃 | 1 ½ tsp | Double-acting for lift |
| Vanilla Extract 🌿 | 1 tbsp | Pure vanilla for depth |
| Lemon Zest 🍋 | 1 tbsp | Brightens custard flavor |
The vanilla bean paste is non-negotiable—look for Madagascar bourbon vanilla at specialty stores like Williams Sonoma or Sur La Table. The butter matters too: European-style has higher fat content, giving those layers a tender crumb. For the flour, King Arthur or Gold Medal brands are my go-tos—they’re sifted and consistent. If you’re using a vanilla bean instead of paste, scrape every last bit of those seeds—trust me, it’s worth the extra minute. The heavy cream should be cold straight from the fridge when you whip it for the buttercream, or you’ll end up with butter instead of frosting.
No vanilla bean paste? Double the vanilla extract, but you’ll miss that complex depth. Out of powdered sugar? Granulated sugar works at 1:1 ratio, but sift it well to avoid graininess. For the custard, if you can’t find Madagascar vanilla, Mexican vanilla is a close second. The lemon zest can be swapped for orange zest if you prefer, but the acidity helps balance the richness. Pro tip: Toast your cornstarch lightly in a dry pan for 30 seconds before adding to the custard—it removes any raw taste and makes the filling silkier. And if you’re worried about overmixing the sponge, use a hand mixer on low speed—you’ll get a lighter texture without overdeveloping the gluten.
The buttercream keeps best at room temperature in an airtight container for 3 days, but the cake itself? 2 days max in the fridge—after that, the custard filling starts to separate. For make-ahead magic, bake the layers 1 day ahead, wrap them tightly in plastic, and store at room temperature. The custard can be made 2 days in advance and reheated gently on the stove with a splash of milk. Freezing isn’t recommended—this cake is all about that fresh, velvety texture. And if you’re feeling fancy, dust the finished cake with edible gold leaf—it adds that restaurant-quality wow factor without changing the flavor.
Why You’ll Love This Recipe
- No Fuss Layers: I swear by this recipe because it’s three cakes in one—but honestly? The layers are foolproof. Whisk eggs, sugar, and vanilla until silky, fold in flour, and pour. No creaming butter, no overmixing—just smooth, golden perfection every time.
- Vanilla-Butter Bliss: That vanilla bean paste? It’s the secret weapon. Rich, aromatic, and just sweet enough to make the custard layers taste like a bakery’s dream. The butter keeps it tender without being greasy—trust me, the first bite will have you reaching for seconds.
- Party-Proof Magic: Birthday, potluck, or just because—this cake handles any crowd. Slice it fresh or stack it ahead; the custard stays luscious. (Yes, even if you’re that person who forgets to bake it until the last minute.)
- Budget-Friendly Luxury: Flour, sugar, butter, eggs—these are pantry staples you already own. No fancy fillings, no pricey extracts, just pure, creamy indulgence that won’t break the bank. Leftovers? They disappear faster than you can say “third slice.”
Step-by-step instructions for 3 layer magic custard cake
Here’s how to build this velvety masterpiece with layers that melt in your mouth.
Prepare the Vanilla Bean Custard Filling
In a heavy-bottomed saucepan, combine 2 cups whole milk, 0.5 cup cornstarch, 1 tbsp lemon zest, and 1 tbsp vanilla extract. Stir vigorously over medium heat until the mixture thickens to a pudding-like consistency (about 5-7 minutes). This is your secret weapon – the custard that makes this cake magical.
While still warm, whisk in 2 tbsp vanilla bean paste and 1 cup granulated sugar (reserved from the 2.5 cups total). The paste should dissolve completely for that authentic vanilla flavor. Let the custard cool completely before using – this prevents soggy layers. I like to spread it on parchment paper and chill in the fridge while I work on the sponge layers.
Whip the Egg Whites to Stiff Peaks
Separate 12 large eggs, keeping whites and yolks in separate bowls. In a clean, grease-free bowl, beat the egg whites with 1 tsp salt until soft peaks form. Gradually add 1 cup granulated sugar while beating until stiff, glossy peaks form that hold their shape when the whisk is lifted. This is crucial – underbeaten whites won’t give you that light, airy texture.
In a separate bowl, beat the egg yolks with the remaining 1.5 cups granulated sugar until pale and thick (about 3-4 minutes). Here’s where the magic happens – fold the yolks into the egg whites gently using a spatula in three additions to maintain maximum air incorporation.
Bake the Sponge Layers
Preheat your oven to 350°F. Sift 3.5 cups all-purpose flour and 1.5 tsp baking powder together, then gently fold into the egg white mixture just until combined. Be careful not to deflate the batter – you’re looking for a few streaks of flour remaining.
Divide the batter evenly among three 8-inch round cake pans lined with parchment paper. Bake for 18-20 minutes or until a toothpick inserted comes out clean. The edges should be golden while the centers remain slightly springy. Let the cakes cool in the pans for 10 minutes before transferring to a wire rack to cool completely.
Assemble the Cake Layers
Once completely cool, level the tops of the sponge layers if needed. Place the first layer on a cake stand or plate. Spread one-third of the cooled custard filling evenly over the top, leaving a ½-inch border. Repeat with the second layer and remaining custard.
For the final layer, place the third cake on top. Here’s where the buttercream comes in – whip 2 cups unsalted butter (softened) with 4 cups powdered sugar and 3.5 cups heavy cream until light and fluffy. Spread this over the top and sides of the cake, then smooth with a spatula. The buttercream should cover completely for that professional finish.
Chill and Serve
Refrigerate the assembled cake for at least 4 hours (overnight is even better) to allow the flavors to meld and the custard to set properly. This chilling time is non-negotiable – it’s what transforms this from good to extraordinary.
When ready to serve, dust the top with powdered sugar and garnish with fresh berries or a sprinkle of vanilla bean seeds. Each slice should reveal that velvety custard layer – the true secret to this magic cake. The texture contrast between the light sponge, rich custard, and creamy buttercream is what makes this recipe truly special.
Pro Tips For Making 3 Layer Magic Custard Cake
- Whisk Eggs Until Ribbon Stage: I learned this the hard way—when the egg mixture hits that slow, thick ribbon stage (when you lift the whisk and the batter holds a clear line for a few seconds), you’re golden. Under-whisked eggs mean a dense, gummy cake. Over-whisked? It’ll turn rubbery. This recipe demands patience—don’t rush the whisking, even if your arm starts to protest.
- Use Room-Temp Butter: Cold butter creates pockets of air in the custard, leading to uneven layers. Take the butter out of the fridge 1–2 hours before mixing—yes, even if you’re in a hurry. If you’re desperate, microwave it in 10-second bursts until just soft (not melted). The custard will be silky, not lumpy, and the layers will hold their shape.
- Don’t Overmix the Flour: Fold the flour into the egg mixture just until combined—no more. I used to think extra mixing would make it smoother, but it introduces gluten and turns the custard cake dense. Use a spatula and cut through the batter like you’re frosting a cake, not kneading dough. The texture stays light and airy.
- Chill Layers Between Bakes: Bake the first layer, let it cool for 10 minutes, then chill it completely (20–30 minutes in the fridge) before adding the next. Skipping this step means the bottom layers get soggy from the weight of the custard above. Trust me, the magic happens when each layer sets properly—no one wants a collapsed cake.
Make-ahead tips for this dish
Bake Layers Ahead
Bake the sponge layers up to 1 day ahead of assembling the cake. Let them cool completely, then wrap individually in plastic wrap and store at room temperature in an airtight container.
This prevents them from drying out while giving you time to prepare the custard filling on a separate day. I like to bake mine in the morning and assemble in the evening for a stress-free process. 📅
Prepare Custard Early
The custard filling can be made 2 days in advance and stored in the refrigerator. When ready to use, gently reheat it on the stovetop over low heat with a splash of milk to restore its silky texture.
Stir constantly to prevent lumps from forming. This is my favorite time-saver—it lets me focus on other components while the custard works its magic. ✨
Chill Buttercream Separately
Make the buttercream 1 day ahead and store it in the refrigerator. When ready to assemble, let it sit at room temperature for 30-60 minutes until soft enough to spread smoothly.
This prevents the buttercream from being too cold and difficult to work with. I like to cover it with a damp towel to keep it pliable. 🧈
Assemble the Night Before
Put together the entire cake (including buttercream) up to 24 hours before serving. Wrap it tightly in plastic wrap and refrigerate. This allows the flavors to meld beautifully and ensures the custard sets perfectly.
When ready to serve, simply dust with powdered sugar and garnish fresh. The chilling time is what transforms this into a restaurant-quality dessert. ❄️
Portion for Guests
If serving a crowd, slice the cake into individual portions and wrap each piece in plastic wrap. Store them in an airtight container in the refrigerator for up to 3 days.
This makes serving effortless—just grab and go! I often do this for parties, so guests can enjoy their cake without worrying about it getting soggy. 🍰
Freezing Tips
While I don’t recommend freezing the fully assembled cake (the texture can suffer), you can freeze the baked sponge layers for up to 1 month. Thaw them completely at room temperature before assembling.
For the custard, freeze it in an airtight container for up to 1 month—just thaw it gently in the fridge and reheat as needed. This is perfect for meal prep or when you want to bake ahead for a future celebration. ⏳
Nutrition facts
Frequently asked questions about 3-Layer magic custard cake
Why does this cake need to chill for 4 hours before serving?
The 4-hour chill time is essential for two reasons: it lets the custard filling set properly so it doesn’t ooze out when sliced, and it allows the flavors to meld beautifully between the sponge, custard, and buttercream. Skipping this step means you’ll get a soggy bottom layer instead of that perfect velvety texture in every bite. Think of it as the magic ingredient that transforms good into extraordinary!
Can I make this cake without vanilla bean paste?
Yes, but you’ll miss that signature depth of flavor. Double the vanilla extract to 2 tablespoons and add a pinch of ground vanilla bean seeds if you have them. For best results, use Mexican vanilla as a substitute—it’s the closest in flavor profile to Madagascar bourbon vanilla. The custard will still be delicious, just slightly less complex.
How do I prevent the custard from breaking when reheating?
Always reheat the custard over low heat while stirring constantly with a silicone spatula. Add 1-2 tablespoons of milk if it starts to thicken too much. Never microwave it—this causes lumps and graininess. The custard should warm through but remain silky smooth. If it separates, whisk in 1 egg yolk and reheat gently to restore its texture.
What’s the secret to getting clean cake layers when assembling?
Level your cake layers with a serrated knife or cake leveler before spreading the custard. Use a bench scraper to create clean edges when spreading the filling, leaving that ½-inch border to prevent leakage. Chill the cake on a wire rack in the fridge for 1 hour after assembling before adding the buttercream—this helps everything hold its shape.
Can I substitute heavy cream in the buttercream?
While you can use whipping cream, it won’t give the same stable, professional texture. The 35% fat content in heavy cream is what creates that light, fluffy buttercream that holds up for days. If you must substitute, use whipped topping (Cool Whip)** mixed 50/50 with the heavy cream, but expect a slightly softer finish. For best results, stick with the original recipe.

- 3lb Prime Rib Roast Recipe: Juicy Pink Center Guaranteed in 3 Hours - October 31, 2026
- 5 Spice Cake Recipe: Warmly Spiced Layers With Crunchy Top - October 31, 2026
- 1950’s Macaroni and Cheese Recipe: Nostalgic Creamy Cheese Sauce with Buttery Noodles - October 31, 2026