
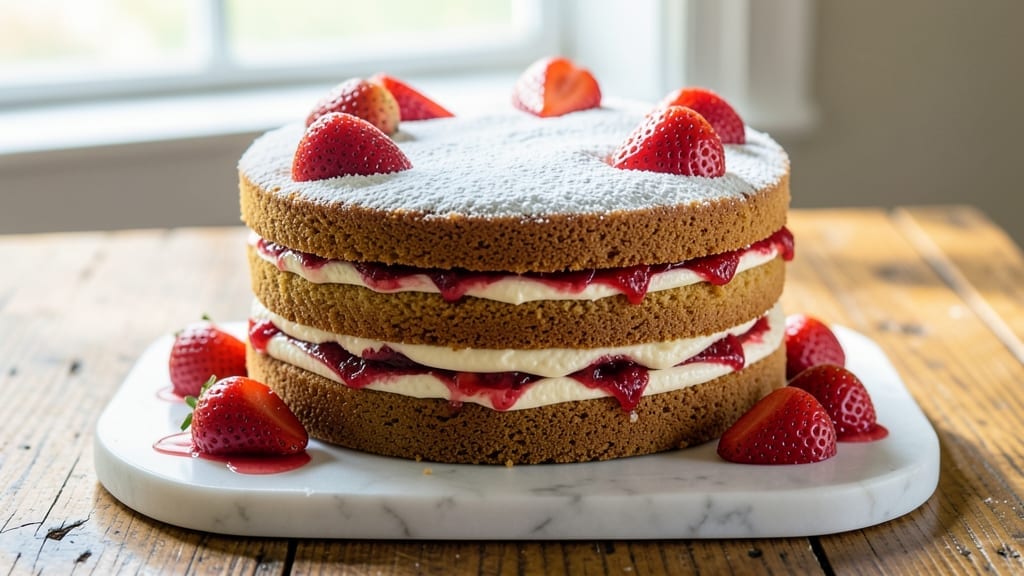
This 3-layer strawberry cake recipe delivers the perfect balance of velvety sponge and luscious strawberry filling—every slice is a celebration in your mouth. The secret lies in precise layering and a foolproof baking technique that ensures moist, tender cake with a delicate crumb.
I’ve perfected this recipe over years of baking, and it never fails to impress, whether for birthdays, holidays, or just because you deserve something special.
The cake itself is made with a simple yet effective recipe: a blend of all-purpose flour, sugar, and eggs that creates a light, airy texture without being dry. The real magic happens in the filling—a fresh strawberry purée sweetened just enough to complement the cake’s natural flavor.
Between each layer, we add a light buttercream that keeps everything cohesive while letting the strawberries shine. This isn’t just dessert; it’s a showstopper that tastes like summer in every bite.
What makes this recipe truly special is the velvety moisture that stays fresh for days, thanks to a few key tricks: baking at the right temperature, letting the layers cool completely, and chilling the cake before frosting.
The result is a cake that’s restaurant-quality at home—golden layers, glossy glaze, and a filling so rich it makes you close your eyes with every bite. No fancy equipment is needed, just patience and attention to detail.
Once assembled, the cake is topped with a smooth vanilla buttercream and fresh strawberries for a finishing touch that’s as beautiful as it is delicious. Serve it at room temperature for the best texture, and watch as everyone reaches for seconds.
This is the kind of recipe that turns a simple dessert into a memorable experience. Let’s get baking!
Ingredients for 3 layer strawberry cake
Twelve ingredients, three perfect layers—this cake delivers restaurant-quality strawberry magic at home.
| Ingredient | Amount | Notes |
|---|---|---|
| All-Purpose Flour 🌾 | 3 ½ cups | Sifted for light texture |
| Granulated Sugar 🍚 | 2 ½ cups | Superfine preferred for smoothness |
| Large Eggs 🥚 | 6 whole | Room temperature for even mixing |
| Unsalted Butter 🧈 | 1 ½ cups | Cold, cubed for layering |
| Vanilla Extract 🌿 | 2 tsp | Pure Madagascar preferred |
| Baking Powder 🍞 | 2 tsp | Freshly opened for lift |
| Salt 🧂 | ½ tsp | Fine sea salt preferred |
| Fresh Strawberries 🍓 | 2 ½ lbs | Hull-less, ripe but firm |
| Powdered Sugar 🍚 | 2 cups | For buttercream smoothness |
| Heavy Whipping Cream 🥛 | 1 ½ cups | Full-fat for stability |
| Lemon Juice 🍋 | 1 tbsp | Freshly squeezed for brightness |
| Cornstarch 🌾 | ½ tbsp | For strawberry purée thickness |
| Vanilla Bean Paste 🌿 | 1 tbsp | For deeper vanilla flavor |
The strawberries are non-negotiable here. Hull-less berries save time, but if you’re using regular ones, grab a strawberry huller—it’s a game-changer. Local farmers markets have the sweetest, most flavorful berries in summer, but the regular grocery store works year-round. Look for berries that are firm but yield slightly when pressed—too soft means mush in your filling. I always buy extra because they’re the star of this show. For the butter, Land O’Lakes or Plugrá are my go-tos—they’re reliable and melt beautifully. Keep it cold until mixing to prevent over-creaming.
No vanilla bean paste? Double the vanilla extract—it’s not the same, but it’ll work in a pinch. The strawberries can be swapped for raspberries or blackberries if that’s what’s in season, but adjust the sugar in the purée to taste. Running short on powdered sugar? Granulated sugar processed in a food mill works perfectly. The cornstarch is crucial for that silky filling—don’t skip it. For the buttercream, if you’re watching calories, light butter and powdered sugar still gives great results, though it won’t be as rich. And if you’re feeling fancy, add a splash of strawberry liqueur to the filling for adults-only indulgence.
Fresh strawberries keep best in the fridge for 3-4 days—use them within 2 days for the purée. The cake layers can be baked a day ahead and stored at room temperature, wrapped tightly in plastic. Assemble the cake within 24 hours of baking for the best texture. Once fully assembled, this cake stays fresh for 5 days at room temperature or 1 week in the fridge. For parties, I always make it a day ahead—flavors meld beautifully overnight. Slice and serve at room temperature for that perfect crumb.
Why You’ll Love This Recipe
- I’ll be real: this cake is ridiculously simple. You’re mixing dry ingredients, creaming butter and sugar, and folding in strawberries—no piping, no fuss. The butter layers stay tender, and the sugar crust on top? That’s the easy part that makes it taste like a bakery showstopper.
- No-Fuss Layers: I’ll be real: this cake is ridiculously simple. You’re mixing dry ingredients, creaming butter and sugar, and folding in strawberries—no piping, no fuss. The butter layers stay tender, and the sugar crust on top? That’s the easy part that makes it taste like a bakery showstopper.
- Strawberry-Butter Magic: That first bite of warm cake with the butter’s richness and the bright, jammy strawberries? Honestly, it’s the kind of flavor combo that makes you pause mid-slice. The vanilla extract ties it all together without overpowering—just enough to feel special, not like you’re eating dessert for breakfast (though, between us, I’ve done that).
- Party or Picnic: This cake cuts into neat squares, so it’s perfect for potlucks, lunchboxes, or even a last-minute office treat. I’ve taken it to book clubs, birthday parties, and—yes—even a raincheck picnic. The layers hold up well, and the taste stays fresh longer than most store-bought cakes.
Step-by-step instructions for 3 layer strawberry cake
Here’s how to build a showstopper with perfectly moist layers and vibrant strawberry filling.
Prepare the Cake Batter for Maximum Moisture
Preheat your oven to 350°F and grease three 9-inch round cake pans, lining the bottoms with parchment paper. In a medium bowl, whisk together the 3.5 cups all-purpose flour, 2 tsp baking powder, and 0.5 tsp salt. Sift this dry mixture directly into a large mixing bowl to aerate it—this prevents dense layers.
In the bowl with dry ingredients, add the 1.5 cups cold, cubed unsalted butter. Using a hand mixer on medium speed, beat until the butter is completely incorporated and the mixture resembles coarse crumbs. This cold butter method creates tender layers that stay moist for days. Gradually add the 2.5 cups granulated sugar and mix until fully combined.
Add the 6 room-temperature large eggs one at a time, mixing just until each is fully incorporated. Scrape down the sides of the bowl as needed. Stir in the 2 tsp vanilla extract and 1 tbsp vanilla bean paste, mixing until smooth. The batter should be thick but pourable—if it’s too stiff, add 1 tablespoon of milk (though we’re not using milk in this recipe, it’s a handy troubleshooting note).
Bake the Layers to Perfect Doneness
Divide the batter evenly among the prepared cake pans. Tap each pan firmly on the counter 3 times to remove any air bubbles. Bake for 25-30 minutes or until a toothpick inserted into the center comes out clean. Rotate the pans halfway through baking for even browning.
Let the cakes cool in their pans for 10 minutes, then transfer to a wire rack to cool completely. This gradual cooling prevents cracking. While the cakes cool, prepare the strawberry filling to ensure everything is ready when you’re ready to assemble.
Create the Signature Strawberry Filling
Hull and slice the 2.5 lbs fresh strawberries into small pieces, removing any tough stems. In a medium saucepan, combine the strawberries, 1 tbsp lemon juice, and 0.5 tbsp cornstarch. Cook over medium heat, stirring constantly, until the strawberries soften and the mixture thickens to a jam-like consistency—about 8-10 minutes. The filling should coat the back of a spoon but still hold its shape.
Remove from heat and let cool completely. This cooling step is crucial—warm filling will melt the buttercream between layers. While the filling cools, prepare the buttercream by beating the 1.5 cups cold, cubed unsalted butter with an electric mixer until smooth. Gradually add the 2 cups powdered sugar and mix on low speed until combined.
Assemble with Precision for Clean Layers
Place the first cake layer on a cake stand or plate. Spread a thin, even layer of buttercream over the top—about ¼ inch thick. This thin layer prevents the strawberry filling from seeping through. Add half of the cooled strawberry filling, spreading it evenly to within ½ inch of the edges. Repeat with the second cake layer.
Spread another thin layer of buttercream over the second layer, then add the remaining strawberry filling. Top with the final cake layer. The buttercream should be at room temperature for easy spreading but not too soft. Chill the assembled cake in the refrigerator for 30 minutes before frosting the exterior to make it easier to handle.
Frost and Decorate for a Professional Finish
Beat the remaining buttercream until light and fluffy. Spread it over the top and sides of the cake using an offset spatula. For a smooth finish, dip the spatula in warm water between each swipe and wipe the edge with a damp cloth. This technique creates a professional, polished look.
Garnish with fresh strawberry slices or a dusting of powdered sugar for an elegant touch. Serve at room temperature for the best texture—this cake tastes even better the next day as the flavors meld together. The layers should be moist but not soggy, with bursts of fresh strawberry in every bite.
Pro Tips For Making 3 Layer Strawberry Cake
- Weigh Your Butter: Butter expands when creamed, and measuring by cups leaves you guessing. Use a kitchen scale for 225g total—this ensures your cake layers rise evenly and don’t turn out dense. (I learned this the hard way when my first batch collapsed like a sad soufflé.)
- Chill the Layers: Let your cake layers cool completely on a wire rack, then refrigerate them for at least 2 hours before assembling. This prevents the buttercream from melting into a soupy mess when you slice into it. (Yes, even if you’re impatient like me.)
- Sift the Flour: Strawberry cake batter is dense enough—don’t skip sifting the flour before mixing. It aerates the batter and keeps the layers light, especially when you’re folding in fresh strawberries later. (Your mixer will thank you.)
- Toast the Strawberries: Before making the filling, pat the strawberries dry and sprinkle them with 1 tablespoon sugar, then let them sit for 10 minutes. This draws out moisture, so they don’t turn your filling into a watery sludge. (Sounds weird, but it works.)
Serving suggestions for 3 layer strawberry cake
Classic Strawberry Garnish
Slice 1 cup fresh strawberries into thin rounds and arrange them in concentric circles on top of the cake for a classic, elegant look. For extra flair, dip the strawberries in powdered sugar or a light glaze made with 1 tbsp cornstarch and 2 tbsp water heated until translucent.
This keeps them vibrant and prevents sogginess. 🍓
Whipped Cream Alternative
Swap the buttercream for whipped cream sweetened with 2 tbsp powdered sugar and flavored with ½ tsp vanilla extract. Pipe it over the cake in rosettes or swirls for a lighter, airier finish.
This works especially well for summer gatherings when you want a fresher, less rich dessert. Keep the whipped cream chilled until serving to maintain its structure.
Chocolate Drizzle Upgrade
For a decadent twist, melt ½ cup dark chocolate (60-70% cacao) with 1 tbsp coconut oil and drizzle it over the cake in a zigzag pattern. Let it set slightly before adding fresh strawberries on top.
The chocolate adds depth and pairs beautifully with the bright strawberry filling. Use a piping bag with a small round tip for clean, professional-looking lines.
Seasonal Fruit Pairings
In summer, complement the cake with raspberries or blackberries arranged around the base. For fall, swap the strawberries for caramelized apples or pears in the filling and garnish with a sprinkle of cinnamon.
Winter calls for a dusting of cocoa powder or crushed peppermint on top. Adjust the filling sweetness to match the seasonal fruit’s natural flavor profile.
Mini Cake Serving
Cut the cake into 1-inch thick slices and serve on individual plates with a dollop of whipped cream and a few fresh strawberries. This makes it perfect for parties or brunch—everyone gets their own perfect bite.
For an extra touch, place a small strawberry on top of each slice before serving. Use a serrated knife and dip it in hot water between slices for clean cuts.
Wine & Coffee Pairings
Pair this cake with a dry sparkling wine like Prosecco or a crisp Sauvignon Blanc to cut through the richness. For coffee lovers, serve with a lightly sweetened espresso or a vanilla latte**—the coffee’s bitterness balances the cake’s sweetness beautifully.
Avoid heavy, oaky wines that can overpower the delicate strawberry flavor.
Nutrition facts
Frequently asked questions
Can I make this cake without fresh strawberries?
Yes! For a similar flavor, use 1 cup strawberry jam (warmed and strained) or 1.5 cups frozen strawberries thawed and cooked down with 1 tbsp lemon juice and 0.5 tbsp cornstarch. The texture will be slightly thicker, but it works well for filling. For a stronger strawberry taste, add 1 tsp strawberry extract to the filling.
Why did my cake layers crack or sink in the middle?
Cracking often happens when cakes cool too quickly or if they’re overmixed. Let layers cool gradually in the pans for 10 minutes, then transfer to a wire rack. For sinking, ensure your oven is fully preheated and check for even baking by rotating pans halfway through. Overfilling the pans or opening the oven too soon can also cause this.
How do I level the cake layers perfectly?
Use a long serrated knife or a cake leveler for clean cuts. Dip the knife in hot water between slices to prevent dragging. For extra precision, place the pan on a cutting board and slice straight down at a 45-degree angle for smooth, even tops. Leveling is key for professional-looking layers!
Can I make this cake gluten-free?
Yes, but with adjustments. Replace the all-purpose flour with a 1:1 gluten-free baking flour blend (like Bob’s Red Mill) and add 1 tsp xanthan gum to improve texture. You may need to reduce liquids slightly—start with 5 tbsp less water and adjust as needed. Test one layer first to check consistency.
How far ahead can I bake the layers?
Bake the layers up to 2 days ahead and store them in an airtight container at room temperature. Assemble within 24 hours of baking for best texture. If storing longer, wrap each layer tightly in plastic and refrigerate. Bring to room temperature before assembling to prevent condensation.

- 6 Egg Cake Recipe with Oil: Light as Air With Buttery Moisture - October 4, 2026
- 4 Bean Casserole Recipe: One-Pan Heartiness With Smoky Paprika Depth - October 4, 2026
- 3-Ingredient Keto Mug Cake Recipe: Microwave Magic in 2 Minutes - October 4, 2026