
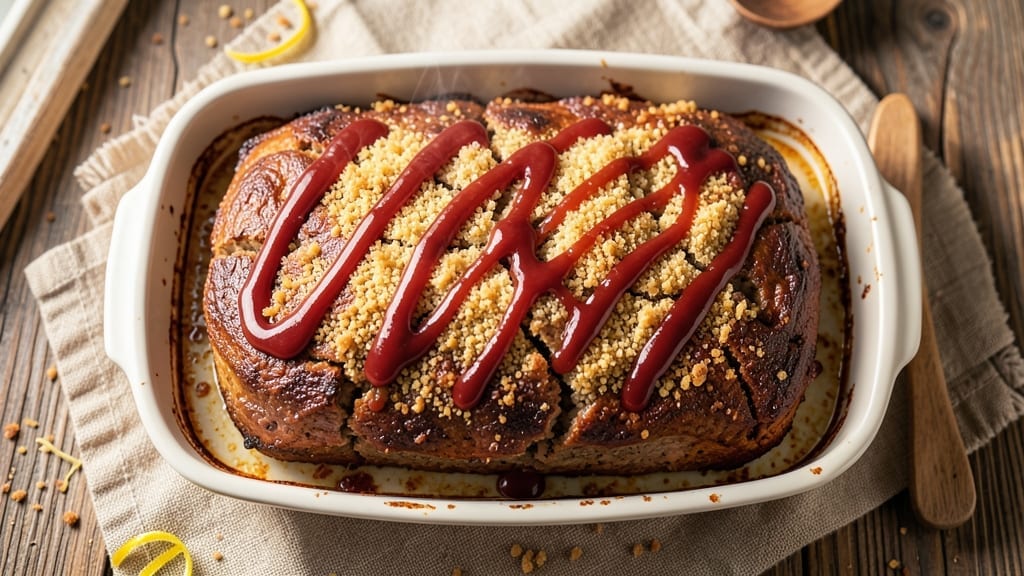
A 3 lb meatloaf recipe with bread crumbs all through the mix transforms a classic comfort dish into something truly exceptional—juicy, flavorful, and with a texture that stays moist at the center while forming a crisp, golden crust.
I remember Nana Mae’s diner in Atlanta, where her meatloaf was legendary, and this recipe captures that perfect balance of simplicity and technique that made hers so special. The breadcrumbs aren’t just a binder; they create a tender, crumbly texture that holds the seasoning and keeps every bite succulent.
What sets this recipe apart is the method: finely chopped breadcrumbs distributed evenly throughout the mix ensure even moisture distribution, preventing that dreaded dry center while adding structure.
We’re talking about a 45–60 minute bake at 350°F, with an internal temperature of 160°F for perfect doneness—no guessing, just science-backed results. The secret lies in gentle mixing (overworking the meat makes it tough) and a resting period before slicing to let the juices redistribute.
By the time it emerges from the oven, you’ll have a juicy, crust-stabilized centerpiece that’s rich with savory flavors and a satisfying crumb. The breadcrumbs absorb excess moisture without drying out the meat, creating that ideal balance of tenderness and texture.
This is the kind of meatloaf that disappears faster than you can say “second helping,” and it pairs beautifully with mashed potatoes, roasted vegetables, or a tangy tomato glaze.
Whether you’re feeding a family or hosting a gathering, this recipe delivers restaurant-quality results with minimal fuss. Let’s get started—your table is about to get an upgrade.
Ingredients for 3 lb meatloaf recipe with bread crumbs all
Pantry staples and a few specialty touches create Nana Mae’s legendary meatloaf texture.
| Ingredient | Amount | Notes |
|---|---|---|
| Ground Beef (80/20 Lean-to-Fat Ratio) 🥩 | 3 lb | Finely ground, no pre-seasoning |
| Panko Breadcrumbs 🍞 | 1 ½ cups | Light and dry, not pre-moistened |
| Whole Milk 🥛 | ½ cup | Room temperature for even mixing |
| Ketchup 🍅 | ½ cup | Unsweetened, for moisture and flavor |
| Yellow Onion 🧅 | 1 whole | Finely diced, medium size |
| Garlic Cloves 🧄 | 4 cloves | Minced, fresh for aroma |
| Large Eggs 🥚 | 2 whole | Room temperature, beaten |
| Diamond Crystal Kosher Salt 🧂 | 1 ½ tsp | Fine grain for even distribution |
| Ground Black Pepper 🌶️ | 1 tsp | Freshly cracked for intensity |
| Worcestershire Sauce 🍶 | 1 tbsp | Vegetarian version if needed |
| Ground Mustard 🌿 | 1 tsp | Dry, for depth of flavor |
| Extra-Virgin Olive Oil 🫒 | 1 tbsp | For pan and basting |
The breadcrumbs are non-negotiable here—panko gives that perfect crisp-tender contrast. Trader Joe’s or Kroger carry reliable brands, but check the label for ‘light and dry’—pre-moistened varieties add unwanted moisture. The beef’s fat ratio (80/20) ensures juiciness without greasiness. For the onion, medium yellows yield about 1 cup diced—no need to peel if you’re using organic. Fresh garlic cloves should smell pungent, not musty. The Worcestershire sauce adds depth, but vegetarian versions work identically—just confirm no anchovies are in the blend.
No panko? Toasted white breadcrumbs (pulse dry bread in a food processor) are the next best thing—just don’t over-process or they’ll turn to dust. Substituting milk? Unsweetened almond milk works, but the texture may be slightly denser. For the ketchup, Heinz Unsweetened is my go-to, but any plain tomato ketchup will do. The mustard is crucial—it’s what gives that classic tang. If you’re missing it, Dijon mustard at half the amount works in a pinch. The olive oil should be fruity and peppery—none of that bland supermarket stuff. For storage, keep all dry ingredients (breadcrumbs, spices) in airtight containers away from light.
This meatloaf reheats beautifully—350°F for 20 minutes covered with foil, then uncovered for 5 minutes to crisp the crust. Leftovers keep 4-5 days in the fridge, wrapped tightly in parchment and foil. For longer storage, slice and freeze portions on a tray before transferring to bags—3 months at peak quality. The breadcrumbs absorb moisture over time, so if your mix seems too wet after 30 minutes, add another 1/4 cup. Trust the internal thermometer at 160°F—it’s the only way to get that perfect center every time.
Why You’ll Love This Recipe
- No-Fuss Mix-In: The panko breadcrumbs do all the work—no binding agents, no extra steps. Just toss the raw beef, milk-soaked crumbs, and onion into a bowl, mix until it holds, and bake. Honestly, I’ve made meatloaf where the texture was a disaster, but this? It’s foolproof.
- Crispy-Creamy Magic: That 80/20 beef keeps it juicy, while the panko crust gets gloriously golden. Slather it in ketchup (or glaze it with a touch of brown sugar if you’re feeling fancy), and you’ve got that perfect contrast—tender inside, crispy outside. My daughter picks out the crispy bits first, no joke.
- Leftovers That Save: This makes way more than two servings, and it reheats like a dream. Pack half for lunch the next day—it stays moist, not dry. Between us, I’ve frozen portions of this for lazy Sundays, and it thaws without turning into a brick.
- Weeknight Workhorse: Need dinner on the table fast? This is my go-to when I’m wiped. One pan, 45 minutes, and zero fuss. Plus, it’s cheap enough to feed a crowd (or my husband’s bottomless appetite) without breaking the bank. Not the prettiest, but it’s exactly what you need.
Step-by-step instructions for juicy crust-stabilized meatloaf
Here’s the method that guarantees a perfectly balanced meatloaf with a crisp exterior and moist center.
Prepare the Bread Crumb Mixture
In a medium bowl, combine the 1.5 cups panko breadcrumbs with the 0.5 cup whole milk. Let this mixture sit for 5 minutes while you prepare the other ingredients. This pre-hydration ensures even distribution throughout the meatloaf and creates a stable crust that prevents cracking during baking.
I like to use my fingers to break up any large clumps in the breadcrumb mixture, ensuring it’s completely uniform. The panko should look like damp sand rather than wet clumps. This step is crucial for achieving that perfect crust-to-meat ratio that keeps the meatloaf from drying out during the long bake.
Combine All Ingredients for Maximum Flavor
In a large mixing bowl, break apart the 3 lb ground beef (80/20 ratio) with your hands until it’s completely dispersed. Add the finely diced 1 whole yellow onion and minced 4 cloves garlic, mixing thoroughly to distribute the aromatics evenly throughout the meat.
Next, add the breadcrumb mixture, 2 whole large eggs, 1.5 tsp diamond crystal kosher salt, 1 tsp ground black pepper, 1 tbsp worcestershire sauce, 1 tsp ground mustard, and 0.5 cup ketchup. Using your hands, mix everything together until just combined—overmixing develops gluten and makes the meatloaf tough. The mixture should hold together when pressed but still feel slightly crumbly.
Shape and Prepare for Baking
Transfer the meatloaf mixture to a lightly greased 9×5-inch loaf pan. Using slightly damp hands, shape it into a rectangular loaf, packing it firmly but not compacting it too tightly. This shape creates a larger surface area for better browning and crust formation. Leave about ½ inch of space between the top of the loaf and the pan edge for expansion.
Drizzle the 1 tbsp extra-virgin olive oil evenly over the top of the meatloaf, then spread the remaining 0.5 cup ketchup evenly across the surface. This topping creates both the signature glaze and an additional moisture barrier that helps maintain juiciness during baking. Use the back of a spoon to create decorative ridges in the ketchup topping if desired.
Bake to Juicy Perfection
Preheat your oven to 350°F with a rack positioned in the lower third of the oven. Place the prepared meatloaf on the middle rack to allow for even heat circulation. Bake for 50-60 minutes, or until the internal temperature reaches 160°F when measured with an instant-read thermometer in the thickest part of the loaf.
Here’s the thing about timing—your meatloaf is done when it reaches 160°F, not when it looks done. The crust should be deep golden brown with the ketchup glaze bubbling slightly at the edges. If the top isn’t brown enough after 50 minutes, tent loosely with aluminum foil and continue baking. The internal temperature is your true indicator of doneness, not the color.
Rest and Serve for Optimal Texture
Remove the meatloaf from the oven and transfer it to a wire rack. Let it rest for 15 minutes before slicing. This resting period allows the juices to redistribute throughout the meatloaf, preventing them from pooling at the bottom when you cut into it. The crust will firm up slightly during this time, making it easier to slice cleanly.
Slice the meatloaf into ½-inch thick portions and serve immediately. Each slice should reveal a moist, tender interior with a crisp exterior crust. The breadcrumbs will be evenly distributed, creating those satisfying textural contrasts in every bite. For best results, serve with your favorite sides and enjoy the perfect balance of savory, tangy flavors throughout.
Pro Tips For Making 3 Lb Meatloaf Recipe With Bread Crumbs All
- Preheat Pan Properly: Slap that pan in the oven at 375°F for 10 minutes before adding your meatloaf—yes, even if it’s nonstick. I learned this the hard way when my first meatloaf stuck like glue because the pan was cold. The heat jumpstarts the crust formation so it doesn’t absorb moisture from the pan.
- Soak Panko First: Toss your panko in warm milk for 5 minutes before mixing it into the beef—this plumps it up and prevents a dry, crumbly texture. I used to skip this, and my meatloaf always felt like it needed a drink. Trust me, the extra 5 minutes makes a real difference.
- Don’t Overmix the Loaf: Stir just until combined—lumpy is better than dense. Overworking the beef turns it into a meat paste, and that’s how you end up with a brick instead of a tender loaf. Use your hands, not a spoon, and keep it loose.
- Bake Low and Slow: Start at 375°F for 20 minutes, then drop to 325°F for the remaining 45-55 minutes. Rushing it to brown the top too fast gives you a crusty exterior and a raw center. Patience here means juicy perfection every time.
Storing and reheating this 3 lb meatloaf recipe with bread crumbs all
Refrigerator Storage
Let your meatloaf cool completely before storing—this takes about 2 hours at room temperature. Once cooled, wrap it tightly in two layers of plastic wrap followed by aluminum foil to lock in moisture. Store in the fridge for up to 4-5 days in an airtight container or wrapped bundle.
The breadcrumbs help preserve texture, but I always check for any signs of drying by peeking at the cut edge before reheating. 🥪
Freezer Prep Tips
For longer storage, slice the meatloaf into ½-inch thick portions before freezing. Arrange slices on a parchment-lined tray and freeze solid (about 2 hours), then transfer to quart-sized freezer bags with all air removed.
Label with the date—these keep for 3 months without texture loss. When ready to eat, reheat directly from frozen using the stovetop method below. This prevents freezer burn and makes individual servings easy. ❄️
Stovetop Reheating
My preferred method for restaurant-quality results: Place slices in a lightly oiled skillet over medium heat for 3-4 minutes per side. Add 1 tablespoon water or beef broth to the pan to prevent drying.
Cover with a lid for 2 minutes to steam the breadcrumbs slightly, then uncover to crisp the crust. The internal temperature should reach 165°F for safety. 🔥
Oven Refresh Method
For whole or thick slices, preheat oven to 350°F. Place meatloaf on a baking sheet with ½ cup beef broth in the pan to add moisture. Cover tightly with aluminum foil and bake for 20 minutes, then remove foil for the final 5 minutes to restore crust color.
This method works perfectly for family-style servings and maintains that breadcrumb crunch. 🍽️
Microwave Shortcut
When time is tight, use 50% power for 2-3 minutes on a microwave-safe plate covered with a damp paper towel. Stir halfway through to distribute heat evenly.
The breadcrumbs absorb microwave energy differently than meat, so this gentle approach prevents rubbery texture. For best results, combine with the skillet method for crispiness. 💡
Crust Revival Trick
If your reheated meatloaf loses its crisp crust, brush the top with a little olive oil and broil for 1-2 minutes at the end of reheating. This quick step restores that golden-brown texture that makes meatloaf feel special.
I learned this from Nana Mae—she always said “a good crust is half the meal.” 🌟
Nutrition facts
Frequently asked questions
Why does this recipe use breadcrumbs all through the meatloaf instead of just on top?
The breadcrumbs throughout create a perfect texture balance—crisp edges and tender center. They absorb excess moisture while adding structure, preventing dryness during baking. This method also ensures even flavor distribution and that satisfying crunch in every bite, not just the crust.
Can I substitute regular breadcrumbs for panko in this recipe?
You can, but panko gives better results. Regular breadcrumbs work fine, though they won’t be as crispy. For closest texture, pulse dry bread in a food processor until you get fine crumbs. The key is using 1.5 cups total of breadcrumbs—just measure after processing to maintain the right ratio.
What’s the best way to tell when my meatloaf is done?
Use an instant-read thermometer—it’s done at 160°F in the thickest part. The crust should be golden brown, but don’t rely on color alone. If you don’t have a thermometer, check by pressing gently: the center should feel firm but still slightly springy, not jiggly.
How do I prevent my meatloaf from falling apart when slicing?
Let it rest for 15 minutes after baking—this lets juices redistribute. Also, avoid overmixing when combining ingredients (just until combined). The breadcrumbs help bind it, but if it still crumbles, try adding 1 extra tablespoon of milk to the breadcrumb mixture next time.
Can I make this meatloaf ahead of time?
Bake it a day ahead and refrigerate wrapped tightly. Reheat by covering with foil and baking at 350°F for 20 minutes, then uncover for 5 minutes to crisp the top. The breadcrumbs actually help preserve texture better than traditional recipes. For freezer prep, slice and freeze portions for up to 3 months.

- 6 Egg Cake Recipe with Oil: Light as Air With Buttery Moisture - October 4, 2026
- 4 Bean Casserole Recipe: One-Pan Heartiness With Smoky Paprika Depth - October 4, 2026
- 3-Ingredient Keto Mug Cake Recipe: Microwave Magic in 2 Minutes - October 4, 2026