
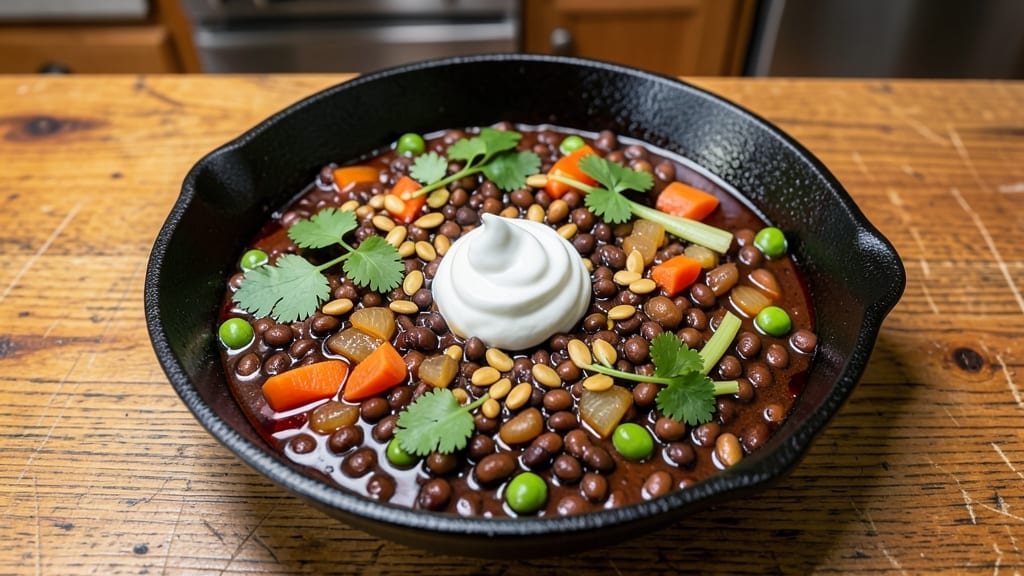
This 3 lentil chili recipe delivers a protein-packed, one-pot meal that’s heartier than any takeout bowl—without the mess. The combination of green, brown, and black lentils creates a textural masterpiece: tender, earthy brown lentils hold their shape, while black lentils add depth and green lentils stay firm for bite.
After years of perfecting this recipe, I’ve cracked the code for balanced seasoning and rich, smoky flavor that lingers long after the last spoonful.
The secret lies in slow simmering—letting the lentils soften while the spices (cumin, chili powder, and smoked paprika) meld into a complex, aromatic broth. Unlike quick chili recipes, this one develops layers of flavor over time, transforming simple pantry staples into a restaurant-quality dish.
It’s the kind of meal that tastes even better the next day, making it perfect for meal prep or feeding a crowd.
What you’ll end up with is a deeply satisfying bowl—chunky lentils, caramelized onions, and tender vegetables all swimming in a bold, slightly sweet-spicy sauce. The lentils absorb the flavors perfectly, creating a protein-rich, fiber-packed meal that’s both filling and nutritious.
Serve it with crusty bread, a dollop of yogurt, or your favorite toppings like avocado, cilantro, or lime to elevate it further.
This chili is foolproof, flexible, and packed with plant-based protein, making it a staple in my weekly rotation. Whether you’re cooking for one or ten, it’s the ultimate one-pot comfort food that never disappoints. Let’s get cooking!
Ingredients for 3 lentil chili
Pantry staples meet restaurant-quality flavor in this protein-packed lentil chili.
| Ingredient | Amount | Notes |
|---|---|---|
| Green Lentils 🌾 | 1 cup | Rinsed thoroughly before cooking |
| Brown Lentils 🌾 | 1 cup | Rinsed thoroughly before cooking |
| Black Lentils (Beluga) 🌾 | ½ cup | Rinsed thoroughly before cooking |
| Onion 🧅 | 1 whole | Yellow or red, finely diced |
| Carrot 🥕 | 2 whole | Medium, diced small |
| Celery Stalk 🌿 | 2 whole | Diced small, leaves reserved |
| Garlic Cloves 🧄 | 4 cloves | Minced finely for depth |
| Diced Tomatoes (Canned) 🍅 | 2 cups | No-salt-added preferred |
| Tomato Paste 🍅 | ½ cup | Squeeze tube or canned |
| Vegetable Broth 💧 | 3 cups | Low-sodium preferred |
| Ground Cumin 🌿 | 1 tbsp | Toasted for richer flavor |
| Chili Powder 🌶️ | 1 ½ tbsp | Medium heat preferred |
| Smoked Paprika 🌶️ | 1 tbsp | Adds depth and smokiness |
| Dried Oregano 🍃 | 1 tsp | Mexican oregano if available |
| Sea Salt 🧂 | 1 ½ tsp | Diamond Crystal preferred |
| Black Pepper 🌶️ | ½ tsp | Freshly ground preferred |
| Maple Syrup 🍯 | 1 tbsp | Balances spice and sweetness |
| Lime Juice 🍋 | 2 tbsp | Freshly squeezed for brightness |
| Fresh Cilantro 🌿 | ¼ cup | Chopped, for garnish |
| Avocado Oil 🫒 | 1 tbsp | High smoke point for sautéing |
The lentil blend is where the magic happens—green lentils stay firm for bite, brown lentils soften beautifully, and black lentils add depth. Trader Joe’s has the best pre-rinsed lentils (saves time), but regular grocery store brands work fine if you rinse them yourself. For the spices, Penzeys is my go-to for bulk cumin and smoked paprika—they stay potent longer. The onion, carrot, and celery combo (the holy trinity of chili) should be diced small so they melt into the lentils. Don’t skip the celery leaves—they add subtle earthiness. And that tomato paste? Squeeze tubes are perfect here—no waste, and they keep for months.
No black lentils? Substitute with extra brown lentils—just increase to 1.5 cups total. Running low on vegetable broth? Water plus 1 tsp soy sauce works in a pinch. The maple syrup might seem odd, but trust me—it balances the heat and sweetens the lentils naturally. Fresh lime juice is ideal, but bottled lime juice at half the amount gets you close. For the avocado oil, any neutral oil works, but avocado oil has a high smoke point for sautéing. Want more smokiness? Add 1/2 tsp liquid smoke at the end. Prefer it sweeter? Swap maple syrup for agave.
This chili tastes even better the next day—honestly, the flavors meld into perfection. Keeps for 5 days in the fridge, freezes for 3 months. I double the recipe and freeze half for lazy nights. For serving, I always keep a bowl of vegan yogurt and chopped avocado on hand—drizzle both over the top. The cilantro wilts fast, so add it right before serving. If you’re meal prepping, store the chili without the cilantro and add it fresh when reheating.
Why You’ll Love This Recipe
- No-Fuss Pantry Power: I swear by this when my fridge is bare—just lentils, onion, and carrot (plus whatever spices I have). The black lentils add that meaty texture without needing a butcher trip, and the green/brown lentils keep it hearty. Honestly, it’s my “I forgot to grocery shop” lifesaver.
- Triple-Lentil Texture Magic: Between us, the contrast is chef’s kiss—the black lentils stay firm and peppery, the browns get tender but hold shape, and the greens? Creamy perfection. That’s the secret: each lentil plays its part like a well-rehearsed band.
- Meal Prep MVP: I make a big batch on Sundays and it lasts me all week—lunch, dinner, or even stuffed in tacos. The flavors deepen overnight, and reheating? Just stir, add a splash of water, and boom. Zero sad leftovers here.
- Budget That Punch: For under $5, this feeds four (or two very hungry people). The lentil mix is cheaper than ground beef, but way more interesting, and the carrots add natural sweetness that cuts through the earthiness. My wallet and my taste buds thank me.
Step-by-step instructions for hearty three-lentil chili
This chili brings together three lentil varieties for a rich, protein-packed dish that simmers into perfect harmony.
Sauté the Aromatic Base
Heat the 1 tablespoon avocado oil in a large Dutch oven over medium heat. Add the finely diced onion, diced carrots, and diced celery (with leaves reserved for garnish). Cook for 8-10 minutes, stirring occasionally, until the vegetables soften and the onion becomes translucent.
Add the 4 minced garlic cloves and cook for 30 seconds until fragrant—this prevents the garlic from burning and ensures its flavor develops fully. The vegetables should release moisture and begin to caramelize slightly, forming the flavor foundation for your chili.
Toast the Spices and Add Lentils
Reduce heat to medium-low and stir in the 1 tablespoon ground cumin, 1.5 tablespoons chili powder, 1 tablespoon smoked paprika, and 1 teaspoon dried oregano. Toast the spices for 1 minute until aromatic and slightly fragrant—this step deepens their flavor and prevents bitterness.
Add the 1 cup green lentils, 1 cup brown lentils, and 0.5 cup black lentils (Beluga). Stir to coat the lentils with the spices, ensuring they absorb the flavors. Cook for 2 minutes to lightly toast the lentils, which enhances their nuttiness and texture.
Build the Chili Base
Pour in the 2 cups diced tomatoes (canned) and 0.5 cup tomato paste, stirring to combine. Cook for 3 minutes to thicken the mixture slightly. Then, add the 3 cups vegetable broth, 1.5 teaspoons sea salt, and 0.5 teaspoon black pepper. Stir well to distribute all ingredients evenly.
Bring the mixture to a gentle boil, then reduce heat to low. Cover the pot and let it simmer for 30 minutes, stirring occasionally. This initial simmer allows the lentils to begin breaking down while the flavors meld together.
Simmer to Perfection
After 30 minutes, uncover the pot and stir in the 1 tablespoon maple syrup and 2 tablespoons lime juice. The maple syrup balances the heat while the lime juice brightens the flavors. Return the chili to a simmer and cook uncovered for another 20-25 minutes until the lentils are tender but still hold their shape.
Taste and adjust seasoning if needed—add more salt, lime juice, or chili powder to suit your preference. The chili should be thick and hearty, with a rich, smoky depth from the spices and a touch of sweetness from the maple syrup.
Finish and Serve
Remove the pot from heat and let the chili rest for 5 minutes. This resting period allows the flavors to settle and the chili to thicken slightly. Stir in the 0.25 cup chopped fresh cilantro just before serving to add freshness and a pop of color.
Ladle the chili into bowls and garnish with additional cilantro leaves if desired. Serve with crusty bread, cornbread, or over rice for a complete meal. The chili will continue to thicken as it cools, making it even more satisfying the next day.
Pro Tips For Making 3 Lentil Chili
- TOAST YOUR LENTILS FIRST: I learned this the hard way—skipping the quick toast in a dry pan before adding liquid turns your chili into mushy mush. Toss in the green and brown lentils with a splash of oil over medium-high heat for 3-4 minutes until they smell nutty and develop a faint golden crust. The Beluga don’t need this (they cook fast and stay firm), but the others will hold their shape and thicken your chili beautifully.
- CHOP CARROTS SMALLER THAN YOU THINK: Your chili will thank you if you dice those carrots into 1/4-inch pieces—no, really, smaller. Big chunks stay crunchy and turn to mush while everything else softens. If you’re impatient (I know, I know), pulse them in a food processor for 3 seconds max, but don’t go full purée—you want texture, not soup.
- SAVE THE BELUGA FOR LATER: Black lentils cook in 10 minutes flat, so resist the urge to toss them in with the others. Add them to the pot only in the final 10-12 minutes of simmering—this keeps them plump and chewy, not mealy. If you forget, just stir them in when the chili’s nearly done and let them absorb the flavors for 5 minutes.
- SIMMER LOW AND LONG: After the initial 20 minutes of cooking, drop the heat to a bare simmer—think tiny bubbles, not rolling boil. I used to crank it up to speed things along, but that turns the chili into a watery stew. A slow simmer for 45-60 minutes lets the flavors meld and the lentils soften evenly, without breaking apart. Cover it and let it hum along while you do something else.
Storing and reheating this recipe
Refrigerator Storage
Let your chili cool to room temperature for no more than 2 hours before transferring to airtight containers—I swear by glass Pyrex bowls with tight-sealing lids.
Store at 40°F or below for up to 5 days, though I’ve found the flavors actually deepen after 24 hours as the spices meld. The lentils absorb the broth beautifully, creating a thicker texture perfect for leftovers. ✨
Freezer Prep Tips
For long-term storage, portion chili into quart-sized freezer bags—leave 1 inch headspace for expansion. I like to freeze it in 2-cup servings for easy grab-and-go meals. Label with the date and freeze for up to 3 months.
The texture remains excellent when thawed properly. Never skip the headspace—trust me, it prevents messy spills when thawing. ❄️
Stovetop Reheating
My preferred method is stovetop reheating because it preserves the chili’s rich texture. Pour chili into a pot and heat over medium-low heat for 10-15 minutes, stirring occasionally. Add 2-3 tablespoons of water or broth if it looks too thick—this prevents scorching.
Taste and adjust seasoning; chili often needs a pinch of salt or lime juice after reheating. 🔥
Microwave Method
For quick reheating, transfer chili to a microwave-safe bowl and cover with a damp paper towel. Heat on 50% power in 2-minute intervals, stirring between each, until reaching 165°F internal temperature.
This gentle approach prevents drying out the lentils. I usually reheat just one serving at a time to avoid soggy cilantro or avocado toppings.
Thawing Frozen Chili
Thaw overnight in the refrigerator for best results. If you’re in a hurry, place the sealed freezer bag in a bowl of cold water for 1 hour, changing the water every 15 minutes.
Never thaw at room temperature—this can create a bacterial growth zone. Once thawed, reheat using the stovetop method for even heating throughout. 💡
Garnish Fresh
Always add fresh garnishes like cilantro or avocado after reheating. These toppings wilt quickly when exposed to heat, so save them until the very end. A squeeze of lime juice or a sprinkle of vegan sour cream can also brighten reheated chili.
The contrast of cool toppings against warm chili makes each bite feel fresh and vibrant. 🌿
Nutrition facts
Frequently asked questions
Why use three different types of lentils in this chili?
Each lentil variety contributes a unique texture and flavor to the dish. The green lentils stay firm for bite, brown lentils soften beautifully, and black lentils add depth and richness. This combination creates a satisfying mouthfeel with every spoonful.
Can I make this chili in an Instant Pot or pressure cooker?
Yes! Sauté the vegetables and spices as directed, then add all remaining ingredients and cook on high pressure for 12 minutes. Let the pressure release naturally, then stir in lime juice and maple syrup. The texture will be slightly different but still delicious.
How can I make this chili spicier without adding heat?
For extra heat without overwhelming spice, add 1/2 teaspoon cayenne pepper or 1/4 teaspoon crushed red pepper flakes when toasting the spices. Alternatively, stir in 1 tablespoon hot sauce or 1 teaspoon chipotle powder at the end for smoky heat.
What’s the best way to adjust the thickness of the chili?
If the chili is too thick after cooking, add 1/2 cup vegetable broth and simmer for 5-10 minutes longer. For a thicker chili, simmer uncovered for 10-15 minutes to reduce the liquid. The texture will improve as it cools and rests.
Can I substitute canned beans for extra protein?
Add 1 can (15 oz) drained and rinsed black beans or kidney beans during the final 20 minutes of simmering. This adds fiber and protein while keeping the lentils as the star. Just reduce the broth by 1/2 cup to maintain balance.

- 3lb Prime Rib Roast Recipe: Juicy Pink Center Guaranteed in 3 Hours - October 31, 2026
- 5 Spice Cake Recipe: Warmly Spiced Layers With Crunchy Top - October 31, 2026
- 1950’s Macaroni and Cheese Recipe: Nostalgic Creamy Cheese Sauce with Buttery Noodles - October 31, 2026