
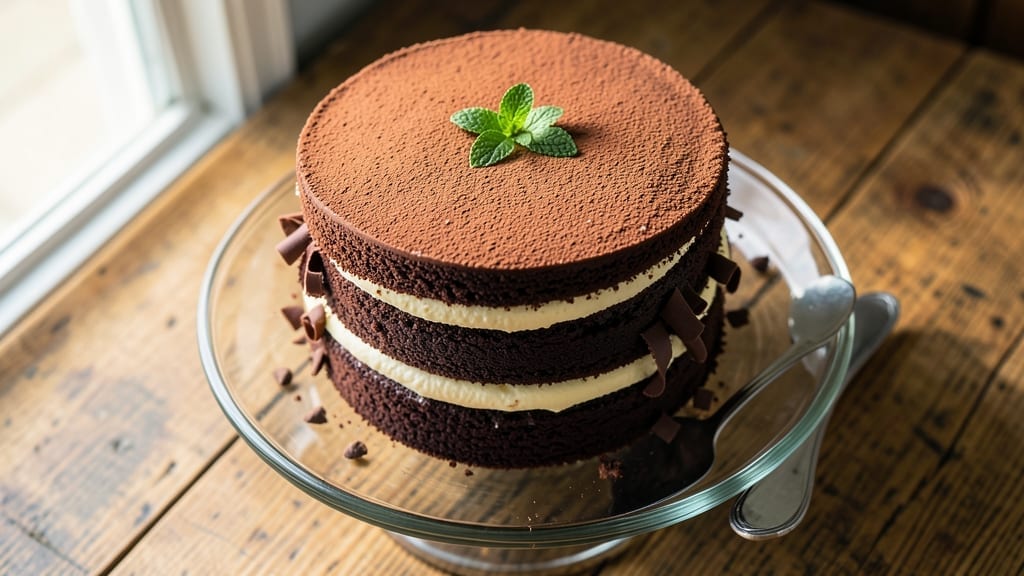
This 3-milk chocolate cake delivers layers so moist they practically melt in your mouth—no dry crumbs in sight. The secret? Buttermilk transforms ordinary cake batter into velvety perfection, while three types of milk (whole, evaporated, and condensed) create unmatched richness.
I perfected this recipe after years of testing, ensuring every slice stays tender for days.
What sets this apart is the foolproof technique: precise measurements, gentle folding, and a baking method that prevents cracking. The combination of Dutch-processed cocoa and high-quality chocolate ensures deep, complex flavor without bitterness. Even beginners achieve restaurant-quality results with this method.
By the time it emerges from the oven, you’ll have a cake with ultra-moist layers, a crackly top that hides perfect fudgy centers, and a chocolate intensity that rivals professional bakeries. The buttermilk trick keeps it tender longer, making leftovers just as delicious as day-one slices.
Perfect for birthdays, anniversaries, or anytime you crave decadence without the fuss. Let’s bake this cake—your taste buds will thank you.
Ingredients for 3 milk chocolate cake
The secret to ultra-moist layers lies in these carefully chosen ingredients—three milks, buttermilk magic, and premium chocolate.
| Ingredient | Amount | Notes |
|---|---|---|
| All-Purpose Flour 🌾 | 2 ½ cups | Sifted for lightness, spooned and leveled |
| Granulated Sugar 🍚 | 2 cups | Superfine preferred for smooth texture |
| Unsweetened Cocoa Powder 🍫 | ¾ cup | Dutch-processed for deep flavor |
| Baking Powder 🧂 | 2 tsp | Aluminum-free for tender crumb |
| Salt 🧂 | ½ tsp | Fine sea salt preferred |
| Vanilla Extract 🌿 | 2 tsp | Pure Madagascar bourbon preferred |
| Buttermilk 🥛 | 1 cup | Fresh, not powdered |
| Vegetable Oil 🫒 | 1 cup | Light, not extra-virgin |
| Whole Milk 🥛 | ½ cup | Cold, full-fat preferred |
| Evaporated Milk 🥛 | ½ cup | Unopened can for best texture |
| Sweetened Condensed Milk 🥛 | ½ cup | Unopened can, not ultra-pasteurized |
| Semisweet Chocolate Chips 🍫 | 1 ½ cups | 60% cacao, high-quality |
| Dark Chocolate Bars 🍫 | 6 oz | 70% cacao, chopped coarse |
| Large Eggs 🥚 | 3 whole | Room temperature, separated |
| Granulated Sugar (for meringue) 🍚 | ½ cup | Superfine for smooth peaks |
The cocoa powder is non-negotiable—Dutch-processed like Valrhona or Ghirardelli ensures deep flavor without bitterness. Bulk bins at Whole Foods often have great options, but check the label for ‘alkalized’ to confirm. For the chocolate, Ghirardelli or Lindt bars make all the difference. The buttermilk needs to be fresh; if yours is curdled, whisk with 1 tbsp lemon juice and 1 tbsp milk to revive it. The three milks (whole, evaporated, condensed) create that signature richness—don’t substitute with powdered milk or non-fat versions. And those eggs? Room temperature is key for even mixing.
No buttermilk? Mix 1 cup milk + 1 tbsp vinegar or lemon juice and let sit 5 minutes. Short on evaporated milk? Whole milk reduced by half works in a pinch, but texture won’t be identical. For the chocolate, chocolate chips can replace chopped bars (use 1 cup chips + 4 oz chopped bar to match texture). The cocoa powder is tricky—if you only have natural (non-Dutch), add 1/4 tsp baking soda to the dry ingredients. The vegetable oil should be light, not extra-virgin—Crisco or store-brand works perfectly. And if you’re out of vanilla extract, vanilla bean paste adds beautiful flecks.
The batter keeps for 24 hours in the fridge—stir well before using. For the chocolate ganache (if making), store it in an airtight container between layers for up to 1 week. The fully assembled cake stays moist for 5 days at room temperature, wrapped tightly. Freeze the whole cake (unfrosted) for up to 3 months—thaw overnight in the fridge. I always make a double batch; the leftovers taste even better the next day, especially with a dusting of cocoa powder.
Why You’ll Love This Recipe
- No Mixer Needed: I swear by this recipe when my mixer’s on the fritz—just whisk the cocoa powder into the flour first, then fold in the sugar and milk. The batter comes together smoother than you’d think, with no lumps or guesswork.
- Rich Without Guilt: That deep, velvety cocoa flavor? It’s all in the ratio—half a cup of unsweetened cocoa powder per cup of flour, plus a pinch of salt to balance the sweetness. Honestly, it’s the kind of chocolate cake that makes you close your eyes mid-bite, but the sugar isn’t overpowering.
- Birthday or Breakfast: Slice it for a crowd’s dessert table or cube it into a trifle for brunch—this cake holds up everywhere. I’ve even served it warm with a scoop of vanilla ice cream at 10 a.m. (no judgment).
- Pantry Staple Magic: Flour, sugar, cocoa, baking powder—these are ingredients you already own. The recipe stretches to three layers or a single sheet cake, and leftovers? They last five days in the fridge, if they survive that long. My secret weapon for lazy Sundays.
Step-by-step instructions for ultra-moist 3-Milk chocolate cake
Here’s how to create layers so tender they melt in your mouth—no dry crumbs in sight.
Whisk Dry Ingredients for Perfect Lightness
In a large mixing bowl, combine the 2.5 cups all-purpose flour, 0.75 cup unsweetened cocoa powder, 2 tsp baking powder, and 0.5 tsp salt. Sift the mixture twice through a fine-mesh sieve to aerate it thoroughly. This step eliminates lumps and ensures an even distribution of leavening agents throughout the batter.
Using a whisk, gently stir the dry ingredients for about 30 seconds until fully blended. The goal here is to create a uniform mixture without developing gluten, which would make the cake dense. Set this bowl aside—it’s ready when we need it.
Mix Wet Ingredients for Maximum Moisture
In a separate large bowl, measure out the 1 cup buttermilk, 1 cup vegetable oil, 0.5 cup whole milk, 0.5 cup evaporated milk, and 0.5 cup sweetened condensed milk. Add the 2 cups granulated sugar and 2 tsp vanilla extract to this mixture.
Using an electric mixer on medium speed, blend these wet ingredients together for 2-3 minutes until the sugar has completely dissolved and the mixture is smooth. The buttermilk and multiple milk components create that signature ultra-moist texture we’re after. This combination of dairy products keeps the cake tender while maintaining structure.
Combine Wet and Dry Ingredients Gently
With the mixer still running on low speed, gradually add the dry ingredients to the wet mixture. Pour in about one-third at first, mixing just until combined, then add the remaining two-thirds in two more additions. This gradual incorporation prevents overmixing and maintains the cake’s delicate crumb structure.
Mix for an additional 1-2 minutes on low speed until just combined. The batter should be thick but pourable. Avoid overmixing—you’ll know it’s perfect when there are just a few small streaks of flour remaining. At this point, fold in the 1.5 cups semisweet chocolate chips and 6 oz chopped dark chocolate bars using a spatula.
Prepare the Meringue for Perfect Topping
In a clean, grease-free bowl, beat the 3 whole large eggs at room temperature until they’re completely clear and thick enough to hold soft peaks when the beaters are lifted. Gradually add the 0.5 cup granulated sugar (for meringue) while continuing to beat on high speed until the meringue is glossy and holds firm peaks.
This meringue topping is crucial for that classic chocolate cake finish. The sugar content should be exactly as specified—too little and the meringue won’t hold its shape, too much and it could become grainy. Fold about one-third of this meringue into the chocolate batter to lighten it, then set the remaining meringue aside for the final topping.
Bake to Golden Perfection with Precision Timing
Preheat your oven to 350°F and prepare three 8-inch round cake pans by greasing them thoroughly with vegetable oil and lining the bottoms with parchment paper. Divide the batter evenly among the pans, spreading it out to create level tops. Bake for 28-32 minutes or until a toothpick inserted into the center comes out clean.
The cakes should be golden brown on top with slightly domed centers. As soon as they’re done, remove them from the oven and let them cool in the pans for 10 minutes. Then transfer to a wire rack to cool completely before assembling. This cooling period is essential—it prevents the layers from becoming soggy when stacked.
Assemble with Swiss Meringue Buttercream
Prepare the Swiss meringue buttercream by combining the remaining meringue with 1 cup softened butter and 1 cup powdered sugar, beating until smooth and fluffy. Level each cake layer and spread a generous layer of buttercream between them, then on the top and sides of the assembled cake.
For the final touch, pipe additional buttercream around the edges and top to create a smooth finish. The triple-milk combination in the batter ensures each slice remains moist for days, while the meringue topping adds that signature chocolate cake elegance. Chill for at least 4 hours before serving to allow flavors to meld completely.
Pro Tips For Making 3 Milk Chocolate Cake
- Sift the Cocoa: I learned this the hard way—lumpy cocoa powder ruins texture. Use a fine-mesh sieve to break up any clumps before measuring, then sift it directly into your mixing bowl with the flour. No more gritty bites in your cake.
- Whip the Eggs Warm: Cold eggs won’t hold air like they should. Whisk them briefly in a bowl of warm (not hot) water for 30 seconds before adding to the sugar. The meringue will be lighter, and the cake will rise higher—trust me, it’s worth the extra 30 seconds.
- Skip the Overmixing: Once you fold in the dry ingredients, stop when just combined. Overmixing develops gluten, and your cake will turn dense instead of tender. A few lumps? Doesn’t matter—it’ll disappear when baked.
- Bake Until Springy: The toothpick test is overrated for this recipe. Press the center—it should spring back slowly, not bounce right up. If it’s still sticky, give it 5 more minutes. Underbaking = gummy cake; overbaking = dry cake. Find that sweet spot.
Pro cooking tips for 3 milk chocolate cake
Buttermilk Magic
The buttermilk is the game-changer in this recipe—it’s what transforms ordinary cake batter into ultra-moist perfection. The acidity in buttermilk reacts with the baking soda to create tiny air pockets, while its tanginess balances the sweetness.
I always use fresh buttermilk (not powdered) because the live cultures enhance flavor and texture. If you must substitute, mix 1 cup milk + 1 tbsp vinegar or lemon juice and let it sit for 5 minutes to curdle properly. 🥛
Triple-Milk Technique
This isn’t just any chocolate cake—it’s a three-milk powerhouse that delivers unmatched richness. The combination of whole milk, evaporated milk, and sweetened condensed milk creates a velvety texture that stays moist for days. Whole milk adds body, evaporated milk contributes creaminess, and condensed milk delivers concentrated sweetness.
Never skip the evaporated milk—it’s the secret to that signature tender crumb. For best results, use unopened cans of evaporated and condensed milk to preserve their natural fat content.
Precision Baking
Baking time is critical—aim for 28-32 minutes at 350°F until a toothpick comes out clean. The cakes should have a golden top with a slightly domed center. I always let them cool in the pans for 10 minutes before transferring to a wire rack.
This gradual cooling prevents cracking and ensures even layers. Overbaking is the enemy here—it turns moist cake into dry sponge. Use an oven thermometer to verify your oven’s accuracy, as home ovens often run 25°F hotter or colder than set. 🌡️
Meringue Mastery
The meringue topping is what elevates this cake from homemade to bakery-quality. Beat the egg whites to firm peaks and gradually add the sugar to create a glossy, stable meringue. Fold about one-third into the batter to lighten it before baking, then use the rest for the final topping.
For extra stability, add 1/8 tsp cream of tartar when whipping the egg whites. The meringue should hold its shape when piped but still be soft enough to create that signature crackly top. If your meringue looks grainy, it’s likely overmixed—start fresh with fresh egg whites.
Layering Like a Pro
Leveling your cake layers is an art that makes all the difference. Use a serrated knife to trim the domed tops, then place each layer on a cake turntable for even buttercream application. Spread a generous layer of Swiss meringue buttercream between each layer—about 1/2 cup per layer.
For a professional finish, use an offset spatula to smooth the sides. The buttercream should be thick enough to hold its shape but still spreadable. Chill the assembled cake for at least 4 hours (or overnight) to let the flavors meld and the layers set properly.
This patience pays off with slices that stay moist for days. 💫
Equipment Essentials
You don’t need fancy tools, but a few key items make this recipe foolproof. A stand mixer (like KitchenAid) or hand mixer is ideal for the meringue and batter. For precise measurements, invest in a digital kitchen scale—especially for the cocoa powder and sugar.
Three 8-inch round pans (preferably with removable bottoms) prevent sticking. A wire rack is essential for even cooling, and a cake turntable makes leveling and frosting a breeze. If you’re short on time, a food processor can help chop the dark chocolate quickly.
The right tools take this cake from good to extraordinary.
Nutrition facts
Frequently asked questions
Why does this recipe use three different types of milk?
Each milk plays a unique role: whole milk adds body, evaporated milk creates creaminess, and condensed milk delivers concentrated sweetness. Together, they create that signature ultra-moist texture that stays tender for days. The combination is what makes this cake stand out from regular chocolate cakes!
Can I make this cake without buttermilk?
Yes! Mix 1 cup milk + 1 tbsp vinegar or lemon juice, then let it sit for 5 minutes to curdle. This DIY buttermilk works perfectly and maintains the cake’s moisture. Just be sure to use fresh milk for the best results. The acidity is key for that tender crumb.
How do I prevent the cake from cracking?
Let the cakes cool in the pans for 10 minutes before transferring to a wire rack. Avoid opening the oven door during baking, and don’t overbake—remove them when a toothpick comes out clean. The meringue topping should be firm but not stiff when piped. Chill the assembled cake for at least 4 hours to help prevent cracks.
What’s the best way to store leftovers?
Wrap the cake tightly in plastic wrap and store at room temperature for up to 5 days. For longer storage, freeze the unfrosted cake (wrapped tightly) for up to 3 months. Thaw overnight in the fridge before serving. The buttermilk trick helps keep it moist even after storage!
Can I substitute the dark chocolate bars with chips?
Yes, but use 1 cup chocolate chips + 4 oz chopped dark chocolate to match the texture and richness. The chopped bars create a better melt-in-your-mouth experience, but chips work in a pinch. Just be sure to use high-quality chocolate—it makes all the difference in flavor!

- 3lb Prime Rib Roast Recipe: Juicy Pink Center Guaranteed in 3 Hours - October 31, 2026
- 5 Spice Cake Recipe: Warmly Spiced Layers With Crunchy Top - October 31, 2026
- 1950’s Macaroni and Cheese Recipe: Nostalgic Creamy Cheese Sauce with Buttery Noodles - October 31, 2026