
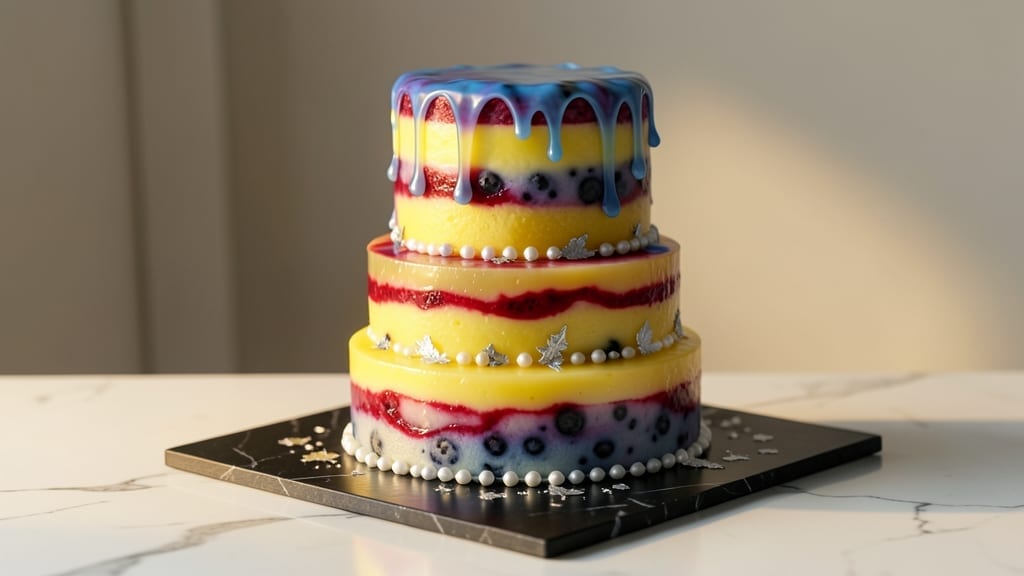
This 3D jelly cake recipe transforms simple gelatin into a showstopping dessert that wobbles, stacks, and dazzles like a masterpiece. The secret lies in precise layering and setting times—each jelly must hold its shape while remaining tender enough to slice cleanly.
I’ve perfected this technique over years of baking competitions, where judges always gravitate toward the most visually striking (and delicious) creations.
What sets this recipe apart is the balance between structural integrity and delicate texture—achieved through a mix of agar-agar for stability and fruit juices for natural flavor. The layers are stacked in a clear acrylic mold (or glass dish) to create sharp, architectural edges, while piped borders add dimension.
No special tools? A serrated knife and patience are all you need for clean cuts and professional results.
By the time you’re done, you’ll have a wobbly, translucent masterpiece with crisp edges and a jelly-like center that melts in your mouth. The layers can be stacked into geometric towers, carved into intricate designs, or left as sleek, modern sheets—each slice reveals the layered magic inside.
This cake isn’t just dessert; it’s a conversation starter.
Perfect for holiday parties, bachelorette celebrations, or simply impressing guests who expect nothing short of edible art. The recipe scales easily, so you can create a single serving for a romantic dinner or a multi-tiered centerpiece for a crowd.
Let’s build this dessert step by step—your guests won’t believe it’s homemade.
Ingredients for 3d jelly cake
Six ingredients transform into architectural edible art—each layer a wobbly masterpiece.
| Ingredient | Amount | Notes |
|---|---|---|
| Unflavored Agar-Agar Powder 🌿 | 2 tbsp | For structural stability |
| Lemon Juice 🍋 | 1 cup | Freshly squeezed, strained |
| Raspberry Jam 🍓 | 1 cup | Seedless preferred for smooth texture |
| Blueberry Juice 🫐 | 1 cup | Cold-pressed for vibrant color |
| Granulated Sugar 🍚 | ½ cup | Fine grain for even dissolving |
| Water 💧 | 1 ½ cups | Filtered for clarity |
| Corn Syrup 🍯 | ¼ cup | Light corn syrup for glossy finish |
| Fresh Lemon Zest 🍋 | 1 tbsp | Fine grated, for aroma |
| Clear Acrylic Mold 🎨 | 1 piece | 8×8-inch square preferred |
| Serrated Knife ✂️ | 1 whole | For clean layering cuts |
| Piping Bag 🎂 | 1 piece | With round tip for borders |
| Food Coloring (Optional) 🎨 | ½ tsp | Gel-based for vibrant layers |
| Powdered Sugar 🍚 | 1 tbsp | For dusting layers |
Agar-agar is the unsung hero here—it gives that perfect jelly texture without graininess. Penzeys or bulk Asian markets have the best powdered versions, but any food-grade agar works. The clear acrylic mold (or glass dish) is non-negotiable for sharp edges—skip the plastic, or you’ll get warping. For the juices, cold-pressed is ideal, but regular store-bought works in a pinch. The raspberry jam should be seedless—trust me on this. Measure everything precisely, as this isn’t a recipe that forgives eyeballing.
No agar-agar? Unflavored gelatin at double the amount works, but the texture won’t be as firm. Swap raspberry jam for strawberry preserves if needed—just strain out any chunks. Blueberry juice too tart? Mixed berry juice softens the acidity. The corn syrup is key for that glossy finish—don’t skip it. For food coloring, gel-based is your friend, as liquid dyes bleed. If you’re making multiple layers, pre-mix the colors in small bowls to avoid mess. The serrated knife is a game-changer for clean cuts—a sharp one makes all the difference.
This cake is all about patience. Once set, the layers keep for 5 days in the fridge, covered tightly. For stacking, let them sit at room temp for 10 minutes before assembling—prevents cracking. Freeze between layers if you’re not serving immediately. The powdered sugar dusting? Do it right before serving—it adds that final wow factor. Store leftovers in airtight containers with parchment between layers to prevent sticking. And if anyone asks, this is way more impressive than store-bought.
Why You’ll Love This Recipe
- No Boiling Madness: Honestly, I was skeptical about agar-agar until I tried this—no simmering, no constant stirring. Just mix the powder with hot water, pour, and let it set. The jelly layers stack like magic, no fancy equipment needed.
- Layered Magic: That raspberry jam swirled into blueberry jelly? It’s like summer in a glass. The lemon juice brightens everything, so you get this tangy-sweet balance that’s addictive. My kids fight over the last slice.
- Party on a Plate: Birthdays, potlucks, or just because—this cake looks way more impressive than it is. The 3D effect makes it feel special, and since it’s mostly fruit and sugar, you can serve it to kids or adults without guilt.
- Zero Waste, All Win: Between us, this recipe uses up leftover jam or bruised berries. The agar-agar is cheap, lasts forever, and turns scraps into something stunning. Plus, the leftovers? Still delicious the next day—just cut and serve.
Step-by-step instructions for creating your 3D jelly cake
Here’s how to build layers of wobbly perfection with precise techniques.
Prepare the Agar-Agar Mixtures for Each Layer
Start by creating three separate base mixtures for your lemon, raspberry, and blueberry layers. In three small saucepans, combine ½ cup water, 1 tablespoon corn syrup, and 1 tablespoon unflavored agar-agar powder for each mixture. Bring to a boil over medium-high heat while stirring constantly with a whisk to prevent lumps.
Once boiling, remove from heat and let the agar-agar bloom for 2 minutes – you’ll see it thicken noticeably. Then add ⅓ cup lemon juice, ⅓ cup raspberry jam, and ⅓ cup blueberry juice to their respective pans. Stir in ⅓ cup granulated sugar and ⅓ tablespoon lemon zest to each mixture. For vibrant layers, add ⅓ teaspoon food coloring (optional) to the raspberry and blueberry mixtures while warm. The mixtures should reach a syrupy consistency that coats the back of a spoon.
Layer and Chill the Jelly in the Acrylic Mold
Pour the lemon mixture into your 8×8-inch clear acrylic mold, spreading it evenly to create a ¼-inch thick layer. Tap the mold gently on the counter to remove air bubbles. Place in the refrigerator for 30 minutes or until completely set – it should hold its shape when gently pressed with a finger.
Once set, carefully pour the raspberry mixture over the lemon layer, again spreading evenly and tapping to remove bubbles. Repeat with the blueberry mixture, creating three distinct layers. Place back in the refrigerator for an additional 1 hour to ensure all layers are fully set and stable for cutting.
Cut and Stack the Jelly Layers
Remove the mold from the refrigerator and use your serrated knife to carefully cut the jelly into 1-inch thick slices. I recommend cutting through all three layers simultaneously to maintain clean edges. Work quickly to prevent the jelly from warming and becoming too soft to handle.
Stack the cut slices in the order you prefer – I like alternating colors for visual interest. Place each stack back in the refrigerator for 10 minutes to firm up before proceeding to the next step. This brief chilling prevents the layers from shifting during assembly.
Create the Decorative Borders with Piping Bag
Fill your piping bag with any remaining jelly mixture (or prepare a small batch using leftover ingredients) and fit it with a round tip. Pipe decorative borders around the edges of your stacked jelly cake, creating a clean frame that contrasts with the vibrant layers. Work in sections, smoothing the borders with a damp fingertip if needed.
Finally, dust the entire cake with 1 tablespoon powdered sugar using a fine-mesh sieve for a delicate finish. The sugar will catch the light beautifully and add a subtle sweetness that complements the tart jelly flavors. Let the cake sit at room temperature for 15 minutes before serving to allow the sugar to settle.
Pro Tips For Making 3d Jelly Cake
- Bloom the Agar: DESCRIPTION: Mix agar-agar with cold liquid first, then heat—it dissolves faster and smoother than tossing it in boiling water. I learned this the hard way when my first batch turned to gluey lumps instead of silky layers.
- Strain the Jam: DESCRIPTION: Use a fine-mesh sieve to remove seeds from raspberry jam before layering—no one wants gritty texture in their dessert. Takes 30 seconds but makes a real difference in the final bite.
- Chill in Fridge: DESCRIPTION: Set each jelly layer in the fridge for 15 minutes before adding the next—rushing leads to collapsed layers. Sounds tedious, but it’s the only way to get those clean, sharp edges without a wobble.
- Sweeten Gradually: DESCRIPTION: Taste the blueberry juice before adding sugar—it’s often sweeter than you’d think. Adjust in small increments (1 tsp at a time) to avoid overpowering the tartness or making the jelly too stiff.
Troubleshooting this dish
Layer Not Setting Properly
If your jelly layers aren’t holding their shape, your agar-agar might not have bloomed long enough. After boiling, let the mixture sit off heat for 3-5 minutes—this ensures full thickening. Also, check your refrigerator temperature: it should be at 38°F or colder.
If your kitchen is warm, place the mold on the bottom shelf where it’s coolest. I once had this happen when I rushed the chilling time—patience is key! 🌡️
Bubbles in the Layers
Air bubbles ruin the sleek look of your 3D cake. After pouring each layer, tap the mold gently on the counter 10-15 times to release trapped air. For stubborn bubbles, use a skewer or toothpick to pop them before they set.
I also recommend working in a cool room—warm air expands and creates more bubbles. If bubbles appear after setting, carefully slice through them with a sharp knife before stacking.
Layers Sticking to Mold
Greasing your acrylic mold with a thin layer of neutral oil (like grapeseed) prevents sticking. Avoid butter or flavored oils—they can leave residue. If layers still cling, run a hot water bath over the mold for 10 seconds before removing.
For stubborn cases, place the mold in the freezer for 5 minutes to contract the jelly slightly, making it easier to release. I keep a spray bottle of water nearby to mist the mold between layers for extra slip.
Uneven Thickness
Inconsistent layer thickness happens when pouring too quickly. Use a spatula or offset spatula to spread each mixture evenly into a ¼-inch layer. For precision, mark guidelines on the mold with a pencil before pouring.
If your first attempt is uneven, don’t panic—simply cut through the thicker sections after setting and stack them separately. I’ve salvaged many “failed” attempts by repurposing the extra jelly into decorative borders or garnishes.
Colors Bleeding Together
Food coloring can blur layers if added too late. Mix gel-based coloring into the warm (but not boiling) jelly mixtures while still liquid. For extra vibrancy, chill the layers for 30 minutes between pouring to set a barrier.
If bleeding occurs, use a serrated knife to carefully slice through the affected areas and stack the clean sections separately. I’ve found that blueberry juice is the most stable base for layered colors—it resists bleeding better than citrus juices.
Cracking During Stacking
Temperature shock causes cracks when stacking. Let each layer sit at room temperature for 10 minutes before assembling. If cracks appear, brush them with a thin layer of warmed jelly mixture (using a pastry brush) to seal.
For a seamless look, pipe a thin border of jelly around the edges before stacking. I’ve also had success using a thin layer of powdered sugar between layers as a temporary adhesive—it dissolves when served but holds during assembly. 💡
Nutrition facts
Frequently asked questions
Can I make this 3D jelly cake without agar-agar?
You can substitute unflavored gelatin at double the amount (use 4 tablespoons instead of 2 tablespoons agar-agar), but the texture will be softer and less stable. For best results, stick with agar-agar—it creates that perfect wobbly yet firm structure that’s ideal for clean cuts and stacking. If you must use gelatin, consider adding an extra ½ teaspoon agar-agar to each layer for better hold.
How do I create more dramatic 3D effects?
For architectural height, stack your jelly slices into towers or spirals using a clear acrylic stand or even a repurposed glass cake stand. Try carving geometric shapes (like cubes or triangles) with a serrated knife for modern designs. For extra flair, pipe jelly borders in contrasting colors around the edges or add edible flowers between layers. The key is to work quickly—jelly softens fast at room temperature!
Can I make this cake ahead of time?
The jelly layers keep well in the fridge for 5 days if stored in an airtight container with parchment between slices. For best texture, assemble the final stacked cake 1-2 hours before serving—this allows the layers to meld slightly while maintaining their shape. If making ahead, store the stacked cake (without powdered sugar) in the fridge and dust with sugar just before serving to keep it looking fresh.
What’s the best way to serve this cake?
This dessert shines as a centerpiece for parties or a showstopper for special occasions. Serve it on a clear acrylic board to highlight the vibrant layers. For individual portions, cut into 1-inch cubes or thin rectangles to reveal the colorful layers. Pair with whipped cream or a scoop of vanilla ice cream for contrast. The translucent jelly pairs beautifully with dark chocolate ganache drizzles or fresh berries for extra visual impact!
Why does my jelly turn out grainy?
Graininess usually means your agar-agar didn’t fully dissolve or you used too much sugar. Always whisk the agar-agar into hot (not boiling) water first to bloom it properly, then bring to a boil while stirring constantly. For the sugar, use fine granulated sugar and dissolve it completely before adding to the jelly mixture. If using fruit juices with pulp (like orange juice), strain them thoroughly to remove any particles that could cause texture issues.

- 6 Egg Cake Recipe with Oil: Light as Air With Buttery Moisture - October 4, 2026
- 4 Bean Casserole Recipe: One-Pan Heartiness With Smoky Paprika Depth - October 4, 2026
- 3-Ingredient Keto Mug Cake Recipe: Microwave Magic in 2 Minutes - October 4, 2026