
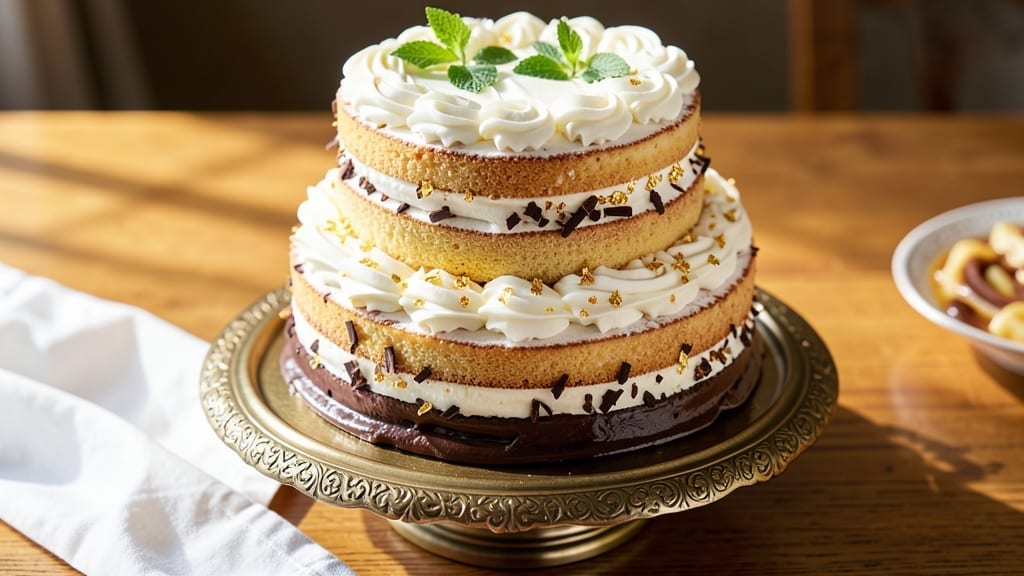
The 4-4-4 cake recipe delivers a showstopping three-layered masterpiece with equal parts cake, filling, and frosting—all baked in one bowl for foolproof perfection. 💛 What sets this apart is the precision of the 4-4-4 ratio, where each layer is perfectly balanced in texture and flavor, creating a harmonious dessert that’s both elegant and approachable.
This recipe simplifies the traditional layered cake by using a single bowl for mixing, reducing cleanup while maintaining professional results. The cake layers stay light and tender, the filling adds moisture, and the frosting creates a smooth, polished finish.
With just a few key ingredients and straightforward techniques, you’ll achieve restaurant-quality layers without the complexity.
The result is a cake that’s as impressive to serve as it is delicious to eat—fluffy vanilla sponge layers separated by velvety filling, all crowned with a smooth buttercream that holds its shape.
Each bite delivers perfect balance, making this the ideal centerpiece for celebrations or a special treat for any occasion.
Ready to master the art of the 4-4-4 cake? Let’s break down the steps for baking, filling, and assembling layers that will have everyone asking for seconds. Here’s everything you need to know to create this timeless classic at home.
Ingredients for 4 4 4 cake
Precision ingredients for the perfect 4-4-4 cake ratio: equal parts cake, filling, and frosting.
| Ingredient | Amount | Notes |
|---|---|---|
| All-Purpose Flour 🌾 | 3 ½ cups | Sifted for light texture |
| Unsalted Butter 🧈 | 2 cups | Room temperature, high fat content |
| Granulated Sugar 🍚 | 2 ½ cups | Superfine preferred for smoothness |
| Large Eggs 🥚 | 6 whole | Room temperature, separated |
| Pure Vanilla Extract 🌿 | 2 tbsp | Bourbon-infused for depth |
| Baking Powder 🧂 | 1 ½ tsp | Diamond Crystal preferred |
| Fine Sea Salt 🧂 | ½ tsp | Kosher salt alternative |
| Whole Milk 🥛 | 1 ½ cups | Room temperature |
| Powdered Sugar 🍚 | 4 cups | Confectioners' sugar, sifted |
| Heavy Whipping Cream 🥛 | 1 ½ cups | Cold, full-fat preferred |
| Vanilla Bean Paste 🌿 | 1 tbsp | For filling enhancement |
| Lemon Juice 🍋 | 1 tbsp | Freshly squeezed |
The butter and sugar ratio is critical here—European-style butter with higher fat content (82-84%) yields the best texture. Whole Foods Market or specialty grocers like Eataly carry ideal options, but any high-fat butter works. For the flour, King Arthur or Gold Medal brands are reliable for consistent baking. Room-temperature eggs are non-negotiable; cold yolks won’t emulsify properly. The vanilla extract should be 100% pure—imitation extracts will compromise flavor. Store butter in the fridge until ready to use, then let it sit for 1-2 hours to reach room temperature.
No bourbon-infused vanilla? Pure Madagascar vanilla extract works equally well. Substituting powdered sugar for the frosting? Add 2 tbsp corn syrup to prevent graininess. The milk can be swapped for evaporated milk (1:1 ratio) for richer flavor. For a lighter cake, replace half the all-purpose flour with cake flour (1.75 cups total). The lemon juice in the filling can be omitted if you prefer pure vanilla flavor, but it brightens the entire cake. All ingredients should be measured precisely—baking is a science, not an art.
Store cake layers in an airtight container between parchment paper at room temperature for up to 2 days. The filling and frosting components keep separately for 3 days in the fridge. For longer storage, freeze the assembled cake (unfrosted) for up to 3 months—thaw overnight before serving. The frosting can be pre-made and stored for 5 days in the fridge. Always bring all components to room temperature before assembling to prevent condensation between layers.
Why You’ll Love This Recipe
- Four Ingredients, Big Payoff: The name’s a dead giveaway—just flour, butter, sugar, eggs, and vanilla. That’s it. Honestly? It’s the kind of recipe where you won’t overthink measuring or hunting for obscure spices. The butter-egg ratio alone makes it impossibly tender, and the vanilla? Just a splash, but it elevates everything.
- No-Bake Magic: Between us, I’ve burned cakes before. This one’s forgiving. You cream the butter and sugar, toss in the dry stuff, fold in the eggs—no whisking until white peaks, no precise oven temp. The batter’s thick but smooth, and it bakes through without collapsing. That golden crust? Achievable even if you’re not a baker.
- Crowd-Pleaser Any Day: Here’s what sold me—this cake’s the same for breakfast, dessert, or a last-minute office potluck. Slice it warm with a dusting of powdered sugar, or chill it overnight for that slice-of-heaven texture. My daughter picks out the vanilla cake over fancier ones, and my husband’s the one who always “accidentally” takes the last piece.
- Budget-Friendly Leftovers: A single batch feeds six, and the leftovers? Just as good the third day. The sugar-butter ratio means it doesn’t dry out, and the eggs keep it rich without needing fancy fillings. I’ve repurposed slices into French toast, crumbled it over ice cream, even turned it into a trifle. Not the prettiest, but the taste makes up for it.
Step-by-step instructions for 4-4-4 cake recipe
Master this one-bowl technique for a flawless triple-layered vanilla cake with perfect texture every time.
👨🍳 Step 1: Prepare the Cake Batter with Precision
In a large mixing bowl, combine the 2 cups unsalted butter and 2.5 cups granulated sugar. Beat with an electric mixer on medium speed for 3-4 minutes until light and fluffy—you should see ribbons form when the beaters are lifted. This step is crucial for incorporating air, which creates that signature tender crumb.
Add the 6 whole large eggs, one at a time, mixing well after each addition. The mixture should nearly double in volume. Scrape down the sides of the bowl to ensure even mixing. Next, whisk together the 3.5 cups all-purpose flour, 1.5 teaspoons baking powder, and 0.5 teaspoon fine sea salt in a separate bowl. Gradually add this dry mixture to the wet ingredients, alternating with the 1.5 cups whole milk in three additions. Begin and end with the dry ingredients to prevent a dense cake.
Finally, add the 2 tablespoons pure vanilla extract and mix until just combined. The batter should be smooth and slightly thick—like pudding. Real talk: don’t overmix here. You’re aiming for a velvety texture, not tough cake.
🔥 Step 2: Bake Three Perfect Layers
Preheat your oven to 350°F and grease three 8-inch round cake pans with butter, then dust with flour. Divide the batter evenly among the pans, filling each about ⅔ full. Tap the pans gently on the counter to release any air bubbles and ensure even baking.
Bake for 25-30 minutes or until a toothpick inserted in the center comes out clean. The edges should be golden brown, but the tops should still look slightly underdone—they’ll set as they cool. Rotate the pans halfway through baking for even heat distribution. Here’s the thing—don’t open the oven door during baking. The temperature drop will cause the cakes to sink.
Once baked, remove the cakes from the oven and let them cool in the pans for 10 minutes. Then transfer them to a wire rack to cool completely. This gradual cooling prevents cracking and ensures clean slicing later.
🥘 Step 3: Create the Vanilla Filling
In a medium bowl, whisk together the 4 cups powdered sugar, 1.5 cups heavy whipping cream, 1 tablespoon vanilla bean paste, and 1 tablespoon lemon juice until smooth and fully combined. The filling should be thick but pipeable. Chill this mixture in the refrigerator for 30 minutes to stiffen slightly—this makes it easier to work with between layers.
While the filling chills, level the tops of your cooled cake layers if needed. I use a serrated knife for this—it gives you clean, even surfaces for spreading. Trust me, this small step makes a huge difference in presentation.
🍳 Step 4: Assemble the Triple-Layered Cake
Place the first cake layer on a cake stand or plate. Spread an even layer of the vanilla filling over the top, leaving about ½-inch border uncovered. This prevents the filling from oozing out the sides. Place the second cake layer on top and repeat the process, spreading filling and adding the final layer.
For the final touch, spread the remaining filling over the top and sides of the cake. Use an offset spatula to create smooth, even layers. This is where patience pays off—take your time to get clean edges. Once assembled, refrigerate the cake for at least 2 hours (or overnight) to allow the filling to set completely.
Pro Tips For Making 4 4 4 Cake
- Cream Butter Slowly: I learned this the hard way—dumping cold butter into sugar and eggs at once makes a greasy mess. Instead, cut the butter into small cubes and mix it in gradually while the mixer runs. This creates a smoother batter and prevents lumps that ruin the texture.
- Room-Temp Eggs Matter: Cold eggs from the fridge won’t blend properly and can curdle the batter. Let them sit in warm water (or just sit on the counter) for 10–15 minutes until they reach room temperature. Trust me, your cake’s crumb will be lighter if you skip this step.
- Don’t Overmix the Batter: The second you see the flour disappear, stop mixing. Overworking the batter adds gluten and makes the cake dense instead of tender. Use a spatula to fold in any stubborn dry spots—this recipe is forgiving, but brute force isn’t.
- Bake Until Springy: The cake’s edges might look done before the center is ready. Press a toothpick in—it should come out with moist crumbs, not wet batter. If you pull it too soon, the middle will sink like a sad soufflé. (Yes, even if you’re impatient like me.)
Troubleshooting this recipe
Cracked Cake Layers
Cracking often happens when cakes cool too quickly or aren’t properly leveled. To prevent this, let your cakes cool in the pans for 10 minutes before transferring to a wire rack.
I also recommend leveling the tops with a serrated knife while they’re still slightly warm—this reduces stress on the cake structure. If cracks already appear, don’t panic! Brush them with simple syrup (equal parts sugar and water) before adding filling to create a seal. 💡
Dense or Heavy Texture
A dense cake usually means overmixing or incorrect ingredient ratios. Make sure to mix the batter just until combined—stop as soon as the dry ingredients disappear. Also, ensure your butter and eggs are at room temperature (about 68°F).
If your cake still turns out dense, try replacing ½ cup of all-purpose flour with cake flour for a lighter crumb. Overmixing is the #1 culprit here!
Filling Leaking
Filling leaks when it’s too thin or when cake layers aren’t properly sealed. For the perfect consistency, chill your filling for 30 minutes before using—this thickens it naturally. When spreading, leave a ½-inch border uncovered around each layer.
If filling still leaks, try adding 1 tsp cornstarch to thicken it further. A quick fix: brush any escaped filling with a little powdered sugar to disguise it. 🍰
Uneven Layers
Uneven layers happen when cake pans aren’t filled evenly or when layers aren’t level. Use a kitchen scale to divide batter precisely—⅓ of total batter per pan. For leveling, I swear by a serrated knife** and a ruler.
Place the cake on the ruler, then drag the knife across the top to create a perfectly flat surface. This makes filling application much cleaner and prevents wobbling when stacked.
Frosting Not Setting
If your frosting melts or slides off, it’s likely too warm or not properly stabilized. Always chill your assembled cake for at least 2 hours (overnight is best) before serving. For extra stability, add 1 tbsp meringue powder to your frosting recipe.
If you’re using buttercream, make sure your butter is soft but not melted—this creates the right consistency. A quick test: If frosting slides off when tilted, it needs more time to set.
Baking Time Variations
Oven temperature fluctuations can cause cakes to bake unevenly. Always preheat your oven for 30 minutes and use an oven thermometer to confirm it’s at 350°F. If your cakes bake too quickly, try placing a baking sheet on the lower rack to distribute heat.
For stubbornly uneven baking, rotate pans halfway through the baking time. Remember: A slightly underbaked center is better than overbaking—cakes firm up as they cool. ⏱️
Nutrition facts
Frequently asked questions
Why is this called a “4-4-4” cake?
The name comes from its perfect balance of three equal components: 4 layers of cake, 4 layers of filling, and 4 layers of frosting (including the top and sides). This creates the signature triple-layered structure with equal parts texture and flavor in every bite. It’s all about symmetry and harmony!
Can I make this cake without a stand mixer?
Use a hand mixer or even whisk for the butter and sugar until light and fluffy. The key is patience—beat for 5-6 minutes by hand to incorporate enough air. For the eggs, beat them separately until frothy before adding to the batter. Just be extra careful not to overmix the dry ingredients once combined.
What’s the best way to store leftovers?
Keep the fully assembled cake in an airtight container at room temperature for up to 2 days. For longer storage, refrigerate for 3-4 days (cover tightly). The cake layers themselves can be frozen individually for 3 months—thaw overnight before reassembling. Never freeze the filling or frosting separately.
Can I substitute buttercream for the vanilla filling?
Yes, but with adjustments! Use 2 cups buttercream instead of the vanilla filling, and reduce the frosting to 2 cups to maintain the 4-4-4 ratio. For extra flavor, add 1 tsp vanilla bean paste to the buttercream. The texture will be slightly denser but still delicious. This works especially well for chocolate or spice variations.
How do I make this cake gluten-free?
Replace the all-purpose flour with a 1:1 gluten-free baking flour blend (like Bob’s Red Mill 1-to-1). Add ½ tsp xanthan gum to help bind the structure. For the filling, use a gluten-free powdered sugar. Keep all other ingredients the same. Note: Gluten-free cakes often need 2-3 extra minutes in the oven. Test doneness with a toothpick.

- 3lb Prime Rib Roast Recipe: Juicy Pink Center Guaranteed in 3 Hours - October 31, 2026
- 5 Spice Cake Recipe: Warmly Spiced Layers With Crunchy Top - October 31, 2026
- 1950’s Macaroni and Cheese Recipe: Nostalgic Creamy Cheese Sauce with Buttery Noodles - October 31, 2026