
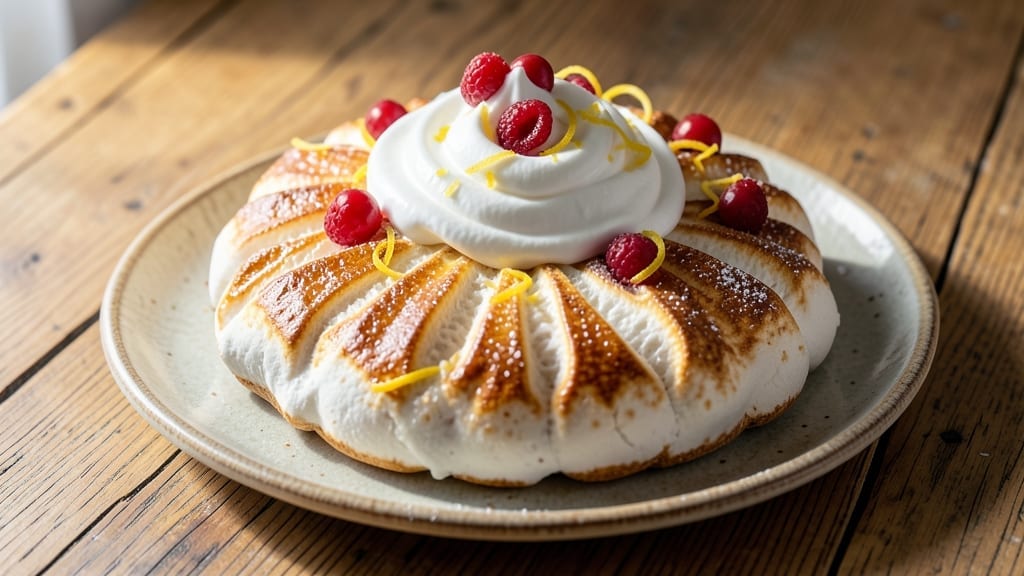
This 4-egg-white pavlova recipe delivers the perfect balance of crispy edges and marshmallow centers—without requiring a single whole egg. 💛 The secret lies in stabilizing the meringue with cornstarch and baking it at a precise temperature to create that signature crunch.
I developed this version after struggling with traditional recipes that either collapsed or turned too chewy.
What makes this recipe special is its simplicity and reliability. With just four egg whites, sugar, cornstarch, and a splash of vinegar, you’ll achieve a dessert that’s light enough to hold fresh fruit without sinking.
The citrus zest in the whipped cream topping adds a bright contrast to the sweet meringue, making every bite feel fresh and vibrant.
By the time you serve this dessert, you’ll have a stunning centerpiece with a crisp exterior that shatters at the touch and a soft, airy interior that melts in your mouth.
The key is patience—letting the meringue set slightly before adding toppings ensures everything stays in place. Perfect for summer gatherings or special occasions, this pavlova is sure to impress.
This recipe is naturally vegetarian and packed with protein from the egg whites, making it a lighter alternative to traditional desserts. The citrus zing cuts through the sweetness, creating a balanced flavor profile that’s both elegant and approachable. Let’s get started on creating this showstopper!
Ingredients for 4 egg white pavlova
Four egg whites, sugar, and a little science—this pavlova is all about crispy edges and marshmallow centers.
| Ingredient | Amount | Notes |
|---|---|---|
| Large Egg Whites 🥚 | 4 whole | Freshly separated, room temperature |
| Granulated Sugar 🍚 | 1 ½ cups | Superfine preferred for smooth texture |
| Cornstarch 🌾 | 2 tbsp | Stabilizes meringue structure |
| White Vinegar 🍶 | 1 tbsp | For meringue stability |
| Lemon Zest 🍋 | 1 tbsp | Fresh lemon preferred |
| Heavy Whipping Cream 🥛 | 1 ½ cups | Full-fat for best whipping |
| Powdered Sugar 🍚 | ½ cup | For whipped cream sweetness |
| Vanilla Extract 🌸 | ½ tsp | Pure vanilla preferred |
| Fresh Berries 🍓 | 2 cups | Strawberries or raspberries |
| Lemon Juice 🍋 | 1 tsp | Freshly squeezed |
| Salt 🧂 | ¼ tsp | Fine sea salt |
Egg whites are the star here, so freshness matters. Look for eggs with bright whites—they whip up better. I grab mine from Whole Foods or the local farmers market when possible. The sugar should be superfine if you can find it—it dissolves faster and gives that signature smooth texture. Cornstarch is non-negotiable for stability, and Bob’s Red Mill is my go-to brand. For vinegar, white works best—apple cider vinegar gives a slight tang but still works in a pinch. The berries? Fresh is best, but frozen works if you toss them in hot water first to thaw.
No superfine sugar? Regular granulated works—just pulse it in a food processor for 30 seconds to break it down. Running low on cornstarch? Arrowroot powder at the same amount does the trick. The heavy cream needs to be cold straight from the fridge—room temperature cream won’t whip properly. For the zest, organic lemons have more flavor, but conventional works too. The whipped cream can be made ahead and stored in the fridge for up to 2 days, just whip it again before serving. Want extra zing? Add a splash of orange zest to the whipped cream too.
This meringue needs 12-15 hours to set properly—don’t rush it. Store it in an airtight container with a paper towel to absorb any moisture. The whipped cream keeps for 2 days in the fridge, but the meringue itself lasts 3 days if you keep it dry. For serving, assemble just before guests arrive—freshly topped berries make all the difference. The meringue reheats beautifully in the oven at 300°F for 5 minutes if you need to revive it, though it won’t be as crisp.
Why You’ll Love This Recipe
- Four Eggs, Big Payoff: I swear by this version—just four egg whites mean less mess, no wasted yolks, and that signature crisp shell forms every time without overworking the meringue.
- Zesty Crunch Magic: Honestly, the lemon zest and vinegar combo is what makes this stand out. That bright, tangy kick cuts through the sweetness, and the sugar crust? It’s ridiculously satisfying to crack open.
- Weekday Dessert Hack: Between us, this is my go-to for when I need something impressive but can’t justify a full meringue pie. Serve it with store-bought whipped cream or a scoop of ice cream—no one will guess it took less than 30 minutes.
- Budget-Friendly Luxury: Four egg whites stretch my grocery budget further, and the sugar/cornstarch mix costs pennies. Plus, leftovers? I freeze slices and toast them like cookies—crunchy, sweet, and zero waste.
Step-by-step instructions for light-as-air pavlova
Here’s how to create a crispy shell with a marshmallow center every time.
🍳 Step 1: Whip Egg Whites to Stiff Peaks
Start by separating the 4 whole large egg whites into a completely grease-free mixing bowl. I like to use a stand mixer with the whisk attachment for this—it gives you more control. Add the 0.25 tsp salt and beat on low speed until the egg whites just start to foam.
Gradually increase the speed to medium-high and begin adding the 1.5 cups granulated sugar—about 1 tablespoon at a time. This slow addition prevents sugar crystals from forming, which could ruin your meringue. Keep whipping until the egg whites form stiff peaks that hold their shape when you lift the whisk. The mixture should look glossy and hold its shape when you turn the bowl upside down.
Here’s the thing—your meringue should be thick enough to hold a peak that stands straight up, but not dry or crumbly. If it’s too soft, whip a bit longer. If it’s too stiff, you can gently fold in a drop of water to loosen it slightly.
👨🍳 Step 2: Fold in Stabilizers and Flavorings
In a small bowl, whisk together the 2 tbsp cornstarch, 1 tbsp white vinegar, and 1 tbsp lemon zest. This mixture is your secret weapon—it stabilizes the meringue and adds that signature tangy flavor. Gently fold about ⅓ of the meringue into the dry ingredients to lighten them, then fold this mixture back into the remaining meringue.
Be gentle here. You want to maintain as much air as possible while incorporating the stabilizers. Use a spatula to fold from the bottom up, cutting through the center to ensure everything blends evenly. The meringue should look smooth and uniform with no streaks of dry ingredients remaining.
🔥 Step 3: Shape and Bake the Pavlova
Preheat your oven to 325°F and line a baking sheet with parchment paper. Transfer the meringue to a piping bag fitted with a large star tip (or use a spoon to shape it). On the prepared baking sheet, pipe or mound the meringue into a 6-inch round that’s about 1-inch thick in the center, tapering to ¼-inch at the edges.
Bake for 15 minutes at 325°F, then immediately reduce the heat to 275°F and continue baking for another 35-40 minutes. The pavlova is done when it’s crisp on the outside and soft and marshmallow-like in the center. Don’t overbake—it should still have some give when you gently press the center.
I know it’s tempting to peek, but resist! Every time you open the oven, you risk collapsing that delicate structure. When it’s done, turn off the oven and let the pavlova cool inside with the door slightly ajar for 10 minutes—this helps prevent cracking as it cools.
🥘 Step 4: Prepare the Whipped Cream
While the pavlova cools, whip the 1.5 cups heavy whipping cream in a chilled bowl until it forms soft peaks. Gradually add the 0.5 cup powdered sugar and 0.5 tsp vanilla extract, continuing to whip until the cream holds stiff peaks. In a small bowl, mix together the 1 tsp lemon juice and 1 tbsp lemon zest—this brightens the cream and complements the pavlova beautifully.
Fold this citrus mixture into the whipped cream until just combined. The cream should remain fluffy but slightly looser than before. Taste it—it should be sweet enough to balance the tart berries and meringue. If you want extra flavor, you can add a pinch more vanilla or a splash of lemon juice, but be careful not to overdo it.
🍽️ Step 5: Assemble and Serve
Once the pavlova has cooled completely (about 1 hour), it’s time to assemble. Spread the whipped cream evenly over the top of the pavlova, creating a smooth base. Arrange the 2 cups fresh berries on top in an attractive pattern—strawberries work well for classic presentation, while raspberries add a pop of color.
Slice the pavlova into wedges and serve immediately. The contrast of the crispy shell, marshmallow center, and fresh berries is what makes this dessert truly special. For the best experience, serve it at room temperature so the flavors can fully meld together. If you have leftovers, store them in an airtight container in the fridge for up to 2 days, but I promise you won’t have any!
Pro Tips For Making 4 Egg White Pavlova
- Whip to Stiff Peaks: Stop when the meringue forms a stiff peak that doesn’t flop over—about 3-4 minutes on medium-high speed. Overbeating adds gluten and makes your pavlova tough. I learned this after a batch collapsed like a sad soufflé.
- Room-Temp Egg Whites: Take egg whites out of the fridge 30 minutes before whipping. Cold whites trap air poorly, and you’ll fight the mixer longer for the same result. Sounds simple, but I used to skip it and wonder why my meringue never held shape.
- Sugar Gradually, Not Dumped: Add sugar 1 tablespoon at a time while mixing, not all at once. Dumping it all in creates sugar crystals that weigh down the meringue, leaving you with a dense, gummy mess. Slow and steady wins the crisp crust.
- Vinegar First, Then Zest: Mix the white vinegar into the egg whites before adding lemon zest. The acid stabilizes the meringue, and the zest blends in evenly without clumping. I used to sprinkle zest first and end up with streaky, bitter patches.
Common mistakes when making this recipe
Overwhipping the Meringue
I’ve ruined more pavlovas than I’d admit by overwhipping the egg whites—turning them dry and crumbly instead of glossy and airy. Stop mixing as soon as you see stiff peaks that hold their shape when you lift the whisk.
Overwhipping introduces too much air, which can cause the meringue to collapse during baking. If your meringue looks dry or grainy, gently fold in a dash of water (about ½ teaspoon) to restore moisture. 💛
Skipping the Stabilizers
The cornstarch and vinegar are non-negotiable—they stabilize the meringue and prevent cracking. Without them, your pavlova might develop soggy edges or collapse entirely. Mix them thoroughly into the meringue and fold gently to avoid deflating the structure.
I once baked a pavlova without cornstarch, and it looked like a sad, crumbly pancake. Don’t skip this step!
Baking at the Wrong Temperature
Pavlova is delicate—325°F for 15 minutes, then 275°F for 35-40 minutes is the sweet spot. If your oven runs hot, reduce the temperature by 25°F to prevent overbrowning. Peeking too early can cause the meringue to sink.
Let it cool inside the oven with the door slightly ajar for 10 minutes after baking to prevent cracking. Trust the process—rushing leads to disappointment.
Adding Toppings Too Soon
Freshly baked pavlova is fragile—wait until it’s completely cooled (about 1 hour) before adding whipped cream and fruit. Toppings added too soon can cause the meringue to sweat and soften, ruining the crisp edges.
I learned this the hard way when my pavlova turned into a soggy mess. Patience is key—let it set fully before assembling.
Using Room-Temperature Cream
Cold, heavy whipping cream is essential for stiff peaks. If your cream is too warm, it won’t whip properly and will turn into butter. Chill your bowl and beaters in the freezer for 10 minutes before whipping.
I always keep my cream in the fridge until the last minute—this ensures fluffy, stable whipped cream that holds its shape. 🥛
Ignoring Humidity
Humidity is the silent enemy of pavlova. If your kitchen feels damp, bake the meringue on a wire rack instead of a baking sheet to allow air circulation. On humid days, I even place a silica gel packet near the oven to absorb moisture.
A dry environment helps the meringue set properly and prevents a gummy texture. Don’t underestimate the power of humidity—it can make or break your dessert!
Nutrition facts
Frequently asked questions
Can I make this pavlova without a piping bag?
Use a spoon to shape the meringue into a round mound on your baking sheet. Moisten your hands slightly to prevent sticking, then gently mound the egg whites into a thick center that tapers to thin edges. Press down lightly on the sides to create that signature shape.
Why does my meringue collapse when baking?
This usually happens from overmixing, humidity, or opening the oven too soon. The egg whites need to be at stiff peaks but not dry, and the oven temperature must stay consistent. Try baking on a wire rack instead of a baking sheet to improve airflow.
How do I store leftover pavlova?
Keep the meringue base in an airtight container with a paper towel to absorb moisture for up to 3 days. Store the whipped cream separately in the fridge and whip again before serving. Reheat the meringue at 300°F for 5 minutes if needed, though it won’t be as crisp.
Can I substitute the lemon zest with other citrus?
Yes! Try orange zest for a sweeter flavor or lime zest for extra tang. Just use the same amount. The zest adds brightness that balances the sweet meringue perfectly—it’s what makes this dessert feel fresh and vibrant.
Is this recipe suitable for vegans?
Unfortunately, no—this classic pavlova relies on egg whites as its structural base. For a vegan alternative, try aquafaba (chickpea brine) meringues, though they won’t have exactly the same texture. The whipped cream could be made vegan with coconut cream, but the meringue itself requires eggs.

- 3lb Prime Rib Roast Recipe: Juicy Pink Center Guaranteed in 3 Hours - October 31, 2026
- 5 Spice Cake Recipe: Warmly Spiced Layers With Crunchy Top - October 31, 2026
- 1950’s Macaroni and Cheese Recipe: Nostalgic Creamy Cheese Sauce with Buttery Noodles - October 31, 2026