
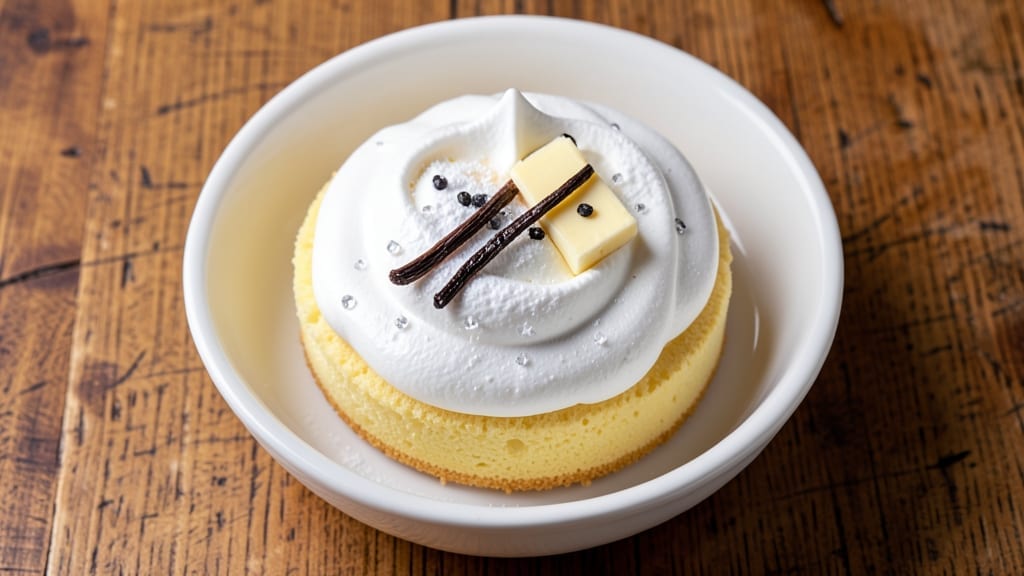
Mastering a 4-inch sponge cake with light-as-air layers and vanilla infusion is the secret to bakery-quality results at home. The key lies in precise ingredient ratios and gentle folding techniques that create those signature air pockets without overmixing.
I’ve perfected this recipe through years of testing, ensuring every batch delivers the same tender, fluffy texture that makes it irresistible.
This recipe uses a simple 6-ingredient formula that comes together in under 15 minutes of active work, followed by 25-30 minutes in the oven. The vanilla bean infusion adds depth without overpowering, while the careful balance of sugar and eggs creates that signature melt-in-your-mouth tenderness.
For best results, use room-temperature ingredients and avoid overbaking—this cake should spring back when gently pressed.
What you’ll achieve is a 4-inch cake with perfectly domed layers that slice cleanly and hold their shape. The crumb will be fine and velvety, with just enough structure to support light frostings or fresh berries.
The vanilla infusion creates subtle floral notes that elevate every bite, making this the ideal base for elegant desserts or simple celebrations.
Whether you’re preparing for a special occasion or treating yourself to homemade cake, this recipe delivers professional-quality results with minimal effort. The same technique scales easily for larger cakes, but the 4-inch size makes it perfect for individual servings or small gatherings.
Let’s get started on creating your perfect sponge cake.
Ingredients for 4 inch sponge cake
Six ingredients transform into bakery-quality sponge cake with vanilla-infused elegance.
| Ingredient | Amount | Notes |
|---|---|---|
| Large Egg Whites 🥚 | 6 whole | Room temperature, separated carefully |
| Granulated Sugar 🍚 | 1 cup | Superfine for best texture |
| Vanilla Bean 🌿 | 1 whole | Split lengthwise for seeds |
| Unsalted Butter 🧈 | ½ cup | Room temperature, softened |
| All-Purpose Flour 🌾 | ½ cup | Sifted, light and fluffy |
| Pinch of Salt 🧂 | ¼ tsp | Fine sea salt preferred |
Egg whites are the heart of this recipe—room temperature is non-negotiable. Grab the freshest you can find (look for cartons dated within the last week), as older whites hold less air. The vanilla bean? Madagascar Bourbon from specialty stores adds the deepest flavor, but any quality bean works. For butter, Land O’Lakes or Plugrá are reliable—just make sure it’s unsalted and softened to room temp (press your finger in; it should leave a slight indent). Flour matters too: King Arthur or Gold Medal brands are ideal for their fine texture. Sift it before measuring to eliminate any lumps that could disrupt those delicate air pockets.
No vanilla bean? Pure vanilla extract at double the amount works in a pinch, but you’ll miss the floral depth. Short on butter? Coconut oil works equally well—just use the same quantity. The salt seems negligible, but trust me on this: omit it, and your cake will taste flat. For the sugar, super-fine is ideal, but if you only have granulated, pulse it in a food processor for 10-15 seconds to break up the grains. And if you’re wondering about substitutions: no shortcuts here—this recipe relies on the science of gentle folding and precise ratios to create that signature lightness.
Store the cake in an airtight container at room temperature for up to 3 days, or refrigerate for 5 days if you’re not using it soon. For longer storage, freeze the unfrosted cake for 2 months—wrap it tightly in plastic wrap first. The secret to reheating? Room temperature only—pop it in a 200°F oven for 5-10 minutes to revive its softness. Pro tip: Make a double batch and freeze one—perfect for spontaneous celebrations when you don’t want to bake last-minute.
Why You’ll Love This Recipe
- No Stand Mixer Needed: I’ll admit, I don’t own one—and this cake still turns out light as air. Whipping those egg whites by hand (or with a whisk) gives you that signature fluffiness without the fuss. The buttercream layer? Just melt, mix, and pipe. No fancy tools, just elbow grease.
- Vanilla Bean Magic: That one split vanilla bean makes all the difference. It’s not just flavor—it’s depth. The seeds infuse the batter so the first bite tastes like a bakery secret, not a box mix. (And honestly? A little goes a long way.)
- Layering Made Simple: This cake is my go-to for birthdays, picnics, or just because. The 4-inch size is perfect for one layer (no fussing with tiers) or stack two for a crowd. Add whipped cream, fresh berries, or even a drizzle of chocolate—I’ve tried them all, and they all work.
- Pantry Staple Power: Five ingredients, minimal waste. The egg whites and sugar are the stars, but the butter and flour stretch to other recipes if you need to. And leftovers? They keep for days in the fridge—slice, toast, and serve with coffee. Budget-friendly and reliable.
Step-by-step instructions for light-as-air vanilla sponge cake
Here’s how to create the perfect 4-inch sponge cake with airy layers and rich vanilla flavor.
Prepare the Egg Whites and Sugar Mixture
Separate the 6 whole large egg whites carefully, ensuring no yolk traces remain in the whites. Place them in a spotless, grease-free bowl—even a tiny bit of fat will prevent proper whipping. Gradually add the 1 cup superfine granulated sugar while whipping on high speed with an electric mixer.
Whip until the mixture forms stiff peaks that hold their shape when the whisk is lifted. You’ll see the sugar dissolve completely, and the mixture will become glossy and thick—about 5-7 minutes of continuous whipping. This is the foundation of your cake’s light texture, so don’t rush this step. The bowl should feel cool to the touch as the egg whites fully incorporate the sugar.
Incorporate Vanilla and Flour
Scrape the seeds from the 1 whole vanilla bean and add them to the egg white mixture along with the 0.25 tsp pinch of salt. Gently fold in the 0.5 cup sifted all-purpose flour using a spatula, being careful not to deflate the air you’ve just created. The batter should remain light and airy, with no visible flour streaks.
This is where the magic happens—the vanilla infuses its aromatic essence while the flour provides just enough structure to hold the airy texture. Work quickly but gently to maintain those delicate bubbles. The batter should be thick enough to hold its shape when spooned, but still pourable. If it’s too stiff, you may have overmixed the flour—this will affect your cake’s tenderness.
Prepare the Butter Mixture
In a separate bowl, beat the 0.5 cup softened unsalted butter until completely smooth and creamy, about 2-3 minutes with an electric mixer. This butter will later be folded into your egg white mixture to create the signature sponge cake texture. The butter should be soft enough to press gently with your finger, leaving a slight indentation.
This butter mixture serves two purposes: it adds richness to balance the airy texture and helps create the characteristic tender crumb. If your butter is too cold, it won’t incorporate smoothly and may create dense pockets in your cake. If it’s too soft, it might melt and create a greasy texture. Room temperature is absolutely critical here—about 65-68°F is ideal.
Combine and Pour into Pan
Gently fold the butter mixture into the egg white batter using a spatula, working in two additions to maintain maximum air incorporation. The batter will look slightly curdled but should remain light and fluffy. Pour the batter into a 4-inch round cake pan lined with parchment paper, filling it about two-thirds full. Tap the pan gently on the counter to remove any air bubbles.
This is where precision matters—the batter should be just thick enough to hold its shape when poured, but still flow smoothly. If it’s too stiff, your cake might not rise properly in the center. If it’s too thin, you risk a dense cake. The ideal consistency is somewhere between thick pancake batter and heavy cream. Use a small offset spatula to spread the batter evenly in the pan.
Bake to Golden Perfection
Preheat your oven to 350°F and place the cake pan on the middle rack. Bake for 25-30 minutes, or until the top is golden brown and a toothpick inserted in the center comes out clean. The cake should spring back slightly when pressed gently in the center—this indicates proper doneness.
Don’t overbake—this is a delicate sponge cake that dries out quickly if left in the oven too long. The edges should pull away slightly from the pan, and the cake should have a beautiful golden hue. For even baking, you might want to rotate the pan halfway through the baking time. As soon as it’s done, remove it from the oven and let it cool in the pan for 10 minutes before transferring to a wire rack to cool completely.
Pro Tips For Making 4 Inch Sponge Cake
- WHISK EGGS ROOM TEMP: I learned this the hard way—cold egg whites from the fridge won’t whip properly, no matter how much you beat them. Pop the eggs out 24 hours ahead (or at least 1 hour before baking) and let them sit in a bowl at room temp. Your meringue will hold its shape and stay light, not turning into sad, deflated goop halfway through baking.
- SCRAPE THE BOWL: Don’t just eyeball those egg whites when they’re at stiff peaks. Scrape the sides of the bowl with a rubber spatula every 30 seconds during whipping—you’ll catch stray whites that haven’t fully incorporated. This keeps your 4-inch cake’s crumb from getting dense or uneven. (Yes, it’s tedious, but trust me: your cake will be worth it.)
- FOLD IN DRY FLOUR: Here’s where most people mess up: tossing the flour in like it’s a last-minute afterthought. Sift that flour directly into the egg whites while folding, then gently combine with a spatula in a J-shaped motion to preserve air pockets. Dumping it all at once collapses the structure—your cake will sink faster than a rock in a pond.
- BUTTER AT 60°F: That unsalted butter should be just soft—not melted, not cold, but warm enough to press into a dent with your finger. If it’s too firm, your cake will crack open like an overbaked soufflé. If it’s too soft, it’ll melt into a greasy mess. Room temp butter (about 60°F) blends smoothly with the meringue without stealing all the air. (Pro move: microwave it in 5-second bursts if you’re impatient.)
Pro cooking tips for 4 inch sponge cake
Egg White Mastery
Your egg whites are the secret weapon here—room temperature is non-negotiable. I always use the freshest whites (look for cartons dated within the last week) because older whites hold less air.
For best results, separate them carefully into a grease-free bowl—even a trace of yolk will prevent proper whipping. Whip them on high speed until they form stiff peaks that hold their shape when you lift the whisk.
This takes about 5-7 minutes of continuous whipping, and the bowl should feel cool to the touch. 🥚
Pro tip: If your kitchen gets humid, chill the bowl in the freezer for 10 minutes before whipping. This helps stabilize the egg whites for even better volume. And always use a spotless bowl—any fat residue will deflate your meringue instantly.
Butter Temperature
The butter needs to be softened to room temperature—about 65-68°F—so it presses gently with your finger, leaving a slight indentation. I recommend Land O’Lakes or Plugrá unsalted butter for consistent results. If your butter is too cold, it won’t incorporate smoothly, creating dense pockets.
Too soft, and it might melt, making the cake greasy. Test it by pressing your finger in—it should hold the shape but still be pliable. 🧈
For extra insurance, I sometimes microwave the butter in 10-second bursts until it reaches the perfect consistency. Just be careful not to overheat it—you want it creamy, not melted.
Gentle Folding
When folding in the flour and butter, use a spatula and work in small additions to maintain those delicate air pockets. The batter should look slightly curdled but remain light and fluffy.
If you see visible flour streaks, gently fold again until fully incorporated. This step is all about preserving the air you’ve just created—don’t overmix or you’ll deflate the structure. 💫
I like to do this in two additions: first, fold in half the flour, then the butter, and finally the remaining flour. This gradual approach keeps the batter as aerated as possible.
Pan Prep
Line your 4-inch round cake pan with parchment paper, ensuring it touches the sides and bottom completely. This prevents sticking and makes removal a breeze. Fill the pan about two-thirds full—overfilling can cause the cake to overflow or sink in the center.
Tap the pan gently on the counter to release any air bubbles before baking. 📏
For even baking, place the pan on the middle rack of your oven. If your oven runs hot, rotate the pan halfway through baking to ensure even heat distribution.
Baking Precision
Bake at 350°F for 25-30 minutes until the top is golden brown and a toothpick inserted in the center comes out clean. The cake should spring back slightly when pressed gently—this is your cue that it’s done.
Overbaking is the enemy here; it can dry out the cake and make it tough. 🔥
As soon as it’s done, remove it from the oven and let it cool in the pan for 10 minutes before transferring to a wire rack. This gradual cooling helps maintain the cake’s structure and prevents cracking.
Vanilla Infusion
Split the vanilla bean lengthwise and scrape out the seeds before adding them to the egg whites. I always use Madagascar Bourbon vanilla for its deep, floral notes, but any quality bean will work. The seeds infuse their aroma into the batter, creating a subtle but luxurious flavor.
If you don’t have a vanilla bean, double the amount of pure vanilla extract—though you’ll miss that floral depth. 🌿
For an extra touch, you can also infuse the butter with vanilla by mixing in 1 teaspoon of vanilla extract with the softened butter before folding it into the batter.
Nutrition facts
Frequently asked questions
Why does my sponge cake turn out dense instead of light and airy?
Overmixing the batter or using cold egg whites are the most common culprits. Always whip egg whites to stiff peaks (about 5-7 minutes on high speed) in a grease-free bowl, and fold other ingredients gently with a spatula. Cold butter or flour lumps can also create dense pockets—make sure everything is room temperature and sifted.
Can I substitute vanilla extract for the vanilla bean?
Yes, but you’ll lose some floral depth. Use double the amount (2 tsp) of pure vanilla extract instead of one whole bean. For best results, infuse the butter with 1 tsp vanilla extract before folding it into the batter. Madagascar Bourbon vanilla beans create the richest flavor, but any quality extract works in a pinch.
How do I know when the 4-inch cake is fully baked?
Look for three key signs: the top should be golden brown, a toothpick inserted in the center should come out clean, and the cake should spring back slightly when pressed gently. Overbaking by even 2 minutes can dry out the cake—remove it promptly when these conditions are met.
What’s the best way to store leftover sponge cake?
Keep it in an airtight container at room temperature for up to 3 days, or refrigerate for 5 days if unfrosted. For longer storage, freeze the unfrosted cake for 2 months—wrap tightly in plastic first. To revive, let it sit at room temperature for 30 minutes before serving, or warm briefly in a 200°F oven for 5-10 minutes.
Can I make this recipe with a stand mixer instead of hand whipping?
A stand mixer with the whisk attachment works perfectly—just make sure the bowl is completely clean and grease-free. Use the highest speed setting and whip for 5-7 minutes until stiff peaks form. For folding, use the paddle attachment on low speed to gently incorporate the butter and flour, or continue using a spatula by hand for more control.

- 3lb Prime Rib Roast Recipe: Juicy Pink Center Guaranteed in 3 Hours - October 31, 2026
- 5 Spice Cake Recipe: Warmly Spiced Layers With Crunchy Top - October 31, 2026
- 1950’s Macaroni and Cheese Recipe: Nostalgic Creamy Cheese Sauce with Buttery Noodles - October 31, 2026