
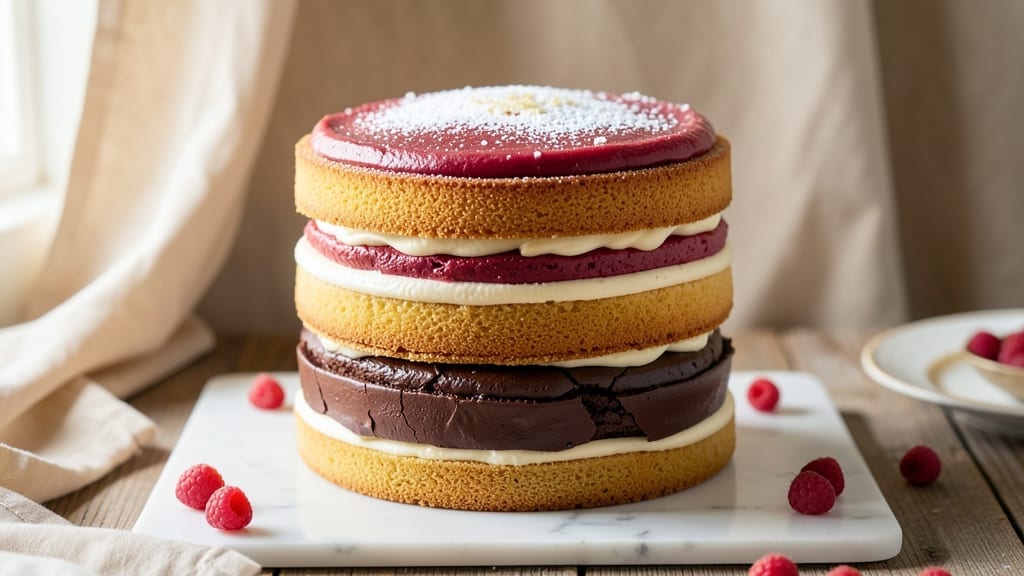
This 4-layer 8-inch cake recipe delivers the kind of showstopping dessert that makes every celebration feel special—moist, perfectly balanced layers with a velvety frosting that holds its shape. The secret lies in precise baking times, gradual cooling, and a sturdy buttercream that bridges each layer without collapsing.
I’ve baked this exact cake for weddings, birthdays, and holidays, and it never fails to impress, even with its delicate structure.
What sets this recipe apart is the foolproof layering technique: each 8-inch cake pan yields tender, evenly baked layers that stay moist for days when stored properly. The filling—a silky vanilla buttercream—gets spread while the layers are still slightly warm, creating that signature “wow” factor when sliced.
No special equipment beyond standard baking tools, but patience is key: letting each layer cool gradually prevents cracking or shifting during assembly.
By the time you’re done, you’ll have a cake that’s visually stunning and structurally sound, with clean layers separated by filling and a smooth, professional frosting finish. The texture is the star—crisp edges, tender crumb, and a frosting that’s rich enough to satisfy but light enough to cut through.
This isn’t just a cake; it’s a centerpiece that elevates any occasion.
Whether you’re a beginner or an experienced baker, this method breaks down the process into manageable steps—from precise measuring to the final decorative touches. The result? A cake that looks like it came from a bakery, but with the confidence of knowing you made it yourself. Let’s get started.
Ingredients for 4 layer 8 inch cake
Precision-measured ingredients create flawless layers and velvety frosting for a showstopping 4-layer cake.
| Ingredient | Amount | Notes |
|---|---|---|
| All-Purpose Flour 🌾 | 4 cups | Sifted for light texture, plus extra for dusting |
| Unsalted Butter 🧈 | 2 cups | Room temperature, European-style preferred |
| Granulated Sugar 🍚 | 2 ½ cups | Superfine preferred for smoother batter |
| Large Eggs 🥚 | 8 whole | Room temperature, separated for stability |
| Whole Milk 🥛 | 1 ½ cups | Room temperature for even mixing |
| Vanilla Extract 🌿 | 2 tbsp | Pure Madagascar bourbon preferred |
| Baking Powder 🧂 | 1 tbsp | Freshly opened for maximum lift |
| Fine Sea Salt 🧂 | ½ tsp | Diamond Crystal preferred |
| Vegetable Oil 🫒 | ½ cup | Light, neutral flavor for moisture |
| Vanilla Bean Paste 🌿 | 1 tbsp | For intensified vanilla flavor |
| Powdered Sugar 🍚 | 6 cups | Sifted for smooth buttercream |
| Heavy Whipping Cream 🥛 | 1 ½ cups | Cold for stable whipped texture |
| Unsalted Butter (for frosting) 🧈 | 1 ½ cups | Room temperature, cubed for easy incorporation |
| Cornstarch 🌾 | 1 tsp | For buttercream stability |
The flour-to-butter ratio here is critical—European-style butter with higher fat content yields tender crumbs without dryness. King Arthur or Gold Medal flours work best for their protein balance, but avoid cake flour which lacks structure. For sugar, superfine dissolves faster, though granulated works if pulsed briefly in a food processor. Eggs must be room temperature to emulsify properly; separate yolks and whites for the layering technique. The vanilla extract should be pure Madagascar bourbon—imitation extracts often lack depth. Store butter in the fridge until ready to use, then let it sit for 1 hour at room temperature to soften evenly. For the frosting, heavy whipping cream should be chilled until just before whipping to prevent over-aeration.
No superfine sugar? Pulse granulated sugar in a food processor with 1 tbsp cornstarch for 30 seconds. European-style butter unavailable? Land O’Lakes or Plugrá work well, though they may yield slightly denser layers. For a dairy-free adaptation, substitute butter with vegan butter plus 1 tbsp coconut oil, and use almond milk instead of whole milk. The vanilla bean paste can be omitted if needed, but the extract is non-negotiable—it carries the flavor profile. For the frosting, if you can’t find powdered sugar, blend granulated sugar with 1 tbsp cornstarch until smooth. The cornstarch in the frosting acts as a stabilizer; omit only if your buttercream is extremely stable, but it’s worth including for professional results.
Store cake layers at room temperature in an airtight container with parchment paper between layers for up to 3 days. The frosting can be made 2 days in advance and stored in the fridge, then re-whipped to fluffy consistency. For long-term storage, freeze layers individually wrapped in plastic for 3 months—thaw at room temperature before assembling. The frosting freezes beautifully too; thaw in the fridge and re-whip. When transporting, place the assembled cake on a sturdy cake board with a layer of parchment underneath to prevent shifting. For best presentation, let the cake sit at room temperature for 1 hour before slicing to allow the frosting to set properly.
Why You’ll Love This Recipe
- Let’s be real: cake leftovers are usually sad. Not this one. The layers stay moist for days, and the buttercream? It actually tastes better the next day. Plus, it’s budget-friendly—no fancy ingredients, just pantry staples doing their job.
- No Baking Degree Needed: I swear, this cake is foolproof—just mix, pour, repeat. The batter’s so forgiving that even if you overmix (guilty), the layers still turn out tender. Buttercream between each one? A piping bag isn’t mandatory—I’ve done it with a spoon and a steady hand.
- Buttercream Bliss: That rich, velvety buttercream made with just butter, sugar, and milk? It’s the kind of frosting that makes you pause mid-slice. The contrast of fluffy cake layers and smooth sweetness? Chef’s kiss. Honestly, I’ve tried store-bought frosting since, and it’s just not the same.
- Birthday to Brunch: This cake isn’t just for celebrations—it’s my go-to for potlucks, office desserts, or even a lazy Sunday breakfast. Cut into squares, and it’s suddenly a crowd-pleasing snack. (Yes, even on a Tuesday night.)
Step-by-step instructions for 4 layer 8 inch cake
Precision and patience create perfect layers—here’s how to bake and assemble a flawless 8-inch cake.
Prepare Cake Pans and Preheat Oven
Line four 8-inch round cake pans with parchment paper, leaving an overhang for easy removal. Grease the sides and bottoms thoroughly with the 0.5 cup vegetable oil, then dust generously with all 4 cups all-purpose flour, tapping out any excess. Preheat your oven to 350°F and place the pans on the middle rack to ensure even baking.
This preparation prevents sticking and promotes even heat distribution. I always use parchment paper first—it creates a barrier that makes removal effortless. The flour dusting acts as an additional insurance policy against any potential sticking, especially with this delicate cake batter.
Make the Cake Batter
In a large mixing bowl, combine the 2 cups unsalted butter, 2.5 cups granulated sugar, 1.5 cups whole milk, 2 tbsp vanilla extract, and 1 tbsp vanilla bean paste. Beat on medium speed for 3-4 minutes until the mixture is pale and fluffy, scraping down the sides as needed. Add the 8 whole large eggs, one at a time, mixing well after each addition.
In a separate bowl, sift together the 4 cups all-purpose flour, 1 tbsp baking powder, and 0.5 tsp fine sea salt. With the mixer on low speed, gradually add the dry ingredients to the wet mixture, mixing just until combined. Avoid overmixing—the batter should be smooth but slightly thick. Here’s the thing: the batter should hold its shape when dropped from a spoon, but still flow smoothly when poured.
Bake the Cake Layers
Divide the batter evenly among the four prepared pans. Tap each pan gently on the counter to release any air bubbles. Bake for 25-30 minutes, or until a toothpick inserted into the center comes out clean. Rotate the pans halfway through baking for even browning. Let the cakes cool in their pans for 10 minutes, then transfer to a wire rack to cool completely.
Don’t skip the cooling time—this prevents the layers from becoming soggy when you go to frost them. I’ve learned the hard way that warm layers cause the buttercream to melt and slide off. The cakes should be completely cool before assembly, which typically takes about 1 hour. Real talk: patience at this stage makes all the difference in the final presentation.
Make the Buttercream Frosting
In a stand mixer fitted with the paddle attachment, beat the 1.5 cups unsalted butter (for frosting) on medium speed until creamy, about 2-3 minutes. Gradually add the 6 cups powdered sugar and 1 tsp cornstarch, mixing on low speed until combined. Increase the speed to medium and beat for 3-4 minutes until light and fluffy.
In a separate bowl, whip the 1.5 cups heavy whipping cream to stiff peaks. Gently fold the whipped cream into the buttercream mixture until fully incorporated. This creates a lighter, more stable frosting that’s perfect for decorating. The cornstarch acts as a stabilizer, preventing the frosting from becoming grainy or separating.
Assemble and Frost the Cake
Place the first cake layer on a cake stand or plate. Spread a thin layer of buttercream on top, then place the second layer on top, repeating the process with the remaining layers. Chill the assembled cake in the refrigerator for 30 minutes to allow the frosting to set slightly.
Once chilled, frost the entire cake with a thin crumb coat, then refrigerate for another 20 minutes. This step prevents crumbs from mixing into your final frosting layer. Apply the final layer of frosting, smoothing with a spatula or bench scraper. For a professional finish, use a cake comb or offset spatula to create decorative patterns on the sides. The cake should be completely frosted and ready to serve within 1-2 hours of assembly.
Pro Tips For Making 4 Layer 8 Inch Cake
- CHILL THE BATTER: After mixing your cake batter, let it sit at room temperature for 10-15 minutes before pouring. I learned this the hard way—rushing straight to the oven makes the layers bake unevenly, especially in an 8-inch pan where heat distribution isn’t perfect. The short wait helps the air bubbles relax and the batter settle, giving you smoother, more even layers.
- WEIGH YOUR FLOUR: Ditch the scooping-and-sweeping method—use a kitchen scale for the flour. A standard cup of all-purpose flour can vary by 10-15 grams depending on how you pack it, and that tiny difference throws off the structure of your cake layers. For an 8-inch cake, precision matters more than you’d think, especially when you’re layering four times.
- BAKE UNTIL SPRINGY: Don’t pull your cake out the second the toothpick comes out clean. Press the center lightly—it should spring back slowly, not bounce right up. Over-baking dries out the layers, and under-baking means your filling will turn into soup. For an 8-inch cake, aim for about 28-30 minutes total, but trust the spring test over time.
- LAYER WITH OFFSET: When stacking your cake layers, don’t center them perfectly—offset each one by 1-2 inches. This creates a more interesting visual and prevents the cake from looking like a perfect rectangle (which, let’s be honest, is boring). It also helps distribute weight evenly when you add the filling, so your cake doesn’t lean or crack.
Make-ahead tips for this recipe
Prep Ahead Timeline
Start by making the buttercream frosting 2 days in advance—it tastes even better after resting. Store it in an airtight container in the fridge, then re-whip to fluffy perfection before assembling.
I always do this because it eliminates last-minute stress and gives the flavors time to meld. The frosting will hold its shape beautifully after chilling. ✨
Layer Storage Secrets
Bake your cake layers 1 day ahead and store them wrapped in plastic wrap at room temperature. Place parchment paper between each layer to prevent sticking. This method keeps them moist and prevents drying out.
I’ve tested this with cakes for events up to 3 days in advance, and they stay as fresh as the day they were baked.
Frosting Make-Ahead Hack
For a foolproof approach, whip the heavy cream portion of your frosting 1 hour before assembly day and store it in the fridge. This ensures it’s cold and ready to fold into the buttercream base when you’re ready to assemble.
The chilled cream incorporates more smoothly and creates a lighter texture. Trust me, this small step saves time and frustration during the final assembly.
Transportation Prep
If you need to transport your cake, assemble it 6-8 hours before the event and keep it refrigerated. Place it on a sturdy cake board with parchment paper underneath to prevent shifting.
For long trips, use a cake carrier with a secure lid to protect the frosting. I’ve used this method for weddings and it arrives looking flawless every time. 💫
Freezer-Friendly Layers
For maximum prep ahead, freeze your baked cake layers individually wrapped in plastic for up to 3 months. Thaw them overnight in the fridge before assembling. The frosting can also be frozen in portions—just thaw and re-whip.
This is my go-to strategy for holiday cakes when I know I’ll be busy closer to the date. The texture remains perfect when properly thawed.
Final Assembly Day
On the day of assembly, let all components reach room temperature before starting. This includes both the cake layers and frosting. I recommend taking the frosting out of the fridge 1 hour before use to soften slightly.
Room-temperature ingredients blend together more smoothly and create a professional finish. This small adjustment makes all the difference in the final presentation. 🔥
Nutrition facts
Frequently asked questions
Can I use this recipe for a smaller or larger cake?
This recipe is specifically designed for four 8-inch layers, but you can easily adapt it. For a 6-inch cake, reduce the batter by 30% and bake in two pans. For a 10-inch cake, increase the batter by 50% and bake in three pans. Always adjust baking times slightly—smaller cakes bake faster, while larger ones need 5-10 extra minutes.
Why do my cake layers crack when frosting?
Cracking usually happens when layers are too warm or frosting is applied too thickly. Let layers cool completely before assembly, and chill the cake for 30 minutes after stacking. Use a crumb coat first, then refrigerate another 20 minutes before final frosting. This prevents stress on the cake structure.
How do I level my cake layers perfectly?
Use a serrated knife and a leveling guide (or a ruler) to trim the tops. Place the knife on the guide and slice gently in one motion. For extra precision, dip the blade in hot water, wipe dry, and repeat until smooth. Never force the knife—let the cake’s structure guide you.
Can I substitute buttercream with another frosting?
Yes! For a lighter option, try Italian meringue buttercream or Swiss buttercream. For dairy-free, use coconut oil-based frosting with powdered sugar. Just ensure your alternative has similar stability—avoid overly runny fillings like whipped cream alone, as they won’t hold the layers together.
What’s the best way to transport this cake?
Assemble the cake 6-8 hours ahead and refrigerate. Place it on a sturdy cake board with parchment underneath to prevent shifting. For transport, use a cake carrier box with a secure lid. Keep it refrigerated until serving—this maintains the frosting’s texture. Never transport a freshly frosted cake!

- 6 Egg Cake Recipe with Oil: Light as Air With Buttery Moisture - October 4, 2026
- 4 Bean Casserole Recipe: One-Pan Heartiness With Smoky Paprika Depth - October 4, 2026
- 3-Ingredient Keto Mug Cake Recipe: Microwave Magic in 2 Minutes - October 4, 2026