
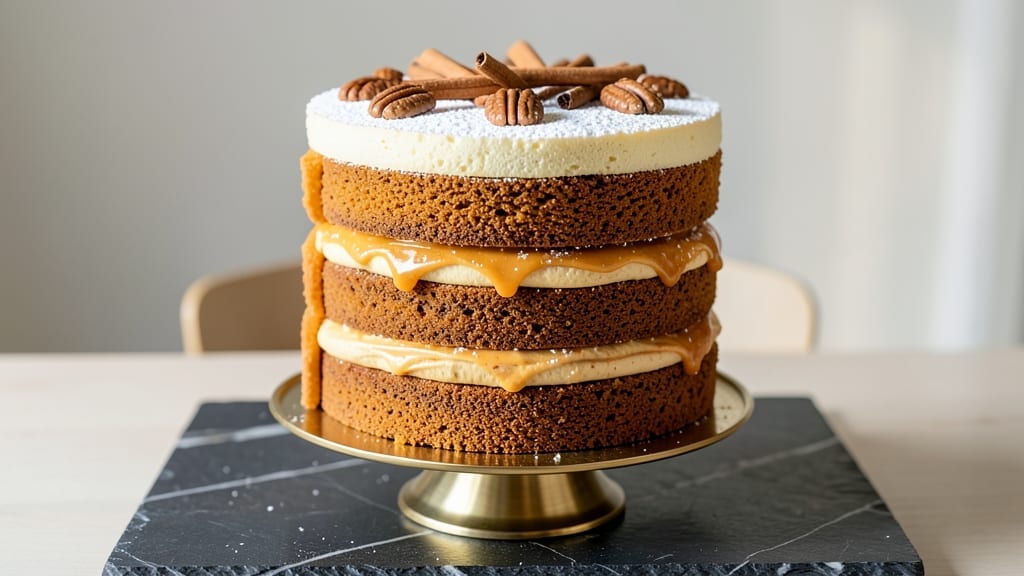
This 4-layer pumpkin cake recipe delivers the perfect balance of spiced moistness and velvety cream cheese swirls that will make your taste buds dance. 💛 After years of perfecting the layers—from the tender pumpkin sponge to the luscious cream cheese filling—I’ve finally cracked the code for a cake that’s both impressive and foolproof.
The secret lies in precise measurements and careful layering, ensuring every slice is a masterpiece of texture and flavor.
What sets this pumpkin cake apart is its moist, spiced layers that stay tender even after chilling, paired with a rich cream cheese frosting that swirls beautifully between each layer. The cake bakes up golden and dense, while the frosting adds a creamy contrast that makes every bite unforgettable.
With just a few simple ingredients and a little patience, you’ll create a dessert that looks and tastes like it came from a bakery.
The assembly process is where the magic happens—each layer is carefully filled and frosted, then chilled just enough to set before adding the next. This ensures clean slices and a professional finish every time.
Whether you’re celebrating a holiday, a birthday, or just craving something special, this cake delivers restaurant-quality results without the fuss.
Ready to impress your guests? This recipe includes tips for perfect layering, chilling times, and even decorative touches to elevate your presentation. Let’s get baking—your kitchen will smell like autumn in no time.
Ingredients for 4 layer pumpkin cake
Simple pantry staples transform into layers of spiced pumpkin bliss and creamy swirls—no fancy ingredients needed.
| Ingredient | Amount | Notes |
|---|---|---|
| Canned Pumpkin Puree 🎃 | 1 ½ cups | Unsweetened, not pumpkin pie filling |
| All-Purpose Flour 🌾 | 3 ½ cups | Sifted for light texture |
| Granulated Sugar 🍚 | 2 ½ cups | White or light brown |
| Light Brown Sugar 🍚 | ½ cup | Packed firmly |
| Unsalted Butter 🧈 | 1 ½ cups | Room temperature, full-fat |
| Large Eggs 🥚 | 4 whole | Room temperature |
| Vanilla Extract 🌿 | 2 tsp | Pure, not imitation |
| Ground Cinnamon 🌶️ | 2 tsp | Freshly ground preferred |
| Ground Ginger 🌿 | 1 ½ tsp | Freshly ground for warmth |
| Ground Nutmeg 🌶️ | ½ tsp | Freshly grated preferred |
| Ground Cloves 🌶️ | ¼ tsp | Sparingly for depth |
| Salt 🧂 | 1 tsp | Diamond Crystal preferred |
| Baking Powder 🍞 | 2 tsp | Aluminum-free |
| Baking Soda 🍞 | ½ tsp | Freshly opened |
| Cream Cheese 🧀 | 16 oz | Full-fat, room temperature |
| Powdered Sugar 🍚 | 4 cups | Sifted for smooth frosting |
| Heavy Whipping Cream 🥛 | 1 cup | Cold for stiff peaks |
| Vanilla Bean Paste 🌿 | 1 tbsp | For deeper vanilla flavor |
The pumpkin puree is non-negotiable—unsweetened canned is the way to go (none of that pie filling nonsense). Libby’s or Storebrand are my go-tos, but any 100% pumpkin works. For the spices, Penzeys or bulk bins at Whole Foods have the freshest ground versions—toss your pre-mixed spice blends. The cream cheese? Philadelphia or Neff block is best—pre-whipped tubs get watery. Room temperature butter and eggs are key for that tender crumb. I always grab extra vanilla extract because vanilla bean paste makes a world of difference (and it keeps forever).
No pumpkin puree? Freshly cooked and puréed pumpkin works (just strain out all the pulp). Running low on brown sugar? White sugar plus 1 tsp molasses mimics it. Cream cheese substitute? Whipped ricotta mixed with powdered sugar gets you close. The frosting can be made ahead—3 days in advance—but let it come to room temp before using. For extra richness, fold in 2 tbsp melted butter—trust me, it’s worth it. And if you’re feeling fancy, add 1 tsp lemon zest to the frosting for brightness.
This cake keeps beautifully—5 days refrigerated in layers wrapped tightly with plastic. The frosting can be made 3 days ahead and stored in the fridge. For serving, bring the frosting to room temperature (microwave 20 seconds, stir, repeat) and re-whip briefly. The cake itself? Room temperature is best—pull it out 30 minutes before slicing. Leftovers? Freeze the whole cake (unfrosted) for up to 2 months**—thaw overnight in the fridge, then refrost.
Why You’ll Love This Recipe
- Pantry Magic: I swear by this recipe when I forget to meal prep. Just grab canned pumpkin, flour, and sugar—no fresh ingredients needed. The layers actually ask to be stacked (moist pumpkin sponge, spiced cream cheese, brown sugar swirl, and that buttery frosting? Yes, please).
- Fall in One Bite: That caramelized brown sugar layer? It’s the star. The pumpkin puree keeps it rich without being heavy, while the buttercream ties it all together like a warm hug. Honestly, I’ve had people ask for seconds and then thirds—and I’ll take that any day.
- Double-Duty Dessert: Make it for Thanksgiving, but keep half for Christmas. The layers hold up for days (yes, even the frosting), so it’s perfect for potlucks or when you’re sure you’ll have leftovers. Between us, I’ve also used the sponge layer for breakfast toast—don’t judge.
- Budget-Friendly Luxury: This cake costs me about $8 to make and feeds 12. The canned pumpkin and brown sugar stretch the flavors, while the butter adds that just-baked richness without breaking the bank. My wallet and my taste buds win every time.
Step-by-step instructions for 4 layer pumpkin cake
Here’s how to build this showstopper layer by layer—moist pumpkin cake meets dreamy cream cheese swirls.
👨🍳 Step 1: Mix the Pumpkin Cake Batter
Preheat your oven to 350°F and grease four 6-inch round cake pans. In a large mixing bowl, combine the 1.5 cups unsalted butter, 2.5 cups granulated sugar, and 0.5 cup light brown sugar. Beat on medium speed until light and fluffy—about 3-4 minutes. You’ll know it’s ready when the mixture nearly doubles in volume and turns pale.
Add the 4 whole large eggs one at a time, mixing well after each addition. Then stir in the 1.5 cups canned pumpkin puree, 2 tsp vanilla extract, and 1 tbsp vanilla bean paste. In a separate bowl, whisk together the 3.5 cups all-purpose flour, 2 tsp baking powder, 0.5 tsp baking soda, 2 tsp ground cinnamon, 1.5 tsp ground ginger, 0.5 tsp ground nutmeg, 0.25 tsp ground cloves, and 1 tsp salt. Gradually fold the dry ingredients into the wet mixture until just combined—don’t overmix or your cake will be tough.
🔥 Step 2: Bake the Layers Evenly
Divide the batter evenly among the four prepared pans. Bake for 25-30 minutes or until a toothpick inserted in the center comes out clean. Let the cakes cool in the pans for 10 minutes before transferring to a wire rack to cool completely. Here’s the thing—if you try to remove them too soon, they’ll crack. Patience pays off with perfect layers.
While the cakes cool, make the cream cheese filling. In a medium bowl, beat the 16 oz cream cheese and 4 cups powdered sugar until smooth and creamy. Add the 1 cup heavy whipping cream and 1 tbsp vanilla bean paste, then beat until stiff peaks form. This should take about 3-4 minutes with an electric mixer.
🥘 Step 3: Assemble the Cake Layers
Place the first cake layer on a serving plate. Spread a generous layer of the cream cheese filling, then top with the second cake layer. Repeat this process with the remaining layers, finishing with the top layer. Here’s where it gets fun—use a long serrated knife to create swirls in the cream cheese between each layer. This isn’t just decoration; it ensures every bite has that rich, tangy cream cheese flavor.
Once all layers are stacked, cover the entire cake with the remaining cream cheese frosting. Use an offset spatula to smooth the top and create clean sides. Chill the cake in the refrigerator for at least 2 hours (or up to 24 hours) before serving. This resting time lets the flavors meld and makes slicing much easier.
🍽️ Step 4: Serve and Savor
Slice the cake into 12 equal pieces using a sharp serrated knife. Dip the knife in hot water and wipe it clean between slices to ensure clean cuts. The cake should have a moist, tender crumb with just the right amount of spice, and each bite should deliver that creamy, tangy cream cheese swirl you’ve been waiting for.
Serve with a dollop of whipped cream on top if you’re feeling extra fancy. The contrast between the warm, spiced pumpkin cake and the cool, creamy filling is what makes this dessert truly special. Trust me, your guests will be asking for the recipe before they even finish their first slice!
Pro Tips For Making 4 Layer Pumpkin Cake
- Weigh Your Butter: Unsalted butter can be tricky—packed tightly, it’s not the same as scooped. Use a kitchen scale for 1 cup (2 sticks) to guarantee you’re not shortchanging the cake’s richness. I learned this the hard way when my first batch turned out drier than a November wind.
- Whisk the Pumpkin: Before mixing, whisk the canned pumpkin puree until smooth—no lumps. Cold puree from the fridge? Run it under warm water for 30 seconds first. Lumps in the batter = uneven texture, and nobody wants a cake that fights back.
- Rotate the Pan: Your oven’s hot spots are real. After 20 minutes, swap the cake pans front to back (or top to bottom if using two racks). This evens out baking and keeps the edges from overcooking while the center stays tender. Yes, even if your oven’s “perfectly calibrated.”
- Chill the Layers: Let each layer cool completely before adding frosting or the next layer. I know, you’re eager—just 10 minutes in the pan, then transfer to a wire rack. Warm layers = soggy cake, and nobody’s here for a pumpkin pudding. Patience pays off.
Creative variations of this dish
Spiced Pumpkin Variations
Swap the classic spices for a Mexican-inspired twist by adding 1 tsp chili powder and ½ tsp smoked paprika to the cake batter.
The warmth of the spices pairs beautifully with the cream cheese—trust me, it’s a game-changer. 🌶️ For a winter citrus kick, fold 1 tbsp orange zest into the frosting and add ½ tsp cardamom to the cake batter. The bright notes cut through the richness perfectly.
Frosting Flavor Swaps
Craving something lighter? Replace the cream cheese with a lemon curd filling—mix 1 cup lemon curd (store-bought or homemade) with ½ cup whipped cream for a tangy contrast.
For a chocolate lover’s twist, fold ½ cup melted dark chocolate into the frosting and sprinkle crushed peppermint on top. The cool mint balances the warm pumpkin beautifully.
Layered Texture Play
Want to shake things up? Add a thin layer of spiced applesauce between the cake layers for extra moisture and a subtle fruit flavor. For a nutty crunch, sprinkle toasted pecans or chopped walnuts over the top frosting.
I also love adding a thin layer of maple glaze on the sides for a glossy finish—just mix ½ cup maple syrup with 1 tbsp powdered sugar and brush it on after chilling.
Dietary Adaptations
Make this cake gluten-free by substituting the all-purpose flour with a 1:1 gluten-free baking blend (like Bob’s Red Mill). For a lower-sugar version, reduce the granulated sugar to 2 cups and add ¼ cup applesauce to the batter.
The cake stays moist without the extra sweetness. If you’re avoiding dairy, use vegan cream cheese (like Kite Hill) and coconut oil instead of butter—just know the texture will be slightly denser.
Seasonal Twists
For a summer version, replace pumpkin with mashed sweet potato and add ½ tsp cinnamon and ¼ tsp nutmeg to the frosting. It’s a lighter take that still feels indulgent.
In fall, top the cake with a candied pecan crumble—mix ½ cup chopped pecans, 2 tbsp brown sugar, and 1 tbsp melted butter, then bake at 350°F for 8-10 minutes until golden. 🍂
Make-Ahead Magic
Assemble the cake a day ahead—it tastes even better after the flavors meld. Store the unfrosted layers in the fridge for up to 3 days, then frost and chill before serving. For holiday gifting, wrap each layer in plastic wrap and stack them in a cake box.
Add a ribbon and a tag—your friends will think you’re a pro! The frosting can also be made 2 days ahead and stored in an airtight container.
Nutrition facts
Frequently asked questions
Why does my pumpkin cake turn out dense instead of moist?
Overmixing the batter or using too much flour are the most common culprits. Always mix just until combined, and measure your flour by weight (or spoon and level) for accuracy. The secret to moisture? Don’t skip the room-temperature butter and eggs—cold ingredients create steam that can make cakes dense. Also, ensure your pumpkin puree is unsweetened and not pie filling.
Can I make this cake in smaller pans to get more layers?
Use 8-inch pans instead of 6-inch for 2 layers each, or 9-inch pans for 1 layer each. Just adjust baking times—8-inch pans need 30-35 minutes and 9-inch pans need 35-40 minutes. The key is maintaining the same batter-to-pan ratio to keep the texture perfect. For a 6-layer cake, you’d need 3 pans of each size.
How do I prevent the cake layers from shifting when I add frosting?
Chill the cake for at least 2 hours before adding the final frosting—this sets the layers. Use a long serrated knife to trim any uneven edges before stacking, and place a small piece of parchment between layers if you’re concerned about shifting. For extra stability, wrap the assembled (unfrosted) cake in plastic and refrigerate overnight before adding the final frosting.
What’s the best way to store leftovers?
Wrap individual slices in plastic wrap and store in an airtight container in the fridge for up to 5 days. For longer storage, freeze the whole cake (unfrosted) for up to 2 months. Thaw overnight in the fridge, then refrost with softened cream cheese frosting. The texture holds up beautifully when properly stored—just avoid freezing with frosting already applied.
Can I substitute cream cheese frosting with something lighter?
Yes! For a lighter option, try a pumpkin spice whipped cream frosting—whip 2 cups heavy cream, 1.5 cups powdered sugar, 1 tsp pumpkin pie spice, and 1 tbsp vanilla until stiff peaks form. It won’t be as rich but adds a lovely airy contrast. Another option is a lemon curd filling**—mix 1 cup lemon curd with ½ cup whipped cream for a tangy twist.

- 6 Egg Cake Recipe with Oil: Light as Air With Buttery Moisture - October 4, 2026
- 4 Bean Casserole Recipe: One-Pan Heartiness With Smoky Paprika Depth - October 4, 2026
- 3-Ingredient Keto Mug Cake Recipe: Microwave Magic in 2 Minutes - October 4, 2026