
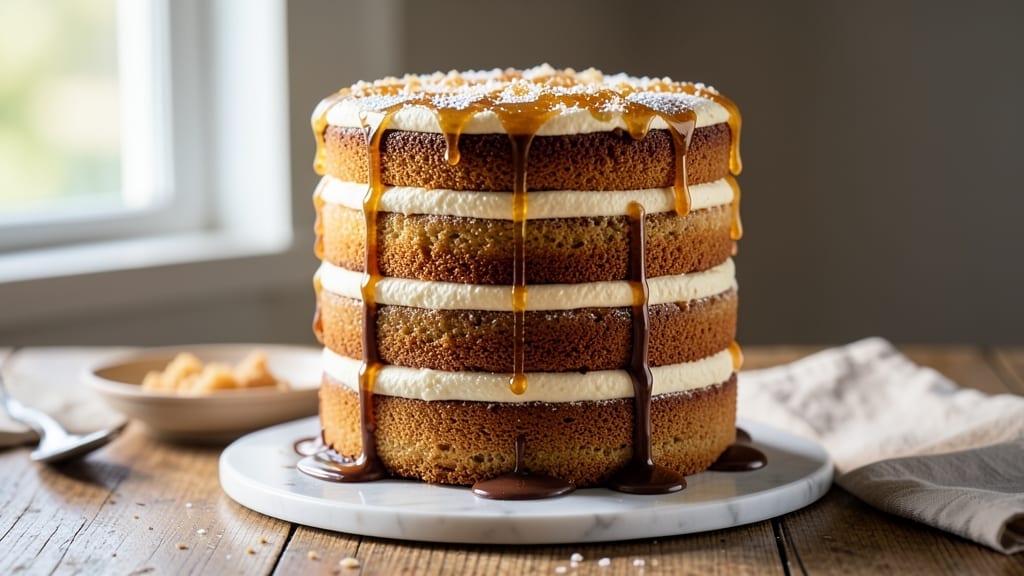
This 4-layer vanilla cake recipe delivers the perfect balance of tender crumb, creamy fillings, and swirled buttercream that looks like a bakery masterpiece. 💛 The secret lies in baking each layer just until golden—no overmixing the batter, no rushing the cooling—and assembling with precision to avoid soggy layers.
I’ve baked this cake for weddings, birthdays, and just-because celebrations, and it never disappoints.
The foundation starts with light, moist vanilla cake layers that stay tender even after frosting. Between each layer, we add a cream cheese filling for tangy contrast and a vanilla buttercream that swirls beautifully when piped.
The final touch? A thin buttercream crust to lock in moisture and create that showstopping clean edge. This isn’t just a cake—it’s a foolproof way to impress without stress.
By the time you’re done, you’ll have a high, elegant cake with layers that slice cleanly and flavors that shine: sweet vanilla cake, creamy cheese filling, and rich buttercream in every bite.
The swirls stay sharp, the layers hold their shape, and the taste? Pure, restaurant-quality bliss. Whether it’s for a celebration or a sweet treat, this recipe delivers every time.
Pro tip: Chill the cake between layers and frosting for cleaner cuts and better flavor development. Ready to bake? Here’s how to assemble it like a pro—no shortcuts, just perfection.
Ingredients for 4 layer vanilla cake
Four layers of tender vanilla perfection and swirls of creamy buttercream—no shortcuts, just bakery-style elegance.
| Ingredient | Amount | Notes |
|---|---|---|
| All-Purpose Flour 🌾 | 4 cups | Sifted for light texture |
| Granulated Sugar 🍬 | 2 ½ cups | Divided for batter and filling |
| Unsalted Butter 🧈 | 2 cups | Room temperature, full-fat |
| Large Eggs 🥚 | 6 whole | Room temperature, separated |
| Vanilla Extract 🌿 | 2 tbsp | Pure, high-quality extract |
| Baking Powder 🧂 | 2 tsp | Aluminum-free preferred |
| Salt 🧂 | ½ tsp | Fine sea salt |
| Milk 🥛 | 1 ½ cups | Whole milk preferred |
| Cream Cheese 🧀 | 16 oz | Full-fat, room temperature |
| Powdered Sugar 🍬 | 4 cups | For buttercream |
| Vanilla Bean Paste 🌿 | 1 tbsp | Or 1 tsp pure extract |
| Heavy Whipping Cream 🥛 | 1 cup | Cold for buttercream |
| Lemon Juice 🍋 | 1 tbsp | Freshly squeezed |
The flour and butter are your foundation. King Arthur or Gold Medal flour gives the lightest crumb, but don’t stress if you’ve only got store-brand—just sift it well. The butter should be soft but not melted (press a finger in; it should leave a slight indent). I always buy Land O’Lakes or Plugrá for the best flavor consistency. The cream cheese? Philadelphia or Neff—never the low-fat versions. Room temperature is key; if yours is straight from the fridge, let it sit for 2 hours. Pro move: wrap it in a towel while it warms for even results.
No vanilla bean paste? Pure extract works just as well—just use the same amount. Running short on powdered sugar? Granulated sugar blended into a powder in a food processor gets you close. The heavy cream needs to be cold and whipped to stiff peaks for that perfect buttercream texture. If your buttercream looks too soft, chill it 15 minutes before piping. For the cake layers, bake until a toothpick comes out clean but with a few moist crumbs—overbaking is the enemy of tender layers. And if you’re worried about soggy cake, chill the layers completely before assembling.
Store cake layers wrapped in plastic wrap at room temperature for up to 2 days—they’ll keep better than you think. The buttercream? Keep it refrigerated between uses and whip it back to fluffiness before piping. Fully assembled cake stays fresh 3 days at room temp or 1 week refrigerated. For freezing, wrap the whole cake tightly in plastic and foil—it’ll keep for up to 3 months. Just let it come to room temperature before serving. And if you’re prepping ahead, assemble the cake layers the day before—the flavors meld beautifully overnight.
Why You’ll Love This Recipe
- No Mixer Needed: I swear by this recipe when my stand mixer’s on the fritz—just fold the butter into the sugar with a sturdy spoon until it’s light and fluffy. The eggs and vanilla blend right in, no pulsing required.
- Vanilla That Sings: That first layer of cake? Buttery, tender, and packed with real vanilla extract—not the cheap imitation stuff. The layers stay moist for days, and the frosting? Creamy enough to make you close your eyes.
- Birthday or Boredom: Between us, this cake handles everything—birthday parties, potlucks, or when I just need dessert at 3 PM. The layers hold up perfectly, so you’re not stuck with a collapsed mess.
- Leftovers for Days: I’ve made this cake twice and still have slices left. The frosting keeps well, the cake stays fresh, and honestly? It’s cheaper than buying a boxed mix with fancy frosting. Win-win.
Step-by-step instructions for 4 layer vanilla cake
Here’s how to bake this showstopper with perfect layers and silky fillings.
👨🍳 Step 1: Prepare the Cake Batter
Preheat your oven to 350°F and grease four 6-inch round cake pans, lining the bottoms with parchment paper. In a large mixing bowl, whisk together the 4 cups all-purpose flour, 2.5 cups granulated sugar, 2 tsp baking powder, and 0.5 tsp salt. Set aside.
In a separate bowl, beat the 2 cups unsalted butter until smooth, then add the 6 whole large eggs one at a time, mixing well after each addition. Add the 1.5 cups milk and 2 tbsp vanilla extract, mixing until fully combined. Gradually fold in the dry ingredients until just combined—don’t overmix.
🍳 Step 2: Bake the Layers
Divide the batter evenly among the prepared pans. Bake for 25-30 minutes or until a toothpick inserted into the center comes out clean. The edges should be golden brown, and the tops should spring back when gently pressed.
Let the cakes cool in the pans for 10 minutes, then transfer to a wire rack to cool completely. This cooling step is crucial—warm layers will melt your fillings. I like to place the pans on the rack upside down to prevent any potential doming.
🥘 Step 3: Make the Cream Cheese Filling
In a medium bowl, beat the 16 oz cream cheese until smooth and creamy. Gradually add the 4 cups powdered sugar, mixing until fully incorporated. Add the 1 tbsp vanilla bean paste and 1 tbsp lemon juice, mixing until well combined. This filling should be thick but spreadable—if it’s too stiff, add 1-2 tablespoons milk to loosen.
🍳 Step 4: Prepare the Buttercream
In a separate large bowl, beat the 1 cup heavy whipping cream until stiff peaks form. In a separate bowl, beat the remaining 1 cup unsalted butter (yes, you’ll use half of the total butter) until smooth. Gradually add the 2 cups powdered sugar and 1 tbsp vanilla extract, mixing until light and fluffy.
Gently fold the whipped cream into the buttercream until fully combined. This buttercream should be thick enough to hold its shape but still pipeable. If it’s too soft, chill for 15 minutes before assembling the cake.
🥘 Step 5: Assemble the Cake
Place the first cake layer on a cake stand or plate. Spread a thin layer of cream cheese filling over the top, then pipe a generous layer of buttercream around the edges. Place the second layer on top and repeat the process. Continue with the remaining layers, finishing with the last layer on top.
Pipe the remaining buttercream over the entire cake, then spread it evenly with an offset spatula. Use a cake scraper to create clean edges. For the swirl effect, pipe dollops of buttercream around the cake and swirl with a spatula. Chill the cake for 1 hour before slicing to allow the fillings to set properly.
Pro Tips For Making 4 Layer Vanilla Cake
- Bake Layers at 325°F: I learned this the hard way—hotter temps (350°F+) make the edges cook faster than the center, leading to cracks or gummy middles. This lower heat ensures even baking without over-browning, and the layers stay tender instead of drying out. (Yes, it takes 5-7 minutes longer, but your cake won’t be a science experiment.)
- Weigh Your Butter: I was skeptical until I tried it: scooping butter straight from the fridge gives inconsistent volumes, and packed vs. loosely packed makes a real difference. Use a kitchen scale for the butter (and sugar, if you’re picky)—your layers will rise more evenly, and the texture stays light. (Pro tip: let the butter sit out for 1 hour first, but don’t soften it fully—it should yield slightly when pressed.)
- Skip Overmixing the Batter: After burning three batches, I finally figured out the flour and eggs hate each other when forced together. Mix just until combined—lumps are fine—then stop. Overmixing develops gluten, and your cake will turn tough instead of fluffy. (Your mixer’s timer is your friend here: 20-30 seconds max after the dry ingredients disappear.)
- Layer with a Damp Cloth: This isn’t the prettiest method, but it’s the tastiest: after frosting each layer, press a damp paper towel between them for 10 seconds. The moisture helps the frosting adhere better and prevents dry spots where the layers meet. (Trust me, you’ll notice the difference when slicing.)
Best sauces and condiments for this recipe
Classic Vanilla Sauce
Warm vanilla sauce elevates this cake like nothing else. Simmer 1 cup heavy cream, ½ cup granulated sugar, and 1 vanilla bean (split and scraped) for 5 minutes until syrupy.
Strain and drizzle over slices—it adds a luscious, creamy contrast to the buttercream. 💛 For extra richness, add 1 tbsp butter at the end. Serve warm for a restaurant-worthy touch.
Salted Caramel Drizzle
This salted caramel takes your cake to the next level. Cook 1 cup granulated sugar in a saucepan until amber, then whisk in ½ cup heavy cream and 2 tbsp butter.
Finish with a pinch of flaky sea salt and drizzle generously over each slice. The salt enhances the caramel’s sweetness while balancing the cake’s richness.
Lemon Curd Swirl
Brighten every bite with homemade lemon curd—simmer ½ cup lemon juice, ½ cup sugar, and 2 egg yolks until thickened. Cool completely, then pipe or spoon dollops between cake layers or over slices.
The tangy citrus cuts through the sweetness beautifully. For extra flair, top with lemon zest or a twist of lemon peel. 🍋
Chocolate Ganache
For chocolate lovers, a dark chocolate ganache is a game-changer. Melt ½ cup dark chocolate chips with ¼ cup heavy cream, then drizzle over slices or use as a filling between layers.
Let it set slightly before serving for a glossy, decadent finish. Pair with a sprinkle of crushed pistachios for texture contrast.
Berry Compote
Fresh or frozen berry compote adds a fruity pop. Simmer 1 cup mixed berries (strawberries, raspberries, or blackberries) with 2 tbsp sugar and 1 tbsp lemon juice until thickened. Strain seeds if desired, then drizzle over slices or layer between cake tiers. The natural sweetness complements the vanilla perfectly. 🌸
Spiced Rum Buttercream
For a boozy twist, infuse your buttercream with spiced rum. Add 1 tbsp dark rum (like Kraken or Captain Morgan) to the buttercream mixture before folding in the whipped cream.
The warm spices in the rum add depth, making it ideal for holiday celebrations. Garnish with a sprinkle of cinnamon or nutmeg for extra warmth. ✨
Nutrition facts
Frequently asked questions
Can I substitute cake flour for all-purpose flour?
Yes, but with adjustments! Replace the 4 cups all-purpose flour with 3 cups cake flour plus 1 cup all-purpose flour to maintain structure. Cake flour has a lower protein content, so adding the extra all-purpose keeps your layers sturdy. For best results, sift the flour mixture thoroughly to avoid lumps.
How do I prevent my cake layers from cracking?
Cracking usually happens from overmixing or uneven baking. Mix the batter just until combined (no streaks of flour), and rotate your pans halfway through baking. Let layers cool completely before assembling—warm layers can’t handle the weight of frosting. Also, chill the cake for 1 hour after frosting to set everything properly.
Can I make this cake in 8-inch pans instead of 6-inch?
but reduce the batter by 25%**—use only 3 cups batter per 8-inch pan instead of 4. This keeps your layers proportionate. Bake times will increase slightly (check at 35-40 minutes
Why did my buttercream turn grainy?
Grainy buttercream usually means your butter wasn’t soft enough or your powdered sugar had lumps. Always use room-temperature butter and sift your powdered sugar. If it happens, beat in 1-2 tablespoons milk or warm water to smooth it out. For extra insurance, chill your buttercream for 15 minutes before piping.
How can I make this cake gluten-free?
Use a 1:1 gluten-free flour blend (like Bob’s Red Mill) and reduce the baking powder to 1.5 teaspoons—gluten-free batters need extra lift. Replace the milk with a dairy-free alternative (like almond milk) and ensure your vanilla extract is gluten-free. Expect slightly denser layers, but the flavor stays rich. Test with one layer first!

- 3lb Prime Rib Roast Recipe: Juicy Pink Center Guaranteed in 3 Hours - October 31, 2026
- 5 Spice Cake Recipe: Warmly Spiced Layers With Crunchy Top - October 31, 2026
- 1950’s Macaroni and Cheese Recipe: Nostalgic Creamy Cheese Sauce with Buttery Noodles - October 31, 2026