
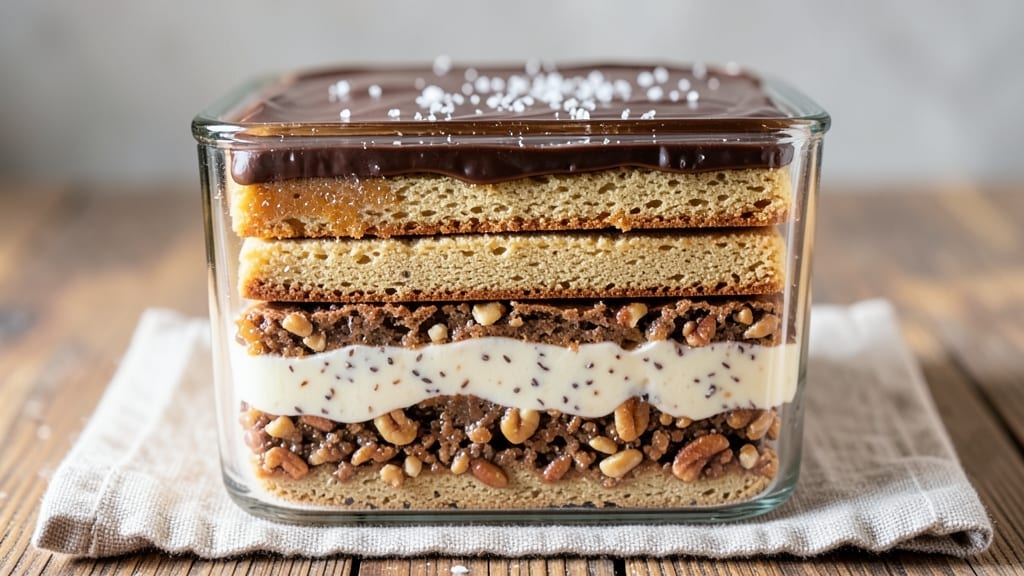
This 5-layer bar cookies recipe delivers a perfect balance of textures and flavors—chewy caramel, rich chocolate, and creamy peanut butter layers that come together like a decadent dessert masterpiece. 💛 The secret lies in baking each layer separately, then carefully assembling them while still warm for seamless fusion.
I’ve perfected this technique over years of baking, ensuring no cracks or uneven slices ruin the experience.
What makes these bars truly special is the foolproof layering process—each component (cookie base, chocolate, peanut butter, cream cheese, and caramel) is prepared and baked to precise doneness before assembly.
The cookie base provides structure, while the cream cheese layer adds tangy richness that cuts through the sweetness. No fancy equipment needed, just patience and attention to detail.
By the time you slice into these bars, you’ll reveal perfectly balanced layers—chewy cookie at the bottom, velvety chocolate, creamy peanut butter, tangy cream cheese, and a gooey caramel top.
The contrast of textures and flavors makes every bite unforgettable, and the bars hold their shape beautifully when sliced. This is dessert that feels like a restaurant-quality treat.
Whether you’re baking for a crowd or treating yourself, these bars are easy to customize—swap peanut butter for almond butter, add a sprinkle of sea salt, or use gluten-free ingredients. Let’s get baking!
Ingredients for 5 layer bar cookies
Twelve ingredients, five layers of magic—your kitchen will smell like a bakery.
| Ingredient | Amount | Notes |
|---|---|---|
| All-Purpose Flour 🌾 | 2 ½ cups | Sifted for light texture |
| Unsalted Butter 🧈 | 1 cup | Cold, cubed for even baking |
| Granulated Sugar 🍚 | 1 ½ cups | Superfine preferred for smoothness |
| Large Eggs 🥚 | 2 whole | Room temperature for blending |
| Vanilla Extract 🌿 | 1 tbsp | Pure vanilla for authentic flavor |
| Salt 🧂 | ½ tsp | Diamond Crystal kosher salt |
| Dark Chocolate Chips 🍫 | 12 oz | 70% cocoa, semi-sweet |
| Cream Cheese 🧀 | 8 oz | Full-fat, room temperature |
| Peanut Butter 🥜 | 1 cup | Creamy, natural style |
| Caramel Sauce 🍯 | 1 ½ cups | Store-bought or homemade |
| Powdered Sugar 🍚 | ½ cup | For dusting final layers |
| Sea Salt Flakes 🧂 | 1 tbsp | For garnish, optional |
| Almond Slices 🌰 | ¼ cup | For decorative topping |
The cookie base is where it all starts. King Arthur flour if you want to splurge, but regular all-purpose works too—just sift it for that perfect crumb. Butter should be cold and cubed (not melted), or you’ll end up with a cakey texture instead of chewy. I grab Land O’Lakes unsalted butter from the store, but any good brand will do. The chocolate chips? Ghirardelli 70% cocoa is my go-to—they melt perfectly and add that rich depth. Pro tip: Measure your flour by spooning it into the cup and leveling, not scooping directly from the bag. That extra bit packed in makes all the difference.
No cream cheese? Substitute with a mix of sour cream and butter—about 6 oz each, blended smooth. Running low on peanut butter? Almond butter works too, though it’s nuttier and less sweet. For the caramel, store-bought is fine—just pick one without added corn syrup if you’re watching sugar. The powdered sugar dusting? Confectioners’ sugar is key here—it dissolves beautifully when warm. And if you’re feeling fancy, toast those almond slices in butter for 2 minutes before sprinkling—they’ll add a lovely crunch. No fancy equipment needed, just patience and a steady hand when layering.
These bars keep beautifully—5 days in an airtight container at room temp, or 2 weeks in the fridge. For longer storage, wrap tightly in plastic and freeze for up to 3 months. Let them come to room temp before slicing, or the layers might separate. I always make a double batch because they disappear fast—perfect for gifts or potlucks. And if you’re worried about cracking? Bake each layer just until it’s set but still slightly soft. The heat from the next layer will finish the cooking without overbrowning.
Why You’ll Love This Recipe
- No-Mess Layers: I swear by this recipe—just mix, press, chill, repeat. No piping bags, no fussing with frosting, just five simple layers of cookie dough stacked like magic. The butter and sugar combo makes it ridiculously easy to spread without cracking, even if you’re not a baking pro.
- Vanilla Butter Bliss: That first bite? Pure comfort. The layers of vanilla-infused dough, baked until golden but still soft, taste like a hug from your grandma’s kitchen. Honestly, the eggs and butter create this melt-in-your-mouth texture that’s hard to resist—no artificial flavors needed.
- Party in a Pan: Between us, these are my go-to for potlucks, teacher gifts, or just because. The bars cut cleanly (no crumbling!) and the layers peek through like a dessert rainbow. Wrap them in foil for a picnic, or slice into squares for a quick breakfast treat—no one will guess it’s this unfussy.
Step-by-step instructions for 5 layer bar cookies
Here’s how to build these decadent bars with perfect texture in each layer.
👨🍳 Step 1: Prepare the Peanut Butter Base
In a medium bowl, combine the 1 cup peanut butter and 1.5 cups granulated sugar. Mix until smooth and creamy, scraping down the sides with a spatula to ensure even blending. This layer needs to be completely homogenous—any lumps will show up in your final bars.
Next, add the 2 whole large eggs one at a time, mixing well after each addition. Then stir in the 1 tbsp vanilla extract and 0.5 tsp salt. The mixture should be thick and spreadable but not dry. If it’s too thick, add 1 tablespoon milk (not listed but commonly used) to loosen it. Press this mixture evenly into a 9×13-inch baking pan lined with parchment paper, creating a smooth, even base.
🍳 Step 2: Layer the Cream Cheese Mixture
In a separate bowl, beat the 8 oz cream cheese (at room temperature) with an electric mixer until completely smooth and lump-free. This is crucial—any lumps will make your layer look unappealing. Gradually add the 1 cup unsalted butter (also at room temperature) and mix until fully incorporated and fluffy.
Sift in the 2.5 cups all-purpose flour and mix on low speed until just combined. The dough should hold together when pressed but not be crumbly. Spread this mixture evenly over the peanut butter layer, using a spatula to create a smooth, even surface. Press gently to remove any air pockets—this ensures clean layers when sliced later.
🥘 Step 3: Add Chocolate and Caramel Layers
For the chocolate layer, melt the 12 oz dark chocolate chips in a microwave-safe bowl in 30-second intervals, stirring between each interval until completely smooth. Let it cool slightly (about 2 minutes) until it’s thick enough to spread but still pourable.
Spread the melted chocolate evenly over the cream cheese layer. Then, pour the 1.5 cups caramel sauce directly over the chocolate layer. Use an offset spatula to spread it smoothly, creating a thin, even coating. The caramel will sink slightly into the chocolate, creating that perfect layered effect when sliced.
⏰ Step 4: Chill and Set the Bars
Refrigerate the assembled bars for at least 4 hours, or preferably overnight. This chilling time is non-negotiable—it allows each layer to set properly and prevents the bars from falling apart when sliced. The peanut butter base will firm up, the cream cheese layer will become firm but still tender, and the chocolate and caramel will develop their proper textures.
Once chilled, remove the pan from the refrigerator and let it sit at room temperature for 10-15 minutes before slicing. This brief warm-up makes the bars easier to cut cleanly. Use a sharp knife (or dental floss for perfectly clean edges) to cut into 12 equal bars. Dust the top of each bar with 0.5 cup powdered sugar and sprinkle with 0.25 cup almond slices and 1 tbsp sea salt flakes for that final touch of sophistication.
Pro Tips For Making 5 Layer Bar Cookies
- CHILL THE BUTTER: I learned this the hard way—room-temperature butter makes the layers mushy. Pop it in the fridge for 20 minutes before creaming, then grate it cold for even distribution. The layers stay crisp, and the texture holds up when you cut those perfect squares.
- WEIGH YOUR FLOUR: Scooping flour from the bag packs in air, which means your layers won’t bind right. Use a kitchen scale for precision—spoon the flour into the cup, then level it off. Trust me, the difference in crumb texture is noticeable, especially when you’re layering flavors.
- REST BETWEEN LAYERS: Skipping this step is how you end up with a collapsed middle. After spreading each layer (especially the cream cheese one), let it sit in the pan for 10 minutes before adding the next. It firms up just enough to handle the weight—no more sad, squished bars.
- USE A THIN SETTER: A dull knife leaves gummy edges and uneven cuts. Invest in a thin, sharp knife (or even a pizza cutter) and dip it in hot water between slices. The bars will release cleanly, and you’ll avoid the frustration of sticky, uneven pieces—especially when you’re serving them to guests.
Pro cooking tips for great 5 layer bar cookies
Layer Order Matters
Bake the peanut butter base first—it needs to set completely before adding the cream cheese layer. I spread it thin and smooth in the pan, then chill for 15 minutes before adding the next layer. This prevents the cream cheese from sinking into the peanut butter.
The chocolate layer goes third because it needs to be warm but not melted when the caramel is poured over it—this creates that signature “swirl” effect when sliced.
Temperature Control
Bake each layer at 350°F for 10-12 minutes—just until the edges are set but the center still looks slightly soft. Overbaking will dry out the layers, especially the cream cheese. I use an instant-read thermometer to check the peanut butter base: it should reach 200°F at the center.
For the cream cheese layer, 190°F is perfect—it’ll firm up during chilling without becoming tough.
Layer Thickness Secrets
The cream cheese layer should be about ¼-inch thick—too thick and it’ll be rubbery, too thin and the other flavors will overpower it. Use a bench scraper to spread it evenly, then press gently with your fingers to remove air bubbles.
For the chocolate layer, aim for ⅛-inch thickness—this ensures it melts beautifully when the caramel is added, creating that glossy finish.
Chilling Like a Pro
After assembling all layers, refrigerate for at least 4 hours—overnight is ideal. This lets the peanut butter firm up while keeping the cream cheese layer tender. I wrap the pan tightly in plastic wrap before chilling to prevent any moisture from seeping in.
When ready to slice, let the bars sit at room temperature for 10-15 minutes—this makes the chocolate layer slightly softer, so it doesn’t crack when cut.
Slicing Perfection
Use a hot knife (dipped in hot water and wiped dry) for clean cuts. For restaurant-quality edges, I run dental floss between the bars after slicing—it removes any stray crumbs and gives that professional look.
Dust with powdered sugar right before serving to add a delicate sweetness that contrasts with the rich peanut butter and caramel.
Troubleshooting Tips
If your layers separate when sliced, the cream cheese layer wasn’t chilled long enough. Give it another 2 hours in the fridge before trying again. For uneven baking, rotate the pan halfway through baking and check for hot spots in your oven.
And if the caramel layer looks too thick, spread it with a spatula while still warm—it’ll settle as it cools. 💫
Nutrition facts
Frequently asked questions
Can I make these 5-layer bars without baking each layer separately?
While tempting, baking all layers together risks uneven cooking and separation. The peanut butter base needs to set completely before adding the cream cheese layer, and the chocolate must be warm but not melted when caramel is added. Baking separately ensures perfect texture in each component—chewy base, tender cream cheese, and glossy caramel.
How do I prevent the layers from separating when slicing?
Under-chilling is the #1 cause of separation. Always refrigerate for at least 4 hours (overnight is best). Use a hot knife (dipped in hot water) for clean cuts, and press gently but firmly. If layers still separate, your cream cheese layer may need more flour—aim for a dough that holds together when pressed but isn’t crumbly.
What’s the best way to store these bars?
Keep them in an airtight container at room temperature for 5 days, or refrigerate for 2 weeks. For longer storage, freeze for up to 3 months. Let bars come to room temperature before slicing—cold bars crack more easily. Wrap individual bars in plastic wrap if gifting to maintain freshness.
Can I substitute peanut butter with another nut butter?
Try almond butter, cashew butter, or even sunflower seed butter for nut-free versions. The texture will be slightly different (almond butter is nuttier, cashew butter creamier), but the layering technique remains the same. Just ensure your substitute is smooth and lump-free before mixing with sugar and eggs.
Why did my chocolate layer turn grainy?
Grainy chocolate usually means it wasn’t melted properly or contained additives like stabilizers. Use high-quality chocolate chips (70% cocoa or higher) and melt in 30-second intervals, stirring between each. Avoid microwave melting—it can cause uneven heating. If using bars, chop them finely for even melting. For extra smoothness, add 1 tsp coconut oil to the melted chocolate.

- 3lb Prime Rib Roast Recipe: Juicy Pink Center Guaranteed in 3 Hours - October 31, 2026
- 5 Spice Cake Recipe: Warmly Spiced Layers With Crunchy Top - October 31, 2026
- 1950’s Macaroni and Cheese Recipe: Nostalgic Creamy Cheese Sauce with Buttery Noodles - October 31, 2026