
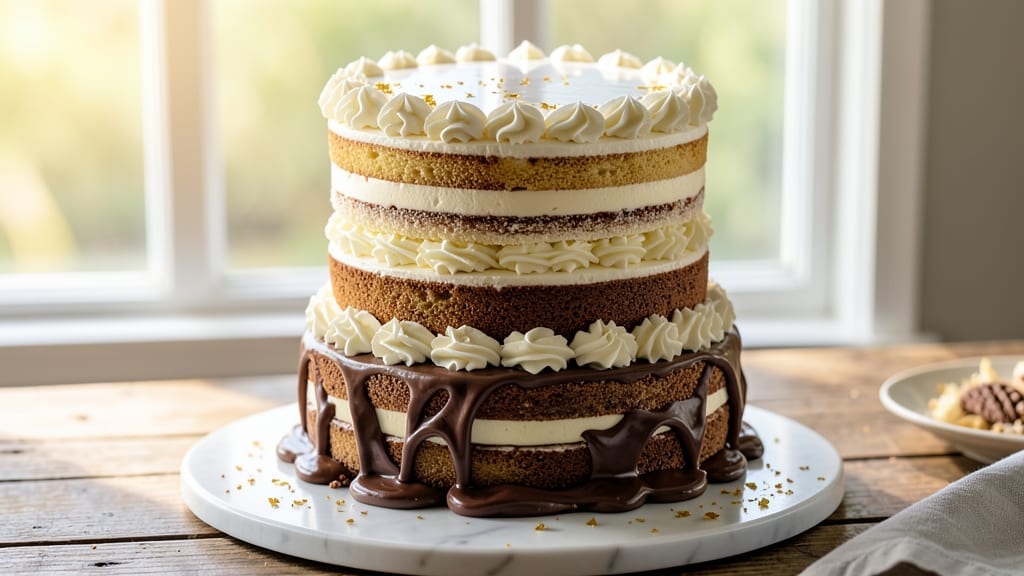
Mastering a 5-layer cake recipe with vanilla bean swirls and cream cheese frosting harmony transforms any celebration into a showstopper. 💛 The secret lies in perfectly balanced layers—light vanilla sponges, velvety cream cheese filling, and buttery swirls that create visual drama while keeping every bite moist.
This isn’t just a cake; it’s a masterpiece that builds confidence with each precise step.
What sets this recipe apart is the foolproof technique for baking even layers that stay tender, plus the art of swirling vanilla bean buttercream between each layer. We’ll use a 350°F oven for consistent results and let each layer cool completely to prevent soggy bottoms.
The cream cheese frosting, stabilized with butter and powdered sugar, creates that signature creamy texture while maintaining structure.
By the time you’re done, you’ll have a cake with golden-brown layers, delicate swirls of vanilla bean filling, and a frosting so smooth it looks professionally piped.
The vanilla bean adds depth that store-bought extracts can’t match, while the cream cheese frosting delivers that perfect balance of sweetness and tang. This is the kind of cake that makes guests ask for the recipe—and makes you proud to serve it.
Perfect for weddings, birthdays, or just because—this recipe scales beautifully for any occasion. The assembly process is where the magic happens, and I’ll walk you through every step to ensure your cake rises to the occasion. Let’s get started on creating your showstopper.
Ingredients for 5 layer cake
Twelve ingredients create a showstopping 5-layer cake with velvety swirls and professional frosting.
| Ingredient | Amount | Notes |
|---|---|---|
| All-Purpose Flour 🌾 | 6 cups | Sifted for light texture |
| Granulated Sugar 🍚 | 2 ½ cups | Divided for layers and filling |
| Unsalted Butter 🧈 | 2 cups | Room temperature, softened |
| Large Eggs 🥚 | 12 whole | Room temperature, separated |
| Vanilla Bean Paste 🍃 | 2 tbsp | High-quality for authentic flavor |
| Baking Powder 🧂 | 2 ½ tsp | Freshly measured |
| Salt 🧂 | ½ tsp | Fine sea salt preferred |
| Whole Milk 🥛 | 1 ½ cups | Room temperature |
| Cream Cheese 🧀 | 32 oz | Room temperature, full-fat |
| Powdered Sugar 🍚 | 8 cups | Sifted for smooth frosting |
| Vanilla Extract 🍯 | 2 tbsp | Pure vanilla extract |
| Heavy Whipping Cream 🥛 | 3 cups | Cold for whipping |
| Vanilla Bean Seeds 🍃 | 1 whole | Scraped from 1 vanilla bean |
| Unflavored Gelatin 💧 | 1 tbsp | Bloomed in 3 tbsp cold water |
The vanilla bean paste is non-negotiable here—store-bought extracts lack depth. Williams Sonoma or Trader Joe’s carry high-quality options, but if you’re feeling ambitious, scrape seeds from a real vanilla bean for extra luxury. Cream cheese matters too: Philadelphia brand is reliable, but look for full-fat versions (the lower the fat, the less stable the frosting). For the butter, Land O’Lakes or Plugrá work perfectly, but avoid salted—you control the seasoning here. The gelatin might seem odd, but it’s the secret to that silky swirl texture between layers. Knox brand blooms beautifully without graininess, and you’ll need it prepped before baking starts.
No vanilla bean paste? Double the vanilla extract in a pinch, but you’ll notice the difference. Running low on cream cheese? Substitute equal parts mascarpone and sour cream—it’s richer but works in a bind. For the buttercream, if you can’t find powdered sugar, sift granulated sugar finely (it won’t be as smooth, but edible). The eggs must be separated—if you’re nervous about overcooking yolks, use pasteurized eggs or make a quick meringue with yolks separately. And that gelatin? If you forget to bloom it, microwave the water-gelatin mix for 10 seconds to dissolve completely before adding to the warm filling.
Store unbaked layers at room temp for up to 2 days in airtight containers, separated by parchment. The buttercream keeps 5 days in the fridge—bring it to room temp before using. For the assembled cake, cover loosely with plastic and store at room temp for 3 days max (the frosting softens in humidity). Freeze the fully assembled cake (uncovered) for up to 1 monthWrap each layer individually in plastic before assembling to prevent drying.
Why You’ll Love This Recipe
- No-Fuss Layers: I swear by this recipe because it’s actually foolproof—no fussy piping bags or tricky frosting. You just bake, cool, and stack. The buttercream (made with that vanilla bean paste?) is so smooth, even my picky nephew stops complaining mid-slice.
- Vanilla Kiss Magic: That single vanilla bean paste transforms everything. The layers stay tender, the frosting tastes like a bakery secret, and honestly? It’s the kind of flavor that makes people ask, “What’s in this?”—then immediately request the recipe.
- Birthday to Brunch: Serve it for a milestone celebration or cut it into squares for a lazy weekend. The layers hold up perfectly—no soggy bottoms here—and it’s the one dessert that everyone clears their plate for, no questions asked.
- Budget Bakes Better: Five layers might sound fancy, but the ingredients are simple and stretch far. A stick of butter, a few eggs, and flour? You’re getting way more cake for your money than store-bought layers. Plus, leftovers? They last a week—if they survive that long.
Step-by-step instructions for vanilla bean swirl and cream cheese frosting cake
Here’s how to build this showstopper layer by layer—no shortcuts, just perfect harmony.
👨🍳 Step 1: Prepare the Cake Batter Foundation
Preheat your oven to 350°F and grease three 8-inch round cake pans, lining the bottoms with parchment circles. Sift together the 6 cups all-purpose flour, 2.5 tsp baking powder, and 0.5 tsp salt in a large bowl. Set aside—this dry mix is your structural backbone.
In a separate stand mixer fitted with the paddle attachment, cream the 2 cups softened unsalted butter and 1.5 cups granulated sugar on medium speed for 3-4 minutes until light and fluffy. This step is non-negotiable—it incorporates air for that signature tender crumb. Scrape the bowl frequently to prevent overheating.
Add the 12 room-temperature egg yolks, one at a time, mixing well after each addition. Stir in the 2 tbsp vanilla bean paste and 1.5 cups whole milk. With the mixer on low, gradually add the dry ingredients until just combined—think “damp sand,” not gluey batter. Fold in the 12 egg whites, previously whipped to stiff peaks, using a spatula in gentle sweeps to maintain airiness.
🍳 Step 2: Bake and Assemble the Vanilla Swirl Layers
Divide the batter evenly among the three prepared pans (about 2 cups each). Bake for 25-30 minutes until a toothpick inserted in the center comes out clean. Let the cakes cool in their pans for 10 minutes before transferring to a wire rack to cool completely.
While the cakes cool, prepare the vanilla swirl filling. In a saucepan, combine 1 cup granulated sugar, 1 cup water, and the seeds from 1 vanilla bean. Bring to a boil, then simmer for 5 minutes until slightly thickened. Remove from heat and let cool completely.
Once cooled, whisk in 2 tbsp vanilla extract and 1 tbsp unflavored gelatin (previously bloomed in 3 tbsp cold water and melted). This will create a glossy, stable filling that swirls beautifully between layers. Spread ½ cup of this filling onto each of the first two layers before stacking.
🥘 Step 3: Build the Cream Cheese Frosting Layers
For the cream cheese frosting, beat the 32 oz cream cheese and remaining 1 cup granulated sugar together until smooth. Add the 3 cups cold heavy whipping cream and 2 tbsp vanilla extract, beating on high until stiff peaks form. This should take about 3-4 minutes—don’t rush it or the frosting will be grainy.
Spread a generous layer of this frosting (about 1 cup) over the third cake layer. Top with the second layer (with filling), then add another 1 cup of frosting. Place the first layer (with filling) on top, and finish with the final 1 cup of frosting. Chill the assembled cake in the refrigerator for 30 minutes to set.
🎂 Step 4: Create the Signature Swirl Pattern
Use an offset spatula to spread the remaining frosting evenly over the entire cake, creating a smooth base. Here’s the magic: insert a long serrated knife or cake comb at a 45-degree angle and gently pull it through the center of the cake, rotating as you go. This creates those iconic swirls that make this cake irresistible.
For extra flair, pipe decorative swirls around the edges using the leftover frosting in a piping bag fitted with a star tip. Dust the top with a fine sieve of powdered sugar for a snowy finish. Serve immediately or refrigerate for up to 4 hours before serving for the best texture contrast.
⏰ Step 5: Final Touches and Serving
Let the cake sit at room temperature for 10-15 minutes before slicing to allow the frosting to soften slightly. Cut into 12 equal wedges using a sharp serrated knife—dip the blade in hot water and wipe dry between cuts for clean slices.
Here’s the thing about this cake—it’s all about the contrast. The warm vanilla layers peek through the creamy frosting, while the gelatin-infused swirl adds just the right amount of structure. Serve with a dollop of whipped cream on top if you’re feeling extra indulgent, but honestly, it’s perfect just as is.
Pro Tips For Making 5 Layer Cake
- Prep Eggs at Room Temp: I learned this the hard way—cold eggs from the fridge won’t blend smoothly, and you’ll end up with lumps in your batter. Pop them in a bowl of warm water for 10 minutes while you measure everything else.
- Weigh Your Butter: Unsalted butter varies in density, and eyeballing it leads to dry or greasy layers. Use a kitchen scale for precision—pack it down firmly in the measuring cup to avoid air pockets.
- Don’t Overmix the Batter: The second you see streaks of flour disappear, stop mixing. Overworking the batter introduces too much gluten, and your cake will turn tough instead of tender. A few lumps are fine—just fold them out gently.
- Rotate Pans Mid-Bake: If your oven has hot spots (and most do), swap the pans halfway through baking. I used to ignore this, and one side would always come out denser—now I rotate at the 20-minute mark for even layers.
Perfect pairings for this recipe
Coffee Pairings
This cake’s rich vanilla and cream cheese flavors pair beautifully with medium-roast coffee—think Colombian or Sumatran blends—whose nutty notes complement the frosting’s tang. I love a lightly sweetened latte with vanilla syrup to echo the cake’s flavors without overpowering them.
For a bolder contrast, try a dark roast espresso to cut through the sweetness. ☕
Tea Selections
Herbal teas like Earl Grey or jasmine green tea create an elegant pairing—the bergamot or floral notes balance the cake’s richness. For something lighter, chamomile tea with a splash of honey highlights the vanilla swirls. Avoid overly sweet teas; let the cake’s natural flavors shine. 🍵
Wine Complements
A demi-sec champagne or Prosecco is my go-to for celebrations—the bubbles cleanse the palate between bites. For a non-alcoholic option, sparkling apple cider adds a crisp, fruity contrast. Avoid heavy reds; they’ll clash with the delicate frosting. 🍷
Fruit Accompaniments
Fresh strawberries or raspberries add a bright, acidic pop against the creamy frosting. I like to arrange them in a rosette pattern on the cake’s base for visual appeal. For a tropical twist, mango slices with a drizzle of lime zest create a vibrant contrast. 🍓
Seasonal Variations
In summer, swap the vanilla swirl for lemon curd and top with blueberries for a citrusy twist. In winter, infuse the frosting with cinnamon and garnish with candied pecans. These seasonal tweaks keep the cake exciting year-round. ❄️
Dessert Wine Pairings
For a decadent finish, serve with Moscato d’Asti or Sauternes—their honeyed sweetness mirrors the cake’s vanilla notes. A Port wine with chocolate shavings adds a sophisticated touch for special occasions. 🍷
Nutrition facts
Frequently asked questions
Can I make this 5-layer cake in smaller pans?
Use four 6-inch pans instead of three 8-inch pans for a more manageable size. Reduce each layer’s batter by about 1/3 cup and adjust baking time to 20-25 minutes. The frosting quantities will need scaling down proportionally—about 2/3 cup per layer instead of 1 cup. The swirl technique works the same way!
Why does my cake have domed tops?
Doming happens when cakes bake too long or cool too quickly. For this recipe, remove cakes from the oven when the center tests clean (a toothpick should come out with a few moist crumbs). Let them cool in pans for 10 minutes, then transfer to racks. If doming occurs, gently press down on the tops with a cake leveler while still warm.
How do I prevent the layers from shifting when stacking?
Chill each layer for 10 minutes in the freezer before assembling to firm up the frosting. Use a thin layer of frosting (about 1/4 cup) as “glue” between layers, and place them on a cake stand or turntable for stability. Let the entire cake set in the fridge for 30 minutes before decorating.
Can I substitute the vanilla bean paste?
Yes, but you’ll notice a difference. Use 4 teaspoons of pure vanilla extract (double the recipe amount) for the batter and filling. For the frosting, add an extra 1 teaspoon of extract. The real vanilla bean adds depth that extracts can’t fully replicate, but it’s a good backup!
How do I store leftovers without drying out?
Cover the cake tightly with plastic wrap and store at room temperature for up to 3 days. For longer storage, refrigerate (up to 1 week) and bring to room temperature before serving. For freezing, wrap the entire cake in plastic and foil, then thaw overnight in the fridge. Avoid slicing until fully thawed.

- 6 Egg Cake Recipe with Oil: Light as Air With Buttery Moisture - October 4, 2026
- 4 Bean Casserole Recipe: One-Pan Heartiness With Smoky Paprika Depth - October 4, 2026
- 3-Ingredient Keto Mug Cake Recipe: Microwave Magic in 2 Minutes - October 4, 2026