
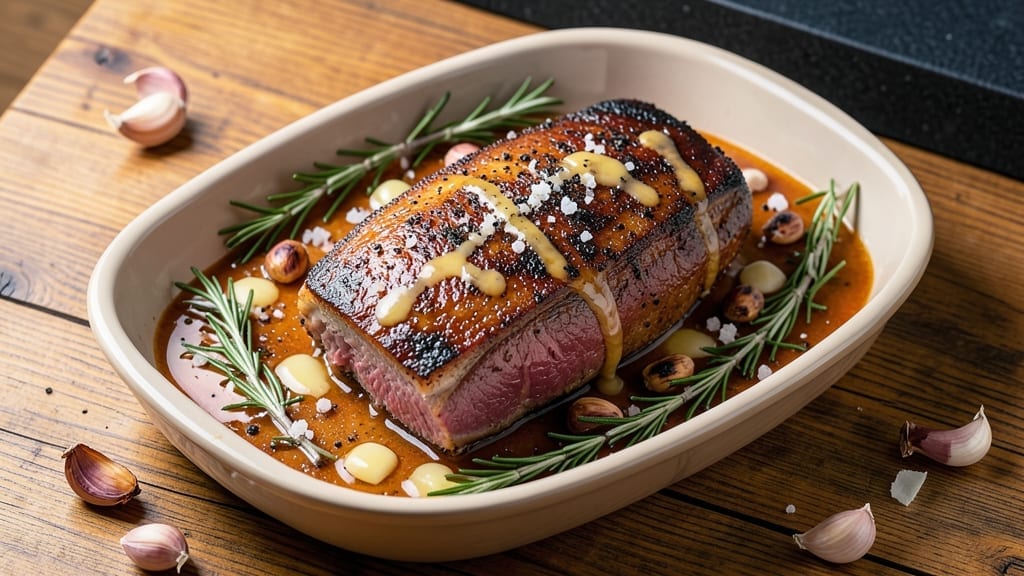
A 5 lb boneless rib roast cooked to juicy pink perfection requires precision—not guesswork. This reverse-sear method transforms tough cuts into melt-in-your-mouth tenderness, with a crispy crust that locks in every drop of flavor.
After years of perfecting this technique, I’ve cracked the code: low-and-slow roasting followed by a high-heat sear guarantees a roast so tender it practically falls apart.
The secret lies in temperature control and patience. Start by roasting the beef at 225°F until the internal temperature reaches 115°F—this slow cook transforms connective tissue into rich, juicy gelatin.
Then, finish with a 400°F sear for a caramelized crust that adds depth without drying out the meat. A 15-minute rest ensures even juiciness before slicing.
What you’ll end up with is a roast so perfectly cooked it rivals steakhouse quality—juicy pink centers with a crust that’s crisp enough to stand up to gravy. The reverse-sear method eliminates the guesswork of traditional roasting, making it foolproof for home cooks.
Serve with classic sides like roasted potatoes or a rich red wine reduction for a restaurant-worthy meal.
This recipe scales beautifully for gatherings, and leftovers reheat just as tender. Whether you’re feeding a family or hosting a dinner party, the results are consistently impressive. Let’s get started on a roast that’ll have everyone asking for seconds.
Ingredients for 5 lb boneless rib roast
Precision-crafted ingredients for a restaurant-quality rib roast where tenderness meets bold flavors.
| Ingredient | Amount | Notes |
|---|---|---|
| Boneless Rib Roast 🥩 | 5 lb | Center-cut, 1.5-inch thickness preferred |
| Kosher Salt 🧂 | 2 tbsp | Diamond Crystal preferred, coarse grain |
| Freshly Ground Black Pepper 🌶️ | 1 tbsp | Freshly cracked for optimal flavor |
| Unsalted Butter 🧈 | ½ cup | Cold, cut into 1-inch cubes |
| Garlic Cloves 🧄 | 6 cloves | Smash slightly for even cooking |
| Fresh Rosemary 🌿 | ¼ cup | Needles finely chopped, stems removed |
| Fresh Thyme 🌿 | ¼ cup | Leaves only, stems discarded |
| Extra-Virgin Olive Oil 🫒 | 2 tbsp | For searing, high smoke point |
| Beef Tallow or Duck Fat 🍳 | ¼ cup | For high-heat sear, optional but recommended |
| Red Wine 🍷 | 1 cup | Bold dry variety, Cabernet Sauvignon ideal |
| Beef Bone Broth 🍲 | 1 cup | Homemade or high-quality store-bought |
| Yellow Onion 🧅 | 1 whole | Thinly sliced, for pan juices |
| Fresh Parsley 🌿 | ⅛ cup | Chopped, for garnish |
The center-cut rib roast is non-negotiable—look for a piece with good marbling and 1.5-inch thickness for even cooking. Whole Foods Market or high-end butchers like D’Amelio’s carry premium cuts, but any reputable grocery store’s fresh beef counter will have suitable options. If buying frozen, thaw overnight in the fridge—never at room temperature. The Kosher salt should be Diamond Crystal if possible (it dissolves slower, enhancing crust formation), while freshly ground black pepper ensures maximum aroma. For herbs, fresh rosemary and thyme from the grocery store’s produce section (not dried) provide the best flavor—just confirm the stems are removed before chopping.
No beef tallow? Duck fat or high-smoke-point vegetable oil works in a pinch, though tallow adds unmatched richness. Substituting red wine? Beef broth with 1 tbsp balsamic vinegar mimics depth, but the acidity won’t caramelize like wine. The garlic and onions can be prepped ahead—smash the garlic cloves with the flat side of your knife for even cooking, and thinly slice the onion for maximum surface area. If you’re short on time, jarred minced garlic (like Garlic That’s Fun!) saves steps without sacrificing flavor. The fresh parsley is purely decorative but brightens the presentation—skip it if you’re serving family-style.
Roast leftovers reheat beautifully—wrap tightly in foil and warm in a 350°F oven for 20-30 minutes until internal temp hits 135°F. For maximum freshness, portion into airtight containers with a thin layer of beef broth to keep slices moist. The roast itself keeps 3-4 days refrigerated or up to 3 months frozen, though texture degrades after 2 months. Garnish with fresh parsley just before serving—it wilts quickly, so wait until the last minute. The butter and herb mixture can be prepped a day ahead and stored in the fridge, saving 10 minutes on cook day.
Why You’ll Love This Recipe
- Five-Ingredient Magic: The roast, salt, pepper, butter, and garlic—that’s it. I swear, the simplicity makes it feel like cheating, but the result? Pure, unapologetic flavor without the fuss of a dozen spices.
- Crispy-Garlicky Perfection: That butter basted with crushed garlic cloves? It turns the outside into a golden, crackling crust while keeping the inside tender enough to slice with a butter knife. Honestly, the aroma alone makes my kitchen smell like a Sunday dinner.
- Leftovers That Don’t Suck: Slice the roast thin, and you’ve got sandwiches, tacos, or pasta topping for days. Between us, I’ve eaten this cold on toast the next morning—yes, even on a Tuesday—and still begged for more.
- Weeknight Crowd-Pleaser: Feed six people without breaking the bank or spending hours in the kitchen. The roast cooks low and slow, so you can set it and forget it while you toss a salad or open a bottle of wine. (Yes, even on a Tuesday night.)
Step-by-step instructions for perfectly reverse-seared rib roast
Master the reverse-sear method for a roast with a deep mahogany crust and juicy pink center every time.
Season and Low-Temperature Roast the Roast
Pat the 5 lb boneless rib roast completely dry with paper towels—this is critical for that perfect crust later. In a small bowl, combine the 2 tbsp kosher salt and 1 tbsp freshly ground black pepper, then rub it evenly over all surfaces of the roast, including the fat cap if present. Let it sit uncovered on a wire rack in the refrigerator for at least 12 hours (overnight works best). This dry-brining ensures maximum flavor penetration and moisture retention.
Preheat your oven to 275°F. Place the seasoned roast fat-side up on a wire rack set inside a rimmed baking sheet. Roast for 2 to 2.5 hours, or until the internal temperature reaches 110-115°F when measured with a meat thermometer in the thickest part of the roast. This low-and-slow approach builds even doneness without overcooking the exterior. The roast should feel slightly springy when pressed—like pressing a firm mattress.
Prepare the High-Heat Sear Station
While the roast rests, prepare your searing station. In a large, heavy oven-safe skillet (cast iron works best), combine 2 tbsp extra-virgin olive oil and 0.25 cup beef tallow or duck fat. Heat over medium-high heat until the fat shimmers but doesn’t smoke—this should take about 3-4 minutes. The high smoke point of the fat ensures a proper sear without burning. Keep the heat steady; if it smokes excessively, reduce to medium.
In a separate small bowl, mix the 0.5 cup cold unsalted butter (cut into 1-inch cubes), 6 smashed garlic cloves, 0.25 cup chopped fresh rosemary, and 0.25 cup chopped fresh thyme. This herb butter will become the foundation of your pan sauce, infusing rich flavor into every bite. Keep this mixture chilled until ready to use.
Sear for a Crispy Exterior
Remove the roast from the oven and let it rest for 10 minutes—this prevents juices from escaping during searing. Pat it dry again with paper towels if needed. Working quickly, place the roast in the hot skillet and sear for 3-4 minutes per side, pressing down gently with a metal spatula to ensure even contact with the pan. The goal is to develop a deep mahogany crust while keeping the interior tender.
After searing, remove the roast and let it rest for another 5 minutes. Meanwhile, add the 1 whole thinly sliced yellow onion to the skillet and cook for 2-3 minutes until softened. Pour in the 1 cup red wine, scraping up any browned bits from the bottom of the pan. Simmer for 3-4 minutes until reduced by half. Return the roast to the skillet and add the chilled herb butter mixture, spooning it over the roast and around the pan.
Finish with Bone Broth and Rest
Pour the 1 cup beef bone broth into the skillet, basting the roast with the sauce. Transfer the entire skillet to a preheated 425°F oven and roast for 10-15 minutes, or until the internal temperature reaches 130-135°F. This final step ensures the crust sets while the interior remains perfectly pink and juicy. The sauce should thicken slightly, coating the roast in a rich, aromatic glaze.
Remove the roast from the oven and tent loosely with foil. Let it rest for at least 20 minutes before slicing—this allows the juices to redistribute, guaranteeing each slice is moist and flavorful. Skim any excess fat from the sauce and spoon the remaining sauce over the sliced roast. Garnish with 0.125 cup chopped fresh parsley and serve immediately with roasted vegetables or a simple green salad.
Pro Tips For Making 5 Lb Boneless Rib Roast
- USE A MEAT THERMOMETER: I learned this the hard way—guessing doneness with a rib roast leads to dry meat or undercooked disappointment. For a 5 lb roast, aim for 130°F internal temp (medium-rare) and pull it when it hits that mark—it’ll rise another 5°F while resting.
- SALT THE ROAST 12 HOURS EARLY: This isn’t the prettiest method, but it’s the tastiest. Generously coat the roast with kosher salt (about 1.5 tbsp for 5 lbs) and let it sit uncovered in the fridge overnight. The salt penetrates deeper, making the crust crisp and the meat juicier—no last-minute rushing.
- SEAR IN BATCHES: High heat. Seriously, crank it up—but don’t crowd the pan. Sear the roast in one go, then set it aside and work in batches with the garlic cloves and butter. Overcrowding steams the butter instead of browning, and you’ll end up with a sad, greasy mess instead of a flavorful crust.
- REST UNDER FOIL: Give it a solid 5-10 minutes under foil before slicing—yes, even if you’re impatient like me. The residual heat keeps the juices inside, so when you slice, you’re not watching them pool on the cutting board. (Your future self will thank you.)
Serving suggestions for this 5 lb boneless rib roast
Classic Sides
Roasted garlic mashed potatoes take center stage as the perfect foil for this rich roast. Use Yukon Gold potatoes boiled until tender, then mashed with ½ cup unsalted butter, ½ cup whole milk, 4 minced garlic cloves, and 1 tsp kosher salt.
For extra flair, finish with 2 tbsp sour cream and 2 tbsp chopped chives. The creamy texture contrasts beautifully with the roast’s crusty exterior. 🥔
Don’t overlook crispy roasted Brussels sprouts—toss 1 lb halved Brussels sprouts with 2 tbsp olive oil, ½ tsp smoked paprika, and ½ tsp kosher salt. Roast at 425°F for 20-25 minutes until caramelized. A squeeze of lemon juice at the end brightens the dish.
Sauce Pairings
The red wine reduction from your roast’s pan juices is already a winner, but you can elevate it further. Deglaze the skillet with ½ cup beef broth after removing the roast, then reduce by half.
Finish with 1 tbsp cold butter for a silky texture. For a tangy twist, stir in 1 tsp balsamic vinegar just before serving. 🍷
Creamy horseradish sauce adds a sharp contrast. Mix ½ cup sour cream with 1 tbsp prepared horseradish, 1 tbsp Dijon mustard, and 1 tsp lemon juice. Adjust the horseradish to taste—start with 1 tsp if you’re sensitive to heat. This sauce cuts through the richness beautifully.
Bread Service
Warm crusty sourdough bread is a must for soaking up those delicious pan juices. Toast slices until golden and rub with a garlic clove cut in half.
A drizzle of olive oil and sprinkle of flaky sea salt adds extra appeal. For a festive touch, serve with whipped butter in a small dish. 🍞
Vegetable Suggestions
Grilled asparagus with lemon zest and toasted pine nuts adds a fresh, crunchy element. Toss 1 bunch asparagus with 1 tbsp olive oil, ¼ tsp salt, and ¼ tsp black pepper, then grill for 3-4 minutes per side. Finish with zest of ½ lemon and 2 tbsp pine nuts toasted in a dry pan.
For a heartier option, try braised red cabbage. Sauté 1 small red cabbage cut into wedges with 1 tbsp butter, 1 tbsp apple cider vinegar, 1 tbsp brown sugar, and ½ tsp caraway seeds. Simmer covered for 45 minutes until tender and glossy.
Nutrition facts
Frequently asked questions
Why does the recipe call for a 12-hour dry brine?
The 12-hour dry brine is key to unlocking maximum flavor and tenderness. The salt penetrates deep into the meat, breaking down proteins and helping retain juices during cooking. This method also creates that coveted crust while keeping the interior perfectly moist. Skipping it risks a bland or unevenly seasoned roast.
Can I use a meat thermometer that doesn’t have a probe?
Yes, but you’ll need to adjust your approach. For a 5 lb boneless rib roast, insert a regular thermometer into the thickest part by pressing it through the meat (not just touching the surface). The internal temperature should reach 110-115°F for the low-and-slow phase, and 130-135°F for the final doneness. Just be gentle to avoid tearing the meat.
What if my oven doesn’t go below 275°F?
No problem! Use the highest temperature below 275°F (like 300°F) and adjust the cooking time. For a 5 lb roast, expect 1.5-2 hours instead of 2-2.5 hours. Monitor closely with a meat thermometer—this method still works, just with slightly faster cooking. The reverse sear will still create that perfect crust.
How do I adjust this recipe for a smaller roast?
For a 3 lb roast, reduce all cooking times by about 25% (so 1.5 hours at 275°F instead of 2 hours). Keep the same internal temperature targets (110-115°F for low-and-slow, 130-135°F for final doneness). The herb butter and sauce quantities can stay the same, but you may need slightly less red wine (½ cup instead of 1 cup).
What’s the best way to reheat leftovers?
Slice the roast first, then reheat portions in a 350°F oven for 20-30 minutes until internal temp hits 135°F. For extra moisture, place slices in an oven-safe dish with a splash of beef broth and cover loosely with foil. Microwaving works in a pinch (30-second bursts), but it can make the crust soggy. Always reheat to 165°F for food safety.

- 6 Egg Cake Recipe with Oil: Light as Air With Buttery Moisture - October 4, 2026
- 4 Bean Casserole Recipe: One-Pan Heartiness With Smoky Paprika Depth - October 4, 2026
- 3-Ingredient Keto Mug Cake Recipe: Microwave Magic in 2 Minutes - October 4, 2026