
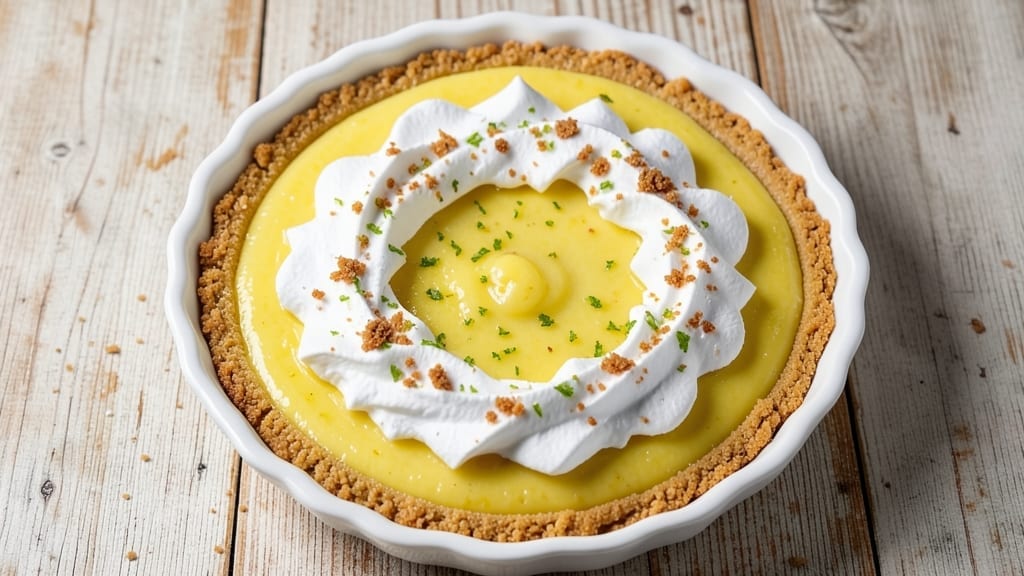
This 5-minute key lime pie delivers all the zesty tartness of classic pie without the hours of baking—or even the mess. The secret lies in a store-bought crust and a foolproof filling made with condensed milk, lime juice, and just a touch of meringue for that signature texture.
I perfected this version after years of craving key lime pie but never having the patience (or oven space) for traditional recipes.
What makes this recipe work is the no-bake approach—no oven required, no waiting for the crust to chill, and no risk of a cracked top. The filling comes together in minutes using pantry staples, while the meringue topping (optional but recommended) adds that familiar toasted finish.
The result? A bright, tangy, creamy dessert that tastes like it came from a tropical paradise, not your kitchen.
This pie is restaurant-quality but takes less time than it takes to order takeout. The crust stays crisp, the filling remains silky-smooth, and the lime flavor shines through without being overpowered. Perfect for last-minute gatherings, potlucks, or when you just need a taste of summer in a hurry.
Serve it chilled with a sprinkle of toasted coconut or fresh mint for extra flair. The best part? You’ll have time to enjoy a slice while the rest stays perfectly set in the fridge. Let’s make this pie!
Ingredients for 5 minute key lime pie
Pantry staples plus a few fresh limes—this zesty pie comes together faster than takeout.
| Ingredient | Amount | Notes |
|---|---|---|
| Graham Cracker Crust (9-inch) 🍪 | 1 whole | Store-bought or homemade, chilled |
| Sweetened Condensed Milk 🥛 | 1 can | 14 oz can (standard size) |
| Fresh Lime Juice 🍋 | 1 cup | About 6-8 limes, freshly squeezed |
| Lime Zest 🍋 | 2 tbsp | From 2-3 limes, finely grated |
| Granulated Sugar 🍚 | ½ cup | For meringue topping |
| Large Egg Whites 🥚 | 3 whole | Room temperature, pasteurized |
| Vanilla Extract 🌿 | 1 tsp | Pure vanilla for flavor |
| Salt 🧂 | ¼ tsp | Fine sea salt |
| Unsweetened Coconut Flakes 🥥 | ¼ cup | Toasted for garnish (optional) |
| Fresh Mint Leaves 🍃 | ¼ cup | Chopped, for garnish (optional) |
The crust is your shortcut—store-bought works perfectly, but if you’re feeling fancy, homemade graham cracker crust is a breeze. For the condensed milk, Dulce de Leche brand is my go-to, but any quality can works. Lime juice is non-negotiable here—freshly squeezed gives that bright, tangy flavor. If you’re using bottled lime juice, add an extra tablespoon of zest to compensate. The zest is where the magic happens, so don’t skip it. Grab limes with thick skins—they’re usually juicier. Trader Joe’s has great limes year-round if you’re in a pinch.
No fresh limes? Bottled lime juice plus a splash of lemon juice gets you close, but it won’t be as vibrant. Running low on egg whites? Pasteurized liquid egg whites from the carton work just as well. The meringue topping is optional but recommended—it gives that classic pie texture. If you’re nervous about meringue, whip the egg whites with a hand mixer until stiff peaks form. For the coconut flakes, toast them in a dry pan for 2 minutes to bring out their flavor. No fresh mint? Skip it or use dried mint at half the amount—it won’t be as fresh, but it still adds a nice touch.
This pie sets in the fridge while you make it—no waiting required. Store leftovers covered for up to 5 days. The meringue topping keeps best if you make it ahead and store it separately, then add it right before serving. For a make-ahead dessert, assemble everything (except meringue) and refrigerate for up to 24 hours. When you’re ready to serve, top with meringue and toast under the broiler for 2-3 minutes. The filling will stay creamy for 3-4 days if stored properly, but the meringue is best eaten within a day or two.
Why You’ll Love This Recipe
- This is my go-to for anything: potlucks, last-minute dinner guests, or just because I’m craving something fancy without the effort. Serve it chilled with whipped cream, or at room temp with a sprinkle of toasted coconut—still tastes like a vacation. (Yes, even on a Tuesday night.)
- No Mixing Madness: I swear by this recipe because it’s basically no work—just dump, stir, and chill. No whisking, no straining, no waiting for custards to thicken. The condensed milk and sugar blend into that silky filling in seconds, and the lime zest? Just a quick grate. Honestly, I’ve made this while microwaving leftovers.
- Tangy Magic: That first bite—oh. The graham crust stays crisp, the filling’s velvety but still zings with lime, and the zest gives it this bright, citrusy punch that’s not too sweet. It’s the kind of dessert that makes you go, “Wait, is this actually good?”—then immediately want a second slice.
- Party in a Bowl: This is my go-to for anything: potlucks, last-minute dinner guests, or just because I’m craving something fancy without the effort. Serve it chilled with whipped cream, or at room temp with a sprinkle of toasted coconut—still tastes like a vacation. (Yes, even on a Tuesday night.)
Step-by-step instructions for quick key lime pie
Here’s how to make this bright, tangy dessert in record time—no waiting for chilling!
Prepare the Filling
In a large mixing bowl, combine the 1 can sweetened condensed milk, 1 cup fresh lime juice, and 2 tablespoons lime zest. Stir until the lime zest dissolves completely and the mixture becomes smooth and vibrant yellow. This tangy base is what makes the pie shine—don’t skip the zest, as it adds that extra burst of citrus flavor.
Next, whisk in the 0.5 cup granulated sugar until fully incorporated. The mixture should be thick and glossy, like a bright yellow syrup. If you notice any lumps from the condensed milk, use a whisk to break them up gently. This step ensures your filling is silky smooth and ready for the crust.
Assemble the Pie
Place the 1 whole graham cracker crust on a baking sheet lined with parchment paper. Pour the lime mixture evenly into the crust, spreading it out with a spatula so it covers the bottom completely. You want the filling to be level—this prevents any uneven baking later on.
Now, cover the pie with plastic wrap and refrigerate for at least 15 minutes (or up to 1 hour if you have time). This chilling step is crucial—it helps the filling set slightly so it holds its shape when you add the meringue. I know it feels like a long wait, but trust me, it makes all the difference in the final texture.
Make the Meringue Topping
In a clean, grease-free mixing bowl, beat the 3 whole large egg whites on medium speed until soft peaks form. This means the peaks should hold their shape when you lift the whisk, but they should still be slightly wobbly. Gradually add the 0.5 cup granulated sugar while continuing to beat, increasing the speed to high.
Beat for 3-4 minutes until the meringue is thick, glossy, and holds stiff peaks. The meringue should be pale and fluffy—if it looks grainy, keep beating for another minute or two. In a separate small bowl, mix the 1 teaspoon vanilla extract and 0.25 teaspoon salt, then gently fold this into the meringue until just combined.
Top and Bake
Remove the pie from the refrigerator and spread the meringue evenly over the top, sealing it to the crust edges with a spatula. Use the back of a spoon to create decorative swirls or peaks—this adds that classic pie look. Preheat your oven to 350°F while you work.
Bake the pie for 12-15 minutes, until the meringue is light golden brown and the filling is set but still slightly jiggly in the center. Watch it closely toward the end—overbaking can make the meringue dry out. Let the pie cool completely on a wire rack before slicing, or the filling might run.
Garnish and Serve
Once cooled, sprinkle the 0.25 cup unsweetened coconut flakes and 0.25 cup chopped fresh mint leaves over the top for a tropical touch. The coconut adds a nice contrast to the tart lime, while the mint brightens up the presentation. Serve chilled—this pie tastes best when it’s well-cooled, letting all those flavors come together perfectly.
Slice into wedges and enjoy immediately. The contrast of the creamy filling, crisp meringue, and bright citrus will make this pie a standout—no one will believe it took just minutes!
Pro Tips For Making 5 Minute Key Lime Pie
- Chill the Crust First: Pop your graham cracker crust in the freezer for 10 minutes before filling—this keeps it from getting soggy when the lime filling hits. I learned this the hard way after serving a pie where the crust turned to mush halfway through.
- Use Real Lime Juice: Skip bottled lime juice—it’s watered down and dull. Roll fresh limes on the counter first to soften their skins, then cut and strain. The extra effort makes the filling taste like actual sunshine, not a sad imitation.
- Whisk the Filling Well: Don’t just dump everything in and stir. Whisk the condensed milk, sugar, lime juice, and zest vigorously for 30 seconds—this dissolves the sugar completely and makes the filling silky instead of grainy. Lazy stirring = regret later.
- Let It Set Longer: Five minutes isn’t enough. Give it at least 2 hours in the fridge (or overnight) for the flavors to meld and the texture to firm up properly. Rushing this step means a runny, underwhelming pie—no one wants that.
Essential equipment for perfect results
Mixing Bowl Essentials
Start with a large stainless steel mixing bowl—I swear by the OXO Good Grips 5-cup bowl—for combining your filling ingredients. The smooth surface prevents scratching, and the size gives you room to whisk without spills.
For the meringue, grab a grease-free glass bowl (like Pyrex) to ensure clean, stiff peaks. A small bowl for your vanilla-salt mixture keeps things organized. 🥄
Hand Mixer Must-Haves
An immersion hand mixer is your best friend here. I use the KitchenAid KHM352ER for its powerful torque and comfortable grip. The whisk attachment is perfect for blending the condensed milk and lime juice smoothly.
For the meringue, a stand mixer with a whisk attachment (like Cuisinart SM-50) gives you more control, but a hand mixer works if you’re patient. 💛
Measuring Precision Tools
Invest in a stainless steel measuring set—I recommend OXO Good Grips—for accurate measurements. The 1-cup measure for lime juice and 2-tablespoon measure for zest are critical. A microplane (like BergHOFF) is perfect for lime zest, giving you fine, even strips.
For the egg whites, a liquid measuring cup ensures you don’t overfill. Precision matters, especially with meringue! 📏
Pie Assembly Gear
A 9-inch pie dish is standard, but I prefer a removable-bottom springform pan (like Nordic Ware) for easy slicing. A flexible silicone spatula helps spread the filling evenly without tearing the crust.
For the meringue, a pastry bag with a large star tip (or a zip-top bag with a corner snipped off) makes decorating effortless. A baking sheet with parchment paper prevents messes when chilling. 🍰
Oven and Cooling Tools
Your oven doesn’t need to be fancy, but a digital thermometer (like Thermoworks Thermapen) ensures it’s at 350°F accurately. A wire cooling rack is essential for letting the pie cool completely—no soggy bottoms here!
For garnishes, a small knife for mint and a lightweight skillet for toasting coconut flakes (just 2 minutes on medium) adds that pro touch. 🔥
Optional Pro Upgrades
Want to take it further? A food processor (like Ninja FP101) can zest limes faster, and a pie crust cutter (like Wilton’s) ensures a perfect circle. For meringue, a stand mixer with a whisk attachment gives you the most stable peaks.
If you’re making this often, a lime juicer (like Manual Lime Juicer) saves time—no more hand-squeezing! 💡
Nutrition facts
Frequently asked questions
Can I make this key lime pie without a meringue topping?
The meringue adds that classic pie texture, but you can absolutely skip it! Simply chill the pie uncovered for 2 hours to let the filling set completely. Top it with toasted coconut and mint instead for a lighter, no-bake version that still delivers all the zesty flavor.
What if I don’t have fresh limes?
Use 1 cup bottled lime juice plus 1 extra tablespoon of lime zest (or lemon zest) to mimic the fresh flavor. For extra tang, add 1 teaspoon of cream of tartar to the filling. The texture won’t be identical, but it’ll still taste delicious!
How do I fix runny filling?
If your pie’s filling is too soft, it likely didn’t chill long enough. Let it set in the fridge for another 1-2 hours uncovered. For a firmer texture next time, reduce the condensed milk to 12 oz and add 1 extra tablespoon of cornstarch to the filling mixture.
Can I make this pie ahead of time?
Yes! Assemble everything (except meringue) and refrigerate for up to 24 hours. When ready to serve, add the meringue and toast under the broiler for 2-3 minutes. The filling stays creamy for 3-4 days if stored properly in an airtight container.
What’s the secret to perfectly crisp crust?
Use a store-bought graham cracker crust that’s been chilled for 15 minutes before filling. For homemade crust, press it firmly into the pan and bake it (unfilled) at 350°F for 5 minutes before adding filling to prevent sogginess.

- 3lb Prime Rib Roast Recipe: Juicy Pink Center Guaranteed in 3 Hours - October 31, 2026
- 5 Spice Cake Recipe: Warmly Spiced Layers With Crunchy Top - October 31, 2026
- 1950’s Macaroni and Cheese Recipe: Nostalgic Creamy Cheese Sauce with Buttery Noodles - October 31, 2026