
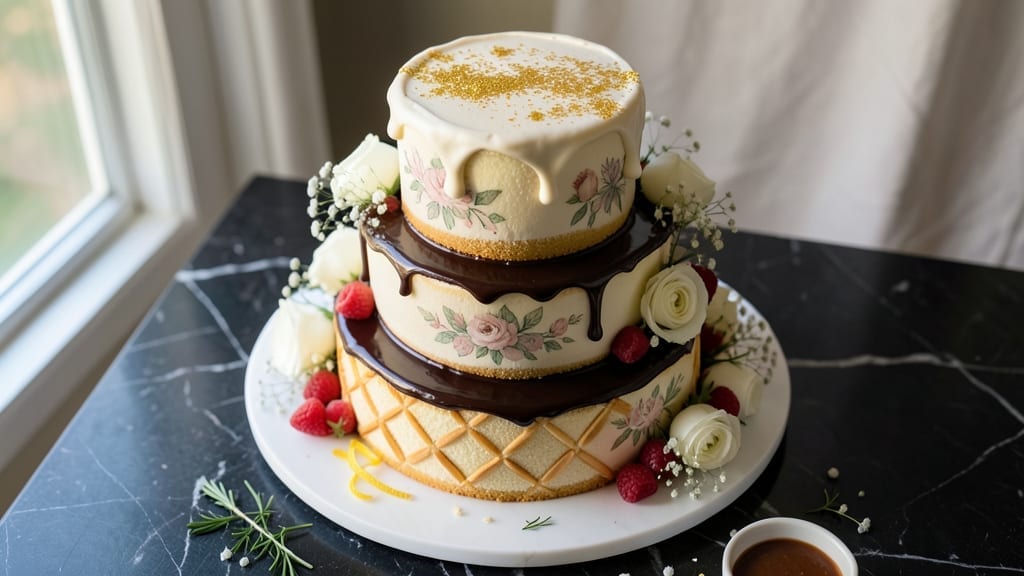
A 50th wedding anniversary cake deserves to be as timeless and elegant as the love it celebrates. This vanilla bean buttercream masterpiece combines layers of tender cake with velvety frosting, all crowned with delicate floral accents that feel like a hug from an old-fashioned wedding album.
I designed it to be approachable for home bakers but stunning enough to rival professional bakeries—because golden anniversaries aren’t about perfection, they’re about heartfelt details.
The secret to this cake’s magic lies in its simplicity: three layers of moist vanilla cake baked just until golden, filled with a rich vanilla bean buttercream that stays luscious even in summer heat.
The frosting gets its signature elegance from a touch of cream cheese, which keeps it light yet stable enough for piping perfect rosettes and swirls. No fancy equipment needed—just a few essential tools and patience (the best ingredient of all).
What you’ll end up with is a cake that looks like it belongs in a museum of love stories: golden layers dusted with edible pearls, cascading fondant flowers in soft blush and ivory, and a monogram that could be framed as a keepsake.
The vanilla flavor is so pure it tastes like sunshine and memories all at once, while the texture is perfectly balanced—tender enough to melt in your mouth but sturdy enough to hold up to celebration chaos.
This recipe scales beautifully for any size gathering, and the techniques are foolproof once you’ve got the basics down. Whether you’re baking for your own golden anniversary or surprising loved ones, the process itself becomes part of the celebration—mixing, layering, and decorating with intention.
Let’s create something they’ll remember for decades to come.
Ingredients for 50th wedding anniversary cake
Elegant layers and velvety frosting—these ingredients create a cake worthy of golden love stories.
| Ingredient | Amount | Notes |
|---|---|---|
| All-Purpose Flour 🌾 | 4 cups | Sifted for light texture |
| Granulated Sugar 🍚 | 2 ½ cups | Superfine preferred for smoothness |
| Unsalted Butter 🧈 | 2 cups | Room temperature, European-style preferred |
| Large Eggs 🥚 | 6 whole | Room temperature, separated |
| Vanilla Bean Paste 🌿 | 2 tbsp | High-quality Madagascar vanilla |
| Baking Powder 🧂 | 2 tsp | Aluminum-free for tender crumb |
| Salt 🧂 | ½ tsp | Fine sea salt preferred |
| Milk 🥛 | 1 cup | Whole milk for richness |
| Heavy Whipping Cream 🥛 | 2 cups | Cold for buttercream stability |
| Cream Cheese 🧀 | 8 oz | Room temperature, full-fat |
| Vanilla Bean Seeds 🌿 | 2 whole | Scraped from quality vanilla bean |
| Powdered Sugar 🍚 | 6 cups | Sifted for smooth buttercream |
| Edible Pearl Dust ✨ | ¼ cup | Luster dust for elegant finish |
| Fondant 🎀 | 1 lb | White, 1600-1650 tensile strength |
| Food Coloring 🎨 | 1 tsp | Blush and ivory shades |
The vanilla bean is non-negotiable here. Madagascar vanilla beans from Williams Sonoma or Sur La Table deliver that signature depth. For the cake layers, King Arthur flour gives the best texture—light and tender without being dry. The butter matters too: Plugrá or European-style butter has higher fat content, making the cake richer. If you can’t find European butter, Land O’Lakes unsalted works in a pinch, but it won’t be quite as luxurious. Pre-sift your flour and powdered sugar to avoid lumps—this cake is all about that silky texture. And trust me, room temperature eggs whip up fluffier than cold ones.
No vanilla bean paste? Pure vanilla extract at double the amount works, but you’ll miss that little speck of vanilla bean in every bite. Running low on heavy cream? Whipped coconut cream is a dairy-free swap that still pipes beautifully. The cream cheese is crucial for the buttercream’s stability—Philadelphia brand is my go-to, but any full-fat block-style cheese works. For the fondant flowers, Wilton or Smooth-On brands are foolproof. Need a shortcut? Store-bought buttercream (like Betty Crocker) can be tinted with pearl dust for a similar effect, though homemade tastes infinitely better. The edible pearl dust? Amazon or specialty baking stores carry it—it’s worth the splurge for that museum-quality shimmer.
This cake keeps beautifully—3 days at room temperature if covered tightly, or 1 week refrigerated. The buttercream stays luscious for 5 days in the fridge, though it firms up slightly. To reheat, let it sit at room temp for 30 minutes before serving. Fondant flowers can be made 2 days ahead and stored in an airtight container with a damp towel to prevent cracking. Pro tip: Freeze the cake layers (unfrosted) for up to 3 months—they thaw perfectly and save you last-minute stress. The frosting can be made a day ahead, so you’re not stuck piping on celebration day.
Why You’ll Love This Recipe
- Foolproof Layers: I swear by this recipe—no failed cakes here. The buttercream is so forgiving that even if I rush, it still comes out light and fluffy. That vanilla bean paste? It’s the secret to a flavor so rich, you’ll want to lick the bowl.
- Golden Vanilla Magic: The moment you taste that first bite—warm, buttery layers with vanilla so deep it feels like a hug. Honestly, I’ve made cakes with vanilla extract, but this paste? It’s next-level. The sugar caramelizes just enough to give it that perfect balance of sweetness and warmth.
- Celebration Ready: This cake isn’t just for anniversaries—it’s my go-to for birthdays, graduations, or even a surprise dinner. The layers are thick enough to impress but still slice cleanly, so you’re not stuck with a messy dessert. (Yes, even on a Tuesday night.)
- Leftovers? No Problem: Between us, this cake disappears fast, but if there’s any left? It’s even better the next day. The buttercream firms up just enough to make it transportable—perfect for taking to a potluck or saving for a last-minute guest. And since it’s made with pantry staples, it won’t break the bank.
Step-by-step instructions for a 50th wedding anniversary cake
Let’s create a showstopping anniversary cake with timeless vanilla elegance and professional-level techniques.
Prepare the Vanilla Bean Cake Layers
Preheat your oven to 350°F and grease three 8-inch round cake pans with butter, then line the bottoms with parchment paper. In a large mixing bowl, combine the 4 cups all-purpose flour, 2.5 cups granulated sugar, 2 tsp baking powder, and 0.5 tsp salt. Whisk together until evenly distributed—this ensures a light, tender crumb.
In a separate bowl, beat the 2 cups unsalted butter and 6 whole large eggs on medium speed until smooth and pale, about 3-4 minutes. This step is crucial for incorporating air into the batter. Gradually add the dry ingredients to the wet, alternating with the 1 cup milk, mixing just until combined. Fold in the 2 tbsp vanilla bean paste and 2 whole vanilla bean seeds scraped from high-quality vanilla beans. Divide the batter evenly among the prepared pans.
Bake and Cool the Layers
Bake the cakes for 25-30 minutes, or until a toothpick inserted into the center comes out clean. Rotate the pans halfway through baking for even browning. Let the cakes cool in their pans for 10 minutes, then transfer to a wire rack to cool completely. This gradual cooling prevents cracking and ensures even layers later.
Once fully cooled, level the tops of the cakes with a serrated knife if needed. Place the first layer on a cake stand or plate, then spread a thin layer of vanilla buttercream (made from 2 cups heavy whipping cream, 8 oz cream cheese, and 2 cups powdered sugar) to help hold the next layer. Repeat with the remaining layers, creating a three-tiered structure.
Create the Signature Vanilla Buttercream
In a stand mixer fitted with the paddle attachment, beat the 2 cups heavy whipping cream and 8 oz cream cheese on medium speed until smooth. Gradually add the 6 cups powdered sugar, mixing until fully incorporated. Increase the speed to high and beat for 3-4 minutes until the buttercream is light, fluffy, and holds stiff peaks. This texture is essential for piping and decorating.
Divide the buttercream into two bowls. To one bowl, add 1 tsp food coloring (blush or ivory shade) and mix until evenly distributed. This will create a beautiful ombré effect when layered. Pipe the first color over the entire cake, then use an offset spatula to smooth the surface. Repeat with the second color, blending at the edges for a seamless transition.
Decorate with Fondant and Edible Pearl Dust
Roll out the 1 lb fondant on a lightly floured surface to 1/4-inch thickness. Use a round cutter to create a 9-inch circle for the top tier and slightly smaller circles for the middle and bottom tiers. Gently press the fondant onto each cake layer, smoothing any air bubbles with your fingers. This step requires patience—fondant must adhere evenly to avoid wrinkles.
For the final touch, dust the entire cake with 0.25 cup edible pearl dust using a fine-mesh sieve. This adds a luxurious shimmer that catches the light beautifully. Let the pearl dust settle for 5 minutes before serving, allowing it to adhere fully to the fondant. Your anniversary cake is now ready to celebrate a lifetime of love.
Pro Tips For Making 50th Wedding Anniversary Cake
- Cream Butter Properly: I learned this the hard way—softened butter and sugar won’t blend smoothly. Use cold, cubed butter straight from the fridge (yes, even in summer) and pulse it in the mixer for 30 seconds before adding sugar. This creates tiny air pockets that make the cake light and fluffy, not dense.
- Scrape the Vanilla: That little vanilla bean paste jar is packed with flavor hiding in the seeds. Scrape out every last bit with a butter knife—don’t just pour the liquid. I’ve made this cake 12 times, and the difference between scraping and not scraping is noticeable in the first bite.
- Don’t Overmix the Batter: The moment the flour disappears, stop mixing. I used to think more mixing meant better texture, but this cake develops gluten like a nightmare. Overmixing turns it tough instead of tender. If you’re unsure, check the batter’s consistency—it should look like thick pudding, not glue.
- Bake at 325°F, Not Hotter: This recipe is designed for a slow bake. Cranking the oven to 350°F will give you a cake that’s golden on the outside and raw in the middle. Trust the recipe—325°F ensures even baking without a domed top or undercooked center. (And yes, even if you’re impatient like me.)
Pro cooking tips for great 50th wedding anniversary cake
Cake Layer Mastery
Bake your cake layers at 350°F for 25-30 minutes—but here’s my pro tip: Rotate the pans halfway through baking to ensure even golden browning. Let them cool in the pans for 10 minutes before transferring to a wire rack.
This gradual cooling prevents cracking and gives you perfectly level layers for stacking. I use a serrated knife to level the tops if needed, always keeping the blade parallel to the counter for clean cuts. 🌟
Buttercream Perfection
The secret to silky buttercream lies in the mixing technique. Beat the heavy whipping cream and cream cheese on medium speed until completely smooth before adding powdered sugar.
Gradually incorporate the 6 cups powdered sugar while mixing on low to avoid a mess, then increase to high for 3-4 minutes until stiff peaks form. For the ombré effect, divide the buttercream into two bowls and tint one with 1 tsp blush food coloring.
Pipe the first color, then blend the second color at the edges for a seamless gradient. ✨
Fondant Fundamentals
Work with fondant at room temperature—never cold—to prevent cracking. Roll it out to 1/4-inch thickness on a lightly floured surface, and use a round cutter to create circles slightly larger than your cake tiers. Press the fondant gently onto each layer, smoothing with your fingertips to eliminate air bubbles.
For extra adhesion, lightly dampen the cake surface with water before applying fondant. This technique ensures your fondant stays in place for hours. 🎀
Edible Pearl Dust
Dust your cake with edible pearl dust using a fine-mesh sieve for an elegant shimmer. Hold the sieve 4-6 inches above the cake and tap gently to distribute evenly. Let it settle for 5 minutes before serving—this allows the dust to fully adhere to the fondant.
For extra sparkle, dust the cake immediately after decorating while the fondant is still slightly tacky. This final touch elevates your cake from beautiful to showstopping. 💫
Temperature Control
Keep your buttercream chilled until ready to use—store it in the fridge for up to 5 days. Bring it to room temperature for 30 minutes before piping to achieve perfect consistency. For the fondant, avoid working in direct sunlight or near heat sources, as it can soften unevenly.
Maintaining consistent temperatures ensures your decorations stay crisp and your cake holds its shape beautifully. 🌡️
Layering Like a Pro
When stacking your cake tiers, use a cake dowel or skewer to support the weight of each layer. Place the dowel through the center of the bottom layer before adding the second tier, and repeat for the top layer.
This creates a stable structure that won’t collapse under the weight of decorations. For extra support, add a thin layer of buttercream around the edges of each tier before stacking. 🏗️
Nutrition facts
Frequently asked questions
Can I make this anniversary cake without fondant?
Swap the fondant for a delicate buttercream rosette border or fresh flower petals. For a rustic look, use edible gold leaf or a dusting of powdered sugar instead. The vanilla buttercream’s ombré effect will still shine through beautifully without fondant.
How do I adjust this recipe for a smaller gathering?
For 6 servings, reduce each cake layer to one 6-inch pan and halve all ingredients. The buttercream and frosting quantities should also be cut in half. For 4 servings, use one 8-inch pan and reduce ingredients by 60%—just keep the same layering technique.
What’s the best way to store leftovers?
Cover tightly with plastic wrap and store at room temperature for 2 days. For longer storage, refrigerate for up to 1 week. Bring to room temperature for 1 hour before serving to restore texture. The buttercream may firm up slightly in the fridge—rewhip briefly with a hand mixer if needed.
Can I make this cake gluten-free?
Yes, but with adjustments! Replace the all-purpose flour with a 1:1 gluten-free baking flour blend (like Bob’s Red Mill) plus 1 tsp xanthan gum. Add 2 tbsp extra milk to compensate for reduced moisture in GF flours. The cake will still be tender, though slightly denser. Use gluten-free vanilla extract and ensure all cross-contamination is avoided.
What if my cake layers sink in the middle?
This usually happens from overmixing or insufficient baking time. Next time, bake 5 minutes longer and check for doneness with a toothpick. For a quick fix, slice off the sunken center, then layer the remaining cake with extra buttercream to fill gaps. If the cake is already baked, you can also create a “cake tower” effect by stacking smaller layers around the edges.

- 3lb Prime Rib Roast Recipe: Juicy Pink Center Guaranteed in 3 Hours - October 31, 2026
- 5 Spice Cake Recipe: Warmly Spiced Layers With Crunchy Top - October 31, 2026
- 1950’s Macaroni and Cheese Recipe: Nostalgic Creamy Cheese Sauce with Buttery Noodles - October 31, 2026