
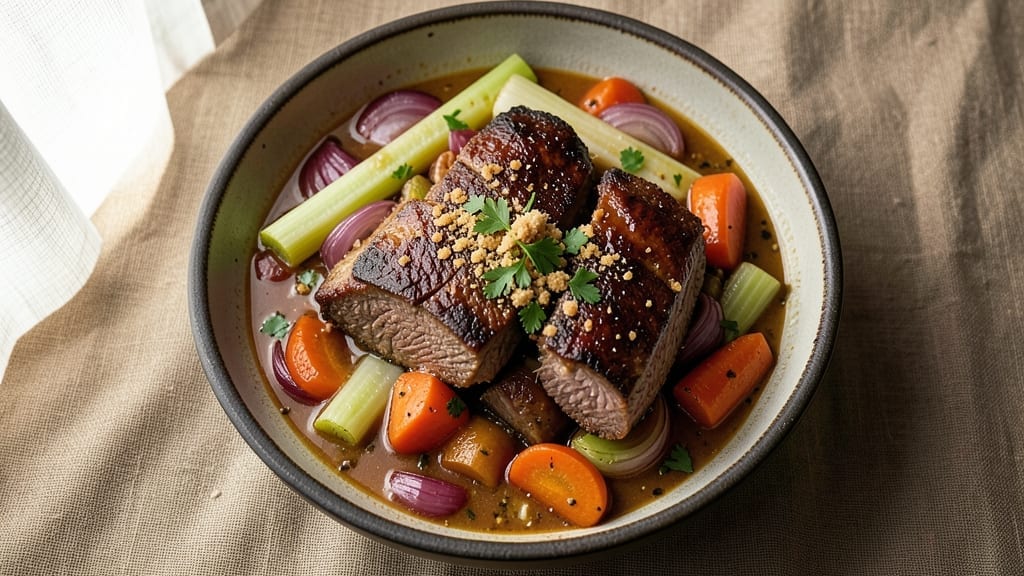
A 6-hour beef stew transforms tough cuts into melt-in-your-mouth perfection through slow, gentle cooking—where every ingredient melds into a deeply flavorful, velvety broth. The secret lies in patience: letting the meat break down while vegetables soften and spices bloom into complex harmony.
This isn’t just a stew; it’s a restaurant-quality comfort dish that simmers away while you go about your day, filling your home with an aroma that announces dinner is ready.
The process begins with browning the beef—this critical step develops a rich, caramelized crust that forms the foundation of the stew’s depth.
Aromatics like onions, carrots, and celery create a flavor base called a soffritto, while herbs and spices infuse the liquid as it reduces over six hours on low heat. The result?
Tender beef that falls apart at the touch, vegetables that retain their structure yet melt in your mouth, and a sauce thickened just enough to coat every bite.
What you’ll end up with is a hearty, satisfying stew that’s perfect for cold evenings or feeding a crowd. The slow simmer ensures maximum flavor extraction, while the reduced broth clings to each forkful, delivering layers of savory, herbal, and slightly sweet notes.
Serve with crusty bread to soak up every last drop—this is the kind of meal that turns a simple dinner into a memorable experience.
The beauty of this recipe lies in its versatility. You can customize it with potatoes, mushrooms, or even a splash of red wine for extra depth. Leftovers reheat beautifully, making it ideal for meal prep.
Whether you’re cooking for family, friends, or just craving a comforting bowl, this 6-hour beef stew delivers foolproof results every time.
Ingredients for 6 hour beef stew
Six ingredients transform tough beef into melt-in-your-mouth perfection through slow, patient cooking.
| Ingredient | Amount | Notes |
|---|---|---|
| Chuck Roast 🥩 | 3 lb | Well-marbled, cut into 1.5-inch cubes |
| Yellow Onions 🧅 | 2 whole | Medium size, sliced into half-moons |
| Carrots 🥕 | 4 whole | Medium size, cut into 1-inch chunks |
| Celery Stalks 🌿 | 4 whole | Trimmed, cut into 1-inch pieces |
| Garlic Cloves 🧄 | 6 cloves | Peeled, smashed slightly |
| Tomato Paste 🍅 | ½ cup | Smooth, not chunky |
| Dry Red Wine 🍷 | 1 cup | Bold, like Cabernet Sauvignon |
| Beef Broth 💧 | 6 cups | Low-sodium preferred |
| Fresh Thyme 🌿 | 2 sprigs | Or 1 tbsp dried thyme |
| Fresh Rosemary 🍃 | 1 sprig | Or 1 tsp dried rosemary |
| Bay Leaves 🌿 | 2 whole | Fresh if possible |
| All-Purpose Flour 🌾 | 2 tbsp | For thickening broth |
| Olive Oil 🫒 | 2 tbsp | Extra-virgin for browning |
| Kosher Salt 🧂 | 1 ½ tsp | Diamond Crystal preferred |
| Ground Black Pepper 🌶️ | 1 tsp | Freshly cracked |
The chuck roast is non-negotiable here—its marbling breaks down beautifully over six hours. Grab it from the butcher counter if possible, or look for pre-cut cubes in the meat section (just check for visible fat). Costco or Whole Foods often carry high-quality cuts, but any well-marbled roast works. The key is to pat it dry before browning—this ensures a perfect crust. For the aromatics, yellow onions add sweetness, while carrots and celery round out the classic soffritto. Buy them fresh, not pre-cut, since they hold up better during long cooking. The garlic should be fresh, not jarred—it makes a world of difference in flavor.
No red wine? Substitute with extra beef broth plus a splash of balsamic vinegar—it mimics the depth without the alcohol. Fresh thyme and rosemary are ideal, but dried works at one-third the amount if that’s all you have. The tomato paste can be the squeeze-tube kind from Trader Joe’s—it’s convenient and keeps forever. For the flour, King Arthur or Gold Medal brands work best for thickening. If you’re making this ahead, prep the soffritto in a jar and store it in the fridge for up to 3 days. The beef broth? Homemade is best, but store-bought low-sodium works in a pinch.
This stew tastes even better the next day—make a double batch if you can. Store in the fridge for up to 5 days, or freeze portions for 3 months. I like to portion it into individual containers so I can grab a bowl whenever I need a comforting meal. The longer it simmers, the richer the flavor, so don’t rush it. If you’re short on time, pressure cook it for 2 hours instead, but the texture won’t be quite as tender. Serve with crusty bread to soak up every last drop of that velvety broth.
Why You’ll Love This Recipe
- Hands-Off Cooking: I swear by this slow cooker method—just dump everything in, walk away, and come back to actual dinner. The chuck roast practically melts into tender perfection while I’m at work or running errands.
- Deep, Rich Taste: That caramelized onion and garlic base? It’s the soul of this stew. The beef stays juicy, the carrots get just tender enough to soak up all the savory broth—no sad, dry bites here.
- Meal Prep Gold: Between us, this is my secret for stress-free lunches. The flavors only get better after a day in the fridge, and reheating takes zero effort. Pack it in jars for the week—no sad desk salads.
- Budget-Friendly Feast: A single chuck roast stretches to feed four (or five if you’re feeding teenagers). The veggies are cheap staples, and the leftovers? Even better the next day. My wallet and my family win.
Step-by-step instructions for slow-simmered beef stew
Here’s how to build rich, deep flavor through patience and technique.
Sear the Chuck Roast for Maximum Flavor
Pat the 3 lb chuck roast dry with paper towels—this ensures a proper sear. Heat 2 tbsp olive oil in a heavy Dutch oven over medium-high heat until shimmering. Working in batches if needed, brown the beef on all sides until deeply caramelized, about 5-6 minutes per side. The goal is to develop a rich crust that will dissolve into the stew as it simmers.
Real talk: Don’t rush this step. You’ll know it’s ready when the beef releases easily from the pan and the surface is deep golden brown. Transfer the browned beef to a plate and set aside—we’ll return it to the pot later. Here’s the thing—this initial searing creates the Maillard reaction, which builds the stew’s foundational depth of flavor.
Build the Aromatic Vegetable Base
In the same Dutch oven, reduce heat to medium and add 2 whole yellow onions, 4 whole carrots, and 4 whole celery stalks—all cut as specified. Cook for 8-10 minutes, stirring occasionally, until the vegetables soften and begin to caramelize slightly. This process releases their natural sugars, which will contribute to the stew’s sweet undertones.
Add 6 cloves garlic cloves (smashed slightly) and cook for another 1 minute until fragrant. Here’s where it gets fun—stir in 0.5 cup tomato paste and cook for 2 minutes until it darkens slightly. This creates a rich, concentrated base that will form the heart of your stew’s flavor profile. Don’t walk away; tomato paste burns easily.
Deglaze and Develop the Sauce
Pour in 1 cup dry red wine and scrape up all those beautiful browned bits from the bottom of the pot. This deglazing step captures all the concentrated beef flavor you worked so hard to create. Let the wine simmer for 3-4 minutes until it reduces by half and the alcohol cooks off. The aroma should be rich and inviting—this is your reward for paying attention.
Sprinkle 2 tbsp all-purpose flour over the mixture and stir vigorously for 1-2 minutes until smooth. This creates a roux that will help thicken the stew as it simmers. The flour should be completely incorporated before adding any liquid—this prevents lumps that can make your stew grainy.
Combine and Simmer for Deep Flavor
Return the browned beef to the pot. Add 6 cups beef broth, 2 sprigs fresh thyme, 1 sprig fresh rosemary, and 2 whole bay leaves. Bring to a gentle boil, then reduce heat to maintain a barely simmering temperature. Here’s the moment that matters: cover the pot and let it cook undisturbed for 4-5 hours. Yes, it’s a long wait, but this slow cooking is what transforms tough beef into fork-tender perfection.
Check the stew after 3 hours—it should be tender but still have some bite. If it’s not quite there, continue cooking for another 30-60 minutes. The liquid should reduce slightly, intensifying the flavors. I know it seems weird, but trust me—this long simmer is what creates that restaurant-quality texture and depth.
Finish and Adjust Seasoning
Once the beef is fork-tender (it should pull apart easily with minimal resistance), remove the thyme sprigs and bay leaves. Taste the stew and adjust seasoning with 1.5 tsp kosher salt and 1 tsp ground black pepper as needed. The stew should be rich and flavorful, but not overwhelmingly salty or peppery.
For the final touch, let the stew sit off heat for 10-15 minutes before serving. This resting period allows the flavors to meld completely and the stew to thicken slightly. Serve in deep bowls with crusty bread to soak up every last drop of that delicious, slow-simmered goodness. The result should be a stew so rich and flavorful that each bite feels like a warm hug on a cold day.
Pro Tips For Making 6 Hour Beef Stew
- Sear the Chuck First: Don’t just toss that raw roast into the pot—get it screaming hot in a skillet with oil until it’s deep brown on all sides. I learned this the hard way: skipping the sear means flavorless beef that’ll dissolve into mush instead of tender, rich chunks.
- Cut Celery in Half-Length: Whole celery stalks turn to mush after six hours. Split them lengthwise into quarters (or even eighths if they’re thick) so they soften evenly without falling apart. Yes, it looks weird, but your stew will thank you—no slimy texture lurking in every bite.
- Deglaze with Red Wine: After browning the meat, don’t just splash in broth—deglaze with ½ cup red wine first. It pulls up caramelized bits and adds depth without extra effort. (Save the cheap stuff for cooking, not drinking.)
- Check Salt at 3 Hours: Taste the stew after three hours and adjust salt before the meat fully breaks down. If it’s bland, add 1–2 teaspoons now—you can’t fix underseasoned stew later. (Pro move: Use kosher salt; it dissolves better than table salt.)
Flavor customization for this dish
Herb Variations
Swap out the thyme and rosemary for fresh parsley and tarragon to create a lighter, more herbaceous profile—perfect for springtime. I like using 4 sprigs parsley and 2 sprigs tarragon, which add a delicate anise-like note that pairs beautifully with the beef.
For a Mediterranean twist, add 1 tsp dried oregano and ½ tsp dried marjoram to the initial sear for an earthy, rustic flavor. 🌿
Spice Boosts
For a smoky depth, add 1 tsp smoked paprika when you deglaze with wine. If you love heat, stir in ½ tsp cayenne pepper with the flour—just be warned, it’ll get spicier as it cooks.
For a warm, cinnamon-like note, add ½ tsp ground cinnamon along with the bay leaves. I’ve found that 1 tsp ground coriander also works wonders, adding a citrusy brightness that cuts through the richness.
Vegetable Swaps
Replace carrots and celery with mushrooms and potatoes for a heartier stew. Use 8 oz cremini mushrooms (sliced) and 2 medium potatoes (cut into chunks) for a rustic, earthy twist.
For a spring-inspired version, swap in asparagus and leeks—just add them in the last 30 minutes of cooking to keep them crisp. I’ve also had great success with turnips and parsnips for a slightly sweeter, nuttier flavor profile.
Liquid Alternatives
Skip the red wine and use 1 cup beef broth plus 1 tbsp balsamic vinegar for a non-alcoholic version that still delivers rich flavor.
For a creamy twist, stir in ½ cup heavy cream or coconut milk during the last 20 minutes of cooking—just watch the heat to avoid curdling.
If you’re feeling adventurous, try 1 cup chicken broth instead of beef for a lighter take, though the beef flavor will be slightly milder. 🍷
Protein Twists
Add ½ lb baby potatoes in the last 45 minutes of cooking for extra heartiness. For a mixed-protein stew, include ½ lb smoked sausage (like kielbasa) when you brown the beef—just slice it into rounds first.
I’ve also experimented with chicken thighs alongside the beef, which adds a lighter texture while keeping the deep flavor. If you’re vegetarian, swap the beef for extra-firm tofu (pressed and cubed) or lentils—though the texture won’t be identical, it’s a great plant-based alternative.
Nutrition facts
Frequently asked questions
Can I use a slow cooker for this 6-hour beef stew?
Transfer all ingredients to your slow cooker after searing the beef and simmer on low for 6-7 hours or high for 3-4 hours. The texture will be slightly different (more tender, less reduced sauce), but still delicious. Just add 1 extra cup of broth since slow cookers evaporate less liquid.
What’s the best cut of beef for this recipe?
The chuck roast is ideal because its marbling breaks down beautifully during slow cooking. Other great options include stew meat (pre-cut chuck) or brisket. Avoid lean cuts like sirloin—they’ll dry out. If you can’t find chuck, short ribs work too, but reduce cooking time to 4-5 hours since they’re already tender.
Why does my stew taste bland after 6 hours?
Blandness usually means insufficient seasoning or lack of flavor development. First, check your salt—add ½ tsp more kosher salt at the end if needed. Second, ensure you’re using low-sodium broth and that the wine reduced properly. For depth, try adding 1 tsp Worcestershire sauce when you deglaze or a pinch of MSG (just a tiny amount!). The long simmer should concentrate flavors, not dilute them.
Can I make this stew in a pressure cooker?
Yes! Follow the same steps until deglazing, then add all ingredients and cook on high pressure for 45 minutes. Quick-release the pressure, then let it sit for 10 minutes before serving. The beef will be tender, but the sauce won’t reduce as much. For a thicker sauce, simmer uncovered for 10-15 minutes after pressure cooking.
How do I store and reheat leftovers?
Store in an airtight container in the fridge for up to 5 days or freeze for 3 months. To reheat, warm on the stovetop over medium-low heat for 10-15 minutes, stirring occasionally. For microwave reheating, cover with a damp paper towel and heat in 1-minute intervals, stirring between each. The flavors actually improve after the first day!

- 3lb Prime Rib Roast Recipe: Juicy Pink Center Guaranteed in 3 Hours - October 31, 2026
- 5 Spice Cake Recipe: Warmly Spiced Layers With Crunchy Top - October 31, 2026
- 1950’s Macaroni and Cheese Recipe: Nostalgic Creamy Cheese Sauce with Buttery Noodles - October 31, 2026