
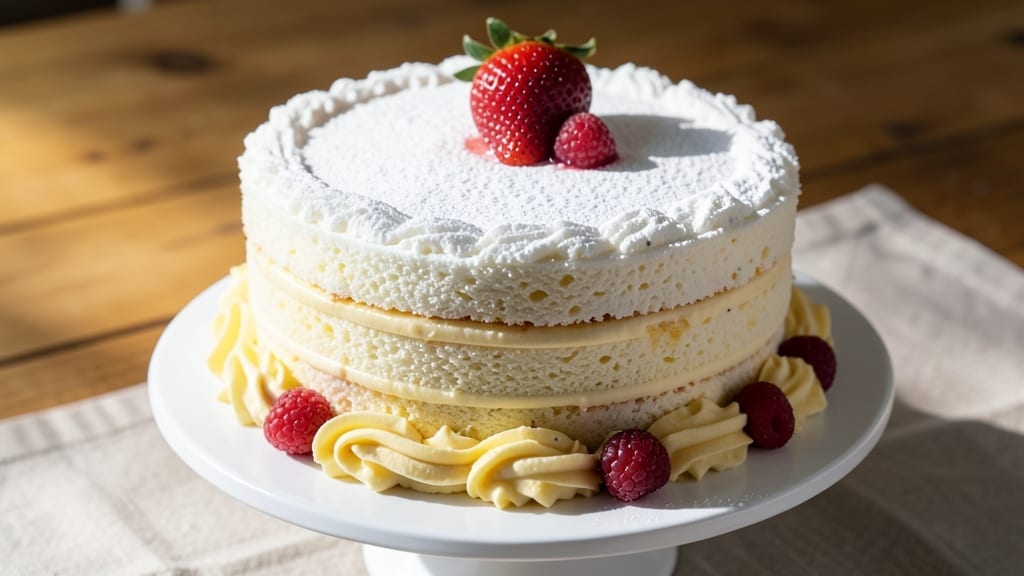
A 6-inch angel food cake delivers that signature cloud-like texture without a single gram of fat—just pure, airy perfection. ✨ This recipe uses a simple technique that relies on egg whites and sugar to create a cake so light it practically dissolves on your tongue.
The secret lies in folding, not beating, which preserves those delicate air pockets that make angel food famous.
What sets this recipe apart is its foolproof method for achieving that signature tender crumb and moist interior without grease or butter. With just 9 ingredients and 45 minutes of active time, you’ll have a cake that’s elegant enough for special occasions but simple enough for weeknight desserts.
The key is patience—letting the cake cool completely before removing it from the pan ensures clean slices every time.
By the time you’re done, you’ll have a cake that’s fluffy, snow-white, and impossibly light, with a texture so delicate it practically melts. The natural sweetness of the cake pairs beautifully with fresh berries, whipped cream, or a dusting of powdered sugar.
This recipe delivers restaurant-quality results with minimal effort.
Perfect for birthdays, brunch, or simply satisfying a sweet tooth, this angel food cake is the ultimate in effortless elegance. Let’s get baking!
Ingredients for 6 inch angel food cake
Nine ingredients, twelve egg whites, and a technique that transforms simple staples into ethereal lightness.
| Ingredient | Amount | Notes |
|---|---|---|
| Large Egg Whites 🥚 | 12 whole | Room temperature, no yolks |
| Granulated Sugar 🍚 | 1 ½ cups | Superfine preferred for even dissolving |
| Unsalted Butter 🧈 | 0 tbsp | None—this is fat-free |
| Cake Flour 🌾 | 1 ½ cups | Sifted, not self-rising |
| Vanilla Extract 🌿 | 1 tbsp | Pure, high-quality preferred |
| Salt 🧂 | ¼ tsp | Fine sea salt preferred |
| Cream of Tartar 🍯 | ½ tsp | Stabilizes egg whites |
| Fresh Berries 🍓 | 1 ½ cups | Optional garnish (strawberries, raspberries) |
| Powdered Sugar 🍚 | ¼ cup | For dusting, optional |
Egg whites are the heart of this cake—room temperature is non-negotiable. Kirkland Signature or Organic Valley brands work best for their consistent quality. The sugar should be superfine (like Domino or C&H) to dissolve faster and create finer crumb. Cake flour is essential—substitute all-purpose at 1:1 only if you can’t find it, but the texture will be denser. Vanilla extract matters: McCormick Pure or Nielsen-Massey deliver the best flavor without artificial aftertaste. Cream of tartar stabilizes the egg whites, preventing over-beating.
No cream of tartar? Lemon juice at half the amount works in a pinch, but results may be slightly less stable. Substituting vanilla extract? Almond extract at one-third the amount adds depth, though it’s more potent. For the flour, King Arthur Measure for Measure is ideal if you’re making substitutions. Fresh berries? Trader Joe’s frozen berries work perfectly for garnish when fresh are out of season. The powdered sugar is optional but adds that classic angel food finish—Confectioners’ sugar from Domino dissolves smoothly.
Egg whites should be stored in their original carton in the fridge for up to 3 months. Once separated, use immediately or cover tightly with plastic wrap at the surface to prevent drying. The cake flour keeps for 6 months in an airtight container. For best results, bake and serve the same day—this cake is at its peak freshness. If storing, keep wrapped in plastic at room temperature for 2 days or freeze for up to 1 month. Always invert the cake onto a wire rack to cool completely before removing from the pan.
Why You’ll Love This Recipe
- No Fuss, No Mess: I swear by this recipe because it’s that simple—just egg whites, sugar, and a whisk. No mixing bowls to scrub, no buttercream fuss, and no waiting for yeast to rise. Honestly, if you can separate eggs, you can nail this.
- Light Yet Rich: That first bite? Airy with just enough structure, thanks to the whipped egg whites, but the vanilla and butter make it feel indulgent. It’s the kind of cake that tastes like a treat without weighing you down—perfect for when you want something special but not heavy.
- Birthday or Brunch: Between us, this cake is my go-to for anything—birthday desserts, brunch toppings, or even a fancy dinner surprise. Slice it thin for a crowd, or keep it whole for a single serving with whipped cream. It’s the kind of dessert that works everywhere.
- Budget-Friendly Magic: Egg whites and sugar are cheap, and a little butter goes a long way. I’ve made this for under $5 and still felt like I served something from a bakery. Plus, leftovers? They last days in the fridge—just reheat slices for a quick treat.
Step-by-step instructions for 6-Inch angel food cake
Here’s the professional method for achieving cloud-like texture and perfect rise every time.
🍳 Step 1: Prepare the Bowl and Egg Whites
Begin by separating the egg whites from 12 large eggs, ensuring not a trace of yolk remains. Place the whites in a spotless, grease-free mixing bowl—the slightest fat residue will prevent proper whipping. I use a glass bowl for this step because it allows me to monitor the texture changes more clearly than metal.
Add the 0.5 teaspoon cream of tartar and 0.25 teaspoon salt to the egg whites. These ingredients are essential—the cream of tartar stabilizes the whites while the salt enhances flavor. Whisk gently with a wire whisk until completely dissolved. This preparation ensures your egg whites will whip to stiff peaks without collapsing.
🍳 Step 2: Gradually Incorporate Sugar
With an electric mixer fitted with the whisk attachment, begin whipping the egg whites on low speed until soft peaks form. This usually takes about 2-3 minutes. Gradually add the 1.5 cups granulated sugar in three equal portions, whipping continuously.
After each addition, increase the speed to medium-high and whip for 2-3 minutes until the mixture becomes glossy and thick. You’ll notice the sugar dissolves completely and the meringue transforms from frothy to smooth and elastic. This gradual addition creates the proper structure for your cake’s lightness. If the sugar doesn’t dissolve, your cake will be dense—so take your time here.
👨🍳 Step 3: Fold in Dry Ingredients Gently
In a separate bowl, sift together the 1.5 cups cake flour and remaining 1 tablespoon vanilla extract. The sifting removes lumps and aerates the flour, which is crucial for maintaining the cake’s delicate structure. Using a rubber spatula, gently fold one-third of the flour mixture into the meringue with light, upward strokes.
After incorporating the first third, fold in another third, followed by the final third. Be careful not to deflate the meringue—your goal is to gently combine without losing air. The batter should be smooth and thick, resembling pale, glossy frosting. If you see streaks of flour, fold a bit more until fully incorporated. This careful layering prevents dense pockets in your cake.
🔥 Step 4: Bake at Precise Temperature
Preheat your oven to 350°F and position the rack in the center. Grease a 6-inch angel food cake pan with cooking spray and dust with cake flour, tapping out any excess. Pour the batter into the pan and smooth the top with a spatula. The batter should come up about halfway up the sides of the pan.
Bake for 30-35 minutes until the top is golden brown and the cake springs back when gently pressed. I check for doneness by inserting a toothpick—it should come out clean. The cake should pull away from the sides of the pan easily. If the top browns too quickly, tent with foil to prevent over-browning while maintaining even cooking.
⏰ Step 5: Cool Inverted for Maximum Lightness
Immediately after removing from the oven, invert the cake onto a wire rack. Let it cool completely in this position for at least 2 hours. This cooling method prevents collapse by allowing air to circulate around the cake while the structure sets. I find that the longer you let it cool this way, the lighter and more stable the texture becomes.
Once fully cooled, carefully remove the cake from the pan by running a thin knife around the edges. Dust the top with 0.25 cup powdered sugar and garnish with 1.5 cups fresh berries if desired. Serve slices immediately for the perfect balance of lightness and freshness. The cake should be so light it practically floats, with a tender crumb that melts in your mouth.
Pro Tips For Making 6 Inch Angel Food Cake
- Whip Whites to Stiff Peaks: Use a stand mixer with the whisk attachment—beat egg whites on medium-high until they hold a peak when you lift the beaters, then crank it to high for another 30 seconds. I learned this the hard way: underwhipped whites mean a dense, sad cake that collapses like a deflated balloon.
- Sift Flour Twice: Angel food cake relies on lightness, so sift cake flour before mixing and sift it again with the sugar before folding. That extra step guarantees no lumps, and the sugar dissolves evenly—no gritty surprises in your bite.
- Skip the Butter Grease: The recipe calls for butter, but grease the pan with melted butter and line it with parchment—don’t skip the flour dusting. Butter alone leaves sticky spots; parchment prevents tearing when inverting. (Yes, even if you’re impatient like me.)
- Invert Immediately: As soon as the cake pulls from the pan, flip it right side up onto a wire rack. Let it cool completely before unmolding—no peeking, no prodding. I was skeptical until I tried it: patience here means a cake that holds its shape instead of caving in like a pancake.
Best sauces and condiments for this dish
Classic Whipped Cream
This is my go-to pairing—heavy whipping cream sweetened with 1 tablespoon powdered sugar and a pinch of vanilla. Whip to stiff peaks and fold gently into the cake layers for a cloud-like finish.
For extra flair, chill the cream for 30 minutes before whipping to achieve those signature high peaks. 🥛
Berry Compote
Warm 1 cup mixed berries (strawberries, raspberries, or blackberries) with 2 tablespoons sugar and 1 tablespoon lemon juice over medium heat for 5-7 minutes until thickened. Strain if you prefer a smoother texture, then drizzle over slices. I love using Trader Joe’s frozen berries for year-round consistency. 🍓
Chocolate Ganache
Melt 4 ounces dark chocolate (60-70% cocoa) with ¼ cup heavy cream over a double boiler, then let cool slightly. Pour over cake slices or use as a filling between layers.
For a lighter version, substitute ½ cup whipped cream for the heavy cream. This adds rich contrast without overwhelming the cake’s delicate texture. 🍫
Citrus Curd
Whisk ½ cup egg yolks, ½ cup sugar, ¼ cup lemon juice, and 2 tablespoons butter in a double boiler until thickened. Strain and chill before spreading thinly over cake layers. The bright acidity cuts through the cake’s sweetness beautifully—perfect for summer gatherings. 🍋
Caramel Drizzle
Simmer ½ cup sugar with 2 tablespoons water until amber-colored, then whisk in ¼ cup heavy cream. Cool slightly and drizzle over slices for a sweet, buttery finish. For a salted caramel twist, sprinkle with flaky sea salt before serving. This adds a sophisticated touch without extra effort. 🍯
Fresh Fruit Syrup
Simmer 1 cup fruit juice (pineapple, mango, or peach) with 2 tablespoons sugar until slightly thickened. Brush lightly over cake slices or serve on the side for dipping. I prefer Dole canned pineapple juice** for its bold flavor—it’s a secret weapon for tropical vibes. 🍍
Nutrition facts
Frequently asked questions
Why does angel food cake need to cool upside down?
Cooling the cake upside down prevents collapse by letting air circulate around the delicate structure while it sets. This method creates those signature air pockets that make angel food so light. If you skip this step, the cake may sink in the middle or lose its signature fluffiness. The longer you let it cool this way (at least 2 hours), the more stable and airy the texture becomes.
Can I substitute cake flour with all-purpose flour?
You can use all-purpose flour in a pinch, but your cake will be slightly denser. Replace the 1.5 cups cake flour with 1.25 cups all-purpose flour plus 0.25 cups cornstarch to mimic the lighter texture. The cornstarch helps absorb moisture, but the result won’t be as tender as with true cake flour. For best results, use King Arthur Measure for Measure flour if available.
What’s the secret to getting stiff peaks in egg whites?
The key is using room-temperature egg whites, a grease-free bowl, and adding sugar gradually. Start whipping on low speed until soft peaks form, then increase to medium-high while adding sugar in three portions. If your whites won’t hold peaks, check for hidden yolk or fat residue—they’re the #1 culprits! Cream of tartar also helps stabilize the whites for better structure.
How do I store leftover angel food cake?
Wrap slices tightly in plastic wrap and store at room temperature for up to 2 days for best texture. For longer storage, freeze slices for up to 1 month. To serve, thaw at room temperature for 30 minutes before enjoying. Avoid refrigerating—it makes the cake dry out faster. For extra freshness, dust with powdered sugar before storing to preserve moisture.
Can I bake this in a different-sized pan?
This recipe is designed for a 6-inch pan, but you can adjust for 8-inch or 10-inch pans by reducing baking time by 5-10 minutes per inch. For an 8-inch pan, bake for 25-30 minutes and for 10-inch, 20-25 minutes. The cake height should reach halfway up the sides. Always check with a toothpick for doneness—it should come out clean.

- 6 Egg Cake Recipe with Oil: Light as Air With Buttery Moisture - October 4, 2026
- 4 Bean Casserole Recipe: One-Pan Heartiness With Smoky Paprika Depth - October 4, 2026
- 3-Ingredient Keto Mug Cake Recipe: Microwave Magic in 2 Minutes - October 4, 2026